How to Use Spectral Repair in iZotope RX 6
04/20/2017

[electric guitar]
To this.
[electric guitar, processed]
Spectral Repair intelligently removes undesired sounds from a file with natural sounding results.
This tool treats selections from within the spectrogram waveform display as corrupted audio that will be repaired using information from outside of the selection.
For example, in this file, noisy guitar squeaks can be heard as the player changes chords.
[electric guitar]
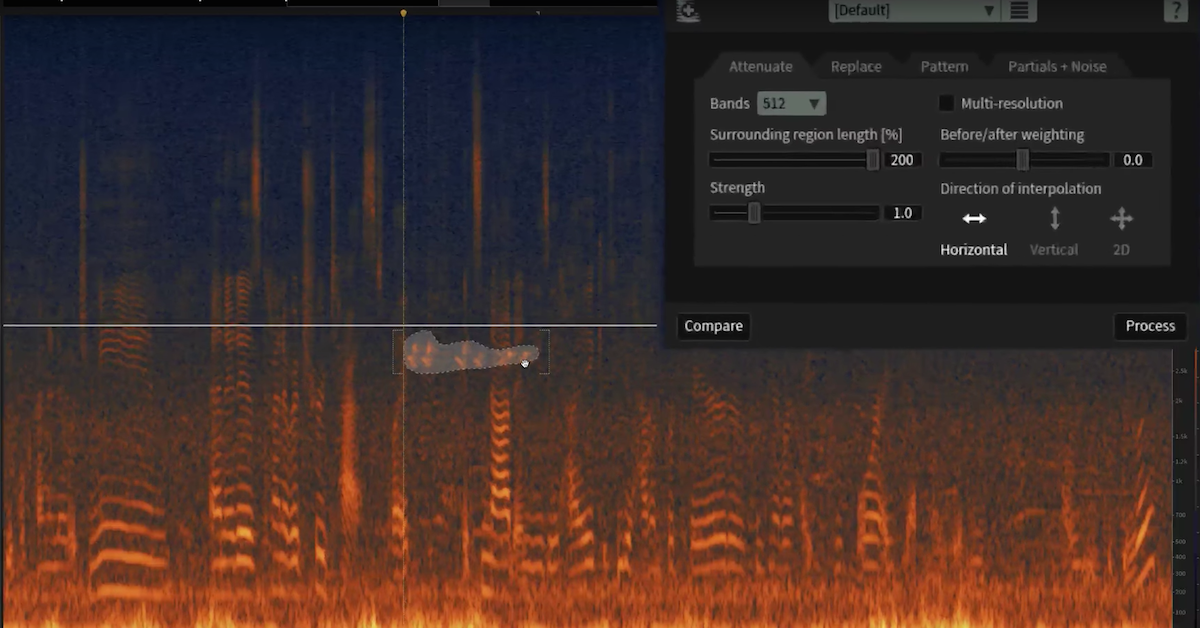
To reduce the severity of those squeaks, I’m going to use the attenuate feature in the Spectral Repair module, which reduces spectrogram magnitudes in the selected area to match magnitudes in the surrounding areas, resulting in the removal of the sound without leaving an audible gap behind.
I’m going to click R to switch to the time frequency selection tool, and make a selection where the first string squeak is occurring.
Once I’ve made my selection, I can preview only the frequency content that I’ve selected by pressing this play button down here.
[squeaking noise]
Now, I’m going to make some choices about where to set the parameters of the attenuation tab. Surrounding region length determines how far around the selection Spectral Repair will look for a good signal.
Watch what happens to the handles, or the wings outside of my selected region as I move the slider of the surrounding region length. First of all, they’re moving vertically. That’s because the direction of interpolation is set to look for information to interpolate north and south of my selection.
If I had direction interpolation set to horizontal, it would extend those handles left and right, or east and west of my selection. Now, because there’s loud signal material left and right of my selection, it makes sense to keep the direction of interpolation vertical. I should add that 2D will create handles north, south, east, and west of the selected area.
Before and after weighting gives more weight to the surrounding audio before or after the selection. In this case, I’m going to move the slider to a value of 8, because it looks as though frequency content far south of my selection is occupied by low end rumble, or hum from the instrument.
Finally, strength adjusts the intensity of the attenuation. In my case, I don’t want to over attenuate the squeaks, so I’m going to leave it where it is at its default setting of one.
Now, I’ll press process.
Now let’s play back that sample after I’ve attenuated the guitar squeak using the attenuate feature in spectral repair.
[electric guitar, after processing]
So for context, here is before.
[electric guitar, no processing]
And here’s after.
[electric guitar, after processing]
As you can hear, that squeak has been attenuated. Spectral repair can also be useful for attenuating noises that interfere with a performance. Like in this example, where a beeping truck is competing with the sound of an acoustic guitar.
[acoustic guitar]
By switching to the time and frequency selection tool by pressing R, we can identify exactly where the unwanted sound is occurring in the spectrogram and select it.
Now that I’ve made a selection, I can ensure that I’ve only selected the truck beeping, and not important tonal noise from the guitar, by using the play frequency selection tool right here. If I play it back, we’ll hear only what is inside of my selection.
[beeping]
If I use the other playback button, we’ll hear what is inside of my selection and outside of it, too.
[acoustic guitar with beeping]
I’m not hearing anything but the sound of the beeping truck, so now I’ll open Spectral Repair, and use it in attenuate mode, which removes sounds by comparing what’s inside a selection to what’s outside of it. In other words, I’m going to use attenuate to bring the truck beeping down to a level where it’s inaudible, and blends in with the background noise.
I’ve chosen a number of parameters here, but maybe most important is to go with vertical mode, so the information above and below my selection is used to repair the audio. Now let’s hit process.
Now, this is a very noisy truck sound, so I’m going to press process once more and do another pass to really make sure that the truck beeping is properly attenuated.
Now, let’s listen back to our results after using a few passes of attenuate.
[acoustic guitar, after processing]
Here’s before…
[acoustic guitar, before processing]
And once more, here’s after.
[acoustic guitar, after processing]
For more information, and to download your own samples to use with RX 6, head to izotope.com/RX.