Vocal Mixing Masterclass — Part 3
01/16/2017
Thanks to B&H, we get to bring you part three in our vocal processing series. In part one, we talked about the basic building blocks of a vocal mix, and some best practices for making your vocal mixes sound as professional as you can. The second part in the series, we talked a bit more about dynamic range compression and EQ, as well as a little bit on volume automation. Now in part three, we’re going to look at time based effects. Reverb and delay in particular.
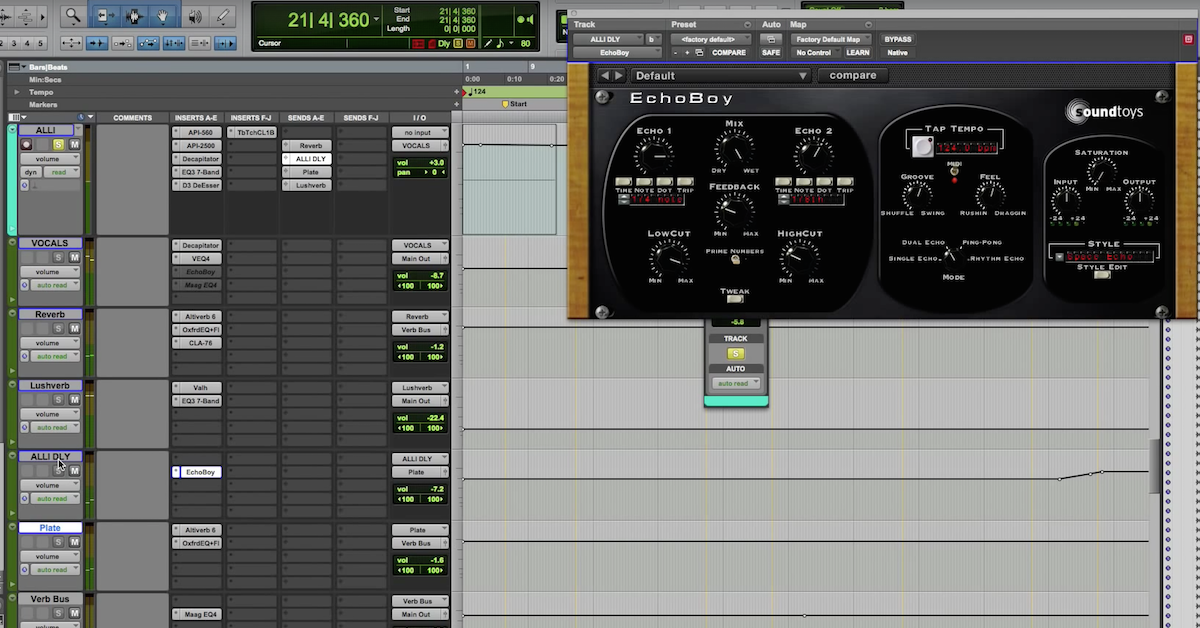
On this track, Heroes, by AMFM, there are four major types of time based effect going on. We’ve got a slapback delay on the verse, and also a short reverb. Then, here in our chorus, we’ve got a repeating echo and a big verb. But this big verb actually isn’t a reverb at all. It is a stereo delay.
Let’s look at these a little bit more in depth.
So first things first, on our verse, we’ve got this here EchoBoy. This EchoBoy is set to about 111 milliseconds of delay time. This is a really classic, Elvisy, Roy Orbison kind of delay. There’s not really much in the way of feedback or repeats going on in here, and we have this set to fully wet.
There is a bit of a low cut going on on this delay. The short reverb we have here on the vocal isn’t actually too short. It’s close two seconds, which to be honest, is a bit long if this were more of a Pop style, but since this is more of a kind of syrupy Rock style, we can get away with a slightly longer reverb time on here. In more Pop mixes, it’s not uncommon to see a reverb time even under one second.
So that’s what’s going on in the verse. Let’s explore that. For reference, here’s our original mix.
[mix, original]
Now that I’ve alerted your ears to it, you can probably hear that pretty significant slapback. It’s almost like he’s inside of a guitar amp on this track being shaken. Let’s hear it before any of these effects are added.
[mix, raw]
I think you can see that we’re pushing the slapback delay quite a bit on this track. It’s really played up as an effect, but you can be much more subtle with this. In this particular mix, it kind of suits the mood of the song, and almost speaks to what the lyrics are doing. The reverb, however, is a lot more subtle. Way further down in the mix.
Now, let’s hear what’s going on in the chorus. This one is quite a bit more modern sounding. First, let’s hear it totally dry, and then we’ll start to bring in our two effects. First, a repeating delay, and then a stereo spreading delay that’s actually labelled, “Big Verb,” even though it’s not really a reverb. It’s kind of taking the place of a larger reverb.
So here it is without, and then with.
[mix, without and then with long delay and reverb]
So that was pretty good! Let’s see what’s going on with that in more detail. I’m going to solo these chorus vocal tracks. First, let’s look at this repeating echo to see what it’s doing.
Here it is, EchoBoy, by Sound Toys, and there’s actually a very, very short delay going on here. About 30 milliseconds. There’s quite a great number of repeats. About sixteen of them going on, and then we’re adding a little bit of saturation and color here.
So here it is with the echo muted.
[vocals, echo muted, then unmuted]
So you can hear this almost has the effect of a reverb in this track, but these repeating delays take up less space than a reverb, and there’s kind of less cloudiness going on.
Another thing that you can sometimes do in particularly slower tracks, is use repeating delays that are timed to the track. Generally much longer than this one. Once you get into the eighth note, quarter note, and even half note range, you can get very interesting repeating effects, often for a quick throw here and there.
The other delay that’s going on here substituting for big reverb is this Big Verb, and this is another instance of EchoBoy, but this time, we’re looking at a stereo delay. Often times, you’ll want to set each side of the stereo delay to a slightly different speed.
So here’s what it sounds like with the stereo delay set to 125 milliseconds on both sides.
[vocals, without and with “Big Verb”]
Now, we’ll try adjusting the left side to be slightly shorter, and the right side to be slightly longer.
[vocals, adjusted Big Verb]
Starting to draw a little bit more attention to itself that way, and starting to give us a — maybe a bit more of a stereo spread, but in some ways, the distance is kind of leaning to one side or the other. This is something a lot of folks will play around with in lieu of a really big reverb. A kind of wide spread, slightly repeating stereo delay.
Put all of that together in context, and you wind up with something a little like this.
[mix]
Really pretty track. You can hear with this style, it’s a bit effect heavy. Maybe a little bit more saturated in the reverbs and delays than you’d expect out of some kinds of contemporary Pop tracks, but no matter what kind of genre you’re working in, these basic principles remain the same.
For reverbs and delays, you’re really looking at — I’d say two broad categories for each. For reverbs, there are very short reverbs — I’d say usually a second or less — and then there are your longer reverbs — two, three, four seconds or more.
In general, short reverbs tend to be a bit more popular today and in more Pop styles, they tend to get shorter and shorter still. You can sometimes add a little bit of slapback to the reverb by using the predelay function, and this helps the reverb kind of separate from the vocal a little bit more, or you can do without predelay, where the reverb kind of happens immediately as soon as the vocal hits.
Then you have your big, more cathedral, churchy reverbs that are much longer in length, and in general, you’re only going to use those if you’re looking for a special effect, an aesthetic that’s really asking for something that’s maybe a bit more retro in some ways. And you do hear certain artists embracing this now and then. You’ll find big reverb coming back into style for short periods, and then going away.
But I’d say overall, folks have been erring a bit shorter with reverbs for the past decade or two. What a lot of people use instead of relying too heavily on reverb are delays, like we explored. One of the most classic delay effects is that slapback effect that we looked at early on that’s used very much as an effect, in a very unsubtle way in the verses in this song. Which is pretty cool. That Elvisy, Roy Orbison-y style of a slapback.
Here in this song, it was about 111 milliseconds, but in general, somewhere between 80 milliseconds and 120 milliseconds. That range will get you the kind of vintage style of tape slap.
Then, after that, you’ve got your repeating delays. And you can use slow, note based repeating delays. Quarter notes, half notes, to get real interesting kind of repeating phrases, but if you’re just looking for the texture of a reverb, without taking up so much space in the mix, without sounding too overwrought and overdone, a kind of shorter repeating delay, like we have here, can do a lot.
I believe on this particular track, there was repeating delay between 30 and 40 milliseconds, and that first repeat, you barely even hear at all. It’s almost too close to even be heard as a repeat, but all of those additional repeats blend together into something that’s like a reverb, without taking up too much space and clouding things up too much.
Then, what some people will do in addition to, or instead of a big reverb, is to try a stereo delay with a kind of longer delay time, and those can be a great way to give a lot of atmosphere, a lot of width in a mix, without using all of the room that a reverb requires.
In general, in faster, more up tempo tracks, and in more dense mixes, you might want to go slightly drier and with slightly shorter delay times and reverb times. Then, with your slightly slower or less dense, more sparse mixes, you can go with longer reverb times, longer delay times, and really let them take up extra space.
So in a way, not only is the style in the genre going to inform how you use these effects, but also the tempo of the song that you’re in, and the density of the track that you’re working on.
I hope this gives you a good sense for the basic principles of reverb. The last couple of fun things I want to look at real quick are predelay and damping. So let’s see what kind of role those play in this track.
Going into verse two, where we have both a slapback delay and a short verb, let’s zero in on this short verb. And we can hear our vocal in isolation, just to give us a sense of what’s happening with predelay and damping. Here is our vocal verb, and let’s try this with an even shorter reverb time. Under a second.
[vocals with short reverb]
Alright, let’s hear that line again, but this time with a predelay that has enough length to almost give it a bit of a slap.
[vocals with short reverb, longer predelay]
You can hear how this reverb doesn’t start kicking in immediately. One more time with no predelay, and then with a long predelay.
[vocals, short reverb with no predelay, then long predelay]
Using a long predelay in this way can draw more attention to the reverb without having the reverb take up extra space in the mix.
You can almost get a sense for having a longer reverb by adding a longer predelay, but without adding it out of sloppiness of a very long delay. Let’s compare this long predelay and short reverb time with no predelay and a longer reverb time.
[vocals, adjusting predelay and decay time]
I think you can hear how when you do a longer reverb time, even with no predelay, you get a bit greater density, and the tail rides on for longer, where instead, if you use a shorter reverb time with a longer predelay, the reverb starts to separate from the vocal, and it can become more apparent, even though it’s taking up a bit less space in the mix.
With too much predelay, you can kind of draw too much attention to the reverb. A good compromise though is to time your predelay to the track. So you’d find out, say, how fast an eighth note is, and then make the predelay, maybe not an eighth note, that’s too long… A sixteenth note, or a thirty-second note.
So if you’re timing that to the track, you can kind of get the separation of a predelay, but without drawing too much attention to that separation. That’s a kind of more advanced trick, but definitely something worth trying out for yourself.
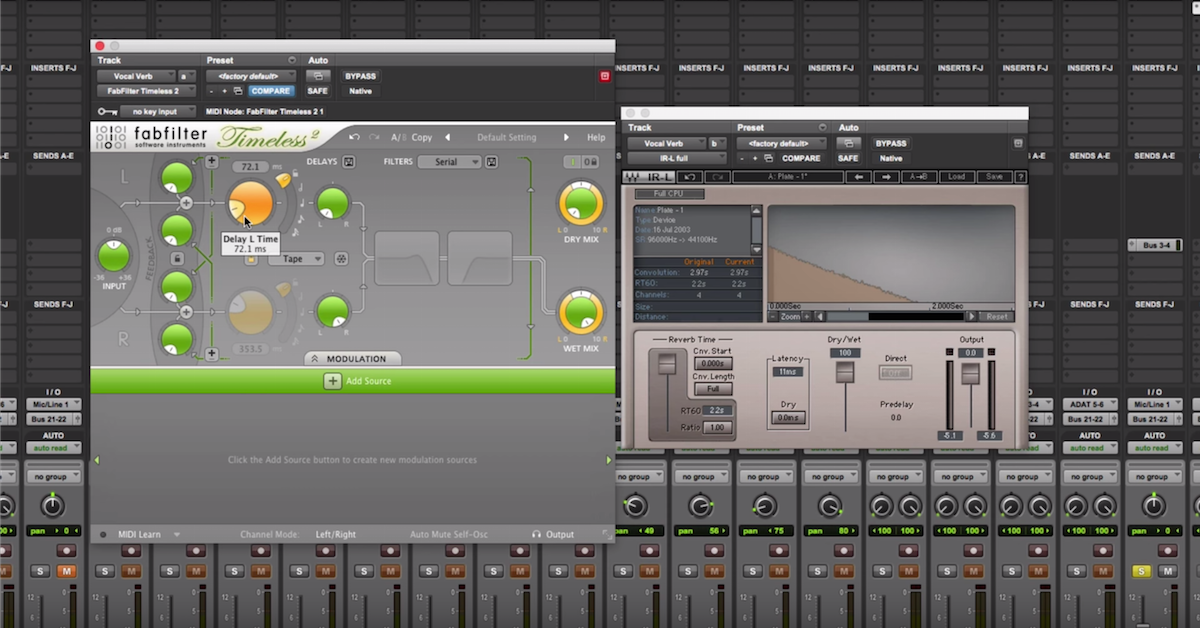
The other thing we were going to talk about was damping. Remember, don’t be afraid to EQ both your reverb sends, and your reverb returns. R-Verb lets us do this very easily, and often, cutting some low frequencies out of your reverb itself, and out of your reverb return can really help clear up some space in a dense mix.
Conversely, if we had a much more sparse mix, you might want to go ahead and bring some of those lows back to really bring a sense of kind of fullness to the reverb return.
So really, those are your broad categories of reverbs and delays and how to use them. With reverbs, you’ve got short ones and you’ve got long ones. You have the ability to EQ them, and you have the ability to set predelay.
Of course, there’s a million different varieties of reverb. Your rooms, your chambers, your churches, your cathedrals, your halls. I’d say that for short reverbs, things like rooms and maybe plates tend to be the most popular, and for longer reverbs, plates are often popular. So are halls and chambers, depending on what kind of vibe you’re going for.
Then for delays, really the role it can play is either a stereo delay, a repeating delay, or a slapback delay. Those are our major types. Of course again, within delays, there’s a million different things. You can have tape delays, and digital delays, and all sorts of emulations of old tools, but those are really the underlying concept.
Well, I hope this tutorial on setting reverb has been useful for you. I hope this whole three part series on vocal mixing has been helpful for you. If you come away from this feeling like, “Well, these ideas are simple. I already knew this stuff,” then that’s good! There are no secrets when it comes to vocal mixing. It really is about understanding these fundamental principles, and having a good strategy for how to apply them, and if you came away with that today, then you’re in good shape.
If on the other hand, this stuff seemed really advanced and you don’t know how we were routing this stuff — sends, and returns, and setting delay times, timing them to a track, setting a compressor — if all of that stuff feels next level to you, then go to sonicscoop.com, go to b&h.com. We’ve got plenty of audio tutorial content for you there.
Thanks again for hanging out with me. This has been Justin Colletti of Sonic Scoop, at Joe Lambert Mastering, working on a killer track from AMFM, and thanking B&H for helping us put this whole thing together. Go to b&h.com, go to sonicscoop.com, sign up for our newsletters there. See you next time!
Elevate Your Ears