Vocal Mixing Masterclass — Part 2
01/16/2017

In part 1, we talked about some strategies, the basic tools we’re going to be using, and how we’re going to be using them. This time, we’re going to be diving right in with compression and EQ, and just how much we can change your vocal, and just how far we can get into a vocal mix by using compression and EQ alone.
I’ve got a really great track to use here, it’s by a band called AMFM. A really brilliant songwriter named David Caruso. I almost liked the song too much to use in a tutorial, but hopefully you’ll dig listening to it.
We’re first going to hear it by itself, the complete production. This is the mix done by Harper James, who produced this track. He did it over at DeGraw Sound, and this is a track that was actually brought to me for mastering, and these guys allowed me to use it for the tutorial today.
I got some mix notes from Harper. I’m trying to create — kind of a recreation of his vocal mix here. To get a sense for it, let’s first hear this full mix, and then we’ll go back, zero in, and hear things totally dry. What the raw vocal sounded like, and then we’ll try to put first compression and EQ on, then reverb and delay, to try to recreate the vocal mix and see how far we can go, and how these tools are working together to create a finished sound.
Alright, let’s dive right in here.
[mix]
Man, I could listen to that song all day, and it just gets better as it goes along.
Now let’s dive in and hear these vocal tracks without any effects. Starting in on the verse…
[mix, verse, raw]
Still a nice performance. It’s a nice tune. There’s something very intimate about this totally dry vocal. But it’s not quite as compelling in a way. I mean, there’s an absence of texture, of depth, there’s a little less dynamic control, a little less smoothness going on in this mix, and it really doesn’t have much personality. There’s also this karaoke-ish feeling where it’s kind of sitting on top of the track.
I could still listen to and enjoy the song this way, but it’s missing something. Let’s first explore compression, which is really going to start to smooth out this verse. So here it is again, I think we’ll notice this even more in the second verse, where it starts to get more dynamic, that there’s just kind of a lack of smoothness, and sometimes the vocal is a bit too loud, and a bit too quiet.
We’re going to first start trying to address that by using a little bit of dynamic range compression in a few stages like we talked about before.
Here’s verse two.
[mix]
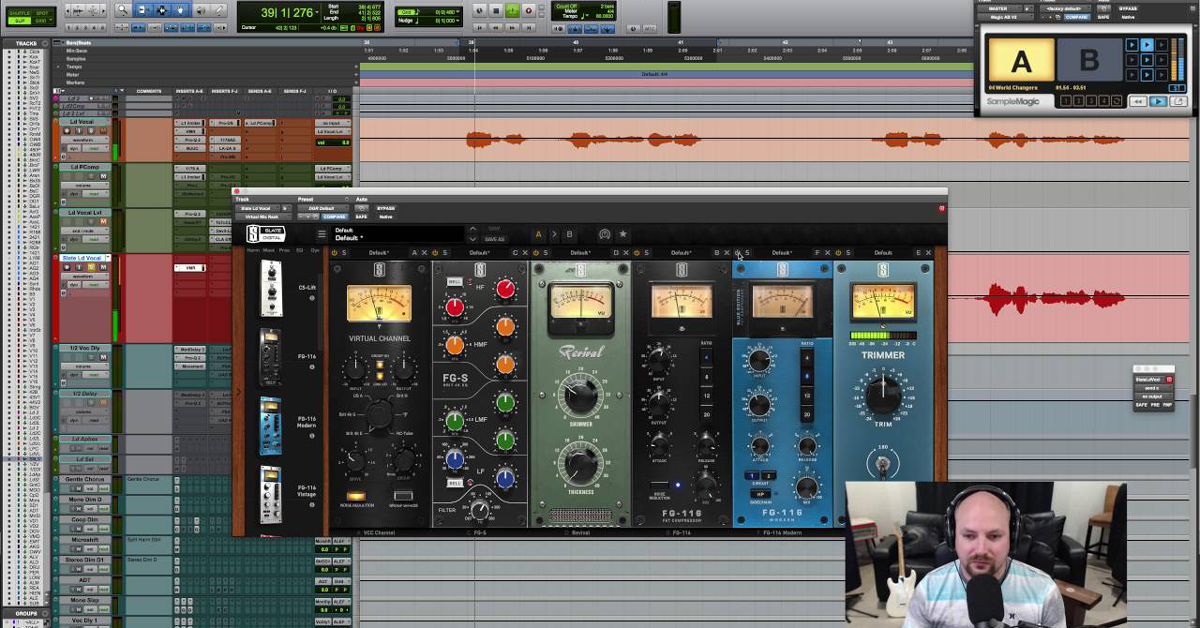
Alright, the first thing in our chain here is R-Vox, which is a really basic, easy to use compressor from Waves. You could substitute for this R-Vox compressor with the built in compressor in Pro Tools, or Logic, or whatever DAW you’re using, but just for simplicity’s sake, this one basically has one big knob here. A compression knob.
You turn it down, it kind of acts as your threshold, then everything else is automated. The further I bring this down, the more it will compress. Based on Harper’s original note, he did use this tool just to kind of kiss it with a light little bit of dynamic range compression first before he drove into his other compressors.
Then, he has another stage of compression going on here. A slightly more aggressive compressor. This is the CLA-76. This is an 1176 style compressor. Tons of different software emulations of these these days, which are really nice.
This particular one is set to all buttons in mode, so it’s actually acting more like an aggressive limiter than a compressor, so a very kind of high ratio. Any time a signal hits this threshold, it’s going to be brought down fairly quickly.
On this style of compressor, our input knob both sets the amount of gain we’re sending into the compressor, and kind of adjusts how hard we’re hitting our threshold. Then we can makeup gain at the end by driving this output control.
The attack is set pretty fast, but not all the way fast, and our release is set pretty much as fast as it will go. So it will release as soon as the compressor hits. With these settings, we’re getting a bit more of an aggressive tone out of this compressor.
Let’s hear it first without these compressors, and then with them.
[mix, vocals without compression]
With it enabled.
[mix, vocals with compression]
That’s starting to do a little something. You can actually see this is a fairly aggressive compressor, our second one, it’s doing as much as three, maybe five dB of compression, which is probably the most I’d recommend on any one compressor, unless you’re going for a special effect, and the R-Vox compressor was kind of a very soft, gentle compressor, just doing a dB or two.
As we talked about in part one, if you’re going to be compressing vocals, and you’re not trying to get a special effect where you make them really aggressive, it can be a good idea to compress a little bit, and a little bit in stages. In this particular one, we have a very gentle compressor, followed by a slightly more aggressive one.
The slightly more aggressive one is a little bit more predictable in the way it responds, because there’s a gentle compressor before it, so there’s a little less fluctuation in level going into the second compressor.
But that’s not all. At the end of this, there are two busses that these vocals are being fed into. A clean vocal buss, and a distorted vocal buss, and each of them has another little layer of compression on it.
So let’s turn these on. First, I’ll turn on our compressor on our double track that you notice comes in once in awhile during the verse, and then I’ll turn on this compressor on a clean vocal buss, and then we have a parallel buss. This distorted vocal buss. I’ll unmute that, and what’s going on here is again, another compressor, an 1176, followed by a Decapitator, and the Decapitator is a SoundToys tool that’s kind of a distortion box and saturator that can emulate a lot of different things.
In this case, it’s just adding a little bit of grit to the sound. You can see we’re adding a little bit of drive, and the tone is set slightly in the dark direction.
So let’s hear this again without any compressors going, and then with our whole chain.
[mix, vocals, no compressors, then with compressors]
Now you’re starting to hear a pretty big difference, right? We’re getting a dB or two of compression out of this R-Vox, a little bit more, maybe three and sometimes more dB, and then they’re being fed into a buss, one of which we’re just adding a little bit of clean compression, another couple of dB there, and a distorted buss, which is driving even harder, and then, giving us a little bit of distortion.
You’ll notice that this distorted buss, this parallel buss, I ended up setting the level kind of low. Around negative 16dB, and I find it sitting in the track pretty well.
Let’s hear it again without any compression, and then with compression, and the distortion buss brought up in level, and then brought down.
So here is our raw vocal again.
[mix, raw vocals, then with compression, then distortion]
Now, part of the reason this compressed track sits in the mix a little bit better is because we brought down the level a little bit with compression, but I think a big part of it is that we smoothed out the vocal tone quite a bit.
I think these 1176 compressors that were just set a little fast are really helping control some of the kind of edge in dynamic consistency for you. Let’s check out the same kind of thing happening in the chorus. First, with absolutely no effects, and then adding in our compressors.
Here we are on the chorus.
[mix, chorus, raw vocals]
And now with our compressors kicked in.
[mix, chorus, compressed vocals]
Let’s check out the same thing in the chorus.
In addition to there being compressors on the chorus, we also have an EQ. What the EQ is doing here is taking out some of those low sub frequencies that we talked about earlier. Cuts as deep as this in the low end might be a bad idea in a very sparse mix, where the vocal is carrying a lot of weight of the song, but we’re getting into a very dense section here, and generally, the more dense the mix is and the more vocal layers you have going, the more you might be inclined to take away low end and low mid frequencies.
There’s also a little bit going on here, cutting at 235Hz, which will help kind of remove some of the chest from the signal, and then there’s another kind of slight but significant cut in the upper-mid range to get rid of some of the nasal quality, and that’s about it.
Let’s hear how this sounds first without our compression and EQ, and then with it.
[mix, without compression and EQ on vocals]
And now, with compression and EQ.
[mix, with compression and EQ on vocals]
Now, I think you can hear that the level comes up a little bit once I turn off these compressors, but taking that into account, I still think you can hear a difference in the overall smoothness of the vocal, both in dynamics, and in how much the attack is sticking out.
One thing I am starting to hear on this one, however, are the esses and t’s coming out just a little bit in the vocal, so I might try throwing on a de-esser. Let’s zero in on a problem area.
So here on my de-esser, I can engage high frequency only, and this will kind of apply very fast compressor/limiter just to the high frequencies where our esses and t’s are poking out. If I want to zone in on the right frequency to cut, I can hit this listen button that will allow me to hear just the problem area.
[filtered vocal]
You know, the esses and t’s aren’t really too bad here. I might not even end up using so much of this de-esser. I’m going to go ahead and bypass these for now, and if these esses and t’s really start to bug me, I’ll play around with them again.
Now, the one thing that we’re leaving off is I believe in Harper’s original mix, after these multiple stages of compression, he threw in a little bit of a limiter at the very end of each track. Just kind of kissing things to help keep them from getting too overboard, but they really aren’t doing too much.
Another big thing, though, I want to reiterate that you shouldn’t expect to get all of your volume control just out of compressors and limiters, even if you’re being subtle and using multiple stages of compression and limiting. The very final pass, you’re likely going to want to automate the levels a little bit. It’s very easy to do that in Pro Tools. I can come over here to any of my vocal channels, and I can change this Read button to Write.
Now, if I switch Waveform view to Volume view, we can see this automation getting written in.
[mix]
Those are some very subtle vocal rides just for show, but a lot of heavy weight mixers will, once they’ve established a good baseline level for their vocal, go in with just a single fader and start to kind of react to the vocal. Goosing up words that need a little bit of extra help, and tucking back syllables that might be a bit too overwrought, and they kind of become part of the performance. I wouldn’t do that just to do it. The best thing to do is really listen to what the vocal needs, and then start reacting, but it is almost a bit like playing an instrument, and something you have to experiment with over time.
Again, in general, you want to get a good amount of your dynamic range control from your compressors and limiters, but don’t expect them to do everything if you want to have a really powerful mix.
The last fun thing I’ll show you on the EQ side is just how quickly you can get some very extreme effects using just a few basic filters on EQ. Let’s come down to the bridge here, because we haven’t checked that out yet, and I’m going to go ahead and add an EQ to our bridge vocal.
Let’s hear it before and after this fairly heavy compressor and EQ. You can see, to get this kind of telephone effect, I am taking out everything below 300-400Hz with a fairly steep filter, using this very simple high pass, or low cut filter. I’ve just dragged it up to about 300 or 400Hz, set it to be pretty steep, and then I’ve done the same thing on the top end with this low pass, or high cut filter. Again, set it to be fairly steep.
The one last thing I’m adding in is this simple third filter. Just a little bit, or a lot of bit, of a resonant boost right before this high rolloff starts. Let’s hear it without, and then with.
[mix, with and without vocal telephone effect]
This isn’t actually an effect that Harper used on the mix, but I think you can hear how quickly and powerfully you can get a pretty radical and convincing telephone effect, just with a few basic filters, doing a very steep low cut, generally somewhere 300Hz and below, doing a pretty steep high cut, usually somewhere around 3kHz and above, and then a bit of a resonant peak right before that high rolloff starts happening.
So very convincing, very kind of instantly familiar effect. One more time, without.
[mix, without telephone effect, then with]
Sometimes just a few quick moves on some very, very basic tools can get you some pretty dramatic results.
Alright, well that’s about it for today on compression and EQ. A couple of quick notes, again, when compressing, using several different layers of compression may be helpful. Don’t expect the compressors to do everything. Think about doing some volume automation once you’ve got them set well.
Then for EQ, there’s really four different ranges. You’ve got your low frequencies, say, 100Hz and below, and often enough, in more dense sections of songs, you want to carve some of those out. Then you’ve got your lower-mid frequencies, say from 200-500Hz, and they can really add a bit of chest to the sound if you like, and then you’ve got your midrange frequencies, which can be a bit nasally when boosted, or a bit hollowing when cut. But, if judiciously used, can be helpful. After that, you’ve got your upper-mid range. Say, 2kHz to maybe 6kHz, where you can add a bit of articulation and teeth and clarity to the vocal, but too much of that can get a bit grating, thin, and annoying.
Then you’ve got your air band. A lot of people love to boost this. Say, 7kHz, 8kHz, 9kHz, 10kHz, 12kHz and above. That area can really add a bit of kind of shimmer and sparkle, and air to a track. Be careful boosting this too much, because you could get some sibilance, but there are some styles where there are somewhat significant boosts in this area. Always a good idea to listen to some references to see if boosting in that area is too much or too little for your track.
Not a lot of that going on in this track.
The last thing I’d say here is this is kind of more of a Rock style track, where the vocal sits back a bit further in the song. It’s okay, in this context, to use somewhat faster attack settings for a vocal, but be careful when using fast attack settings on a vocal. If you’re using very fast attack settings, you can take away some of the articulation of the vocal, and it can kind of sit back in the track a little bit more.
In general, when you have a slower attack time, and you’re allowing more transient to stay on the signal, sounds will feel a little more glued to the speakers. A little more coming at you and a little more forward. When you set a faster attack time to shave off some of that attack, usually sounds will sit further back.
You can play around with this to help a vocal come forward, if it’s a lead vocal, say using a slower attack time, and maybe set back your background vocal by using a somewhat faster attack time.
Again, there are no rules in this, so let taste be your guide. I hope this was a helpful walkthrough, compression and EQ on vocals.
In the next part of this series, we’re going to start digging in to time based effects. Your reverbs, your delays, we’re really going to start bringing this track back to life.
Thanks again to David Caruso of AMFM for letting us use this track. It really is a favorite of mine, and you’re going to hear it sound better and better as we go along. Thanks for Harper James for doing the production on this one. Thanks to B&H for helping us put this whole thing together. If you haven’t already, go to sonicscoop.com, go to b&h.com, sign up for our newsletters, and you’ll get messages from us whenever we put out new videos in this series.
Thanks for hanging out with me, see you next time.
Elevate Your Ears