5 Effective Ways to Use Compression in a Mix
11/11/2014
Article Content
➥ Learn how to control shape, tone and dynamics with compression
Amplitude compression can be one of the most confusing effects for audio engineers.
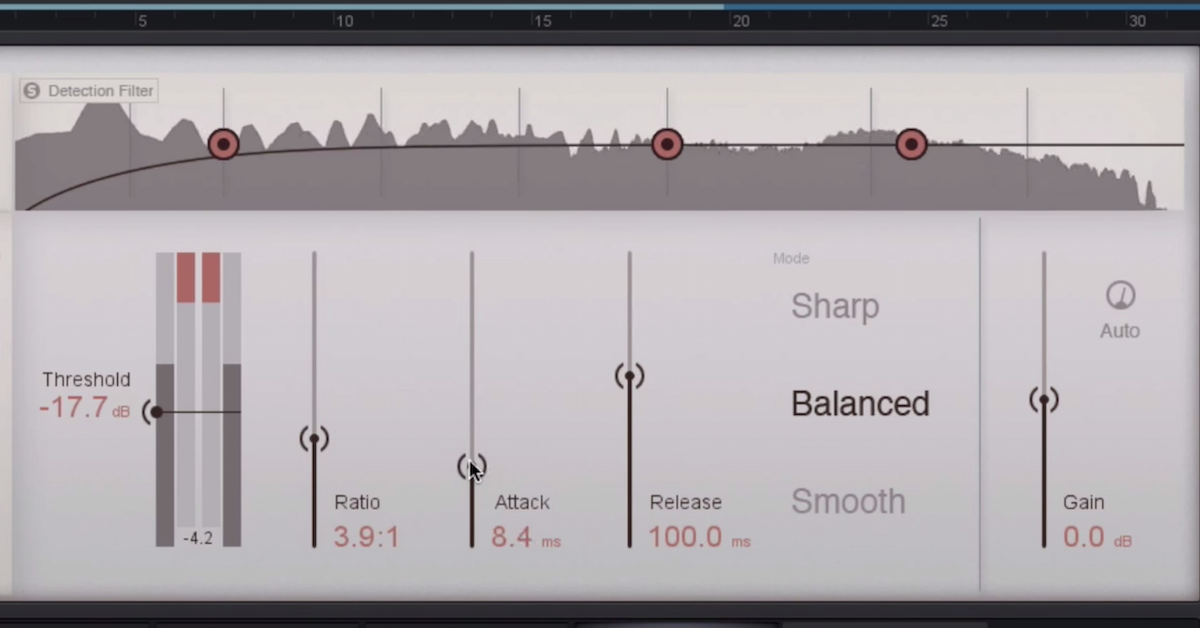
For some engineers, compression can seem complicated and intimidating. The processing by a compressor depends on many factors including the threshold, ratio, attack time, release time, and knee.
On some compressors these factors can be set by an engineer, while on other compressors these factors are fixed. For some engineers, it may not even be intuitive as to why these controls are helpful to use when performing amplitude compression.
On top of all that, there is more than one way to use a compressor. From subtle dynamic range reduction to extreme tone shaping, a compressor can have several, dramatically different purposes in a mix. This is why it is so important to have all the different controls of a compressor, or at least be able to select the compressor with the correct fixed settings.
I have heard from many engineers that have had similar experiences with compressors. They think, “Let’s see if a compressor can add anything to this track.” After routing the track through the compressor, they arbitrarily adjust parameters until they stumble upon a desired sound or they give-up and stop using the compressor. This can make the use of a compressor very time-consuming.
As much as I wish I could say, “There is no wrong way to use a compressor,” nothing could be further from the truth. Unfortunately, there are many ways to use a compressor incorrectly.
In fact, the incorrect use of a compressor is one of the fastest ways to ruin a mix. For this reason, it is my recommendation to compress with a purpose. In other words, only use a compressor when you have a specific reason. Whether you are trying to solve a problem in your mix or add a textural effect to your mix, you should be able to quickly choose which compressor to use and what settings to start with.
Here are five basic “starting points” for a compressor and their corresponding purpose.
1) Taming Transients: Fast Attack + Fast Release + High Threshold
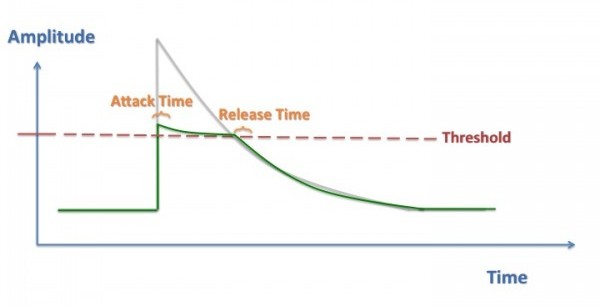
Conventional downward compressors detect when a signal’s amplitude is higher than a threshold, and then respond by reducing the amplitude of the signal.
By using a fast attack time and a fast release time, the compressor will respond almost instantaneously when a signal’s amplitude crosses the threshold.
Therefore, gain reduction will primarily be applied only when the signal’s amplitude is above the threshold. When the amplitude drops below the threshold, gain reduction will not be applied.
If the threshold is set so that only the attack of a signal triggers the compressor, then these settings on a compressor can be used to tame the transients of a signal and also help prevent a signal from clipping.
The threshold can be adjusted to change how much of the transient is changed. Lowering the threshold and increasing the ratio will squash more of the transient, resulting in a higher relative amplitude for the note’s sustain. Extreme settings with this technique work well in parallel compression.
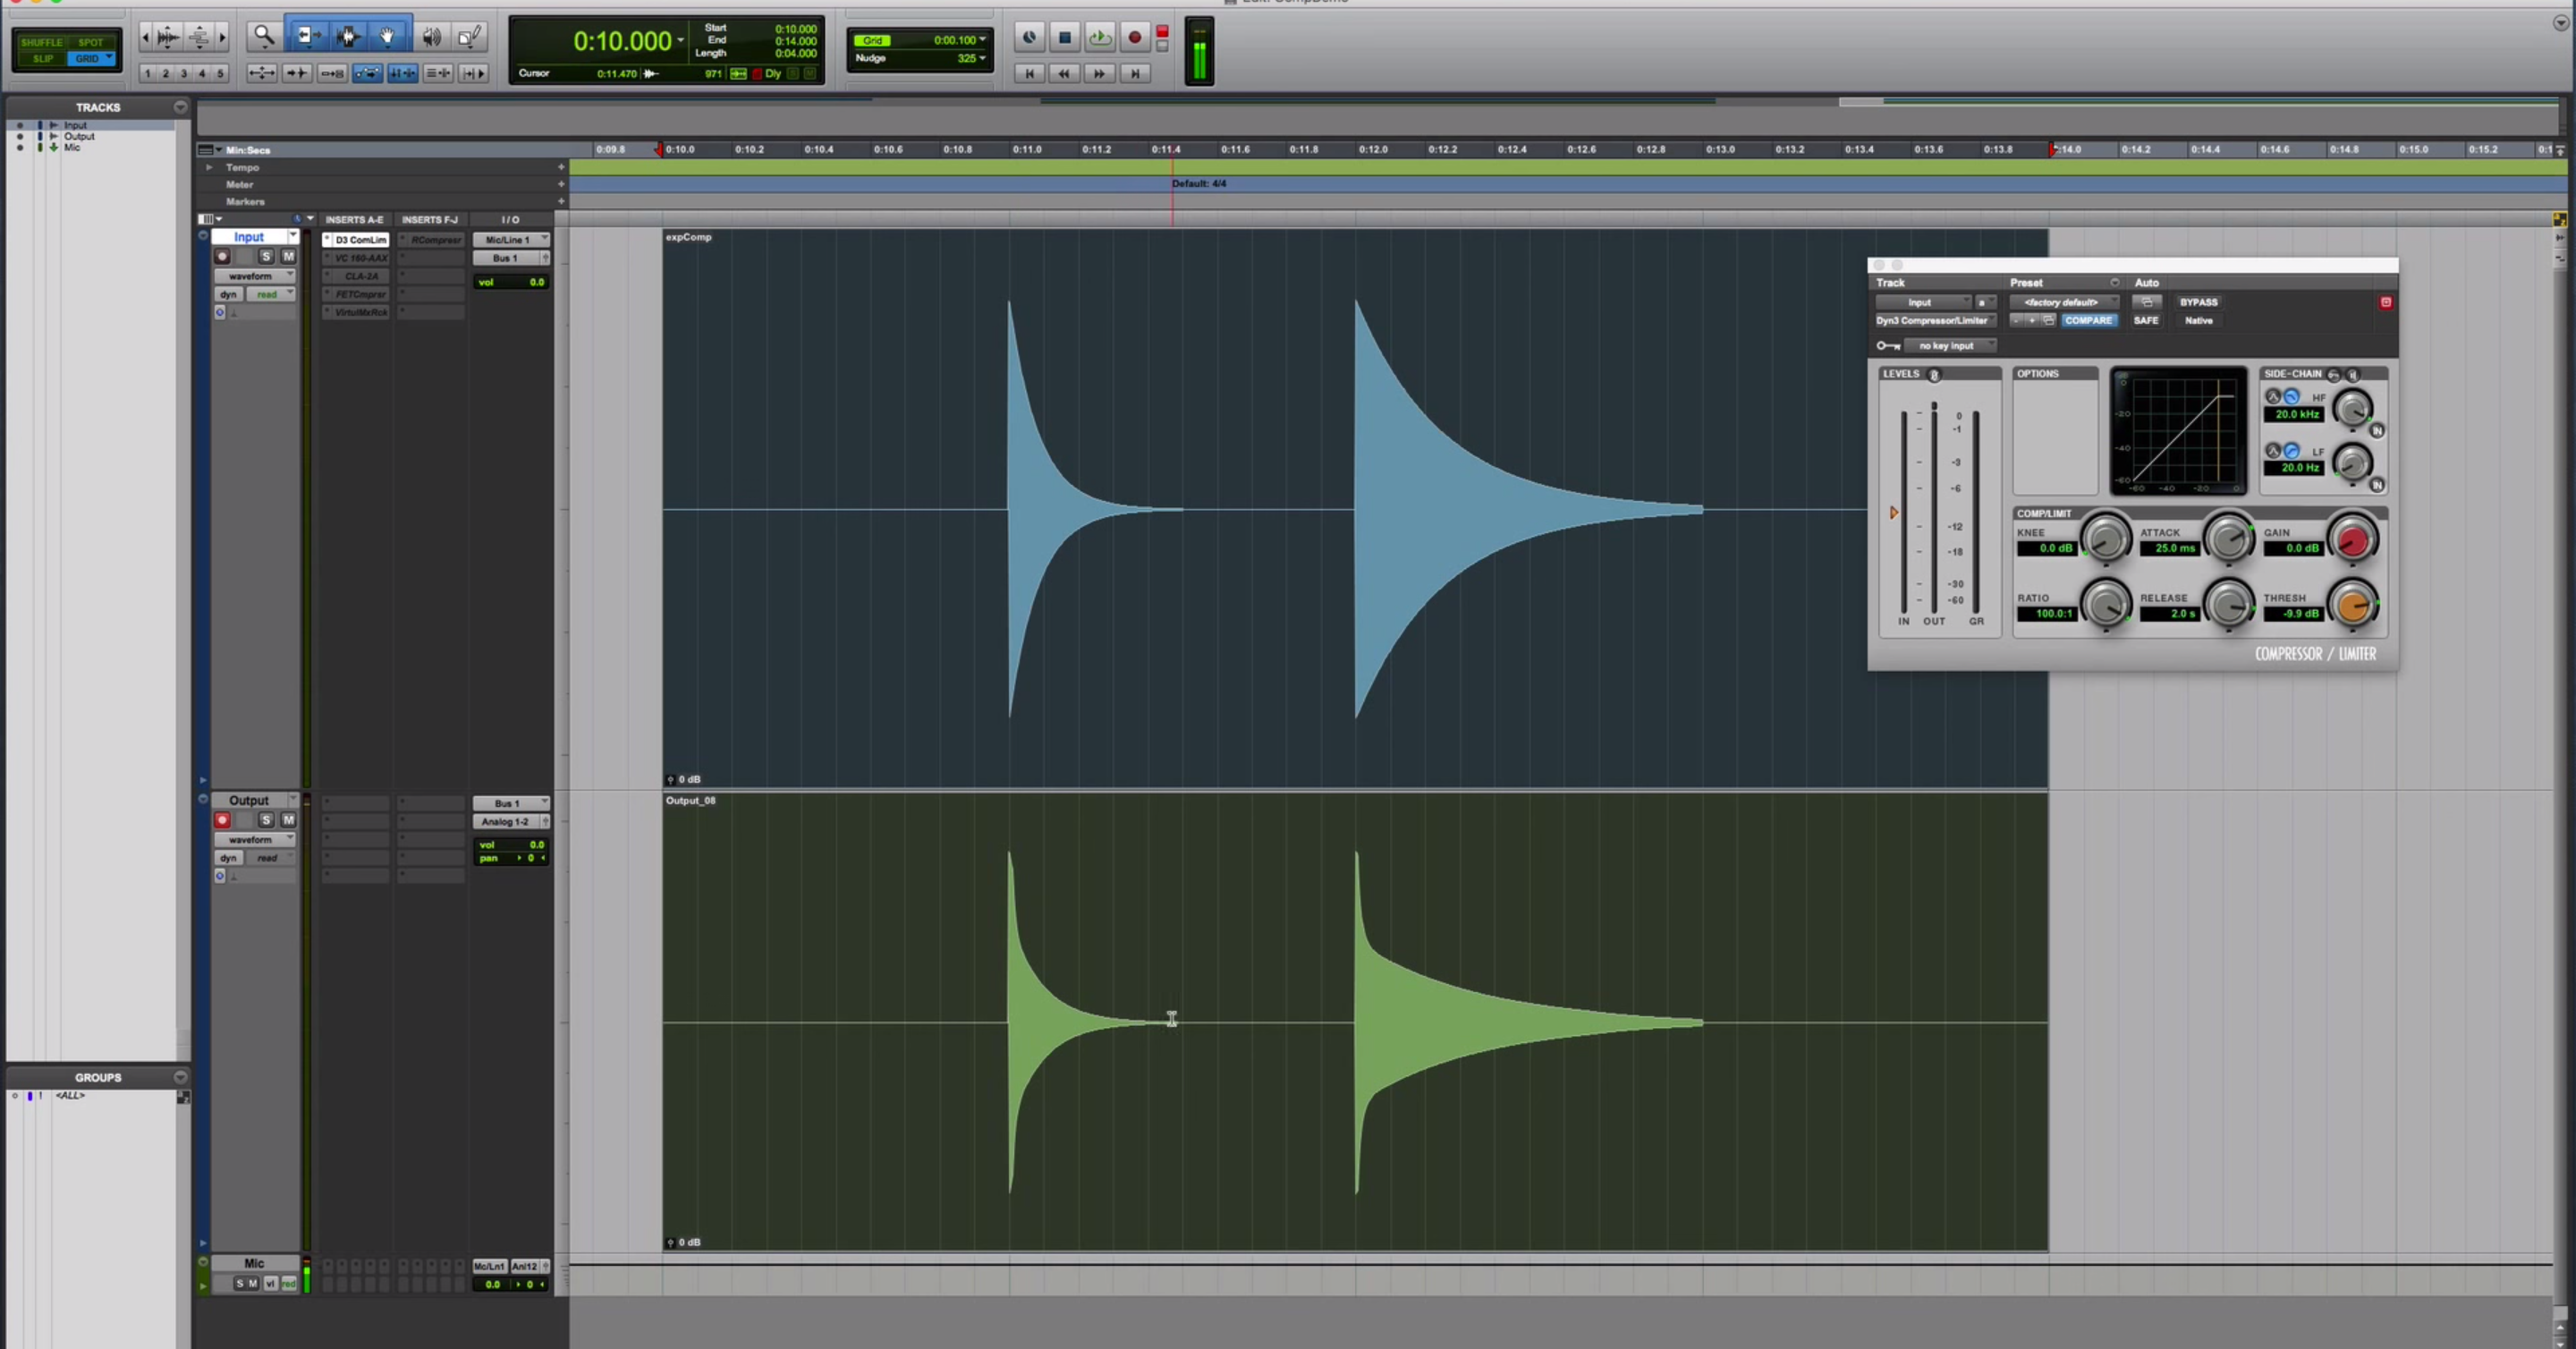
This technique works well with an 1176 compressor. The field effect transistor circuit of the compressor means that it can respond very quickly. This technique is great for controlling the attack of drum hits and plucked/strummed notes on a guitar.
This transient tamer technique can be used to perceptually push an instrument back in a mix because the attack does not cut through as much.
2) Enhancing Transients: Medium attack + Synchronized release + High Threshold
The complement of the transient tamer is the transient enhancer.
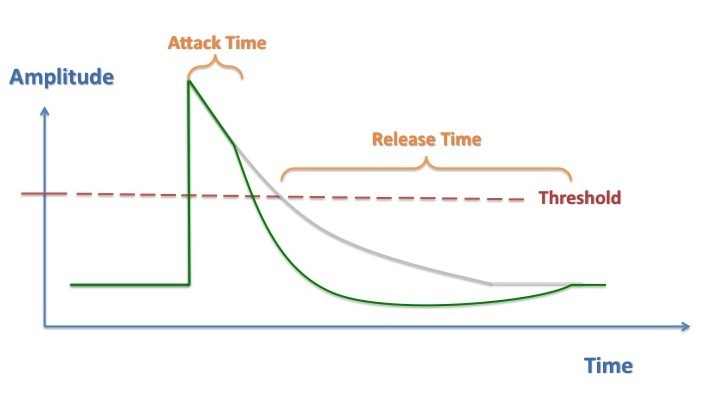
Rather than using the compressor to reduce the amplitude of the signal’s attack, the compressor can be used to reduce the amplitude of the signal’s sustain.
The threshold should still be set so that gain reduction is triggered only by the transient. However, the attack time should be increased so that gain reduction is delayed until after the attack passes through the compressor. By delaying the gain reduction, the sustain of the signal will be reduced. With this technique, the compressor’s release can be set so that gain reduction continues until the start of the next note.
Therefore, the release time should be set to be synchronized with the notes of the instrument and groove. If a snare drum is playing on the 2-4 backbeat, gain reduction of the previous note should return to 0 dB just as the next note is played.
This technique is great for drums, bass, guitar, piano, and anywhere else you want to sharpen the instrument’s attack. Changing the compressors ratio from low settings (2:1) to high settings (8:1) will change how much the sustain is squashed.
To dial in these settings on a compressor, it can be helpful to use a compressor with fine control over the attack time and release time.
The following is an order of operation that can be used to quickly dial in the appropriate settings based on your song.
- Start with fast attack/fast release and set the threshold to detect the signal’s transients.
- Slow down the release time so that the gain reduction lasts until just before the start of the next transient.
- Finally, slow down the attack time until you hear the transient pass through.
There are also many compressors that have fixed settings that perform this technique automatically.
The dbx 160 and LA-2A are examples of compressors that have a fixed attack time, which allows a signal’s transient to pass through.
The dbx 160 is great for drums, while the LA-2A is great for bass. The release time of the LA-2A is program dependent, meaning that it will synchronize, in some ways, with the instrument’s notes automatically.
On an SSL console, the compressor has a switch for the attack time. In one position the attack time is fast and in the other position the attack time is slower. Essentially the switch assumes that an engineer only needs two settings: either an attack time that will compress a transient or an attack time that will allow the transient to pass through. In general, this can be a helpful way to think about using a compressor’s attack control. Even though a variable knob can be used to set a wide range of attack times, it can be much simpler to ask the question, “Transient? Yes/no?” when choosing your attack setting.
This transient enhancer technique can be used to perceptually push an instrument forward in a mix because the transient will cut through more.
3) Transparent Dynamic Range Reduction: Low threshold + Low Ratio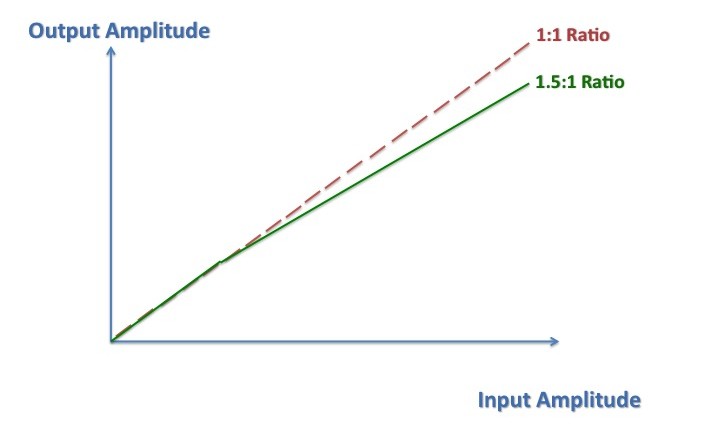
In theory, a compressor is an amplitude processor that can be used to reduce (compress) the dynamic range of a signal. This can be accomplished by reducing the amplitude of the parts of a signal that have high amplitude.
However, a compressor can also be used to increase (expand) the dynamic range of a signal, accomplished with the transient enhancer technique.
Nonetheless, many times the purpose of using a compressor is to actually reduce the dynamic range of a signal. With the transient tamer technique, the threshold is conventionally set so that the compressor only responds to the transient portion of a signal. Another technique to reduce a signal’s dynamic range is to set the threshold so that the compressor responds to both the transient and sustain portions of a signal.
If a low ratio is used, this can be a very transparent method to reduce dynamic range. One place to start would be to use a ratio of 1.2:1 or 1.5:1.
This technique requires a compressor with a variable ratio that goes down to 1:1. After the low ratio is set, the threshold can be reduced so that nearly the entire signal triggers the compressor.
With this technique, the effective gain reduction for portions of the signal that are slightly above the threshold will be smaller than the effective gain reduction for portions of the signal that are significantly above the threshold.

Ready to elevate your ears?
It doesn’t have to take years to train your ears.
Get started today — and you’ll be amazed at how quickly using Quiztones for just a few minutes a day will improve your mixes, recordings, and productions!
As an example: with a ratio of 1.5:1, if an input signal is 6 dB above the threshold, the output will be 4 dB above the threshold. The effective gain reduction is 2 dB. If an input signal is 15 dB above the threshold, the output will be 10 dB above the threshold for an effective gain reduction of 5 dB.
Therefore, this technique is an effective way to slightly reduce the gain of low amplitude signals and gently reduce the gain of high amplitude signals. With such a low ratio, compressors can be very transparent.
4) Lengthening Sustain: Conventional Upwards Compression
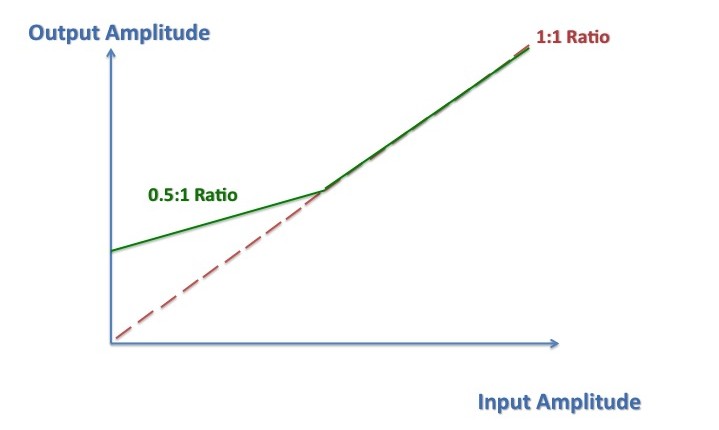
The dynamic range of a signal can be reduced by decreasing the amplitude when it is above the threshold (downwards compression).
Additionally, the dynamic range of a signal can be reduced by increasing the amplitude when it’s below a threshold. This is called upwards compression.
This mode of operation was not typically found on analog hardware compressors. However, it is becoming more common on digital software compressors.
This type of compression is helpful if your purpose is to change the amplitude of the quieter parts of your signal. One example would be if you would like to increase the amplitude of an instrument’s sustain.
Common places to use this technique are for vocals, lead instruments, and bass. The result of upwards compression is a signal that has a much more consistent level. Therefore, it can help a vocal part stay out front of the rest of mix. It can also help make sure a bass sits in the context of a mix without ever getting too loud or too quiet.
When it comes the compressor’s ratio, upwards compression uses a ratio less than 1:1.
As an example: if the ratio is 0.5:1, this means an input signal 4 dB below the threshold will be increased so that the output is only 2 dB below the threshold. When actually setting the ratio for upwards compression, a little goes a long way. Even settings of 0.9:1 can have a significant impact.
This type of compression is found on many software compressors including Waves MaxxVolume/MV2 and several iZotope plugins.
5) Upwards Compression: Downwards Compression + Gain
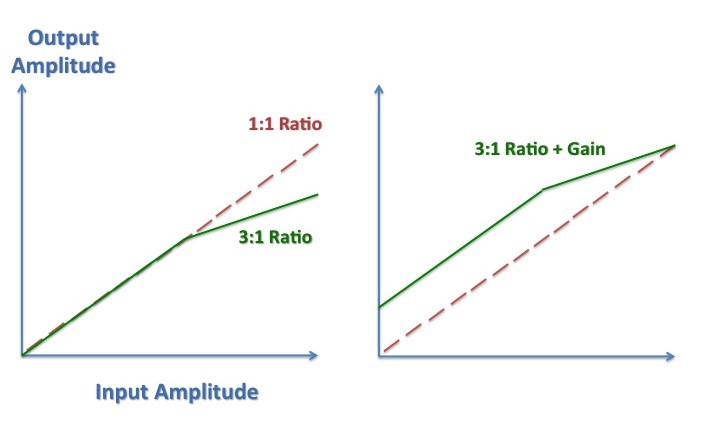
Lastly, another version of upwards compression can be accomplished using a combination of downwards compression and make-up gain.
Therefore, if your compressor does not have a specific setting for upwards compression, you can still achieve a similar result.
Downwards compression can be used to reduce the amplitude of the signal when it is above a threshold.
After downwards compression is performed, there is additional headroom to increase the gain of a signal without clipping. By applying a constant make-up gain, both the amplitude above the threshold and below the threshold will be increased.
If performed carefully, this type of compression can actually increase the amplitude of the portions of a signal with low amplitude, while having almost no net change to the amplitude of the portions with high amplitude.
This type of compression can be used very subtly or very dramatically. Try it both in series and in parallel. Experiment with this technique on everything: drums, vocals, piano, etc.
Almost any compressor can be used with this technique. You could try “All Buttons Mode” on an 1176 for your drum room mics, gentler settings with a CL-1B on vocals, or a Fairchild on the mix buss.
Conclusion
Compressors are one of the most versatile and powerful processors for an audio engineer to use.
Even though there are many parameters and possible combinations of parameters, a compressor can be mastered for use in common mix situations.
After learning several basic “starting points,” it is only a matter of making minor adjustments to make the compression more/less audible.
When you compress, make sure you compress with a purpose.
More
Eleveate Your Ears