Analyzing Effects: Compression (Part 2)
07/2/2015
![Compressor Plugins — Part 2 [Analyzing Mixing Effects]](https://i.ytimg.com/vi/evEPVGqPEck/hqdefault.jpg)
This is a followup video to a tutorial that I made previously about analyzing compressor plug-ins. In my first video, I demonstrated how you could visualize and understand the basic parameters of a compressor. Things like the threshold, attack, release, and ratio.
So, if you want to understand the basic setup of what I’m working with here, make sure to check out that other tutorial too. In this video, what I’d like to do is take a closer look, specifically at the release characteristics of several compressors. This is going to be very important in how the compressor functions, and ultimately, how it’s going to sound.
I’ll start out first by working with the stock Pro Tools compressor. What I’m going to do is send my test signal over here through the compressor, and visualize the output. Specifically, I’m going to be looking at what happens when the compressor transitions from a time of gain reduction to a time of no gain reduction.
So I have part of the signal above the threshold, and part of the signal below the threshold, and I can look at how it’s going to transition from the compression that’s taking place, to when no compression is taking place.
[sine wave]
So, here’s the release of this compressor. We have gain reduction happening here, and it transitions to no gain reduction over here. I would describe this type of release as a linear release. In other words, you can draw a straight line from the point of full compression, all the way up to no compression. We can compare and contrast this, then, to other styles of release.
I’ll go ahead and save this waveform and make this plug-in inactive, and bring up another plug-in.
This is the R-Compressor from Waves. It has two different styles of compression. One is the Electro release, one is the Opto release. They’re both slightly different.
Here, I’m going to just keep the release time to be fixed, and just be manipulating this release setting. I’ll start out and print the Electro.
[sine wave]
And next, the Opto.
[sine wave]
Now, I can switch back and forth between the various waveforms that I’ve printed. So this is the Opto. Compare that then to the Electro, and then back to my Linear style release.
So, again, I’ve got the straight line during this part for the Linear, but then if I go back to Electro, this one is more of a curve. This is because for Electro style compression, the release time actually increases it’s speed as the gain reduction gets closer to zero, or it gets faster.
The Opto is the opposite. If I switch back to this one… The Opto, it’s the case that the gain reduction actually slows down, so it gets more drawn out, where the release takes more time, because as gain reduction approaches zero dB, essentially, the compressor is going to take a longer time where the release starts to slow down.
So, this can be very useful for certain styles of compression. For drums, bass, vocals… You can experiment with how the release plays an important role in how it’s going to sound.
What I’d like to do in the next part of my video is move on from specifically looking at the release characteristics of these compressors, to talking about how these compressors are going to respond to signals that are more like what we normally work with in music.
Up to this point, I’ve been using a test signal. It kind of has these stair-step characteristics. Constant amplitude for one period of time, and a constant amplitude for another period of time. There’s not that many signals that we work with in music, typically, that have these kinds of attack and decay characteristics.
What I’ve done is synthesized some other test signals over here so we can look at how compressors respond to these types of signals. So instead of having an abrupt transition from above the threshold to below the threshold, what I’ve done is have more of a smooth decay in the signal. I actually have two different signals side by side.
This one has a faster decay. They both have a very sharp transient at the beginning. Then we have a fast decay here, and a little bit slower decay in this signal.
So you can think of these as kind of simulating the envelope characteristics of maybe a drum hit, or maybe the pluck on a guitar, or maybe when a piano note is being struck.
So we can look at how these different kinds of compressors are going to respond. So to begin with, I’ll start out with the stock Pro Tools compressor and see how it’s going to shape the envelope of these kinds of signals.
So I’ll go ahead and select this one, and print through it.
[sine waves]
So, for these kinds of signals, you can see that what a compressor is going to do, depending on your attack and release settings, that I’m actually accentuating the transient of it. What I’ve done is reduce the amplitude then of the sustain of the note.
I’ve turned it down here. As soon as the attack kicks in, there’s going to be gain reduction taking place, and the sustain is going to be brought down. We can look at, then, how other types of compressors will behave with these types of signals.
Let’s bring up the dbx style compressor here. It’s the one from Native Instruments and Softube. Let’s look at how it’s going to respond.
[sine waves]
So, here we actually have a very fast attack, and fast release. What can end up happening is you’re carving out part of the signal that’s loud, but then, you allow for a very natural release where you’re not doing any gain reduction on the whole tail of the signal.
So, it’s going to produce a very different kind of sound, so sometimes it’s useful, sometimes it’s not.
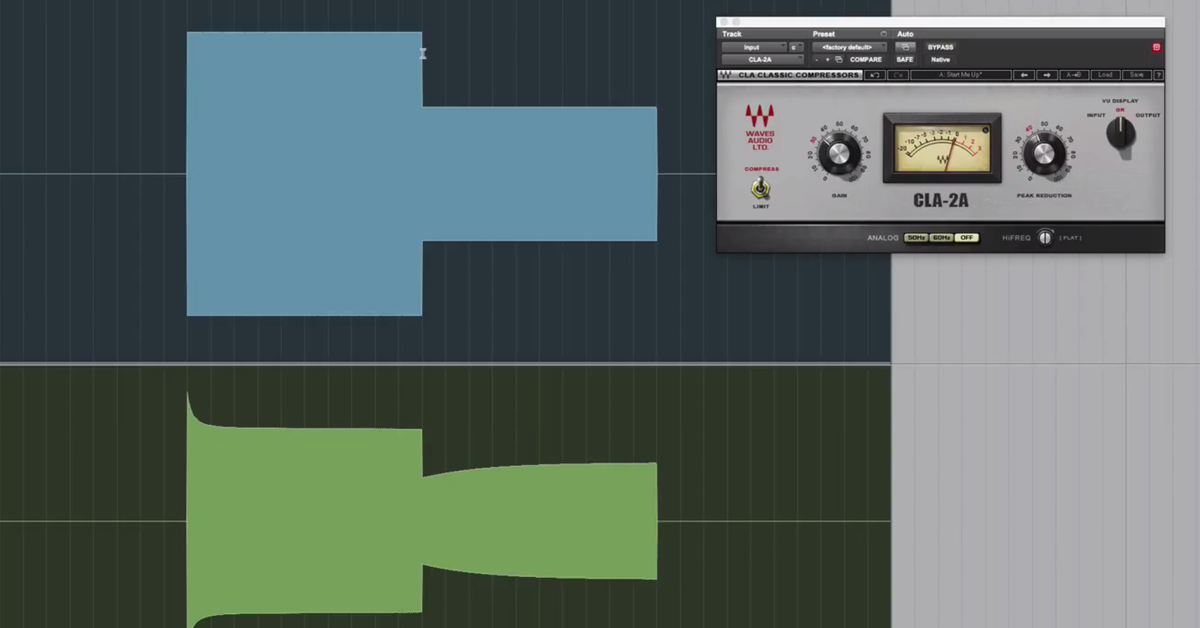
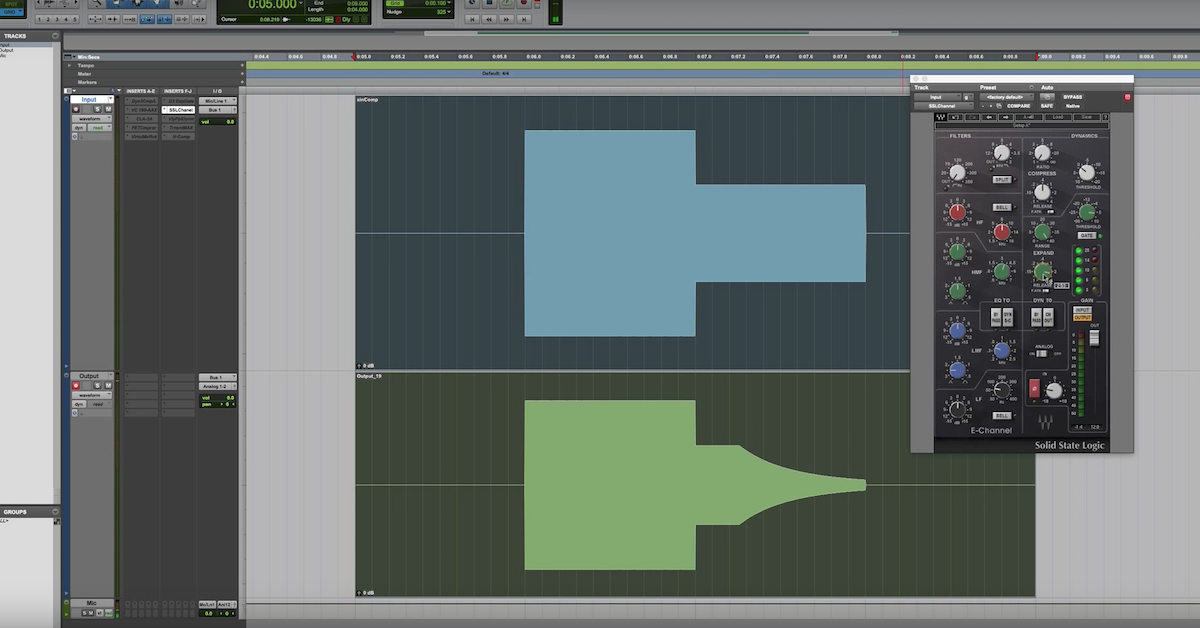
Let’s look at, then, the LA-2A style compressor. Instead of maybe one that’s typically used for drums, like the dbx 160, this one is maybe used more for bass. So we can look at what it’s going to do.
[sine wave plays]
So, we have a very smooth transition that ends up happening. The attack kind of passes through initially, but then we have a smooth transition, because the release is longer, or for LA-2A, can even happen in multiple stages where you have the release happen over multiple seconds.
So compare this then to my last compressor I’ll show you. The FET style compressor. I’m going to send these signals through the FET compressor. I’ve got a slow attack and fast release, and see what ends up happening when I send these signals through.
[sine waves play]
So, the interesting thing here is the compressor grabs on initially, right at the beginning of the signal, but then because we have such a fast release, we can actually do some envelope shaping to this signal, where initially we had this kind of concave shape to the decay, in both of the signals, just at different times.
However, with the FET style compressor, you can actually almost elongate the tail with this really fast release, such that it actually starts being convex instead of concave. So, just a different way that these compressors are going to respond and process the kinds of signals.
So if you’re thinking about, “how is this processor going to manipulate things like the attack and the decay of these types of signals,” maybe drums or bass or piano, think about what’s the difference between a FET style compressor or an LA-2A style compressor.
So that’s all I wanted to demonstrate with this video. Thanks for checking it out, guys. If you have questions, post them below or comments. I love hearing from you. Until next time, take care.
Elevate Your Ears