Analyzing Effects: Expander/Gate
07/8/2015
![Expander/Gate Plugins [Analyzing Mixing Effects]](https://i.ytimg.com/vi/AGHENKD6Dfo/hqdefault.jpg)
I’ve been going through a series of videos where I’m demonstrating techniques that you can use to analyze your plug-ins in order to get a better understanding of how they’re going to work.
I’ve looked at spectral processors, saturation or harmonic style processors, and also compressors. Now, in this video, I’m going to look at a different type of dynamic range processor, and that’s the expander/gate.
You can use this type of processor for several things while you’re mixing. Some people like to use it to remove background noise, or low level noise in their signal. Other people will use it to do something that I’ll call, “envelope shaping,” to change the attack, decay, sustain, and release of the notes that are actually part of the signal.
To go along with this, then, I’m also going to demonstrate a transient designer style processor that you can use for more overall envelope shaping.
Let me take you through my basic setup in my session. I’ve got a couple of test signals that I’ll be working with. I’ve designed them specifically that they’ll be convenient for analyzing these types of processors.
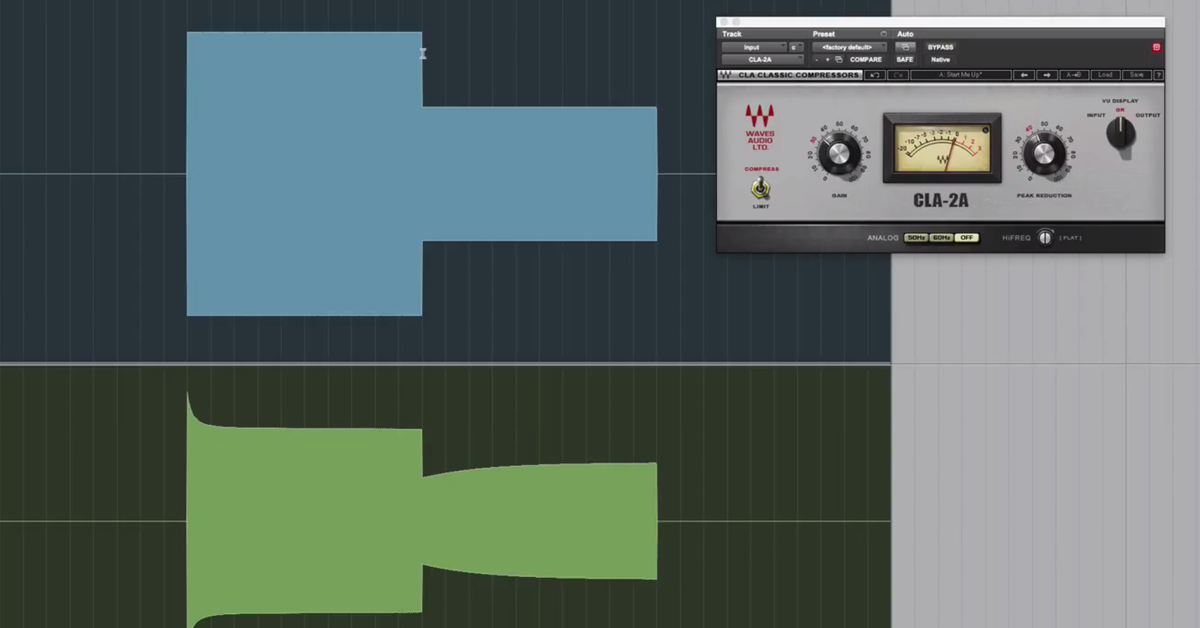
So, here I’ve got a 1kHz tone where I’m changing the amplitude. For one second, it has a constant amplitude at one level, and then for another second, it has a lower amplitude.
Now what I can do is set the threshold on my dynamic range processor so that part of the signal is above the threshold, and then another part of the signal is below the threshold. Then I can see how the processor is going to respond to when the signal changes amplitude.
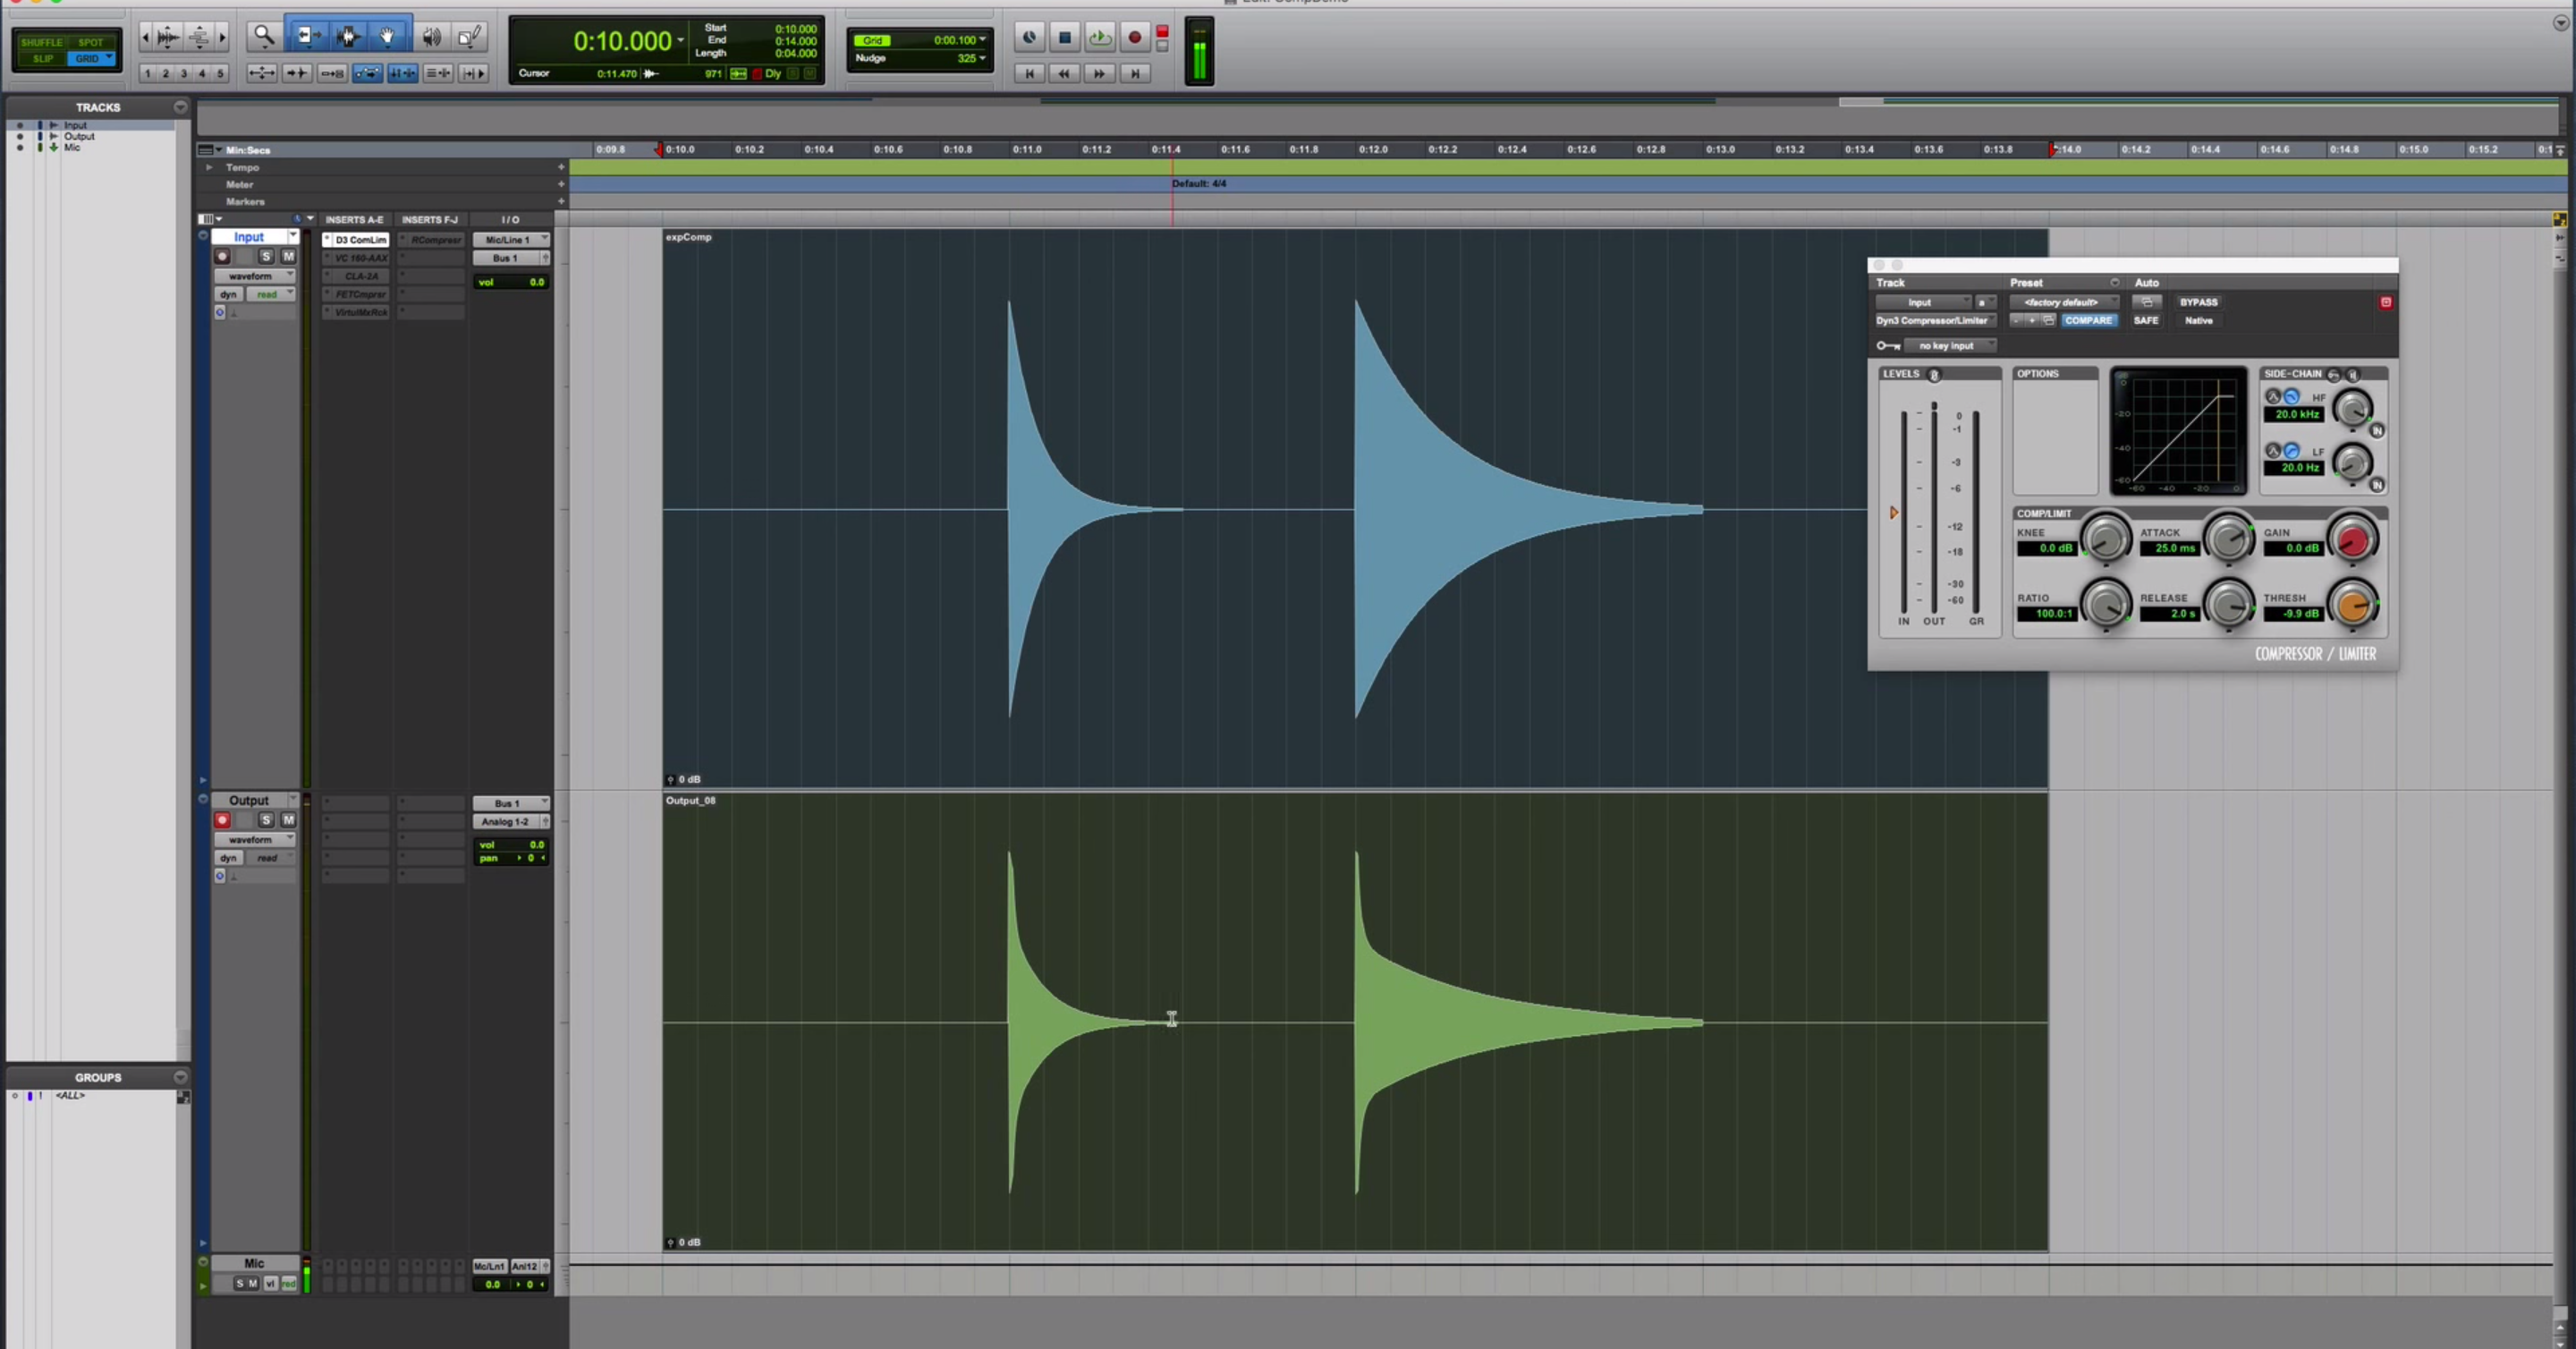
So, for instance, I’ve got the stock Pro Tools expander/gate pulled up here, and I’ve got it in its basic settings, where it’s going to be acting as a gate with a very fast attack, fast release, and fast hold, and I’ve got the threshold set so that this part of the signal will be below.
So, I can go ahead and print – this is my input signal – I’m going to print on this other track the output, and see what ends up happening when the signal goes through.
[sine wave plays]
So, as you might expect, the expander/gate is going to kick in and change the amplitude of this part of the signal over here, so that it’s turned down as much as, you know, by a ratio of 100:1. So this is a very fast gate that kicks in right away based on the attack and release settings.
So, let’s go ahead and look, then, if I start to manipulate some of these things. So, instead of having a really fast release, why don’t I elongate this to a few milliseconds.
[sine wave plays]
So, now I have, instead of an immediate, sharp tail that cuts the signal off, this one is a little bit elongated. It has a little bit more of a smooth curve here. This can be more dramatic as I change the release time.
[sine wave plays]
Nonetheless, as soon as this signal drop below the threshold, the expander/gate is going to kick in, and it’s going to start to decrease the amplitude of the signal in a very smooth way.
To go along with the release then, another control that can be helpful to use is the “hold” that’s available at least on this gate. So, if I change the Hold and elongate this one to 300 or so milliseconds, watch what ends up happening to the signal.
[sine wave]
So, with the Hold setting, what it’s going to do is delay when the gain reduction is starting to take place. So, the signal at this point drops below the threshold, and then the gate will take whatever amount of time this is – 300 milliseconds or so – it will hold the signal out without doing any gain reduction, and then the release will take over at this point, and have that smooth curve to do the gain reduction.
Let’s look, then, at the attack control. What part of the signal this is going to affect.
So, we can increase the attack time to about 60 milliseconds…
[sine wave]
Okay. In this case, what has changed from the previous example was that at the beginning, now we have a very smooth onset. In the input signal, the signal – the transient right at the beginning, the signal is off, and then all of a sudden it’s on with a constant amplitude.
Now that I’ve increased the attack time, what it’s going to do is have a smooth onset. So this can be useful for trying to do envelope shaping if you want to take away some of the transient in your signal so that it doesn’t have as sharp of an impact right at the beginning, just decrease – or, elongate the attack time, and in this case, go up to even 300 milliseconds…
[sine wave]
And see how the processor is going to slowly ramp on. In this case, the gain reduction is going to take 300 milliseconds to release, so that when the signal goes above the threshold, it’s going to take a certain amount of time to allow the signal to ultimately pass through the gate.
So, what I’m going to do then is move on from this expander/gate and show you another one, and compare and contrast the settings that you can use, and also, the response of how it’s going to work.
So, I’m going to bypass this one.
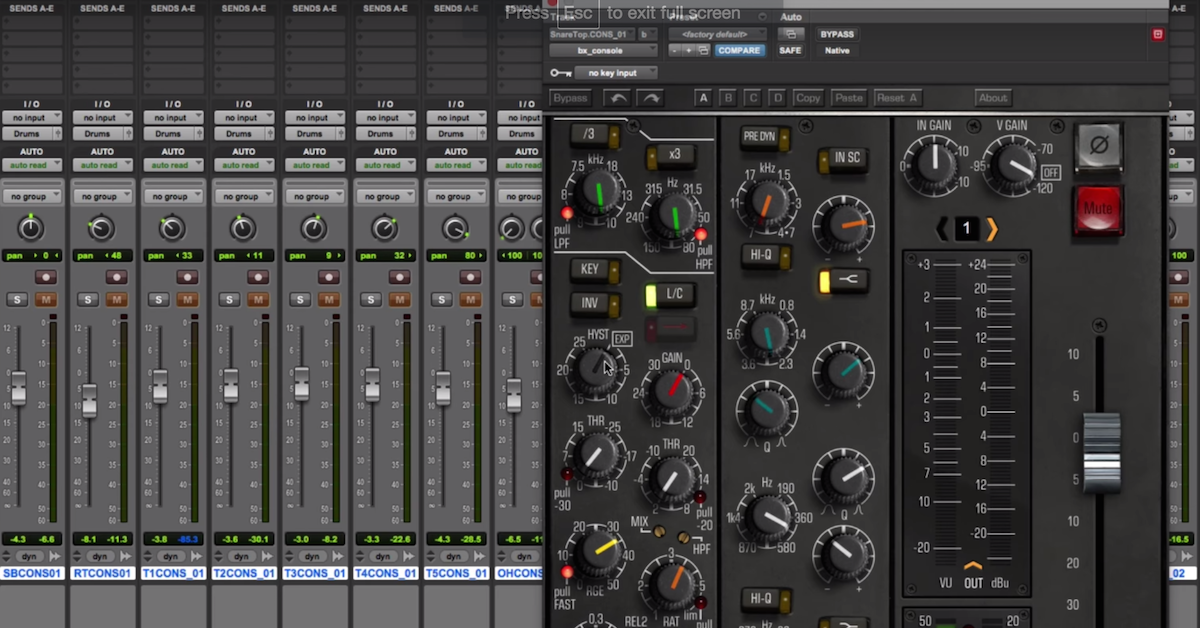
One of my all time favorite expander/gates to use is the one that’s on the SSL Channel Strip from Waves. I use this all the time for drums and that kind of thing. It’s very convenient to have all the controls there, including the compressor and the EQ together, but I also like some things about the way that it sounds.
You have some of the same kind of controls, and some different ones. So, I can set my threshold so that part of the signal is above and part of it is below; I can change it between expander and gate here; then I have release time, and attack time as well.
So right now, I’ve got a fast attack, essentially as soon as this signal goes above the threshold, it’s going to allow it to pass through, and the range I’ve got it at its maximum setting. So you can look at what the gate is going to do.
[sine wave plays]
Alright, so this is with this particular release setting. I can elongate that one.
[sine wave plays]
What you should notice about this, is that even though I’m just manipulating the release control, if you remember back to the previous plug-in when I had to change the release and the hold independently, for the SSL gate, what ends up happening is that the release knob also includes a Hold setting. So the longer I make the release, there’s going to be part of the signal that does not have any gain reduction applied to it, and then it has the smooth release applied afterwards, even if I’m not changing that at all in this case.
So I can speed up the release…
[sine wave plays]
And you can see at the fastest release setting what that ends up looking like.
Instead of using the gate now, I’ll switch over to the expander.
[sine wave plays]
So, the main thing here is there is still going to be part of this signal that ends up passing through. So, depending on my range that I end up setting and the threshold, my release is going to allow part of the signal to still pass through, and this is the original amplitude without any gain reduction.
So let’s look at the settings here.
[sine wave]
Let’s see what the release is going to do.
[sine wave]
Right. So, different characteristics in how it responds. Last thing to show you then is a slower attack – what the difference is there.
[sine wave]
So, even if this is the slower attack, you can zoom in here at the beginning. Just a few cycles in this signal that get the amplitude held over. The gain reduction is held over when the signal goes above the threshold.
So, even though this processor has limited controls compared to the expander/gate – the stock one – it’s very usable, because it comes as part of a whole channel strip, and it does some cool things here. A very simple way to either act as a gate, or also just as an expander that decreases the amplitude slightly in this case.
So, let me move on from this one and look at another one that has its own characteristics that’s unique in and of itself, and this is the Valley People Dynamite, modeled hardware compressor and gate that Softube put together.
So, I’ve got it setup again here with the threshold so that part of the signal is above and below, then I have to manipulate release time here. There’s no attack setting. Then I can also change it between an expander, and then also a gate.
So right now, it’s in the expander setting. I’ll go ahead and print this one.
[sine wave]
And look at how it’s going to release. Here, we don’t have a hold setting, but we have how it changes the amplitude in a smooth way. It’s just going to be different from the SSL. It has a different way of releasing here, and I could also change the release time to be longer.
[sine wave plays]
To go along with that, I could also speed it up. So this is a much longer release.
[sine wave plays]
And the faster release.
Then, we’ll go ahead and kick it over to the hard gating, with a ratio it says of 120.
[sine wave plays]
Alright. Look at the characteristics of the gate and how it’s going to change in amplitude and ramp off.
[sine wave plays]
Right? Very different kinds of curves from being concave to convex. All of those things are going to change the way that the signal sounds, or it will be perceived, whether this is drums, or bass, or whatever you’re trying to use it for.
So, let me move on from expander/gates, then, and bring up another type of processor. This is a transient designer style processor. This is the Transient Master from Native Instruments.
Here, you just have two controls: the attack and the sustain. This is going to be used specifically for envelope shaping. So, this type of processor works pretty well with this test signal, but I’m also going to demonstrate it with another type of test signal too.
I’ll go ahead and print this one here. We can look at the attack. So I’ll increase the attack here, and make sure it doesn’t clip, so I’m going to press the limit and look at how this works.
[sine wave plays]
Right. So in the case of the attack, right here at the beginning, we’re going to increase the amplitude whenever there’s a change in the signal from going to lower amplitude to higher amplitude, we’re going to enhance that and bring up the initial transient, or the initial attack.
We could also do the opposite here if I back it off.
[sine wave plays]
And now, in a different way, we’re going to ramp on the amplitude, and make it take longer for the amplitude to increase.
Another way to look at this would be to use kinds of signals that are more similar to what we typically work with in audio. So, instead of using this stair-step style signal, here I’ve got one that has a sharp attack at the beginning, but then a smooth curve for the decay and the release of the sound.
So, I’ll print this where I decrease the attack.
[sine wave plays]
You can see the result here and how it changes at the beginning.
Then I’ll go on and show you the sustain.
So, I could do extreme settings here, where I back the sustain off. What this is going to do, is the processor – it’s going to decrease the amplitude of the signal whenever the signal is already decreasing in amplitude.
So, let’s look at this.
[sine wave]
So, what ends up happening here is the relative amplitude of the sustain is turned down so that it’s perceived as being a shorter note. Instead of having this longer tail here for this particular note, the Transient Master allows you to decrease the length of that, or decrease the amplitude so that it’s perceived as being a shorter length.
Converse that then by making it longer.
[sine wave]
And look at the result. Now, when the signal starts to decrease in amplitude, the Transient Master is going to kick in and then actually increase the sustain.
The last thing I want to demonstrate then was brought to me. The idea came from one of the viewers here on The Pro Audio Files. This guy’s name is Ben Mallet?*** I hope I’m saying his correct – Mellet?*** But he suggested checking out the H Comp from Waves, and there’s always been this knob on here that I was confused about what exactly it’s going to do. It’s the punch knob.
In theory, it’s supposed to add some extra excitement to, or enhance, the transient of a signal when it’s going to be compressed. So, I’ve got basic compressor settings already setup, but what I’m going to do to them primarily is manipulate the punch.
So let’s go ahead and print a signal with the punch turned off.
[sine wave]
So you can see how the compressor is going to react. It will kick in as soon as the signal goes above the threshold, and then it’s going to have its own release characteristics here.
So, what I’m going to do then is increase the punch, and look at the resulting signal. How does this compressor change specifically the transient here at the beginning when I’ve got the punch turned up?
[sine wave]
So, you can see that when the punch knob is turned up, what it’s going to be doing is enhancing that transient by essentially elongating the time it takes for the compressor to kick in and take over.
So, if I can go back and forth between these, right? You can see the differences when I’ve got the punch on versus turned off.
So, if this is a drum hit or something like that, it’s going to mean that the amplitude right at the beginning is larger.
So thanks to Ben Mellet for coming up with this idea and this suggestion. I think it helps illustrate just a unique feature about the H Comp that doesn’t really show up in other types of processors.
Nonetheless, I hope this video demonstrates some things, not only about how expander/gates work, but how you can shape the overall envelope of the signal. Whether you’re using an expander/gate or you’re using a Transient Master style plug-in.
So, make sure to post some comments below if you’ve got questions or other ideas for unique ways to use these types of test signals to understand how your processors work, and I’ll try and do my best to get back to them.
Elevate Your Ears