Analyzing Effects: Compression Plugins
06/25/2015
![Compression Plugins [Analyzing Mixing Effects]](https://i.ytimg.com/vi/AKS7EdK0dPY/hqdefault.jpg)
I’ve been going through a series of videos where I’m looking at techniques that you can use to analyze your audio plug-ins or your effects processors.
In my first video, I looked at categories of plug-ins that you could call spectral processors and how you can use a frequency sweep or other types of test signals to understand how those processors are going to work.
Then I moved on to my next video to looking at saturation and distortion plug-ins, how you can visualize the harmonic content that’s going to be created by those processors.
Now in this video, I’m going to move on to dynamics processors, and look specifically at compressors. So in this video, I hope to demonstrate the basic functionality of how a compressor works, and also do a side-by-side comparison of popular types of compressors, so you can see their similarities and differences.
If you need a quick crash course on what a compressor is and how it works, check out some of my other videos, or also some of the things that I’ve written about in the past to get up to speed on what a compressor actually does.
So, let’s jump into the session so I can show you what’s going on here. We’re going to be using two test signals in this demonstration, and I synthesized them specifically to be useful for analyzing a compressor dynamics processor.
So here is my first test signal. It’s a four second long signal. There’s one second of silence at the beginning, and one second of silence at the end. Then what I’ve done is I went in here and I synthesized a step signal.
So right at time second one, the amplitude is going to increase, and it’s going to have a constant amplitude for one second. Then, at the end of that one second, what I’ve done is I’ve changed the amplitude. I’ve stepped the amplitude down to a different amplitude – a lower amplitude. I’ve done this specifically so I can set the threshold of my compressor in here so that it’s going to kick in when the amplitude changes here at time second one, and set my threshold so that this part of the signal is above the threshold, and this part of the signal is below the threshold.
Then I can look at the attack characteristics here at the beginning when it first goes above the threshold, then I can look at the release characteristics here when the signal’s amplitude goes below the threshold.
I’ve done a similar kind of thing over here with this other test signal, where what I’ve done is I’ve made another four second signal with one second of silence at the beginning and one at the end, but instead of using a stepped signal that we can’t really listen to, I decided to use a 1kHz tone. So it actually has – it oscillates, it has a frequency, we can perceive it, and we can go through our processor and we can look at what it’s going to do. So it has one constant amplitude for the first second here, and then a lower amplitude, but still the same frequency when I start the next.
So, for demonstration purposes, when I’m using this step kind of signal, I’m going to mute the output, because it’s not really helpful to listen to. All it’s going to generate is just clicks and pops here whenever the amplitude transitions, but I’ll try to remember to bring the signal in so we can listen to it when I have the 1kHz tone over here.
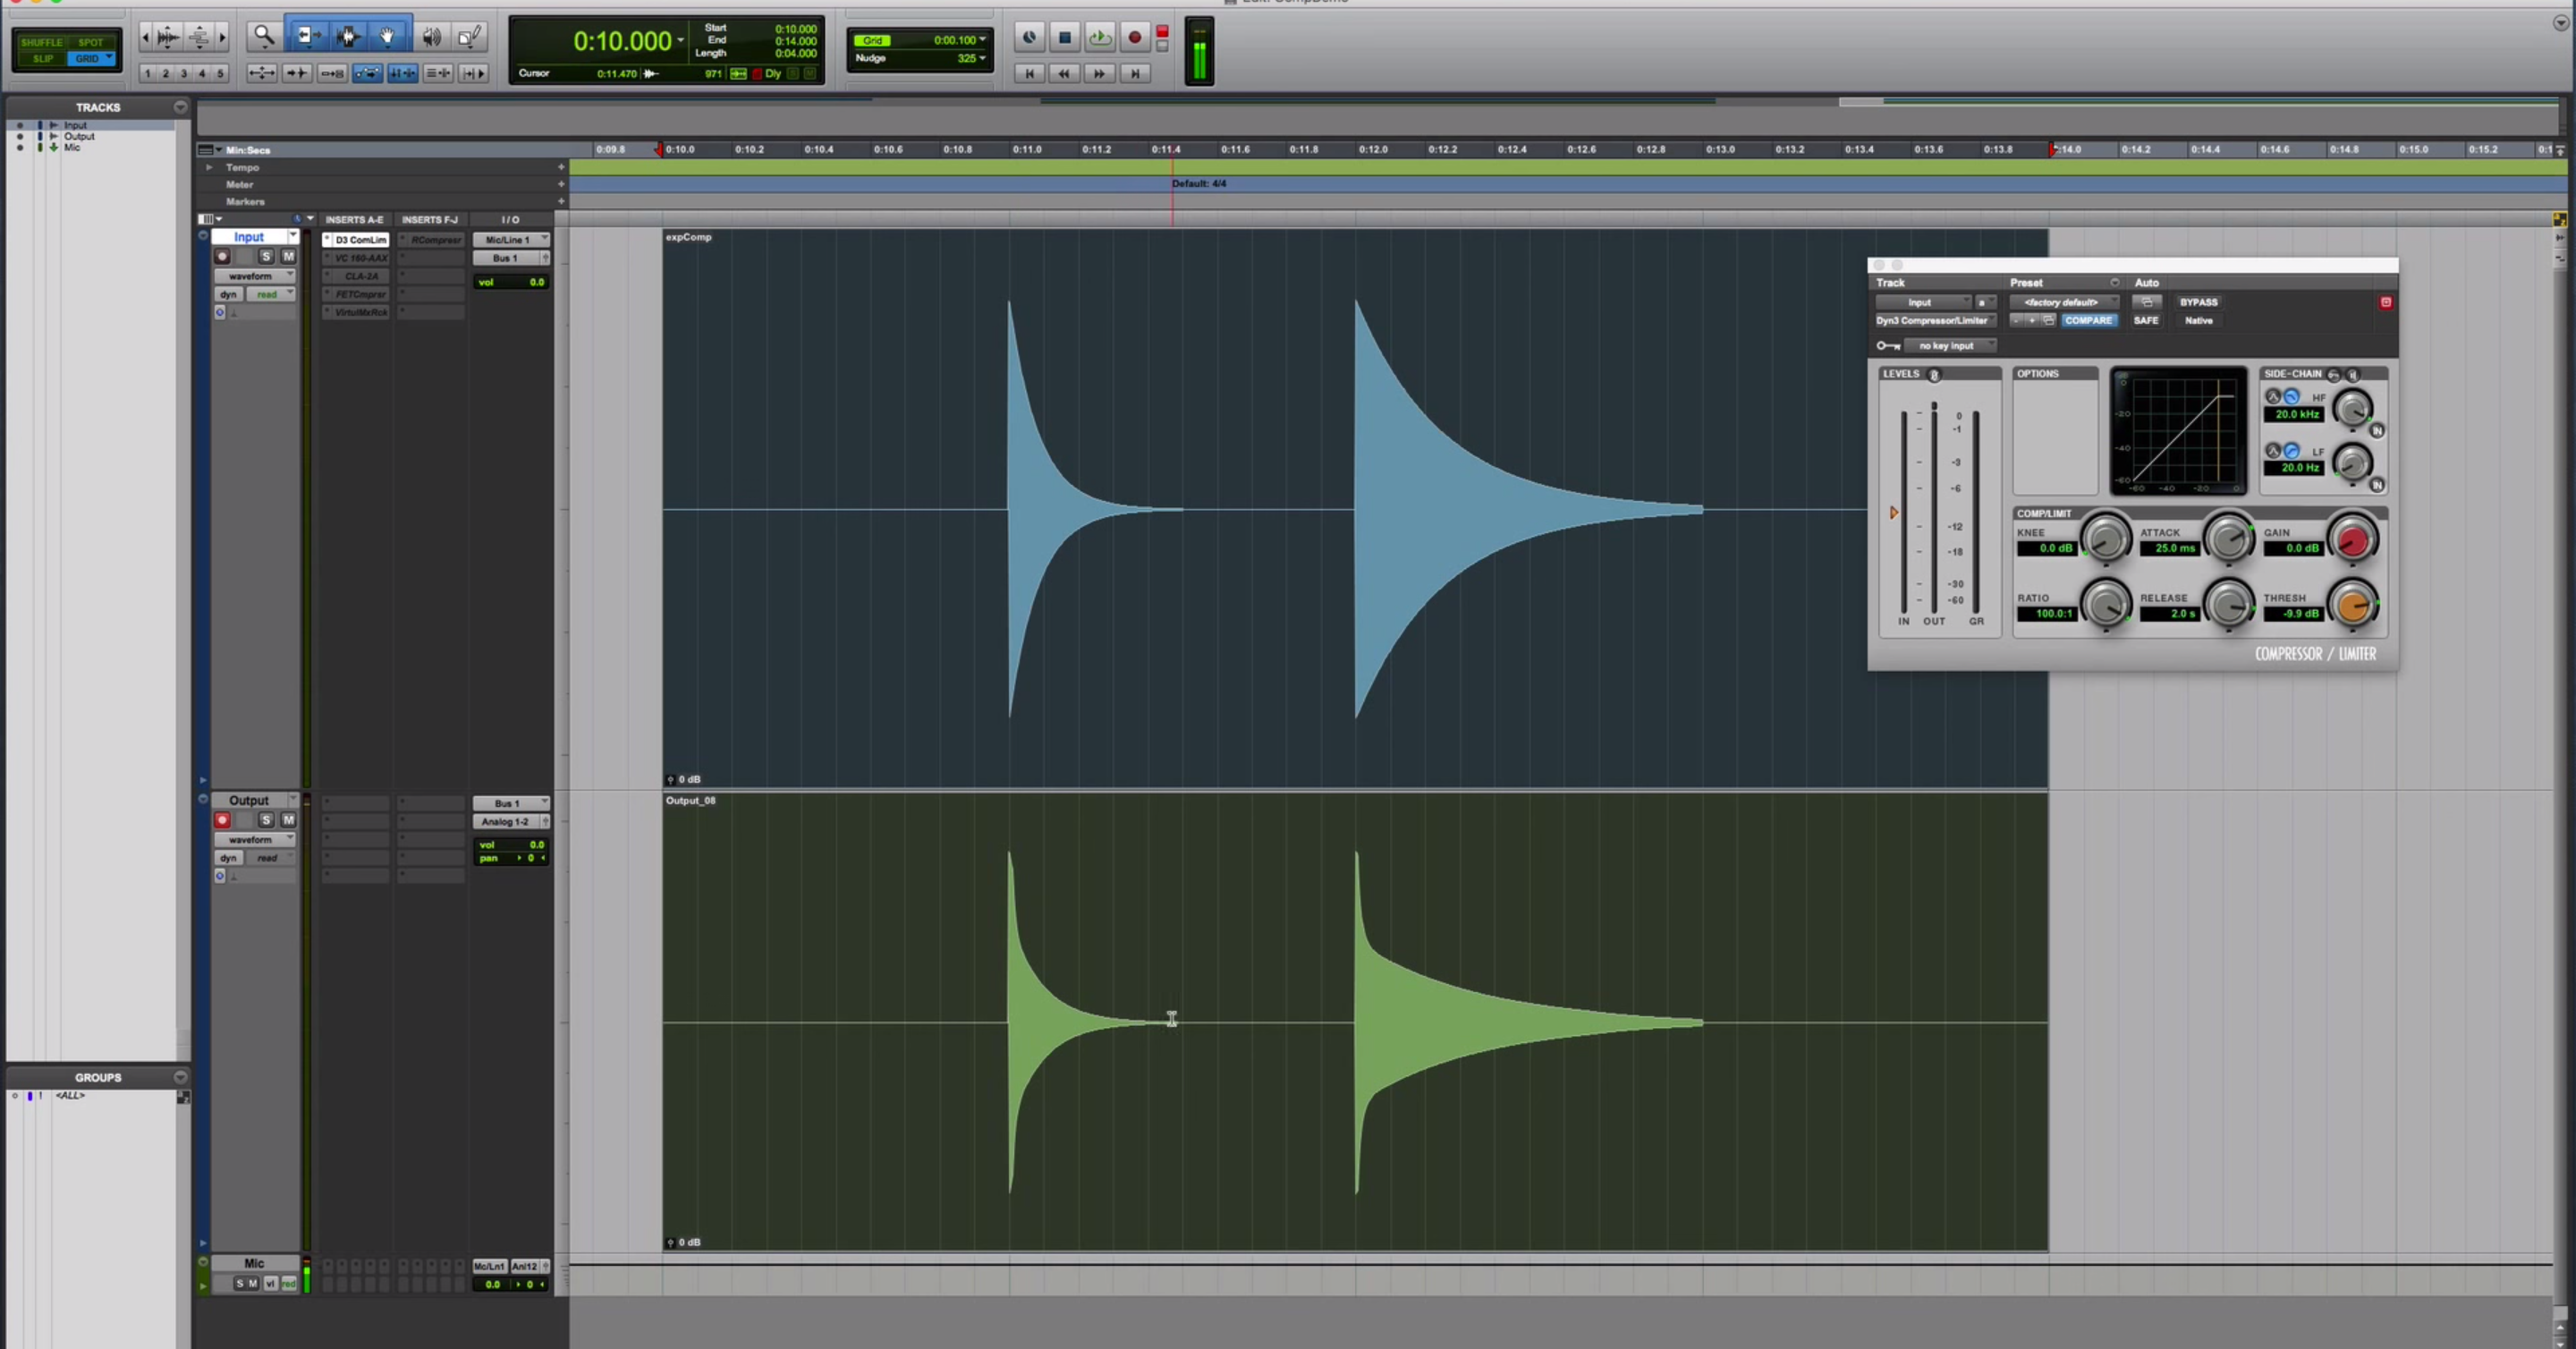
So, let’s go ahead and print some signals. I’ve got these sound files – or these test signals – loaded in on this track up here at the top called “input.” I’m going to send these signals through various compressors that I’ve got inserted over here. Then I’ve bussed the output from the input track over here to the output track, where I made the input of this the buss.
So I can record this signal and visualize what happens to it after it gets processed by this compressor. So for instance, if I just dial up some attack time here of 300 milliseconds and then a release of one second, I’ve got it setup here as a ratio of 100:1, or in limiting mode. You’ll see that I’ve got the threshold set over here so that part of the signal goes above, and part of the signal goes below. So go ahead and print this and you can see how it looks.
Let me get this out of the way.
Alright, so I’ve taken my stair step input signal, I’ve printed through the compressor, and you can see with an attack time of 300 milliseconds and a release time of one second what this kind of signal is going to look like after it gets compressed.
So, we have some time at the beginning where the amplitude is not changed, but then we have this smooth ramp that happens based on this attack time that I set. So it doesn’t transition linearly, and it also has a constant time at the beginning, it has a smooth transition there, until it reaches its final limiting stage.
So I’ve also got these grid lines here. Hopefully you can see this in the video on YouTube. These grid lines are every 10 milliseconds, so there’s 10 divisions here between time second one and time second two. That should give you a better idea about seeing when the attack time and release times actually occur.
So now when the signal drops below the threshold, I’ve got the release set here at one second. You can see the transition that happens where this part of the signal is actually being reduced in amplitude until it reaches it’s final steady state level.
So, I can manipulate some of these things – parameters – and see what happens. So keep in mind here, I’ll first manipulate the release time, and watch, if I lengthen it, what ends up occurring, and then if I shorten it. So I can go ahead and print this one again quickly and move it to four seconds which is the maximum.
Watch the transition now.
Okay, so the transition takes a longer period of time. I can shorten it up.
You can see that the release time now is much shorter at the beginning relative to this one second of signal. Let me go back to one second here. Should be 1,000 milliseconds.
Great. Now let’s look at the attack time. I have it set at the maximum right now. Let’s shorten that one down to around 100 milliseconds. Let’s see what that one ends up looking like.
Shorten it a little bit more down to a few milliseconds.
Alright. You can see that the attack now is going very quickly to settle on the steady state level. I can zoom in and I can see the transition that’s occurring very, very quickly here. Why don’t I crank the attack all the way down to it’s fastest setting and have a look at this.
Alright. So even at 10 microseconds, you can see the transition that ends up happening.
Why don’t I experiment with some of these things over on the sine wave so we can actually listen to them as well? So I’ll back this one off and we can listen to the sine wave and what it’s going to sound like.
[sine wave]
Alright. So you can see the transition that occurs over here. This time, why don’t I speed up the attack, and look at the different ratios here.
So, I’ll start out at limiting.
[sine wave]
Now, watch what happens when I back off the ratio. You’ll see that this level, instead of being at the actual threshold of my compressor, it’s going to move up a little bit more. So how about 10:1 to begin with.
[sine wave]
Still a lot of compression taking place. But I get into this range of 3:1…
[sine wave]
…and down to one and a half.
[sine wave plays]
Right. The compression becomes less dramatic. There’s less gain reduction that’s occurring. The different attack and release times stay constant, but you can see how much gain reduction is going to take place at one point five versus limiting.
Alright. What I’d like to do next is move on and show you different types of popular compressors, and give you a side-by-side comparison, and show you how they’re going to work.
So I’ll go ahead and make this stock plug-in inactive and bring up my first one. This is a plug-in from Softube and Native Instruments. This is a dbx 160 style compressor. Here you have a threshold, and then you also have the compression ratio, but here you don’t have the attack and release times. Those things are hidden and happening behind the scenes for you. You can’t really set them.
So if you want to understand the attack and release times of this compressor, well, you can use a test signal to get a better idea about how they’re going to work. So why don’t I send the sound wave signal through it first and have an idea about what it’s going to do? [sine wave plays]
Alright. So with this type of compressor, you’re stuck with whatever the attack and release times are, or how it’s going to sound, but you can manipulate compression ratios, so I’ll back that off a little bit and see how that’s going to work.
[sine wave plays]
Alright. Similar to how the ratio setting was changing with the other plug-in, the main parameter that you can adjust here along with the ratio is the threshold. So you can lower it, you can raise it up so that you can change what part of the signal is going to be compressed versus not compressed.
Alright, so let me go ahead and move on from the dbx 160 and show you the LA2A style compressor.
So, here’s one from Waves. It’s the CLA-2A. I’ve already dialed in the peak reduction and make-up gain for this one here, and then I can manipulate compression and limiting settings, but we don’t have attack and release, so we can visualize what this is going to do and listen to it as well. Let me select this.
[sine wave plays]
So, the LA-2A is known for having a little bit longer attack time. If I zoom in here, you can see my signal and how it’s going to transition from the original level down to its compressed level, then look at the release time.
LA-2A is known for having a long release, and that’s being demonstrated here by the fact that it takes at least a full second for it to transition, if not more, back to its release level.
So that’s your LA-2A style compressor. A little bit different than a dbx. Certainly a longer release time here, and the attack time is a little bit different as well. So, we disable this one, and bring up an 1176 style.
So this is the FET compressor from Softube. I setup the input – now, in this case, there is no threshold setting that you can set, so I’m just working right now with the input so that this part – the first part of my signal is above the threshold, and this part is below. Then I can manipulate ratio, attack, and release.
So I’ll start out really fast attack and release and look how this one is going to do.
[sine wave plays]
So, right at the beginning, it’s going to grab that transient very, very quickly. Very fast attack time. If this is 1/1,000th of a second, then you can see that right off the bat, it’s going to grab that transient very quickly. I can also back off this attack time and you can see what it’s going to do.
[sine wave plays]
Just a little bit slower. It’s always – with an 1176 – going to be pretty quick on the attack time, so even if I go to the slowest setting on the attack, you can see…
[sine wave plays]
It’s still only a few cycles before the compressor really grabs on to it.
You can also lengthen the release. Slow that down.
[sine wave plays]
You can see that the release can be very, very long. See how the transition is occurring for over one second right here? Even around a ratio of 8.
[sine wave plays]
It’s still taking a very long time to recover. So, it can change dramatically how it’s going to sound.
Now, I’m going to bump up the ratio here to maybe 12:1 and increase the attack here. One thing about the FET compressor to know, or an 1176 style, is typically, when you manipulate the ratio, it’s also used to manipulate the threshold.
So, if you have a button 1176 where you have a different ratio that you press by a button, those things can manipulate what the threshold level is.
[sine wave plays]
So even though I’m here at a level of 12:1, you can see what’s going to happen here with the transition from uncompressed to compressed.
Alright, the last one I’ll demonstrate, if this is the 1176, is another popular one. I think it’s – it’s not based off one specific compressor, but maybe a combination of several types of compressors.
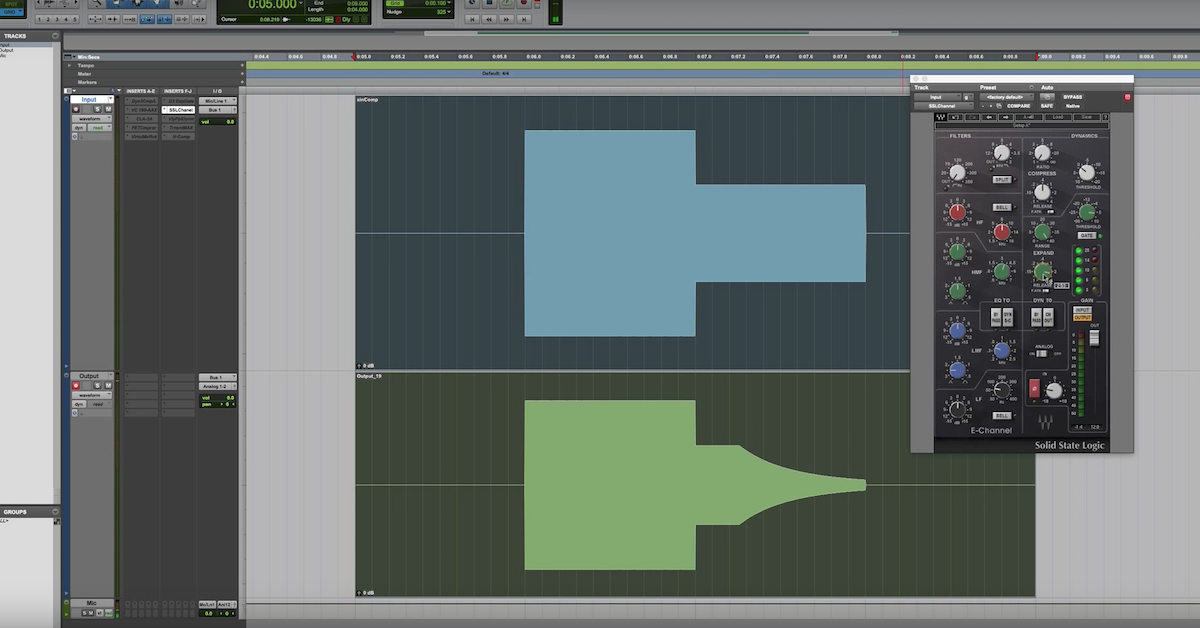
This is the FG-401 from Slate Digital. It has a cool thing that happens with the transformer. You can dial in the threshold, attack, and release. All of these things ahead of time. And I can listen to the signal after it goes through this type of processor. So, here we go.
[sine wave]
So this is pretty fast attack for the signal here at the beginning. Just a few cycles before we start to transition. This is on a medium attack time for this compressor. I can even speed it up and look at how fast it can go.
And slow it down. Look at the release time. It’s happening currently very quickly.
[sine wave]
See how much longer it’s going to take here. The one thing I noticed that’s kind of unique about this particular plug-in compared to some of the other ones that I was doing is that with this transformer button engaged, it actually starts to create some kind of these ripples here in the signal.
If I zoom in on it, you can see there’s maybe some ripples that start to occur in the signal. I’ll have to do some investigating to see exactly what’s going on there.
But, if I turn this transformer off, what ends up happening is it’s much more smooth. Much more like the stock plug-in.
[sine wave plays]
Right? Not as many ripples or anything like that going on here as the signal starts to settle down.
So, without further investigations, it’s kind of difficult to say what exactly is going on. Nonetheless, you can visually see that there’s some different things that are happening to the signal when you engage that transformer button.
I hope that this video gave you some better ideas about how a compressor works, how you can visualize what it’s going to do to a signal, and then also, side-by-side, what’s the difference between an 1176 versus an LA-2A? Is the long release time of the LA-2A, what does that actually look like when you send a test signal through it that has a constant amplitude? So, until next time. Take care guys, and stay tuned for more videos coming up here in the near future!
Elevate Your Ears