Using Virtual Instruments in Logic Pro X
10/15/2017

Of course, this doesn’t only apply to electronic music. Lots of rock music now will have virtual instruments, whether that’s electric keys, maybe it’s drum samples, or even using complete drum replacement. There’s loads of drummers where you’ll need to use this, so today what you’re going to learn is how to start using virtual instruments. We’re going to go over some of the basic instruments within Logic, so you can begin writing music straight away.
Now, if you enjoy this video, check out the other free videos in this series here on YouTube, and also check out the full course. There’s a link to that below this video, and inside there, we’re going to go into loads more depth on Logic Pro and cover literally everything, but for now, let’s crack on.
So it’s important to know more about the software instruments and synthesizers available in Logic before you start learning about recording and working with MIDI. If you’re working with any electronic music or genre, this is going to be really important, or if you’re working with any genre of music where you want to include, say, for example, even just one or two synthesizer parts, you need to be familiar with the software instruments that come with Logic and the synthesizers that come with Logic.
So first of all, we’re just going to go ahead and create a software instrument. Default patch is fine, and in the future, you can set it here so that it goes straight to the right synth, and open library. Let’s create. So a few things here. First of all, we see the musical typing window has appeared. You can access this any time with Command+K, or by going to window and Hide Musical Typing and then let’s turn that back on.
What this allows us to do is to use our computer keyboard like a musical keyboard. So by pressing the corresponding keys here…
[keyboard]
You can play your music. And this is really handy if you’re composing on the fly on your laptop, and you just want to play a part in. This is also really handy if your USB keyboard isn’t plugged in or isn’t accessible, and you just want to test out different sounds, because what we can do now is using the library, which is accessible here, we can go for and explore different sounds. So you can see there’s loads of different categories, and within each category, you have different sounds as well.
So let’s just try something a bit different.
[keys]
And then we can try clav.
[clav]
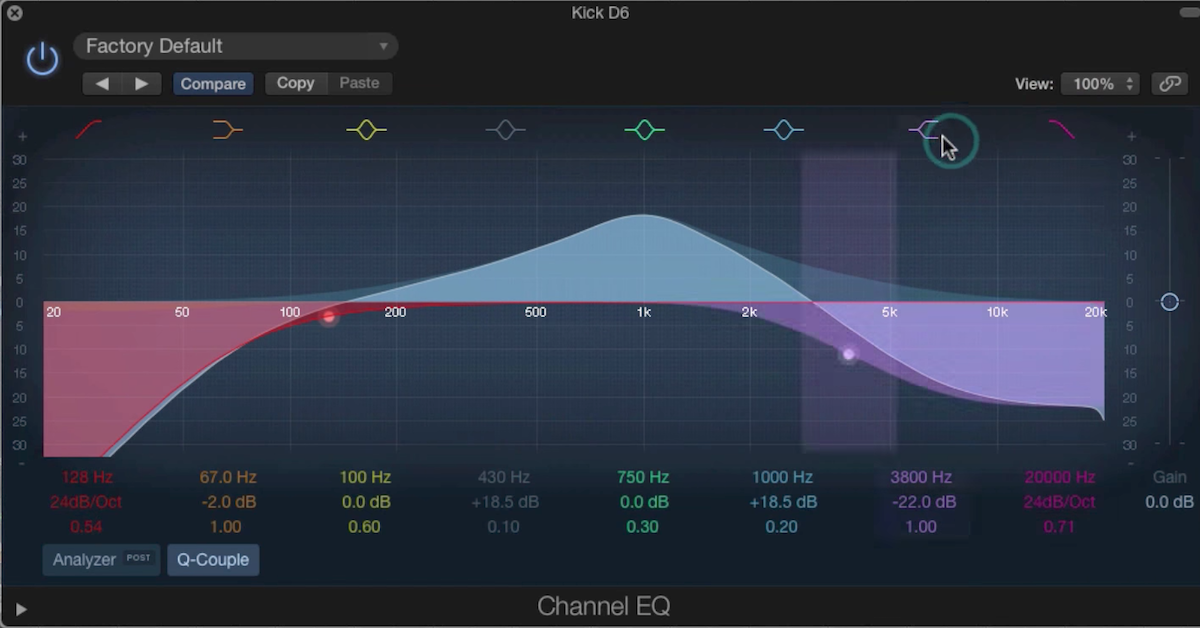
And what you’ll notice is this doesn’t just change the instrument, which you can see here, it also adds EQ, it adds sends, so now if we go to our mixer by pressing X, or if we turn off the musical keyboard with X, you’ll see it’s also created two new sends, one called Small Room, and that’s a reverb, and I have one called Large Hall, so this is actually a mixture of two different reverbs that are being sent.
So just to recap from earlier, a buss will just send a duplicate of this channel — another version of this channel to wherever you route it to. So buss one is going to — the input here is buss 1, so that’s going through EQ, and then buss 2 is going to here. So let’s turn those up and have a listen.
If we just quickly record some MIDI, and we’re going to talk more about this in another lesson.
[click track, recording MIDI]
Excuse my poor playing, and now let’s just loop that and listen to what happens when I adjust these sends.
So we can hear, that’s a small room, and this is a large room.
[synth with reverb]
And then the EQ here has already been set to a slight curve for us.
[synth with reverb, adjusting EQ]
Of course, you can play with that as much as you want, and the same with the clav.
[clav]
So you can play around with the sounds yourself and get loads of cool, different…
[clav]
But the easiest way, if you just want to get to a sound, is to use this library and kind of find what you’re looking for. So a lead synth, a festival lead for example.
[festival lead synth]
And you see this time, we’ve even got a stereo delay, similar two busses. One’s an ambience, and one’s a larger reverb. Let’s have a look at them. So that’s quite a short reverb, and that’s a really long reverb.
So there’s so many sounds there, and I recommend that you pick a sound in the library.
[synth]
And then you can edit it to kind of your preferences.
[synth]
So that sounds kind of horrible. But you get the idea, you can go through and now edit these plugins and change the sound.
So to use a synthesizer to create your own sounds, or to use a more traditional synthesizer, you can turn off the library, and we can create a new track. We could do it on this track, but let’s make a new one. Another software instrument. And this time, we’re actually going to go to the synthesizer. This will create an ES2 synth for us.
So now we can open that synthesizer…
[ES2 synth]
And now we’ve got a more traditional…
[ES2 synth]
Synthesizer, and you could also do it by just changing it here, so if I decided instead, I wanted to use a different one, I could just change the input like so.
When you’re working with sounds as well, you can click on the channel, and then you can actually access the library for any one of these plugins, and this applies to audio channels as well. So if I want to pick a EQ preset, I simply hit that, and now this is going to give me a load of EQ presets in the library, or I could click the arrow next to delay, and now we’ve got loads of delay presets, or phaser. And now it gives me phaser presets.
So the library is really handy if you want to just quickly navigate to something that works and then tweak from there. I recommend using presets, because it can save you quite a lot of time. Over time, you can create your own presets. So I can add my own here by going save, and now I’ve got my own preset here. So you can create your own over time, but that can save you a lot of time and energy when you start using the same settings over and over again, it’s worth creating presets, and if you’re new to it all, start off with the presets to kind of get you into the right starting area, and then tweak from there.
Of course, you can also access presets at any time by going to the dropdown box within the plugin and choosing a preset there.
I hope you enjoyed that. You’re ready now to go and implement this and start playing around with those virtual instruments, which is super fun just seeing what you can come up with, seeing what music you can create, and playing around with the different sounds.
Now, be sure to check out the other videos in this free series, and if you want to go in more depth with Logic Pro X, and you want a complete guide how to use this great software, then check out the course in the link below, especially if you want to skip all the wasted time and frustration that goes into learning a new piece of software.
But either way, thanks for watching, and I’ll see you again soon.
Elevate Your Ears