How to Quickly Replace Drums in Logic Pro X
09/24/2017

This feature allows you to really quickly and easily replace drums with samples, or add samples underneath drum recordings to just give them a boost. This is such a common practice today in music, and it’s a really good thing to do, especially if you’re recording at home or in a less than ideal environment. What you can do is record a drum kit, close mic the snare and the kick, and then down the line you can keep the overheads, but you can either replace that snare with a sample so that it’s perfect every time and it sounds great, and you can do the same with the kick, or what you can do is you can just add a sample underneath if you don’t want to completely replace it, or you think it’s not going to sound natural enough, just add a sample underneath that supports it. Then you still have the dynamics of the mic, but you get the body, or the crack, or the overall quality of the snare sample, and again, same for the kick.
Now, this feature for Logic Pro makes it really easy to do this. You can do it in seconds. In most other DAWs like Pro Tools, you can even do this manually by copy and pasting it on every transient, which we don’t want to do, because that’s going to take loads of time, or you can purchase the plugin that will do this for you, like Slate Trigger.
But Logic Pro comes with this built in, which is great. So I’m going to show you how to use that to improve the sound of your drums, and in turn, improve the overall quality of your mixes. If you do enjoy this video, be sure to check out the full course. There’s a link in the description below. We’re going to go into so much more depth into all of these features and how to use Logic Pro to produce great mixes, but for now, let’s jump into Logic, and take a look at this powerful feature.
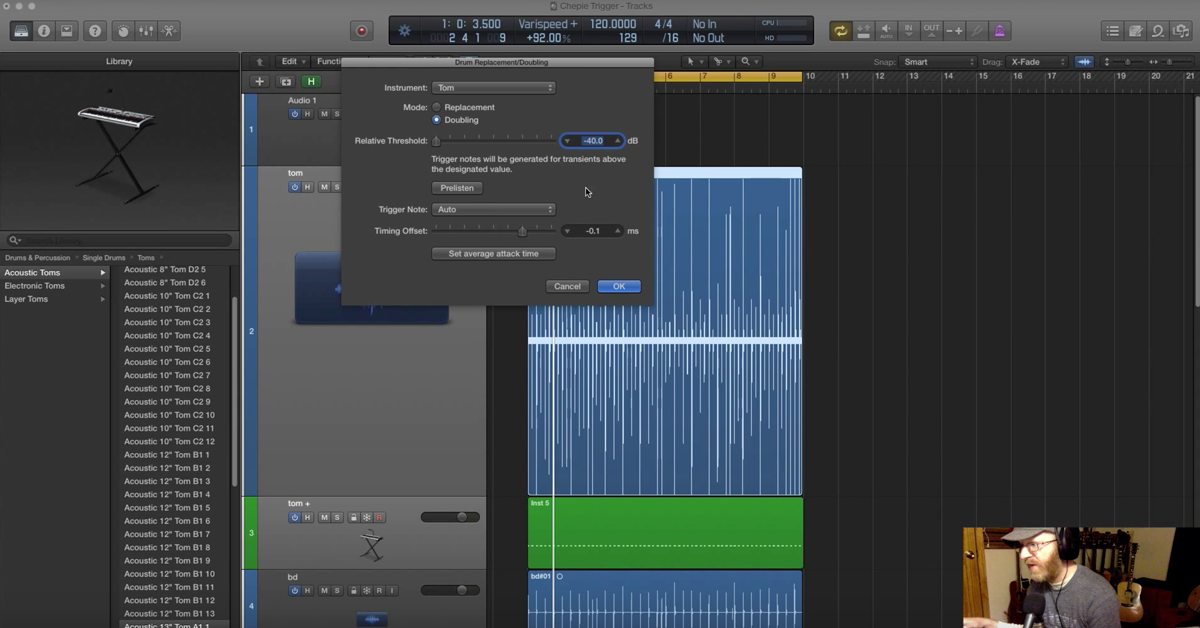
So let’s go to Track, and Replace or Double Drum Track. You can do Alt+D. First of all, what we’re going to do is actually replace it. So we’re going to hit Replacement, and then what we’re going to do now is have a listen to these snares.
[drums]
So once you’ve found the snare that you like by sampling through these, just leave that selected. I quite like this one, it’s got a lot of crack to it.
[snare, then full drums]
Great. And now what we’re going to do is in this window here, we’re going to address some of these options. Now, the most important option you have here is the relative threshold, and this dictates at what point it counts the hit. So in here, the transients on here, as the snare hit. So when it’s really high, at 0 dB, none of our snares are hitting hard enough to trigger that. When it’s really low, every little sound — so the bleed from the kick, and probably the toms and the hi-hat, are being kind of measured as a snare hit.
So what we’re going to do instead is tune it so it’s only on these big hits, and some of these kind of ghost hits here as well. So now we can see that all of these big hits, yup, there’s a MIDI marker on each of them, and then each of these ghost hits, there’s also a MIDI marker there. So let’s have a listen.
[drums]
So you can hear those ones are quite a bit quieter. So just make sure that they’re being triggered as well, because if not, you’ll only get the loudest ones. Which can be fine. Sometimes you might want that. You might just want to add a sample on the loudest snares, and not the ghost notes, but I’m going to do the ghost notes too.
Trigger note, we’re just going to leave to auto, then time and offset also at zero. Then we hit okay. What you’ll notice now is that it’s muted the original track because we hit replacement, and it’s added a new track with the EXS24 sampler. It’s loaded up the sample that we wanted. If we take a look at that, we see our sample here.
[drums]
So I’m not sure where the… It’s probably around there somewhere. So now we can have a listen to that on its own.
[snare sample]
Obviously, it sounds quite repetitive, because it’s the same velocity every time. Then when we add it in underneath the overheads, because what we’re actually doing now is replacing the snare. So let’s mute the bottom snare as well.
[drums]
Because we’re getting some snare from the overhead, it doesn’t sound too fake.
[drums]
Just adding a lot of presence. Let’s just turn that hi-hat down, that’s quite annoying. Let’s do that. Just give these a quick mix. Bring down the overheads, then let’s bring up the snare. Let’s add some gain on here, just make it louder.
[drums]
Overheads should be in stereo. So that’s without the snare, then we bring it back in.
[drums]
And then of course, you can EQ it to taste. Let’s bring this back down. We might want a bit less crack.
[EQing snare]
Something like that. So that’s one way. That’s replacement, and that’s really good if you’ve recorded in a really bad room, for example, and you want to replace most of the close mics, you want to replace the snare, and then of course we could also replace the kick, and then just have the overheads up for dynamics, but just have them quite low.
And then what you can do is just go into this and play with the velocity a bit if you want to. So we could actually select some of these and adjust the velocity like so.
[drums]
So you could go through, and when you’re replacing all of the drums, that’s good practice. You need to spend a lot of time being very meticulous and trying to make it sound as human as possible. Of course, because it’s MIDI, we can also quantize it, but then it’s going to be perfectly on the beat, which might sound a bit too inhuman, but there we go.
Now, if you want to just tuck it in underneath, in the original settings, we could’ve said, “doubling” rather than replacement. But all it’s done is just turned off our original, so we can turn that back on.
Now what we can do is balance the natural snares, we’ve got a snare top and a snare bottom, and then just bring this one in for a bit more crack, or a bit more body, whatever kind of sample you went for. So let’s listen with the original snare.
[drums and snare]
Then we can bring this in to add a different character.
[drums]
Cool. So that’s going to increase the volume, so then you have to balance all of these. And of course, we might want to add a different characteristic of sound, so if you want to add a different sample, we can just click on this little arrow here. That’ll take us to the library with the samples.
Then we could try something slightly different. So we could either us a whole snare, or these ones, layer snares, are made for this purpose exactly. So if we want to add more body or more transient, we can do that. Let’s test some of these.
[snare samples]
So they’re sometimes good for when you’re creating your own snare, and you do want to layer lots and lots of samples, but I think I actually prefer just layering normal acoustic snares, so now let’s try that.
[drums]
Of course, what we can also do is instead of using the EXS24 sampler, we could just use a different kit or snare altogether. So we can go to drum kit, and then we can pick one of the drummer kits, and it’ll automatically use the snare from that. So let’s try SoCal. Let’s have a listen to that.
[SoCal kit]
And then we can try something a bit heavier.
[Heavy drum snare]
So that’s a really important part of modern production, especially if you’re working in a home studio. Using samples can really help to add more attack, more body, or a kind of more professional sounds to your snares, and your kicks, and your toms. A lot of the time, toms don’t necessarily need it. The most common way to replace drums is just the kick and the snare, but that can make a huge difference to your mix.
That feature there makes it just so easy that there’s no excuse not to, really.
So there you go. Go and try this. Give it a go. Even if you just tuck a sample in underneath your kick or snare, really quietly, just see how it improves your mixes. Practice using this feature, first of all, so later on, if it comes to a point where you’re like, “Ah, I need to replace this,” You’re going to be able to do it really quickly.
But I actually recommend you just try this, just to improve the quality of your work as well, especially if you record at home or in a small studio where maybe the acoustics aren’t ideal. Just adding that sample in underneath, which can take seconds, with this feature, you can make a huge improvement to the overall quality of your mixes.
If you found this video useful, you’re going to love the full course. There’s a link in the description below, and inside that, there’s over ten hours of video content where we just go through every single feature, every single element of Logic Pro in depth, so you can get to grips with all of this, use Logic Pro efficiently, so you can focus on your music and the stuff that really matters.
But either way, thanks for watching, be sure to check out the other free videos as part of this series, I’m Rob Mayzes of musicianonamission.com, and I’ll see you again soon!
Elevate Your Ears