6 Mistakes to Avoid for Layering Drums
04/26/2021
Article Content
The process of layering (otherwise referred to as augmenting) and even replacing drums entirely can be credited to legendary engineer Roger Nichols, who first used the technique in 1979 when working on the Steely Dan album “Gaucho.” Nichols had been experimenting with the idea of sampling drum hits for layering and replacement for several years at that point — he had initially purchased a COMPAL-80 computer in 1976, and by 1978 he called his sampling drum machine “Wendel.” Nichols recorded individual drum hits (which included kick, snare, toms and other percussion sounds) using a 3M digital mastering system, sampled at 50 kHz with a depth of 16-bits. These samples, which were stored on cartridges and then loaded into Wendel, could be triggered via audio signals from tape machines, a feed from a console, a drum machine or other means. Wendel allowed the user to alter the pitch of the samples and even to use two separate snare samples to simulate how a human drummer plays with two hands.
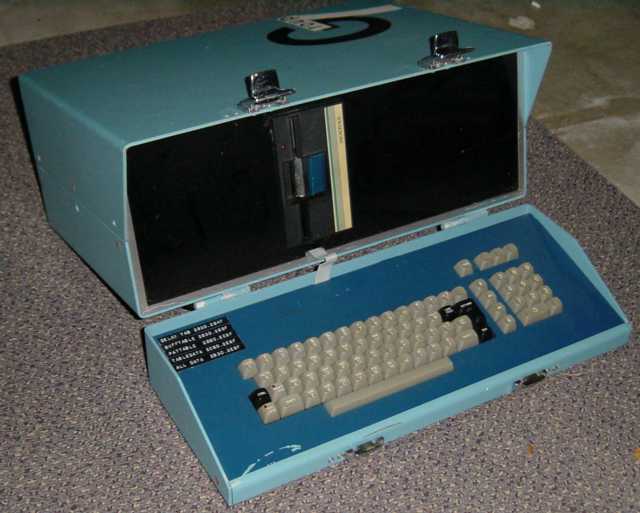
Nichols’ Drum Sampler and replacement Computer “Wendel” in 1978.
Some of Nichols’ own descriptions of individual samples are as follows:
SN1-B: The SN1-B cartridge is a deep ballad type snare drum. Plenty of low end, lots of crisp snares. If the amount of tone contained in this snare bothers you, then notch out 6 dB or so at 320 Hz.
KH-2: Kick drum two. A tight kick drum with plenty of snap on the leading edge. Don’t let this one fool you. There is tons of bottom end in this kick drum. A lot of it is below 100 Hz.
HH-2a and Ho1: Closed hi-hat. Nice hi-hat. Cute hi-hat. The open hi-hat, when used in conjunction with the closed hi-hat, HH2a, you can track and replace open-closed hi-hat patterns that were generated by a drum machine.

The “Wendel” Editing Screen in 1984.
After use on Steely Dan’s “Hey Nineteen,” Wendel and its successors “Wendel II” and “Wendel Jr.” saw extensive use by music producers and was utilized on records by some of the biggest musical acts of the 1980s including Pink Floyd, Stevie Wonder, Diana Ross, Miles Davis, Neil Young, Huey Lewis and many, many more. It can’t be overstated how Nichols’ invention changed the process of music production, allowing levels of fidelity and creativity in drum and percussion tracks that had never been achieved before. Although Nichols passed away in 2011, his legacy of engineering excellence lives on in the records he was a part of and in his innovations.
I do drum layering and/or replacement on a good percentage of the records I work on. While it’s always nice to come across a record that has drums that were engineered in such a way that no layering is needed, even the best recordings can benefit from the added punch, depth and character that can be achieved with drum augmentation. Before we get into mistakes to avoid, allow me to walk through my process:
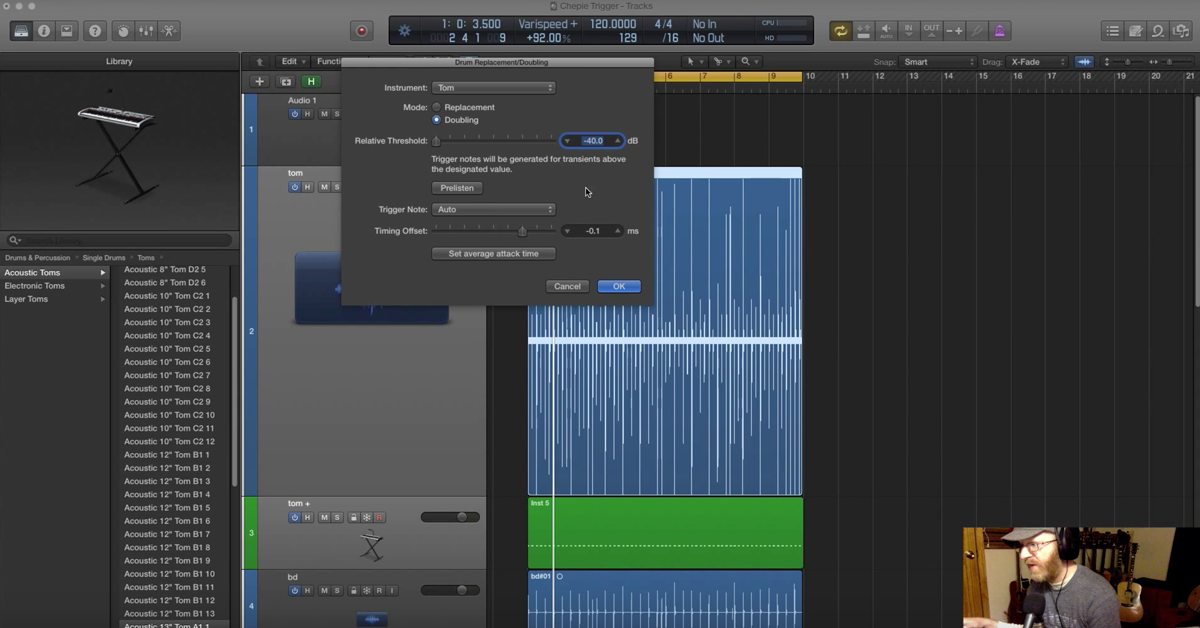
There are several great drum replacement and augmentation software plugins available including Addictive Trigger from XLN Audio, Trigger from Steven Slate Drums, Superior Drummer 3 from Toontrack, Drumagog from WaveMachine Labs and more. DAWs including Logic even have built-in features that allow you to augment and replace original drums. I personally use a combination of Addictive Trigger/Addictive Drums 2 and Massey DRT. I utilize Massey DRT specifically to analyze drum tracks and then create MIDI regions which will then trigger whatever I want from my very large (too large, to be honest) collection of samples.

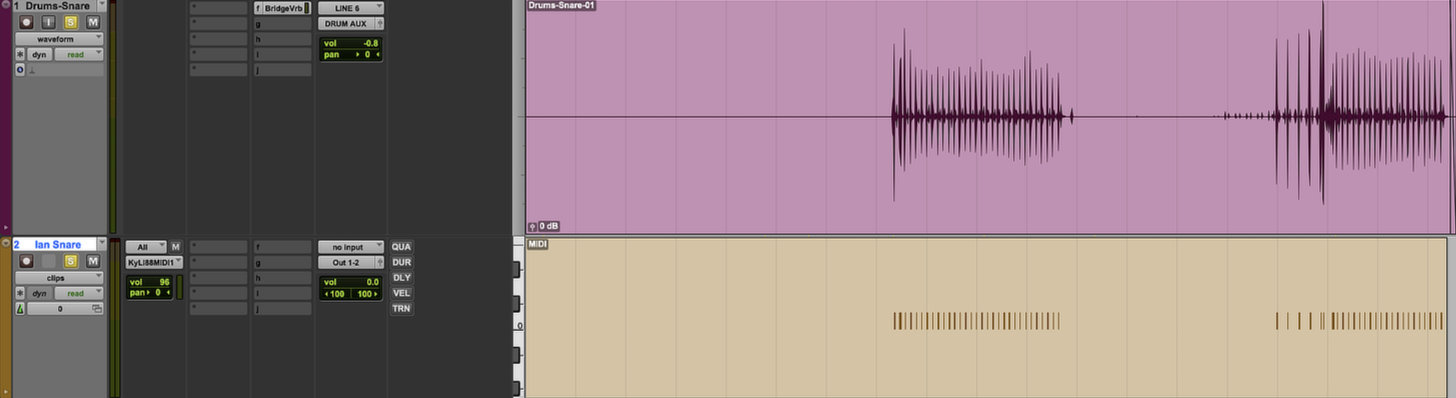
A recording of a Snare Drum in Pro Tools.
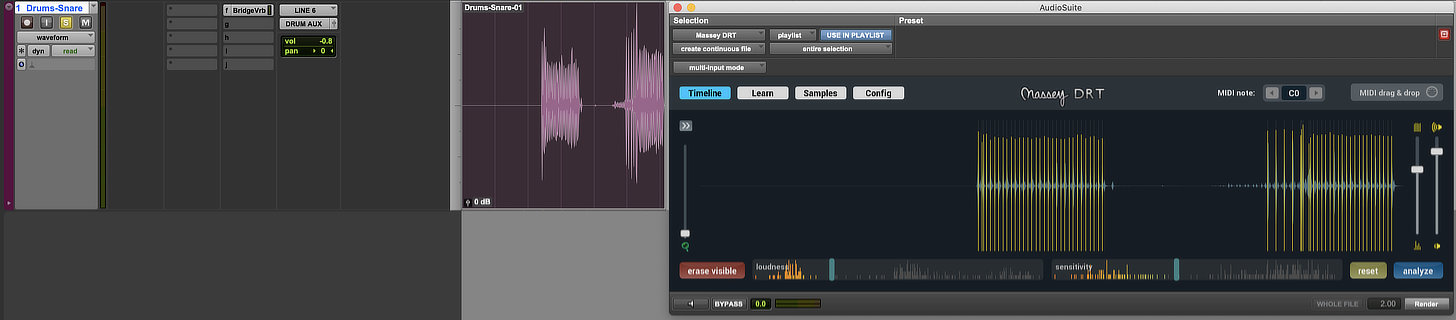
Using Massey DRT to analyze the transients of the recording.
After using the MIDI Drag and Drop feature in Massey DRT to bring the MIDI information onto a new instrument track.
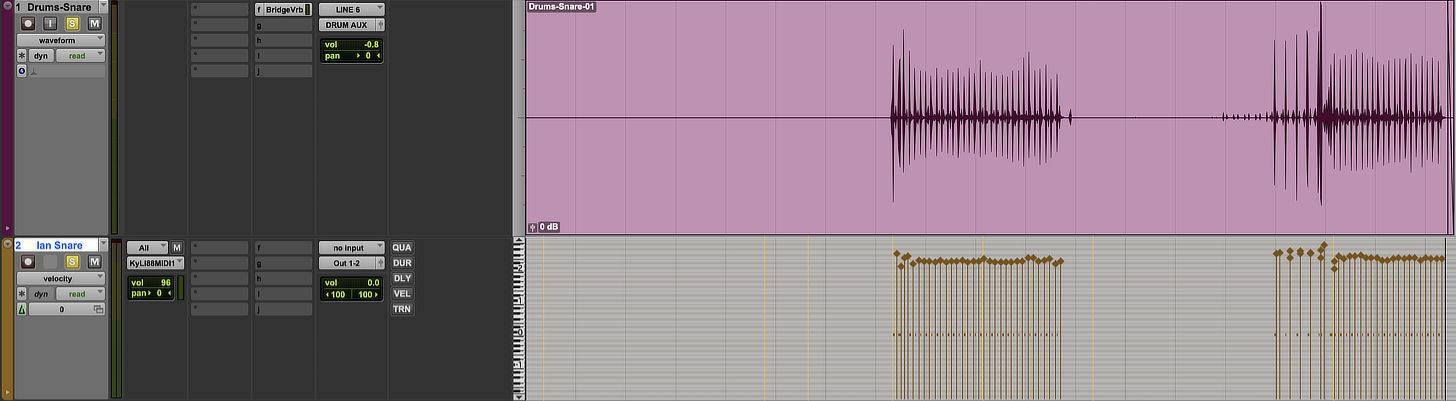
Note how the velocities of individual hits are embedded into the MIDI. This ensures a dynamic, humanistic-sounding performance.
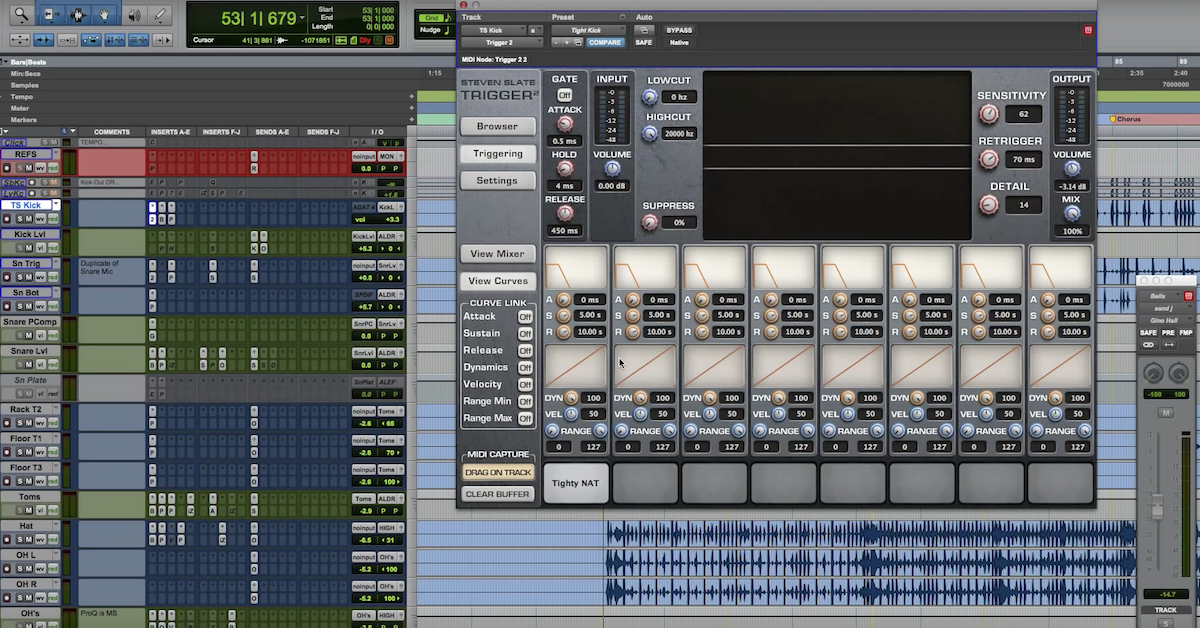
XLN Audio Addictive Trigger 2 is more of an all-in-one solution. Not only can it create trigger points, one can also select and manipulate individual drum sounds. The amount of flexibility is staggering, and you have access to numerous high-quality effects including compression, saturation, equalization and more, as well as the ability to blend the different microphone signals that were used when the samples were recorded. So if you want your kick to have more room than overheads, you have control over those individual levels. You can even control the amount of snare bleed into the other drums, as well as control over the top/bottom snare drum microphone balance. XLN Audio has released many ADPacks (Addictive Drums Packs) that include genres like pop, hip-hop, metal and more, and I’ve found that it feels very much like having access to an actual drummer. This isn’t only due to the superb sound quality, but the incredibly flexible user interface.
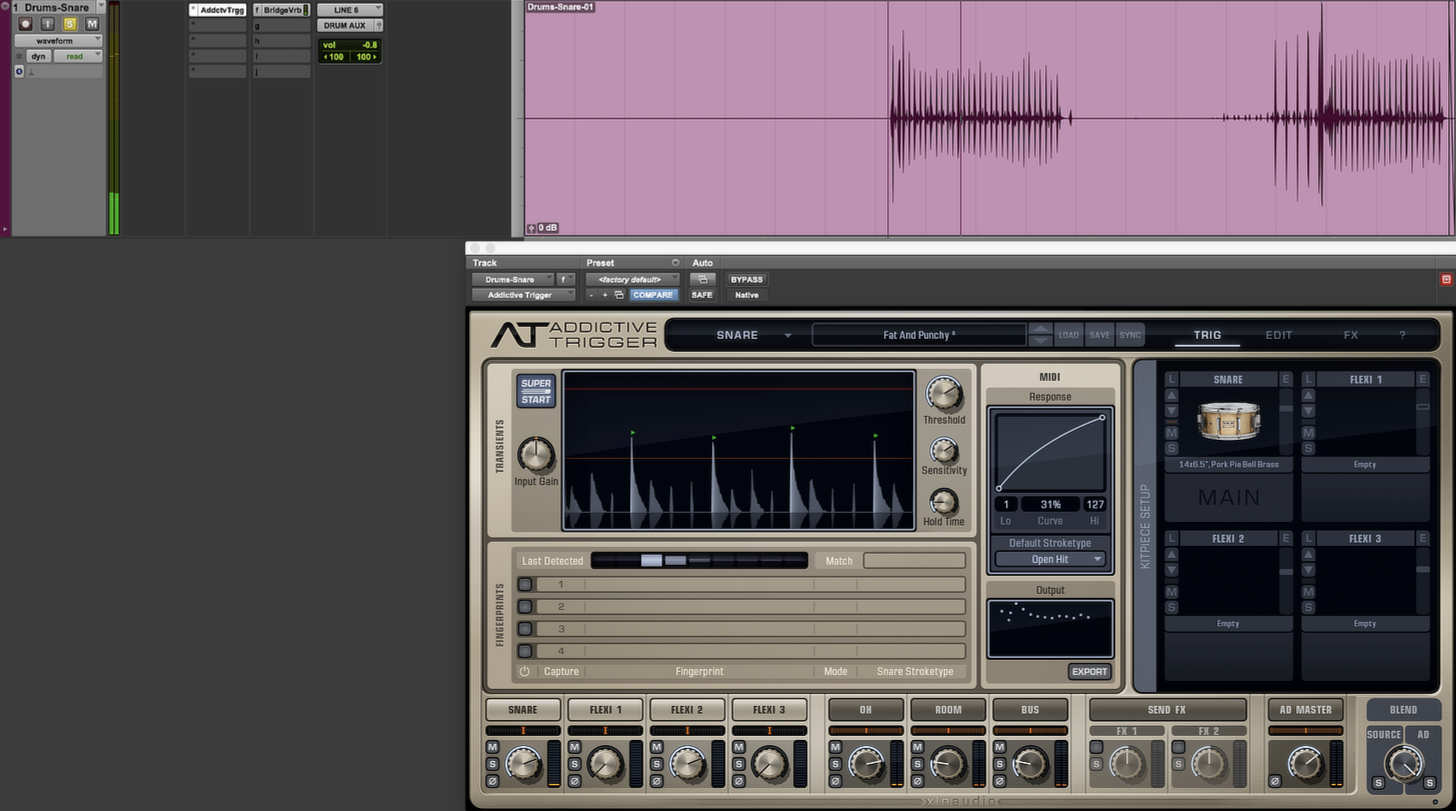
Using Addictive Trigger to augment a snare recording.
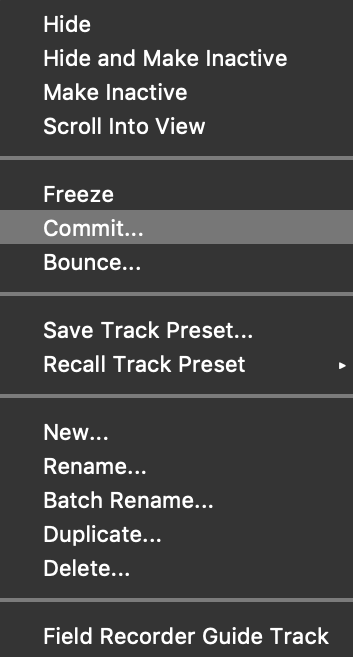
Using the “commit” feature in Pro Tools to render a snare layer.

The snare is now rendered to an audio clip and can be mixed with whatever processing you desire.
Here are 6 mistakes to avoid when layering drums.
1. Not Considering Phase and Polarity
There is perhaps nothing more important than being sure that when layering samples that your drums are aligned correctly. Phase is a time-based concept. If it’s not considered when layering samples, it can negatively affect the overall punch of the drums and result in flammy-sounding drum hits due to the transients occurring at slightly different times. The key here is zooming in using your DAW and making sure that the beginnings of the waveforms are occurring as simultaneously as possible on the timeline.
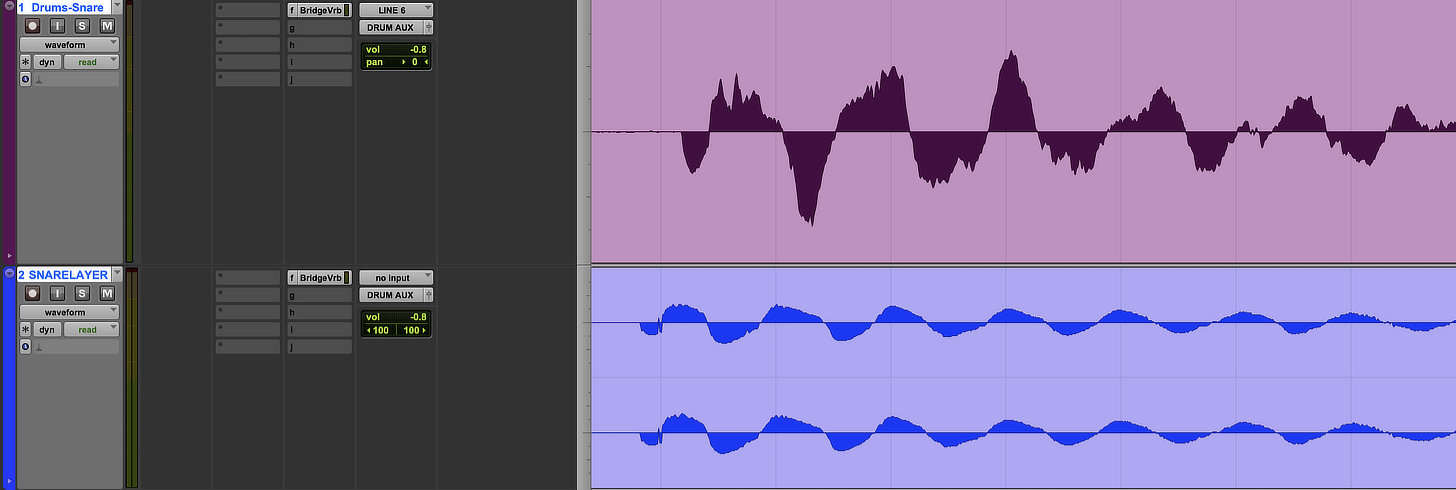
A layered snare (in blue) that was printed before the original snare. This will result in a “flammy” sound.
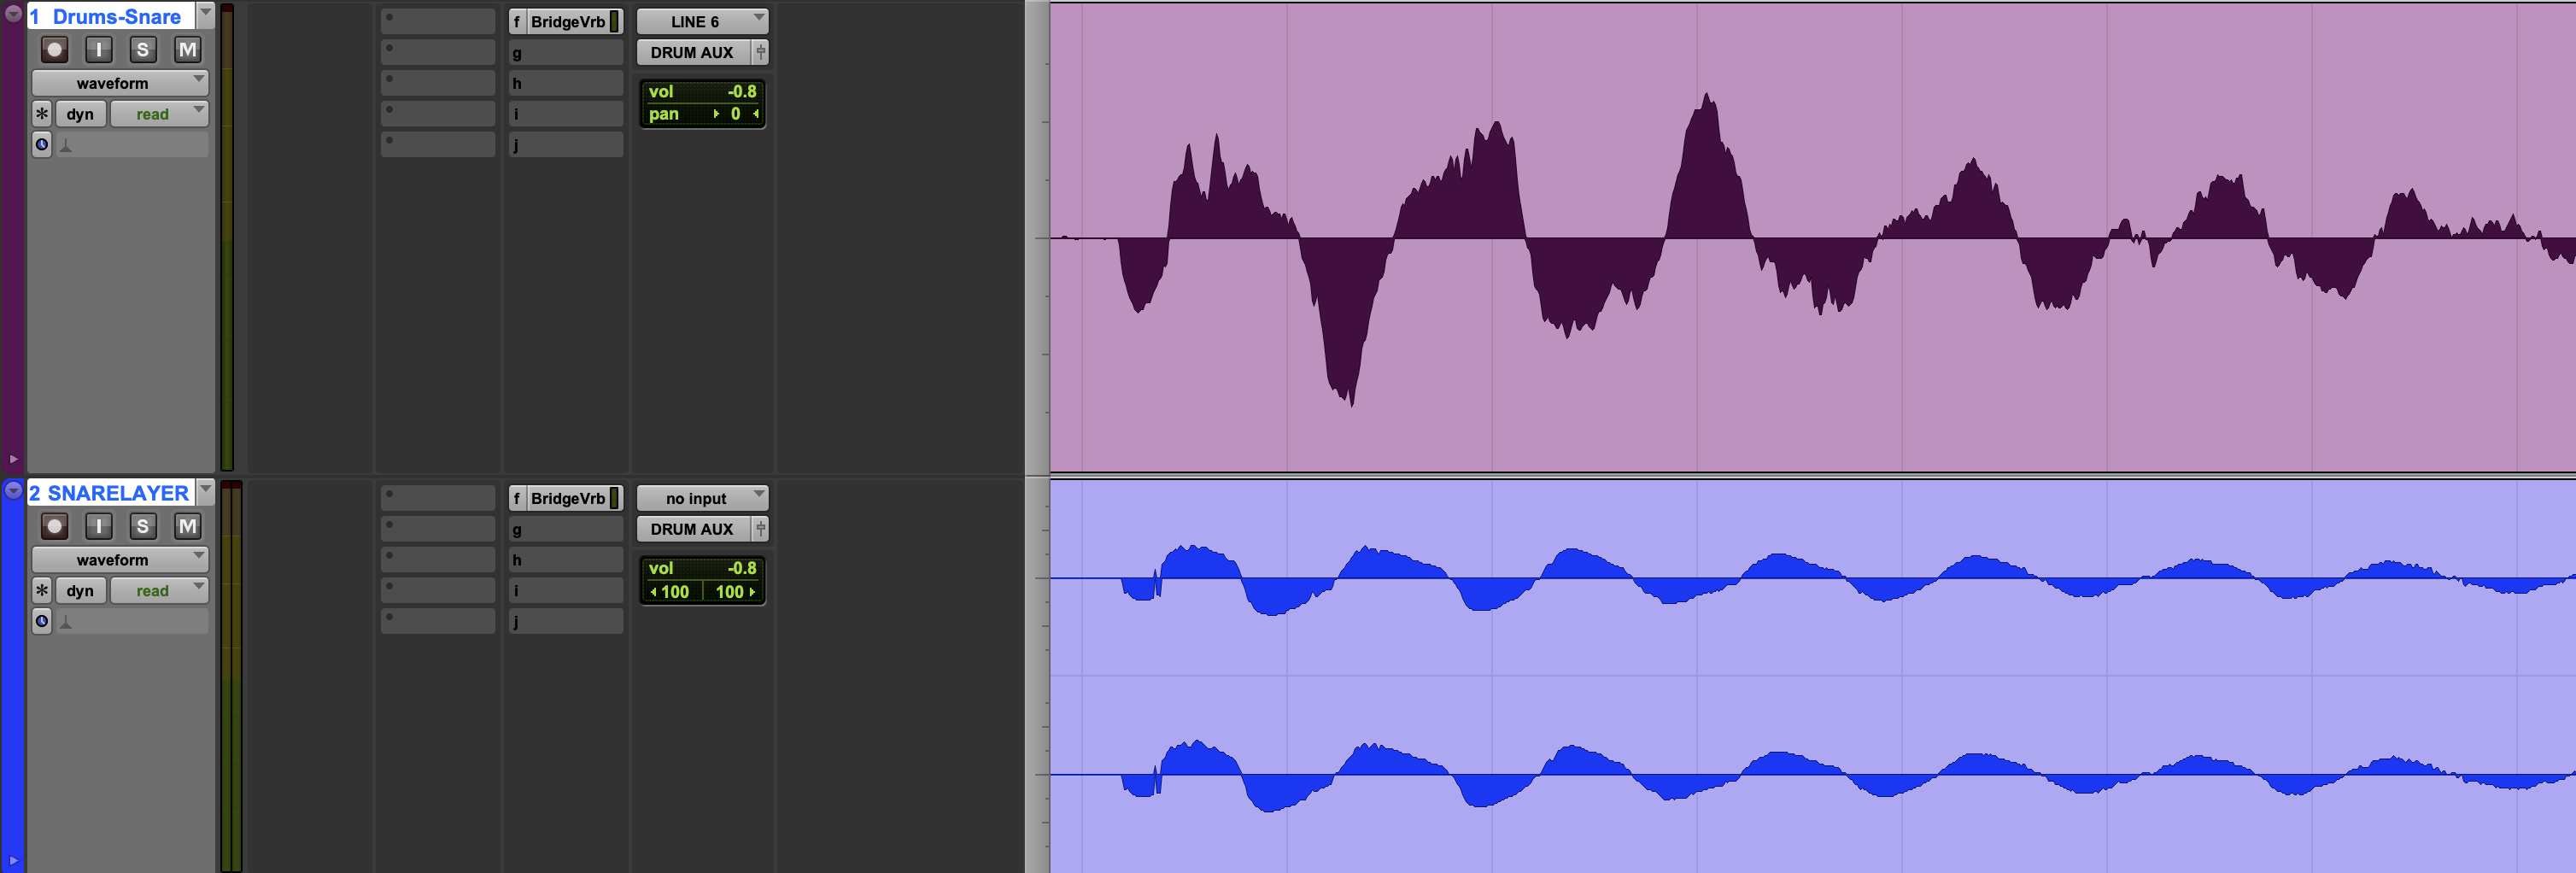
After phase alignment.
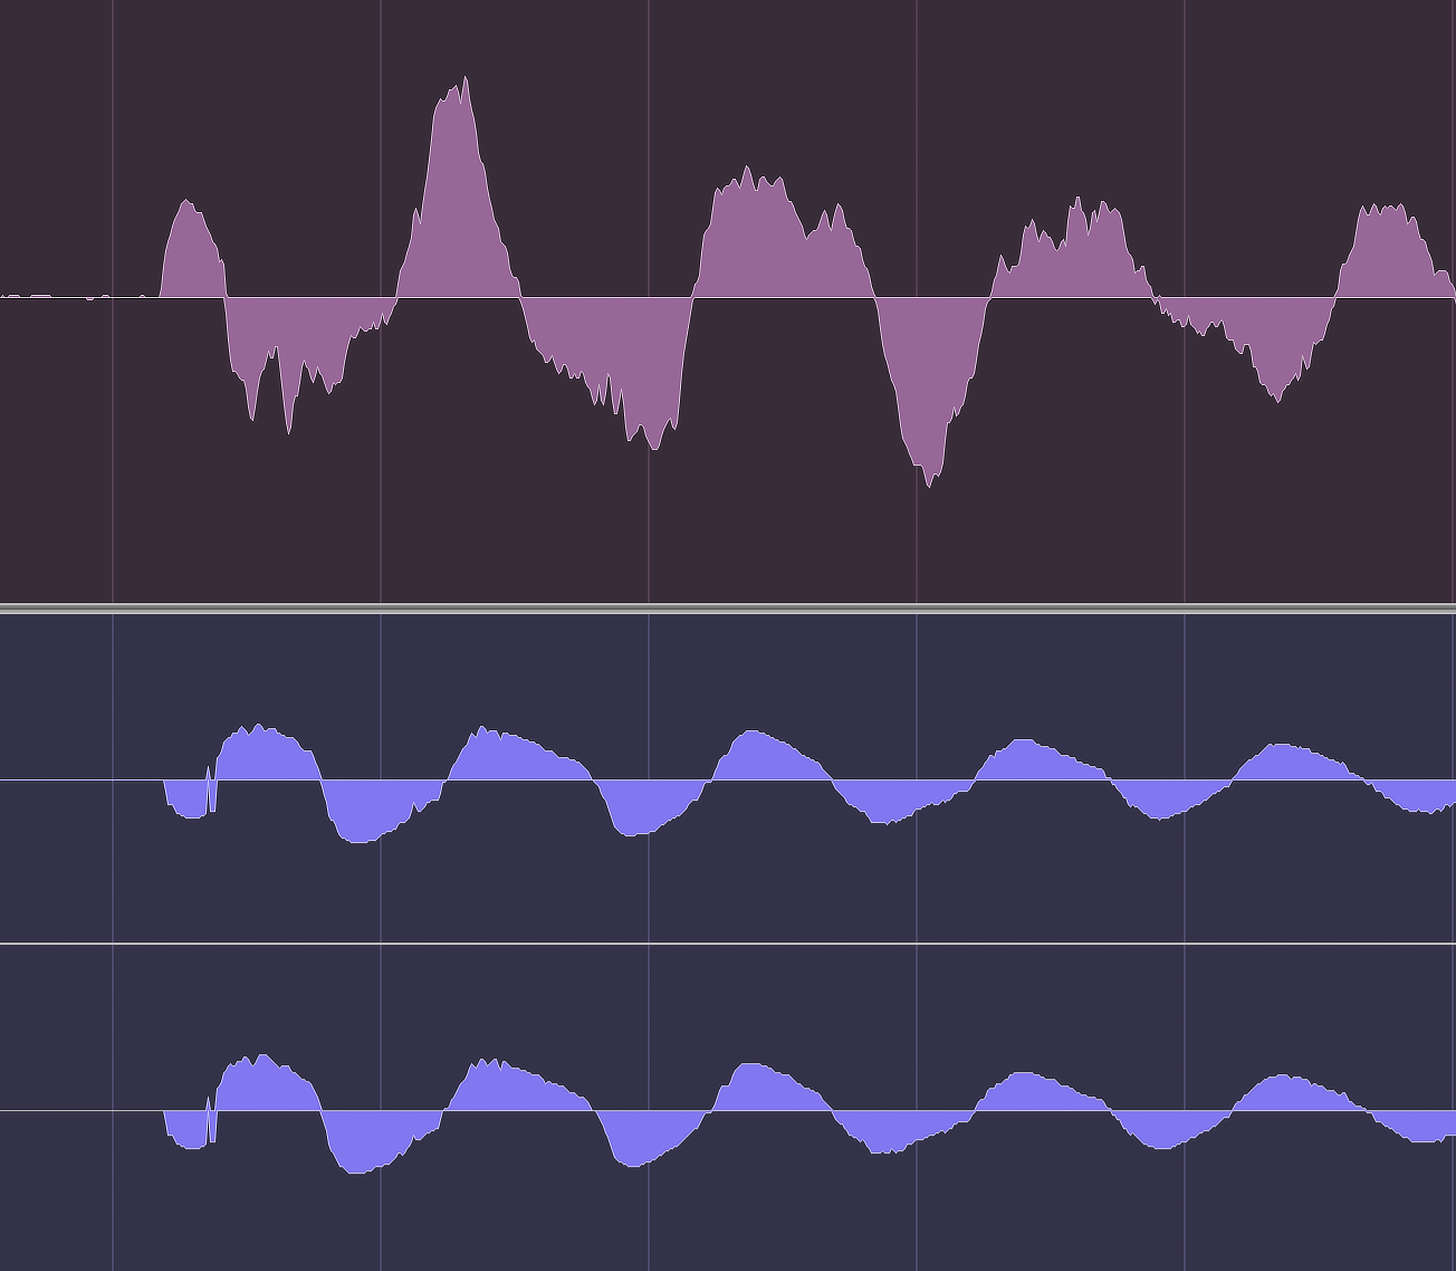
Before inverting the polarity of the layered snare. Note the discrepancies between the compressions and rarefactions of the waveforms.
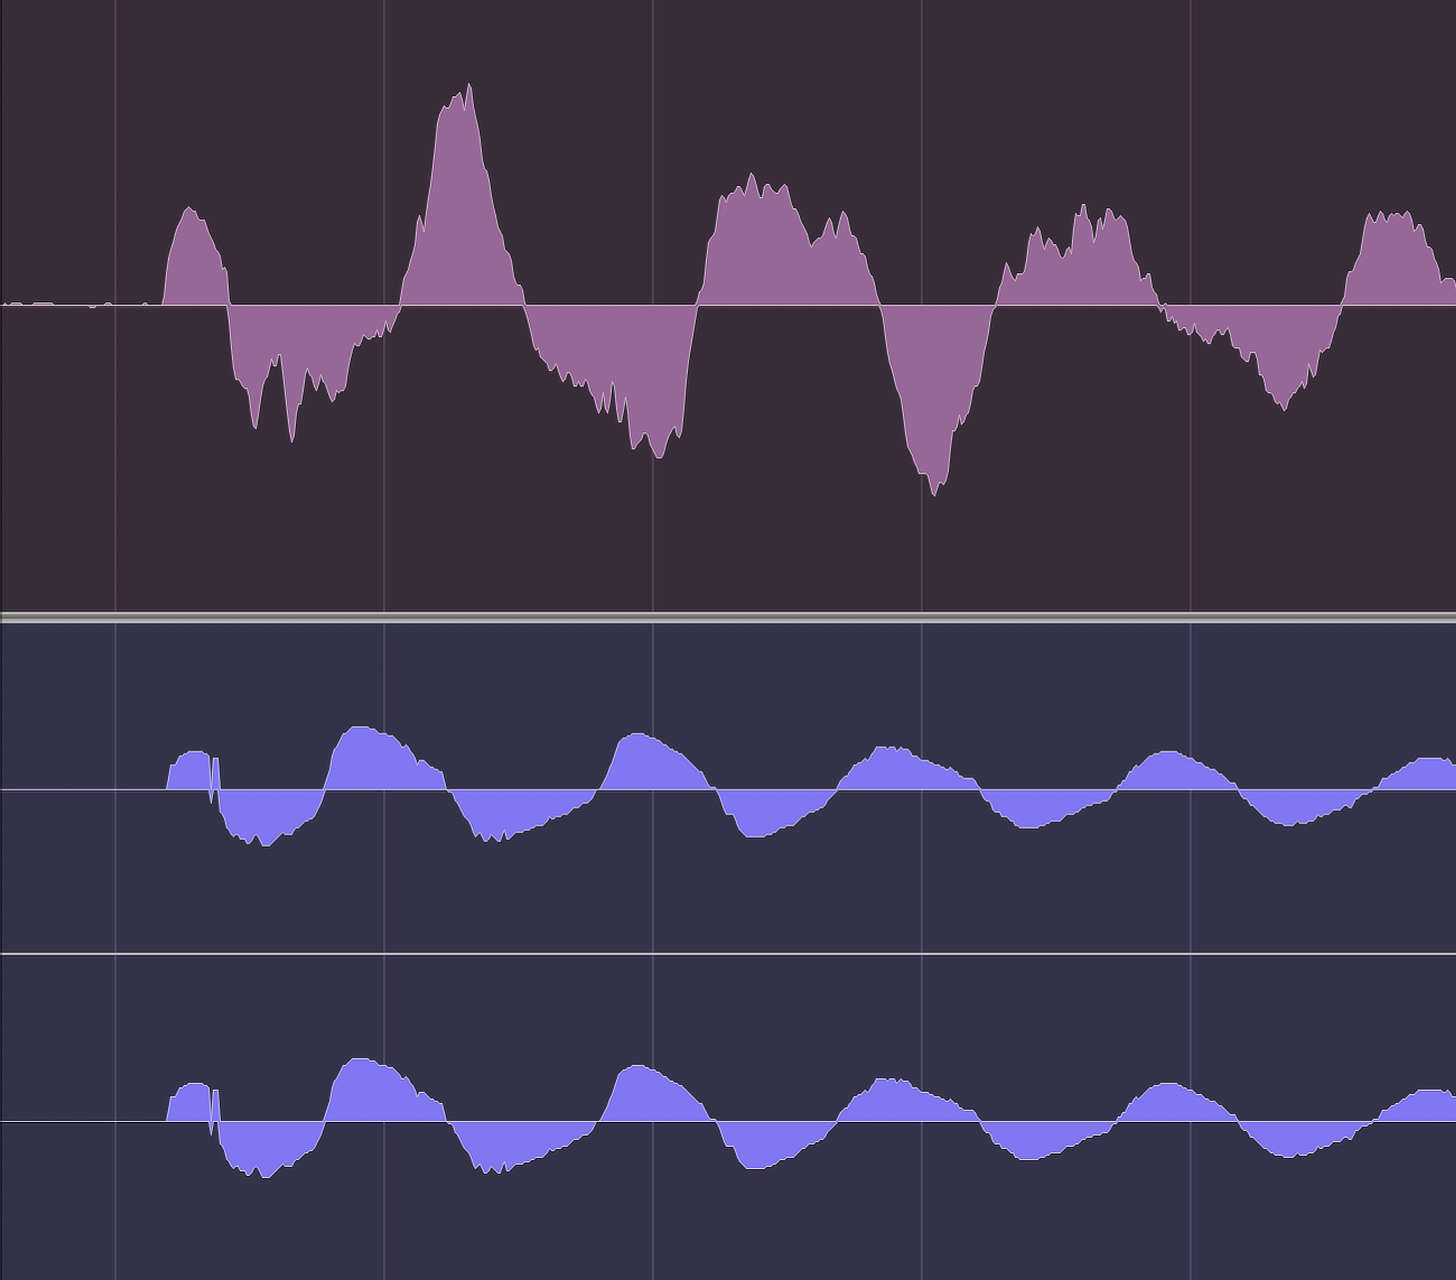
After inverting the polarity of the layered snare.
Every sound wave has two components: a compression and a rarefaction, with the former referring to when the air particles are compressed together, and the latter being where the air particles are spread out. When viewing a waveform, the compression will be seen as the sound wave going in an upward motion, resulting in a crest like that of an actual wave of water, whereas the rarefaction will move in a downward motion, resulting in a trough. It is essential when layering drums to be sure that the compressions and rarefactions of the multiple layers are occurring simultaneously. If not, all sorts of sonic gnarlyness can occur. Most notably, deficiencies in the low frequency response can happen once the two (or more) layers are combined.
As a mixing engineer who receives multitrack sessions from producers, it is incredibly common for there to be both phase and polarity issues between layers. It may sound obsessive (because it is) but I go through and inspect each and every drum hit to be sure that the relationships between layers are on point. If not, I’ll chop up the regions and nudge individual hits until they are perfect.
2. Not Considering Pitch
Some producers go to great lengths when matching the pitch of their samples to that of the original drum, going as far as placing a tuner on the original drum and subsequent layered sample(s). Honestly it’s a pretty ingenious idea if you’re the obsessive type. While this is important when layering something like toms (that do sound as if they have an apparent musical note to their tonality), I am a bit less precious about pitch when layering snare and kick drums. I will certainly tune samples to work sympathetically with whatever they are laid on top of, but sometimes a slightly pitched up or down sound is just what is needed for the combined drum sound to cut through the mix. That said, you should always be considering the pitch of the original drum and the pitch of whatever samples are layered on top.

Ready to elevate your ears?
It doesn’t have to take years to train your ears.
Get started today — and you’ll be amazed at how quickly using Quiztones for just a few minutes a day will improve your mixes, recordings, and productions!
3. Not Considering Space
Sometimes I’ll layer in samples specifically for the sense of space that they add to the overall drum sound. Let’s say the drums I’ve been given to work with were miked using close mics and rooms/overheads, but the sound of the snare in the distant microphones leaves something to be desired. In this case, I’ll find (or design) a roomy snare sound to blend in with the others. Conversely, sometimes the close-miked kick is lacking in intimacy. I’ll find a full, close-sounding kick to lay on top. The great thing about most drum VSTs including Addictive Drums 2, BFD3, or the many excellent software instruments from Native Instruments is that they include virtual mixers which allow for a precise degree of control over the space. Sometimes I’ll want my overheads to be in mono, other times I’ll need super wide room mics. With these VSTs, I can dial in the exact sense of space that my drums need.
Mix Tip
If you want all of the room and none of the punch of the drums you’re layering in, most VSTs have an attack control so that the initial transient is made less prominent. This effect can also be achieved by using compression with a fast attack setting.
4. Overdoing It
While I find the process of augmenting drums to be incredibly fun and creative, it’s easy to get heavy-handed with your samples. This ultimately could detract from the artist/producer’s vision. Try to limit yourself to 1-2 additional samples maximum per drum. In most cases, you’ll be able to design a punchy, spatially appropriate drum sound with a good tone using only a couple of extra layers. Anything more than that and you might not be using the right samples, or there are other mix issues that should be addressed first. Not only can adding multiple drum layers be both time and DSP-intensive, but the resulting sound might also be lacking in clarity and definition.
5. Not Applying Appropriate Processing to the Layers
Sometimes I’ll lay in a sample and it just works, but most of the time my samples will require the same type of tonal and dynamic sculpting that the original drums call for. Don’t be afraid to employ equalization to get your samples to play nice with the original drums, compression to achieve maximum punch and consistency, saturation to give the layers some attitude & character and whatever other types of processing they may need to fit well within the context of the mix.
6. Limiting Yourself to “Traditional” Sounds When Layering
Let’s say I’m working on layering a snare drum. I’m not simply trying to replace/augment using “better sounding” snare drum samples. I’m methodically analyzing what qualities already exist in the snare drum that I was provided and deciding what qualities can’t be embellished using tools such as EQ, compression, saturation, etc. As I mentioned, sometimes I need the snare to sit in a deeper sense of space, other times the snare has no body, other times it’s the attack (initial transient) that is deficient. It’s important to note that I won’t always use a snare sample to aid in bringing out these qualities. As I mentioned, in addition to several drum specific VSTs, I’ve got an extensive sample library that I’ve been building over the years. Using a sample that contains a very quick attack and decay (something like a synthesized cowbell) could very well be the element that I use to aid in embellishing the transient of the overall snare drum sound.
There are other times when I am given complete creative license, and while I’m technically hired to mix, it’s more like I am brought on to “remix.” In this event, I may choose drum samples that completely transform the sound of the individual drums.
Summary
To any aspiring mix engineers and producers, I would say that the ability to layer drums appropriately and effectively can “level up” the overall quality of your productions, and I suggest incorporating these aforementioned tips into your workflow.