A Guide to Essential Logic Pro Keyboard Shortcuts
07/2/2022
Article Content
Shortcuts are crucial to developing a fast and smooth workflow regardless of what DAW you are using. Repetitive tasks are the obvious choice for implementing shortcuts, as are basic navigation controls, transport controls, changing views or interfaces and more. The nature of the work might dictate the need for specific shortcuts — post production may require a different key set than music mixing or mastering. Often the need for a shortcut becomes apparent if you find yourself using the mouse to access the same menu item or button over and over again.
In the heat of the moment, you may not want to stop and look up a shortcut as it might disrupt your creative flow, and you’re probably right. Between projects is the perfect time to develop a personal list that you can print and ultimately memorize. While there are hundreds of shortcuts available in Logic Pro, what follows are some of my favorites that you may find useful.
Standard Mac Symbols
The standard Mac symbols for modifier keys used throughout this article are below. Memorizing these is a good idea since you will see them time and time again in most Mac application menus and in Logic Pro documentation.
⌘ is the command key
⌃ is the control key
⌥ is the option (alt) key
⇧ is the shift key
← is left arrow
→ is right arrow
↑ is up arrow
↓ is down arrow
↵ is return
␣ is space
⌦ is delete forward
NOTE: For clarity, I have used all capitol letters in brackets, such as [A] below, but there is no need to hold down the caps key unless explicitly stated.
Standard Mac Commands Used in Logic Pro
These are universal shortcuts typically reserved for use across all Mac systems and software.
[⌘ – C ] – copy selected clip or event to the clipboard
[⌘ – V ] – paste the contents of the clipboard
[⌘ – A ] – select all (depends on active window)
[⇧⌘ – V ] – paste and replace (replaces the selection with the contents of the clipboard)
[⌘ – Z ] – undo last command
[⇧⌘ – Z ] – redo last undo
[⌘ – S ] – save session
[⇧⌘ – S ] – save a copy of the session as…
Tool Menu
One nice feature of Logic Pro is the ability to quickly program easy access to two mouse tools at once. The tool menu has two identical palettes. On the right, the current mouse tool is displayed and on the left, the tool displayed is accessible by holding down the ⌘ key. This is great when you need repetitive alternating access to two different tools. To program the right side, press the letter [T] and the menu will open displaying all possible tools with a letter next to each. Choose the letter next to the tool you want to program and you’re done. So in this case with two keystrokes you can program the tool. For the [⌘] side of the menu, use the mouse to select the tool to be accessed by holding down the [⌘] key.
![]()

Other Toolbar Items
A few other toolbar-related items that are commonly needed include:
[ A ] – opens the automation menu and controls in each track
[⌘ – F ] – opens the flex editing controls
[ O ] – opens the loop browser
[⌃ ⌥ ⌘ – T ] – opens the expanded toolbar
[ I ] – opens the track inspector window
[ Y ] – opens the sound and patch library window
[ G ] – opens the global tracks
[ K ] – toggles the metronome
[ F ] – open browsers (lists, loops, media and notes)
[ ⌥ – C ] – show color palette
Editing Window Views
These commands will open the corresponding editing window at the bottom of the main window:
[ E ] – opens either the audio editor, piano roll editor or step sequencer based on the selected track
[ P ] – opens the piano roll editor
[ X ] – opens the mixer view
[ B ] – opens the smart controls for the selected track
Floating Window Views
These commands open editors in floating windows which is convenient for displaying more than one editor at a time. It’s especially useful if you have multiple monitors and plenty of screen space.
[⌘ – 1 ] – opens the main window
[⌘ – 2 ] – opens the mixer view
[⌘ – 3 ] – opens the smart controls
[⌘ – 4 ] – opens the piano roll
[⌘ – 6 ] – opens the audio editor
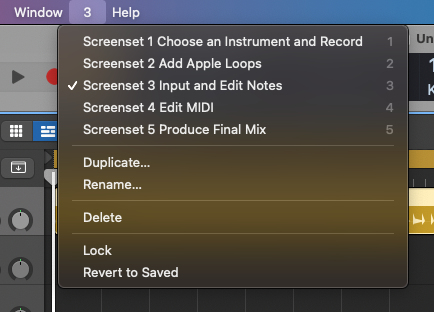
Creating Screen Sets
Typing a number [1,2,3….] while a particular combination of windows are visible will create a screen set linked to that number. Any changes you make to the window configuration will automatically be linked to that number preset. To recall a screen set simply hit that number key. This is highly useful when toggling between views in mixing or editing. For instance, you may only want to see the mixer window so everything else (including the main window) can be closed or vice versa.
Transport and Navigation
Perhaps the most used shortcuts are those related to navigation and transport controls.
[ ␣ ] – press the spacebar to start playback
[ R ] – start recording
[⇧ – R ] – capture recording button. This functionality is super cool for the situation when you forget to hit the record button. It will retrieve the MIDI data most recently played — a real lifesaver!
[↵] – return key sends the cursor to the beginning of the session
[⌘ – ←→ ] – expand or contract the session view
[⌘ – ↑↓ ] – expand or contract track height
[ Z ] – make the current track or clip full window view
[ . ] – move the cursor forwards
[ , ] – move the cursor backwards (rewind)
Create Tracks and Track Stacks
Creating new tracks can be done by hitting the [+] button at the top of the track header section, but using a shortcut will create the exact type of track you need right away.
[ ⌥⌘ – A ] – create a new audio track
[ ⌥⌘ – S ] – create a new software instrument track
[ ⌥⌘ – U ] – create a new drummer track
[⇧⌘ – D ] – create a new track stack from selected tracks
Audio and MIDI Editing
These are super useful commands when listening to, tweaking and editing a session.
[⌘ – U ] – set the cycle area or locator bar above the selected area
[ C ] – toggle the cycle area (repeat)
[ S ] – solo the selected track
[ M ] – mute the selected track
[⌘ – R ] – duplicate the selected clip
[⌘ – D ] – duplicate the selected track
[ ⌥ – drag ] – duplicate a clip, event or track
[ ⌥ – ↑↓ ] – transposes the selected clip up or down by half-step
[ ↑↓ ] – the arrow keys are highly useful for moving the current track selection to a new track
[ ←→↑↓ ] – these keys can also be used to select adjacent clips in a track or to select clips in an adjacent track
[ ⌥ – ←→ ] – holding option and using the left/right arrows will nudge a selected clip by the current nudge value
[⌘ – T ] – will split a selected clip at the position of the cursor
[⌃⌘ – T ] – adding control will crop a selected clip under the cycle area
[⌃⌘ – Z ] – insert silence in a selected clip under the locator bar
[⌃⌘ – B ] – bounce a track in place
[⌃ – B ] – bounce a region in place
[⌘ – B ] – bounce the session
Automation Editing
All these commands for editing automation can be found under the mix menu, but the shortcuts can be extremely useful once you commit them to memory.
[ A ] – opens the automation menu and controls for each track
[⌃⇧⌘ – 1 ] – create one automation point at region borders
[⌃⇧⌘ – 2 ] – create two automation points at region borders
[⌃⌘ ⌫ ] – delete all visible automaton on the selected track
[⌃⇧ ⌘ ⌫ ] – delete all automaton on the selected track
[ ⌃⌘ ↓ ] – convert visible track automation to region automation
[ ⌃⌘ ↑ ] – convert visible region automation to track automation
[ ⌃⇧⌘ ↓ ] – convert all track automation to region automation
[ ⌃⇧⌘ ↑ ] – convert all region automation to track automation
[ ⌘ – L ] – open the controller assignments window for mapping a MIDI controller
Piano Roll Window Commands
The dual tool menu in the piano roll editor operates the same as in the main view with a programmable command-based side option (see above).

Ready to elevate your ears?
It doesn’t have to take years to train your ears.
Get started today — and you’ll be amazed at how quickly using Quiztones for just a few minutes a day will improve your mixes, recordings, and productions!
[ A ] – opens the MIDI automation window
[Right-click] on a MIDI event to get a list of common editing tasks. Some of the most common operations are:
[ ⌥ – ↑↓ ] – with MIDI events selected the option + up/down arrow keys will move events by half-step
[⇧ ⌥ – ↑↓ ] – with MIDI events selected the shift + option + up/down arrow keys will move events by octave
[⌘ – ←→ ] – expand or contract the session view
[⌘ – ↑↓ ] – expand or contract the piano roll height
[ ⌥ – ←→ ] – holding option and using the left/right arrows will move a selected clip by the current nudge value
Favorite and Most Used Shortcuts
The shortcuts listed above are those that I’m most likely to use in a session, and it may seem overwhelming to try and memorize all of these at once. But if you make it a practice to look things up when a shortcut seems appropriate in your workflow, you will find these commands will get embedded in memory naturally over time.
To get started with the basics, below are a few shortcuts, culled from the lists above, that are absolutely essential to get under your fingers.
[ ⌥⌘ – A ] – create a new audio track
[ ⌥⌘ – S ] – create a new software instrument track
[ ⌥⌘ – U ] – create a new drummer Track
[⇧⌘ – D ] – create a new track stack from selected tracks
[ A ] – opens the automation menu and controls in each track
[ ⌘ – L ] – open the controller assignments window for mapping a MIDI controller
[⌘ – ←→ ] – expand or contract the session view
[⌘ – ↑↓ ] – expand or contract track height
[⌘ – B ] – bounce session
[⌘ – U ] – set the cycle area or locator bar above the selected area
[ C ] – toggle the cycle area (repeat)
[⇧ – R ] – capture recording
[ E ] – opens the audio editor, piano roll editor or step sequencer based on context
[ P ] – opens the piano roll editor
[ X ] – opens the mixer view
[ B ] – opens the smart controls for the selected track
[ ⌥ – C ] – show the color palette
[⌘ – R ] – duplicate the selected clip
[⌘ – D ] – duplicate the selected track
[ ⌥ – drag ] – duplicate a clip, event or track
Alternatives
Program Your Own Shortcuts
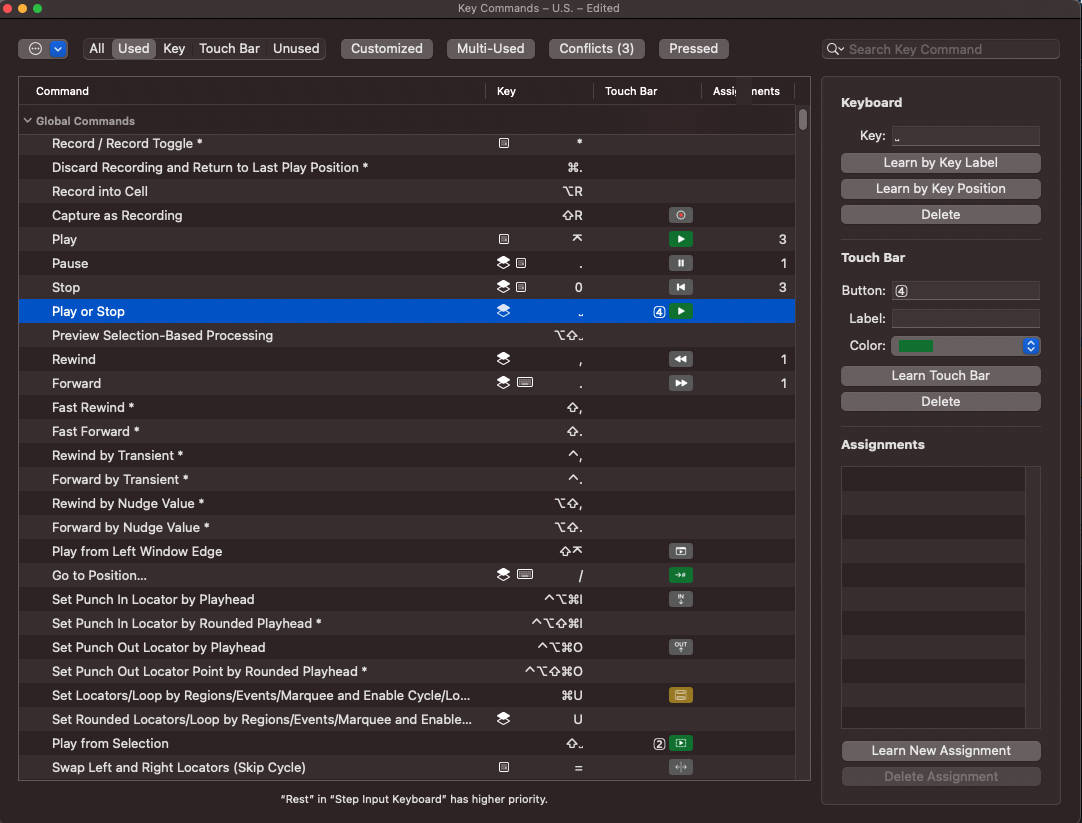
[ ⌥ – K ] – access the key command window. Alternatively, go to the menu and access Logic Pro/Key Commands/Edit.
With this window active you can search for existing shortcuts or select an action and assign a key command to the shortcut. If the key command is already in use you will be prompted to overwrite it or select another.
Exporting and Importing Shortcuts
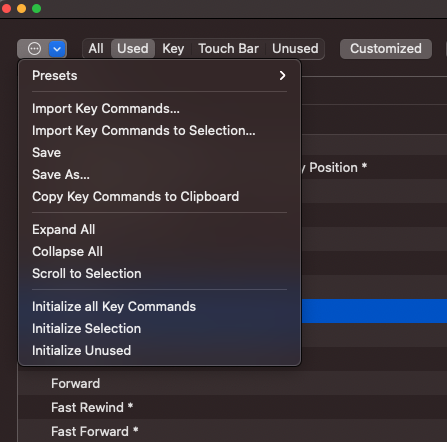
If you have created a customized set of shortcuts you can export them to be used on another computer by using the top left-hand drop down menu in the key commands action window.
Using a Logic Pro Keyboard Overlay or Skin
There are several keyboard overlays available with text and icons that indicate various Logic Pro commands. To my eye most of these seem unnecessarily cluttered and I prefer simply memorizing the shortcut which sort of happens naturally over time. But these products may be useful when starting out with Logic Pro or if you are using a lot of unfamiliar operations for a particular project.
- KB Covers Logic Pro X Keyboard Cover for Apple Magic Keyboard with Num Pad
- Logic Pro Keyboard Cover (Laptop)
- XSKN Logic Pro X Shortcut Keyboard Skin
Summary
While all of these shortcuts can be found scattered around in the menus and submenus of Logic Pro or in the key commands window, they are not always easily found in the heat of battle. Developing and memorizing your own shortcut library tailored specifically to your personal workflow will have a huge positive impact on your productivity. Using shortcuts not only makes your process faster, but it makes using the computer more like playing an instrument.
Check out my other articles, reviews and interviews
Follow me on Twitter / Instagram / YouTube
Eleveate Your Ears