How to Use Spectral De-ess in iZotope RX 6
04/20/2017

Once you’ve downloaded the test file called, “Vocal Production_Spectral De-Ess” for this tutorial from the RX web page and opened it in RX by clicking and dragging it into the RX application window, or by opening RX and pressing Command+O or Control+O on a PC to locate and open it, your RX window should look like mine, with the file, “Vocal Production_Spectral De-Ess” in a tab on the top-left of the screen.
In this vocal sample, I’m hearing a lot of sibilance. Harsh frequencies usually audible in words that have an “s” in them. I’m going to play back this sample and see if you can hear those harsh frequencies that I’m talking about. They’re especially present when the vocalist uses the words, “sunrise,” “anticipant,” and “sway.”
I’m going to press return to bring the playback head to the beginning of the sample, and then space bar to play the sample.
[vocals]
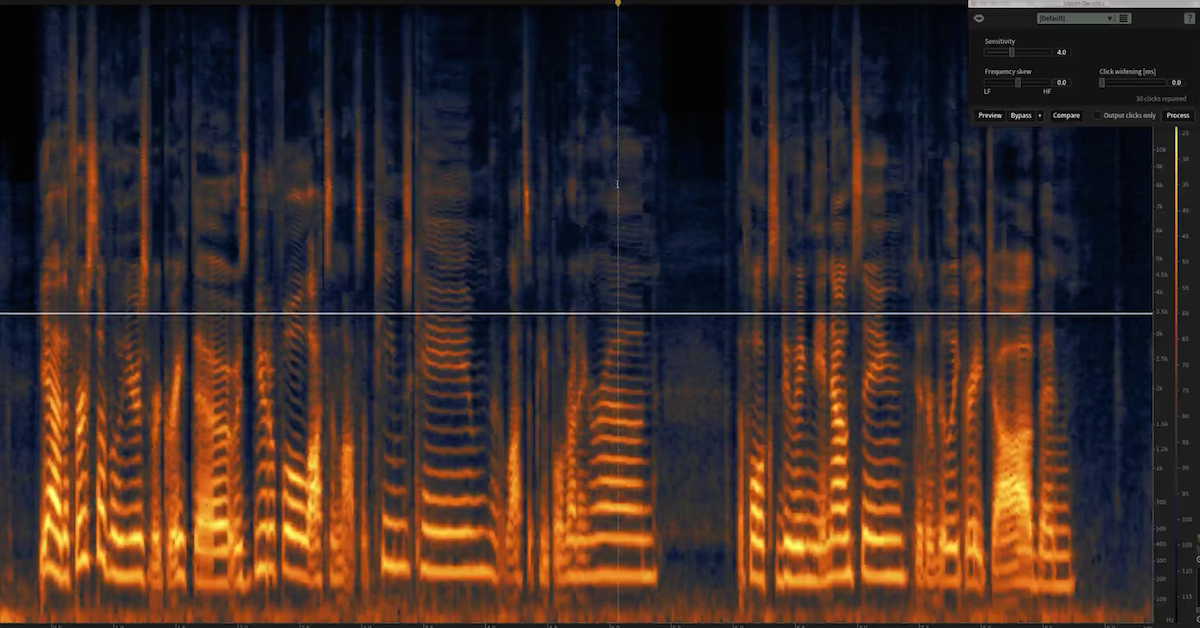
Not only can we hear those “s” sounds, but we can see them very clearly in the spectrogram, which allows us to visualize frequencies from zero 20,000Hz on the y-axis.
We can visualize the amplitude of frequencies too, depending on the loudness. Cyan if quiet, and bright orange to white if very loud.
I’m going to use this slider on the bottom left so that I can get a better look at just the frequencies, and not the waveform in blue running across the x-axis. I’ll slide it all the way to the right.
So, the sibilance that we were hearing is visualized really nicely with these bright orange streaks. Let’s take care of the sibilance by using the brand new spectral de-esser in RX 6, which I’ll locate on the right in the de-esser module.
I’ll click on that and set it to spectral from classic. Classic works well too, but the spectral de-esser affords us a more transparent, intelligent, and frequency specific type of de-essing in classic mode by only attenuating events where sibilance is most active.
Let’s quickly go through these parameters, and then we’ll dial in some settings to tame those “s” sounds.
First, we have the threshold. This determines the level at which the de-ess module begins compressing sibilance. The threshold control has two modes that determine how it reacts to incoming signal level. It’s specified in decibels relative to the speech level, that’s relative mode, or full scale in absolute mode.
You’ll see that when I click on absolute, you go from dB to dBFS. I’m going to leave it in relative mode and un-click absolute right now.
The cut-off frequency specifies the crossover point between the speech to be preserved, and the sibilance to be reduced. I can see from the spectrogram that the sibilant events begin at around 4,200Hz and are active upwards from there, so that’s where I’m going to tell Spectral De-Ess to start detecting sibilance.
I’ll just double click here, then type in my values. Perfect. In other words, we’re telling the de-esser to shine a flashlight to look for sibilance up here above 4,200Hz, and don’t bother looking below 4,200Hz.
Now, to be sure that the Spectral De-Esser is only listening for harsh “s” sounds, I’ll click, “output ess only,” and what this will do is it will allow me to hear only what the de-esser is hearing. I’m doing this to make sure that the de-esser isn’t messing with audio that isn’t strictly sibilance.
So if I can hear entire words, or other events not associated with the sibilance when I preview this, it means I’ve gone too far. I need to adjust some parameters to make sure that only sibilant events are being affected by Spectral De-Ess.
Let’s do just that. I’m going to press preview and have a listen.
[Spectral De-Ess, ess only preview]
Great. I feel confident that the de-esser is only listening for harsh sibilant events. I’ll un-tick this box, now let’s keep going through the parameters.
We have fast and slow. Think of these like attack and release settings on a compressor. Settings that are too fast will reduce the high frequency signal too much in the initial transient phase, and create a sound that is too smooth.
If the settings are too slow, the processor won’t recover quickly enough, resulting in too much high frequency compression overall. I’m going to leave it on fast, because some of these sibilant events are close together, and I want to make sure that the de-esser can recover fast enough to catch them all, and personally, it just sounds better to me, given this vocal material, and if it sounds good, it is good.
Next is spectral shaping. This determines how much of the spectral shape the sibilant is changed. A setting of 0% leaves the natural shape of the sibilance by applying uniform compression across all bands. A setting of 100% flattens the shape of the sibilant towards a specified noise profile that we’ve chosen in spectral tilt, which I’ll explain really quickly.
Spectral tilt creates a noise profile for the sibilance. A setting of zero, as we have it now, creates a natural spectral decay, similar to pink noise. Values below or above zero create a profile that is heavier in low frequencies, like brown noise, or high frequencies like white noise.
In other words, moving this shape towards brown noise moves it towards a darker sound. Moving the shape toward white noise provides a brighter result.
I’m going to stay with my pink noise profile, and I’ll push my shaping to around 70% so that it really conforms to the noise profile that I’ve picked in the spectral tilt section.
Now that I’m happy with my settings, I don’t want to forget them, so I’ll save them as a preset by clicking here and choosing “add preset.” I’ll name it “Pink Preset” and press enter.
There’s a few ways to preview these settings. I can choose to preview them using the preview function, or I can quickly A/B this setting among other settings using the compare feature.
However, I’m pretty confident with my settings, and I don’t feel the need to spend time comparing them to a whole bunch of other parameters, so I’ll press “preview” and listen back.
[vocals, previewed after Spectral De-Ess]
That sounded great. So I’ll commit my changes my pressing process.
I’ve clicked out of de-ess, and now I want to focus your attention to this little box on the bottom right. This is our undo history window, and what we can do here is toggle back and forth between the original, initial state, our before, and our newly de-essed track.
Let’s do just that. So here’s before we did any processing with the de-esser.
[vocals, no processing]
And now I’ll switch over to my newly de-essed file. Here’s after.
[vocals, after de-essing]
Hopefully this gives you a good starting point for taking care of sibilance in RX 6 using the new Spectral De-Esser. Be sure to download all the test files, and check out our other in-depth tutorials to make the most of your music and RX 6.
Elevate Your Ears