Phasing vs Flanging: Technical Breakdown (Part 2)
10/13/2014

—
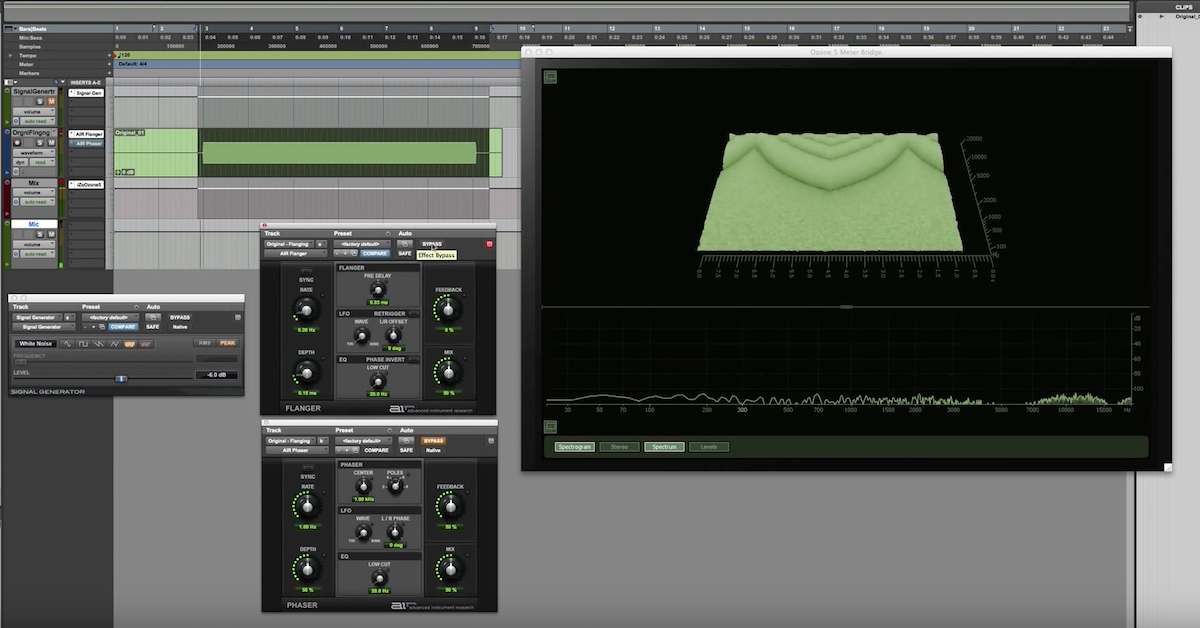
Hey guys, Eric Tarr for theproaudiofiles.com. This is my second video on the differences between phasing and flanging modulation effects. In my first video I looked at what each processor is doing to a signal. In this video I’m gonna look at how these effects are created — what’s going behind the scenes of the plugins to create these effects. I’m gonna be working inside of Pro Tools. I’ve synthesized a test signal to analyze.
I’ve started out with white noise inside the signal generator plugin and I’ve printed it onto a separate audio track. Then I’m feeding it into the iZotope Ozone 5 meter bridge plugin. I’ve got the spectrum and the spectrogram displayed. The white noise by itself looks like this.
[white noise via signal generator plugin]
It’s got energy across the whole spectrum from low to high frequencies. Let me talk about how the flanging effect is actually created. I’m gonna bring up some other tracks I’ve got going. I’ve got my original white noise printed onto this track but then what I did is duplicate it and I’ve got several different versions of the same track. If I zoom in at the sample level, you’ll see I’ve got the same signal on all these tracks. The only difference is I’ve shifted the original by 1 sample for each track. I did this to show you the way that a flanging effect creates this comb filter that sweeps across the spectrum is it actually uses very short delay times such that when it adds a signal with itself that’s been shifted by 1, 2 or 3 samples of delay, certain frequencies get cancelled. That’s how the comb filter gets created.
I’ve got the original flanging noise I’m gonna use here going through the Ozone plugin.
[white noise]
Watch when I bring in a signal, the same signal duplicated, but I delay it by one sample so there’s a one sample delay between these. The high frequencies get rolled off.
[white noise]
Right now we have a kind of spectral effect by actually using a time delay. If I mute the 1 for 1 sample and bring in the 1 for 2 samples, you’ll see there’s another notch. Now I’ve done a time delay, a very short time delay of that white noise signal and added it in with itself.
Next if I do a time sample of 3 samples of delay it looks like this. The notch is occurring at a different place than 2. And 4, 5, 6, 7 and 8 you can see what happens. So on a conceptual level how the flanger creates this kind of sweeping comb filter is to use very short delay times where it’s blending in together the original signal with one that’s been delayed by just 1, 2, 3 or a few samples and it modulates that. So rather than just sticking with a delay time of 1, 2 or 3, it actually moves between these different samples of delay and what that’s gonna do is shift where these notches occur across the spectrum. That’s how the flanging effect is created.
Let me show you how the phasing effect is created. I’ve got that same white noise signal printed. Then I duplicated it on a separate track. I’m gonna mix together the original signal with a version of itself. I’m gonna use a phase plugin from Waves called InPhase. It allows you to shift the phase of a signal at specific frequencies. For low and high frequencies I’m leaving the signal as it was. Zero degree phase shift. At 1 kHz, I’m gonna shift the phase by 180 degrees. I’m gonna take it out of phase so the frequencies are out of phase and have destructive interference with the original. If I show you the original, I’ve brought it up so I have the same number of samples of delay of internal processing, but I’ve got it turned off here. Then my second version of it, I’ve got the part at 1000 kHz where I’m doing the phase shift.
[white noise + Waves InPhase plugin]
What the phaser effect is gonna do is flip the phase of certain frequencies and then modulate the frequency so I can sweep it around and you can see how this sweeps across the spectrum.
[noise + Waves InPhase]
This is what’s taking place behind the scenes inside the phaser plugin. It’s gonna be doing it in a smoother way rather than stepping from one frequency to another, but the idea is you’re flipping the phase on certain frequencies and then adding them together so you have constructive interference with the two signals when they’re at zero degrees phase shift. And destructive interference where they cancel out just at these frequencies. That’s how a phaser effect is created.
Hopefully these videos have given you a good idea about the differences and similarities between phasing and flanging.
Elevate Your Ears