Phasing vs Flanging: What’s the Difference? (Part 1)
10/9/2014

Hey guys, Eric Tarr for theproaudiofiles.com. This is a side by side comparison of two different modulation effects: the flanging and phaser effect. I get a lot of questions about these effects including the difference between flanging and phasing. Another is what are these processors actually doing to my input signal.
I’ve got a Pro Tools session set up where I’m gonna be synthesizing a signal to send through each plugin and then analyze what the plugin is doing.
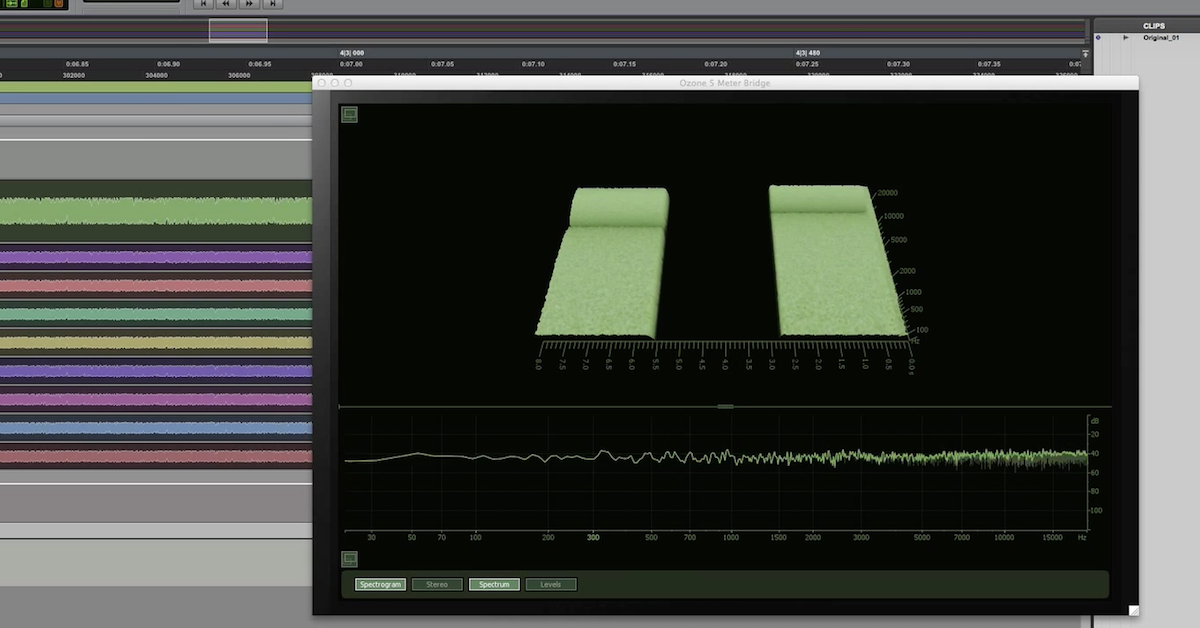
I’ve got my signal generator plugin pulled up and I’m creating some white noise. I chose white noise because it has energy all the way across the spectrum from low frequencies up to high frequencies. I’ve printed this white noise onto a separate audio track, that way every time through, I’m gonna be passing the same exact signal through each one of these plugins. I’m gonna be using the very basic effects, the stock plugins that come with Pro Tools: Air Flanger and Air Phaser. But you can do this demonstration with all kinds of different modulation effects. Then after the signal goes through the plugins it’s gonna come over here and be analyzed inside of iZotope’s Ozone 5 meter bridge. What you’ll see here is the spectrum and then also the spectrogram to see how these frequencies are changed across time.
[white noise + iZotope Ozone 5 Meter Bridge]
I’m gonna focus on the flanger. I’ll bring it in, and you can see what happens all the way across the spectrum when I’m using the flanging effect. I’ve got it set up on the factory default. But for the sake of the demonstration I’m actually gonna change a few things so I can make it a very basic flanger. I’ll slow down the depth, slow down the rate. This will help you see what’s taking place. Bring down the pre-delay. I’ll bypass it, then bring it in.
[Air Flanger + iZotope Ozone 5 Meter Bridge Spectrogram]
What you can see happening is across the spectrum there are notches carved out. This is called comb filtering. You can see this in the spectrum and also the spectrogram how these notches are sweeping, they’re changing across time and they depend on things like the depth, rate and pre delay. If I change some of these parameters you can see what the effect is.
[flanging effect]
By changing pre-delay, what I’ve done is increased the number of notches and they show up at different places throughout the spectrum. I’ll lower it again. Now I can change the rate. What that’s gonna do is the sweeping of the position of those notches is going to happen at a quicker rate. Next is the depth. The depth parameter is gonna control how far across the whole frequency spectrum these notches are going to sweep. That basically covers the flanger. Another thing to point out is that these notches are occurring at harmonics of each other. At even and odd harmonics of where these notches — the lowest one is occurring — you have all these other notches taking place. That’s just a product of the signal processing.
Next let me move to the phaser effect. Like before I’ve got the factory default but I’ll change a few things so it’s a very simple phasing effect. Slow down the rate and depth.
[phasing modulation effect]
Right now we have a single notch being taken out rather than having a bunch of notches in the entire comb filter. The center of that notch is occurring around 1000 Hz, but it’s gonna sweep a bit based on the rate and the depth. So if I increase the depth you’ll see that the sweeping goes further and further across the spectrum.
[sweeping phaser]
I can change the rate and it’ll go faster. I can also change the number of poles. This will change the number of notches occurring across the spectrum, so I can go from having two poles, where you have essentially one notch to four poles. Now I have two notches. Six. Three. And then with eight you get four. One thing to point out is where the frequency notches occur, they don’t necessarily have to be harmonically related.
Last thing I’ll point out is with feedback you can actually increase the resonance of where the notches occur.
That basically covers the effect the flanger and the phaser have on an input signal. With the flanger you have this sweeping comb effect that starts at high frequencies and goes down and back up. With the phaser, you can center it around a specific frequency here and sweep around there. With the phaser you can also notch out one decrease in amplitude across the spectrum rather than having a bunch show up like what happens with the flanger effect.
In my next video I’ll show you behind the scenes what’s taking place with the signal processing to cause comb filters and notches in these different kinds of modulation effects.
Elevate Your Ears