What’s the Noise Floor of a Digital Audio Workstation?
04/10/2016

In today’s video, we’re going to get into some pretty technical stuff, so if you’re the kind of person who likes to go deep on a lot of these audio concepts, I hope you’ll be able to appreciate it.
I’m also going to try my best to give you some practical application. Things that you can use in your everyday workflow inside of a Digital Audio Workstation.
So if you nerd out on all of this kind of stuff, I put together a lot of resources for you. You can find some of them over at theproaudiofiles.com for your enjoyment.
I’ve also put together a full length tutorial that gets very deep and very technical into algorithmic reverb. So you can find that one and track it down over at algoverb.com.
Today’s video is all about what is the noise floor of a Digital Audio Workstation?
Have you ever thought about that while you’re working in Pro Tools? What is the noise floor? If you’ve been around audio for any length of time, you’ve come across these concepts before like dynamic range — what’s the difference between the maximum amplitude and the minimum amplitude you can work with?
Or like your headroom. What kind of space do you have at the top of your dynamic range to work with? Well, the noise floor is what’s going on at the bottom of your dynamic range.
So we’re going to look at, in Pro Tools, what that noise floor is all about. Right?
A lot of these concepts come more from the analog world — the analog era of recording — and you had to be very careful and conscious about maintaining a good signal level. Making sure it wasn’t too hot, or wasn’t too quiet, or too soft.
So we’re going to look at that, how that translates over into the digital world. Certainly, some of the things apply, especially when we are converting an analog signal over to a digital signal going through the sampling process.
We’re going to choose a bit-depth that’s going to set, “What is our range of amplitude values that we’re interested in representing digitally?”
So as an example, in my Pro Tools session, up here, if I bring up my session info, you can see that I’m sampling at 48kHz, and my bit depth is 16-bit. Right?
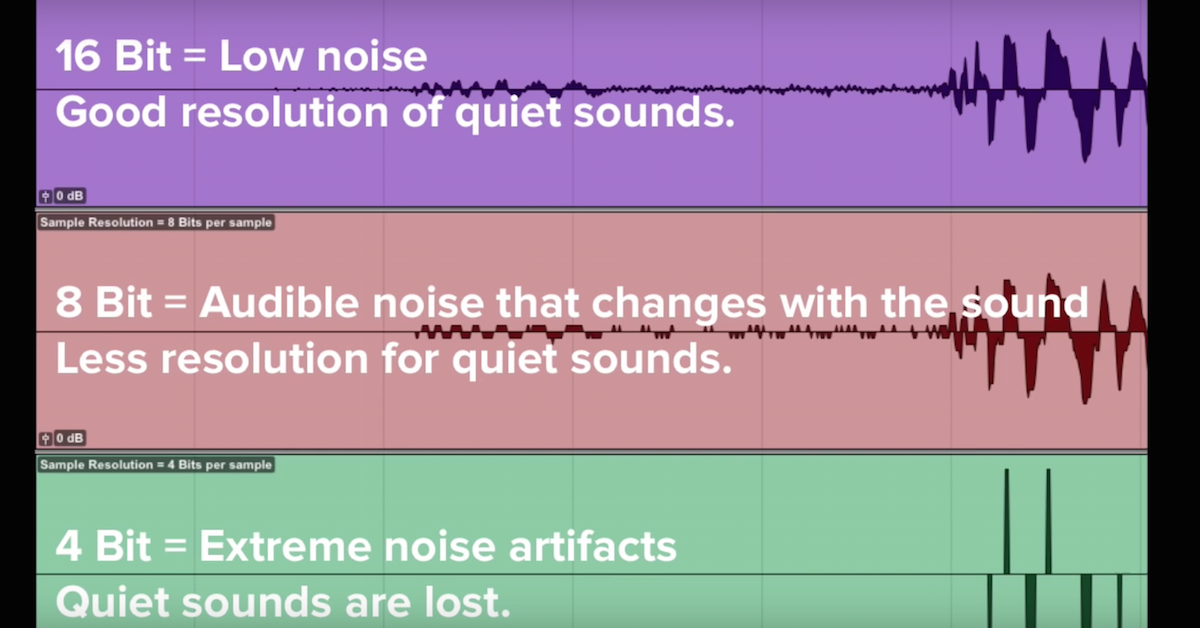
So as we add more and more bits, it’s going to give us more dynamic range. You’ve probably heard about some of these things before that for every bit that you use — additional bit — it’s going to double the number of possible amplitude values. It’s going to go up by a factor of two.
When you go up by a factor of two, that’s the equivalent of 6 decibels. So you can figure out for 16-bit, multiply that by 6 is going to give you 96 decibels of dynamic range if everything is working perfectly.
So that’s our dynamic range that we’re working with. So you’re thinking probably, we’ve got a bottom end of our noise floor for this session around -96, right? Relative to 0 dB Full Scale.
0 dB Full Scale is our maximum level that we can work with.
Let’s look at — I’ll go through an exercise here to show you a few interesting things about what the noise floor is all about.
So I’m going to close out of this and I’m going to open up here and create a new aux track. This is just going to be where I can synthesize a signal here. So I’m going to go ahead and create an aux input.
On this track, I’m going to go ahead then and insert the Signal Generator plug-in right here. So now we’re synthesizing a signal. Now I know it’s going to get pretty annoying for you, so what I’m going to do is even mute this. But this one, my signal is still going through this channel, and then it’s being muted here at the output. I just don’t want to bug you with it.
Another thing I can do is pull up some kind of spectral analyzer. So for instance, I’ve got the Blue Cat Frequency Analyzer right here. This is one that’s free. You can find it on Blue Cat’s website, and I think you can even use it even if you don’t have an iLok.
So now I can visualize this signal that’s going through here and see what’s going on across the entire spectrum. Right? This is just a single frequency, so we’ve got a spike that shows up, right?
But if we add other kinds of information up here, I can change it to noise and see what noise looks like, right? Noise we’re going to have this flat spectrum all the way across.
So let’s switch back here to a sine wave. We can look at, then, the level of the signal right here. It’s at -20 dBFS for the peak. I can turn it up, and we’re at 0 dB now.
So for working with a signal, we’re typically thinking that it’s very important, and we’ve got to make sure the signal isn’t too quiet and not too loud, because we might have some issues with this noise floor coming into play, whether that’s the digital noise floor or the analog noise floor.
So let me show you a few things about this and how it might go against your intuition.
So let’s synthesize a signal here at 1000 Hz. That’s fine. I’m going to back this way off. Really decrease it. Right?
Going down maybe 20 dB, 30, 40, 50 decibels. Even to be very precise with this, right now we’re at -90. Right? If this is a 16-bit session, well are we getting close to our noise floor or not?
I’m going to in fact go below this. To be precise, I’m going to put -120.
-120 here. Our signal no longer shows up here on our analyzer. Right? One thing that we can think about is -120, this is going to be 24 decibels less than our -96 level. Okay?
So we’ve got a signal being synthesized here. You might even be wondering, how is it possible to synthesize a signal that’s less than -96 dB? Right off the bat, that’s one question to try and wrap your head around what’s going on here. Right? Are we looking at fractions of a bit that we’re synthesizing right here?
Well, not entirely, and to hopefully illustrate that point, what I’m going to do is go through a process now of also opening up and using some trim plug-ins. These are just going to be things that we can use to increase the amplitude of the signal.
So I’m going to use this one, switch it over to +12, copy this several times on the track…
Let me go ahead and bring this up, because we can start to see our signal come into play.
Now, you might be thinking, “Oh, well you buried the signal below the noise floor, so as we start to bring up the signal, are we also going to bring up the noise with it?”
As we bring up this signal here, it comes into range that our analyzer is going to give us a visual representation of here. Right?
I brought this signal up now by a total of I guess 12 times 8. That’s going to give us plenty of amplitude to bring this signal back into play. I don’t see any noise on here. Let’s go ahead and listen to it briefly.
[sine wave]
Right? You don’t hear any noise whatsoever. All you’re hearing is just that pure sine wave. So what’s going on here? Why is it possible for us to synthesize a signal 24 decibels below 96 dB and when you bring that signal up, how come we’re not bringing up noise with it? Right?
This is a product of the fact that inside of our digital audio workstation, when we are processing signals within the session, they are not at 16-bit at all. They are at 32-bit floating point. Right? 16-bit is a fixed point representation that’s used during the conversion process.
While we are actually processing it, whether that’s changing the amplitude, equalizing it, synthesizing a signal, compressing it… It doesn’t matter. Any processing that’s going on, like adding signals together, all of that happens with a representation of the number that is 32-bit floating point.
32-bit floating point is going to give us essentially infinite headroom, and it’s going to give us an infinitely small noise floor. It essentially just doesn’t exist.
So this is a thing that you can now be maybe more reassured when you’re working inside of a digital audio workstation. It’s alright if signals get to be too hot. You just need to turn them down.
If signals ever get to be too quiet, just turn them up. You don’t have to worry about the fact that the noise floor is also going to be turned up at the same time.
This is a big advantage of digital compared to analog. If you’re trying to do this similar kind of exercise on analog tape where you synthesize and bury a test tone underneath the tape hiss, and then you bring the level up, you’re going to hear tons of tape hiss.
So this is an example where in the digital world, it’s actually much, much better to be doing things like changing the gain of a signal, rather than doing that if you’re working in a hybrid setup in the analog domain. Because that’s when you have to worry more about things like the noise floor and headroom and so on. Maintaining a good operating level.
So there you go. Shows you some things about the noise floor of a Digital Audio Workstation, or the lack of a noise floor in the Digital Audio Workstation.
So until next time, take care guys.
Elevate Your Ears