Tutorial: Using VocalSynth 2 in a Pop Song
05/30/2018

Now, the song I’m using today is called, “Your Eyes,” and it’s by Kylo.
[song]
So here’s technique number one. I wanted to add some power and depth to the backing vocals during this pre-chorus. I’m going to play for you the beginning, and then the after, and then I’ll show you how I came up with this sound.
So here’s before we used VocalSynth 2.
[song]
And here’s after.
[mix, after VocalSynth 2]
Now let’s dig into the setup. So first, I’ve set my mode in VocalSynth 2 to MIDI mode. This gives me easy to follow instructions on how to setup MIDI mode in my DAW, which is Logic. In fact, VocalSynth 2 automatically recognizes your DAW and gives you DAW specific instructions for how to route in either auto, MIDI, or sidechain mode.
So now that I’m in MIDI mode, I followed the steps for MIDI setup in Logic, first by creating a new software instrument track, and then placing VocalSynth 2 on it. Then I headed to the sidechain options and chose the track that I essentially wanted to play with my MIDI keyboard. In this case, the track is called, “low harmony,” and it’s over here.
[low harmony vocals]
So once I had my low harmony track, the track that I knew I wanted to play, I went to VocalSynth and searched for it in these sidechain input options.
Now, this is going to be different depending on the DAW that you’re working in, but Logic makes it pretty easy. So there it is right there, low harmony, Audio 65, make sure it’s check marked, and now you can pull out your MIDI controller or MIDI keyboard and play some notes.
[affected vocals]
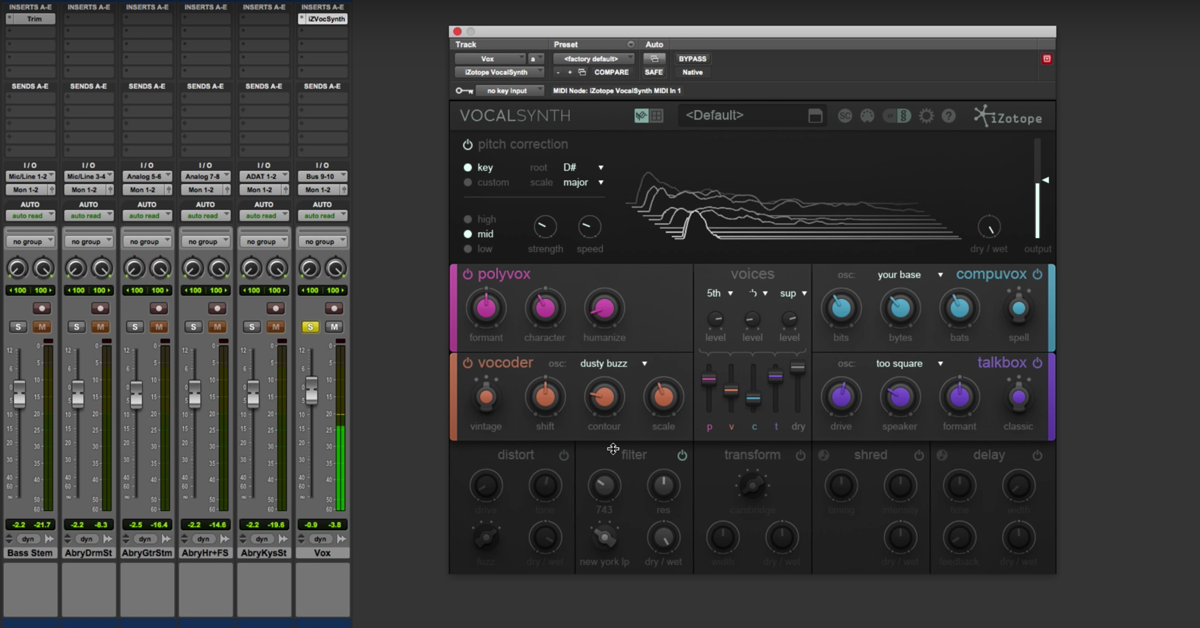
Let’s talk a little bit about the sound of VocalSynth 2. I got this sound by starting with a preset which you can find in the global preset menu over here. Just click that. You’ll notice that we have things divided into two categories, auto-mode presets and MIDI mode presets. Because we’re using MIDI, I started with the clear folder in the MIDI mode preset menu, and went for searching for symmetry, and then I made a few tweaks and came up with this tweaked Searching for Symmetry preset.
You’ll notice as I flip back and forth between both of them, they’re not too different. Things sounded really good right away, but let’s go through the tweaked preset that I saved and talk about how we came up with the sound.
The first tweak I made was to engage BioVox, a module modeled after the human vocal tracked. I added some breathiness with the breath slider to give the harmonies an ethereal quality. I’ll bring up the breath slider as I play this vocal passage back.
[vocals with processing]
So aside from breathiness, adding the BioVox module to your module chain is a great way to add power, smoothness, and depth. So have a listen as I turn the module on and off here.
[vocals, with and without module]
Next, I went to Polyvox and turned the formant slider here to its default. You can always do that by double-clicking, and this is just to protect from any pitch shifting with Polyvox.
I also turned down Polyvox from the animation here, and this is just to give most of the power to the vocoder and BioVox modules. You can blend and bring things in right from the animation itself here, or toggle it from the sliders. It’s up to you.
And we also have vocoder, which is adding some robotic grit to this background vocal. Have a listen as I bring this in and out of the mix.
[vocals]
Finally, I added some width from the global output menu here, which affects the totality of my effects chain, and this was just to make the background vocals sound really epic and wide.
[vocals, processed]
I should mention that I can add width and even affect the panning and gain of this instance of VocalSynth 2 from the visual mixer, which is right over here on my master buss.
So here is my instance of VocalSynth 2 MIDI, and I’ll play this, and watch and listen as I move this around.
[vocals, adjusting panning]
So the ability to remote control VocalSynth 2 is possible thanks to inter-plugin communication between these two plugins.
So as you can see, we only made a few small changes to the original preset, which we used as a starting point. Again, let’s do a before and after.
[mix]
The next technique I want to show you follows the same steps. We’re using MIDI mode, but this time I’m not affecting a vocal, but an entire percussion buss. So here’s what it sounds like before. I’m going to play the dry drums and then put them into the mix.
[drums]
Here they are in the mix.
[mix]
And here’s our vocoded drums, and the I’ll put them into the mix.
[vocoded drums]
So I’m using the same setup as earlier, MIDI mode, but instead of the sidechain source being a single track like in our previous example, it’s a whole buss of instruments. In this case, they’re all hanging out on buss number four. Let me show you what I mean.
So the track I want to affect this time is not a low vocal harmony, it’s this percussion track, and it’s a track stack in Logic which contains a whole bunch of tracks. We have snares, crashes, loops, all kinds of stuff.
When I collapse this down, you’ll see that all of that information is hanging out on buss number four. That means that I have to go to my software instrument track, which has VocalSynth on it, open it up and search for buss number four as my sidechain source. So I’ll go do that now. And there it is with the check mark. So now I am affecting everything on buss number four, which is that percussion stack.
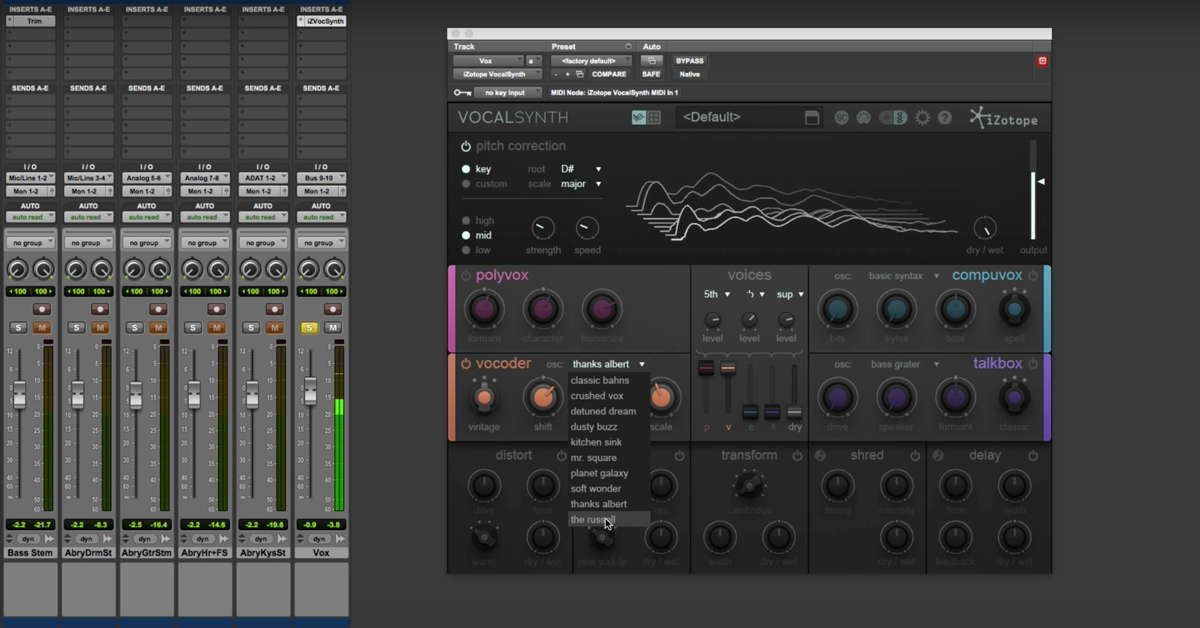
Let’s talk about the sound. So I’m actually using the same preset that I used in tip number one. It’s the Searching for Symmetry preset, but I made a few different creative choices before arriving at this sound, and the first choice that I made was to turn the BioVox module off. I really like the sound of just the vocoder and the Polyvox module, and the biggest decision I think was to turn the distort effect on. And by the way, you can change and reorder these effects to your liking down here.
Let’s have a listen to the distort before and after. I think it just really helps the drum sound pop. Here’s before.
[drums, before distortion]
So that harmonic saturation just helps lift this drum sound to the next level.
The next thing I’m doing is I enabled the chorus and delay effects down here. Now, chorus is brand new. It just adds a kind of dreaminess and creaminess to the drums. Have a listen before and after.
[drums, before and after effects]
And the delay just helps lift this drum buss and give it a bit of air, so again, before and after.
[drums, before and after delay]
And here’s everything in the mix.
[mix]
So thank you so much for watching this video. Please check out our other videos on VocalSynth 2 to learn more about how to use it on genres like Rock and Hip Hop. Take care.