5 Tips for Organizing Large Pro Tools Sessions
03/4/2014
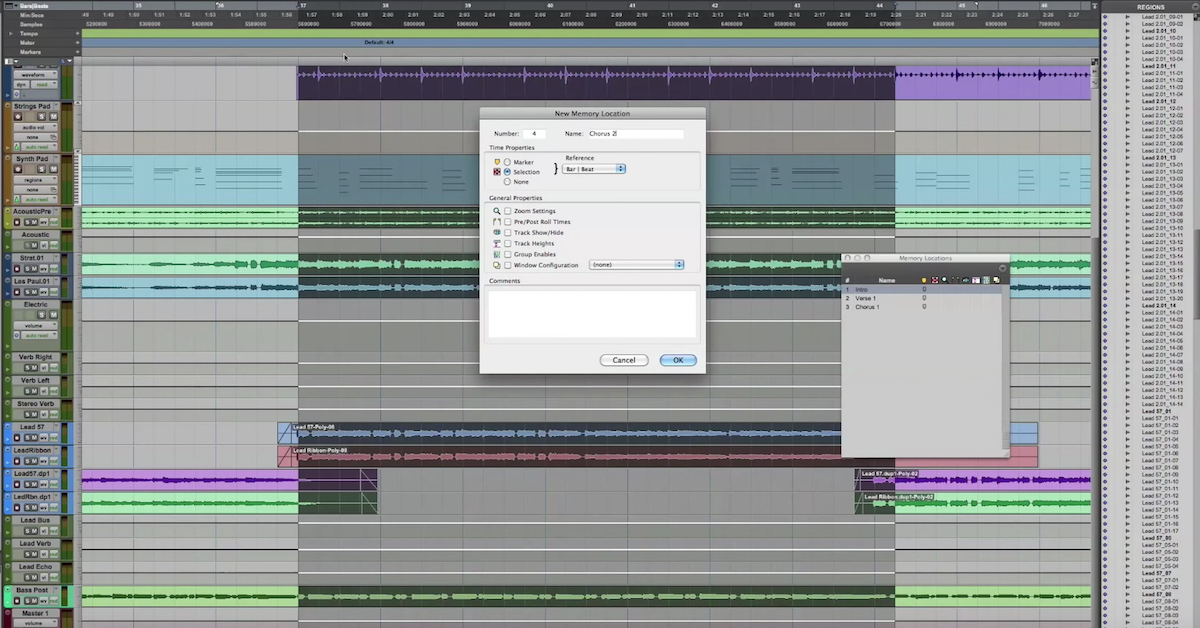
So the way I see it is if you spend any time while you’re mixing dedicating time to cleaning up, organizing, hunting for a track, or searching for things; that means that you’re not being musical and you’re not being creative and you’re not serving the song. So what I like to do is before I do any processing or mixing whatsoever, I organize my Pro Tools session a certain way. And how I start is, of course, by listening to the song and identifying different parts of the song structure. So I create memory location so I can quickly navigate to certain parts of the song. And memory locations, you just hit enter and one is created.
So let’s go to this part of the song right here before the second verse and take it from here. We’ve got the second verse coming up so I’m going to create a memory location by hitting enter. Make sure you’re in grid mode. Now because I was in grid mode when I hit enter and created this memory location, it snaps right to the grid and I can navigate now between these via the memory locations window. So if you keep this open and you really quickly want to go to the first chorus, you just click.
And you can navigate through parts of the song very quickly. Next I like to color code and organize my tracks. So as I said, this has a lot of tracks, so what I’ve done and what I do always, this is my particular method, feel free to do your own, but I keep the master fader up at the top and beneath that I put any percussion that doesn’t include the drum set. So any tambourine or shaker, something like that, I will make light green and then I will select all of these and hit command, G, and create a group for that. Call it percussion. I make sure that mutes, solos, and all of these are selected and now what I can do is solo all of these together if I want. Okay?
So I’m going to go through really quickly. Beneath that I’ve got my drums, which I make dark purple. Select all these. This is just an aux track, all of these drums are going through here. I keep these green. Drums, bass is dark green, makes sense to keep it near the drums because it’s the rhythm section. My keys, which include piano, synthesizer, glockenspiel, melotron, which I will show you in another tutorial, one of my favorite instruments.
So you do this by selecting your first track, holding down shift, and clicking on the bottom track that you want selected. Command G, all those keys, all my guitars are orange. All my horns, if you have any in this session, I make them yellow. Now what we see right here is what is called string print. I keep my strings brown. This is actually a bunch of tracks combined. So that’s another way to keep organized and save CPU. So if you have a large group of tracks as I did here, I had a bunch of strings. Let’s show you. And if you’re happy with the way they’re processed or you don’t want to process them at all, what I did is I came out of my string track, my string aux, and printed them directly to this audio track right here. And that will save space and help you keep organized and saves a lot of CPU. Okay?
So I don’t need to group that and then all my vocals I make red because I want them to draw attention to the eye. I make them a nice, bright red for the lead vocal and a duller reds for the background vocals. Let’s select these groups. Next what I do is create track show/hide memory locations. Now this is a pretty easy process. What you do is you hit option and hide all of your tracks and then show only the tracks that you want to create a track show/hide memory location for. This is sort of a complicated process, I’ll do it a couple times.
So I have hidden all of my tracks and then I show only the percussion tracks and hit enter, and let’s call this percussion one. Time properties make sure to select none and then general properties, I select track show/hide. You can experiment with this. You can do some really great things, especially for large sessions, extremely helpful. Let’s do this again with my drums. Enter, drums. Time properties, none, track show/hide, make sure that’s selected. Now what you could do is if you just want to visually focus on a certain part of the arrangement, these memory locations right here, you can just click now and it will show what was visible when you created the memory location.
In this case we’ve got the drums here, you can toggle between drums and percussion, whatever you want to do. Okay? Well I hope this has been informative. If you have any questions, make sure to e-mail me. Make sure to check out, “My Mouth, the Sea,” by the band Goose and Fox. And this is Ian Vargo with theproaudiofiles.com.
Elevate Your Ears