6 Timesaving Tips for Working in Pro Tools
09/27/2019
Article Content
You’ve heard the adage “time is money”, and it’s absolutely true in the field of audio production. If you hope to maintain a successful career, being able to work quickly is essential, especially during client-attended sessions.
Here are some tips for saving time when using Pro Tools:
1. Track Presets
I can’t believe I lived without this feature for so long, as track presets have become a staple of my workflow for production, mixing in-the-box and hybrid mastering. One of my favorite uses for this feature is saving plugin assignments. When using it in this manner, I like to think of my track presets as rack units, except using digital plugins rather than analog gear.
If I want to set up the classic “vocals into an 1176 and LA2A combo”, once I have that preset saved, it’s only a few clicks away to get my vocals sitting pretty. This is a huge timesaver, especially if you already have the clip gain set on your track to be hitting the processors, in particular, the compressors, just right. I also am a big fan of “brauerizing”, which involves sending my vocals to one of several auxiliary tracks, each with their own unique combinations of processes. Thanks to track presets, I can access these chains within seconds.
It’s important to note that when saving track presets, you have the option to save the plugin assignments with the current settings, or without, so if you don’t want to hear how the changes you’ve made in the plugins affect the track, they will load to their default settings.
When it comes to in-the-box mastering duties, track presets are similarly useful. Chances are for this application I’m going to be using some sort of surgical equalizer, a more broad-stroke equalizer, a compressor, and limiting. On program material that needs more vibe, a bit of tape saturation, harmonic exciting, and perhaps stereo widening may fit the bill. Years ago I’d use a template (more on these later), or even import session data, and those methods worked just fine, but I adore having access to dozens of different chains that range from subtle to extreme with a singular mouse click. Of course, once my preset is loaded, I’ll tweak away to give the specific production I’m working with exactly what it needs.
Those working in post-production can benefit from track presets as well. I have several dialog and voiceover editing presets saved so that I can quickly insert a de-esser, an equalizer, and a compressor for general vocal cleanup and enhancement duties.
Your imagination (and perhaps your available DSP) is really the limit to what you can do with track presets. I use them to speed up my workflow, but also as tools to interject some creativity and inspiration into my work. I have several presets that contain some very esoteric combinations of processors, and it can be fun to load them up and simply hear what happens.
2. Use Session Templates
Whether you are working in music or post-production, session templates are crucial for saving the hassle of starting every project from scratch, especially if you’re working with a complex I/O configuration.
I scored a film earlier this year, and upon collaboration with the director, decided that my sonic palette was going to be pretty similar from cue to cue, utilizing a combination of live guitars, some homemade sound design elements used in a musical fashion, and virtual instruments including Output Arcade, Hans Zimmer Strings, and Omnisphere.
First, loading instances of these as inserts on instrument tracks, I created a template that allowed me to hit the ground running the instant I loaded the movie file into the session. Giving a score the sense of sonic continuity is one of the most important and oft-overlooked responsibilities of a composer, and I use session templates to do just that.
For music mixing, the importance of templates can’t be overstated. Although my workflow has changed a bit since I’ve incorporated track presets, here are some of the auxiliary tracks you’ll find at the top of my template that feed the master buss:
- All Drums
- All Instruments
- All Vocals
- All Reverbs and Delays
- Parallel Buss
And here are additional aux tracks that I hard send audio tracks to, which are then fed into the aforementioned aux tracks at the top of my session. I may not use all of these tracks on each and every mix, but I have them ready to go if I need:
- Percussion
- Kicks
- Snare
- Risers and similar Effects
- Lead Vocals Verses
- Lead Vocals Choruses
- Backup Vocals 1, 2 and 3 (some of these pop records I mix have upwards of 30 layers of backup vocals)
- Guitars
- Synths
- Basses
- Strings
- Horns
Again, I may not use all of these on each session, but sometimes I may even require more. You might be wondering “Why all the aux tracks, and how does this save time rather than waste it?” Well, because most of the sessions I work on these days are 80 tracks or above, things can start to sound (and look) dense pretty quickly. I use these aux tracks to process groups together. For example, on a recent mix, I had some backup vocals that needed to cut through a dense arrangement and sound a bit “shinier”. There were actually three sets of densely stacked backup vocals, sung in low, middle and high registers.
Although my computer is pretty beastly, it probably wouldn’t have liked the 18 instances of tape saturation, compression, equalization and de-essing it would have taken to dial in the vocal stacks. So instead, I created three auxiliary tracks — low, middle and high backup vocals, hard sent my audio tracks to the appropriate one, and applied subtle variations of those processes on those tracks. Not only do I save DSP this way, if a passage or single phrase of one of those groups was too loud or quiet in volume, I could handle those adjustments at the newly created “sub-aux” track.
Included in my mix rate is the printing of stems, and separating the different elements out via auxiliary tracks ensures that I can print them quickly when it comes time to do so.
In post-production workflows, especially when working on large scale projects, session templates are must-have. It’s advisable to use templates for when recording and editing dialog, foley and sound design. It’s even more important when these elements are combined and mixed by a re-recording mixer, and oftentimes delivered in a variety of formats including stereo, 5.1 and Dolby Atmos.
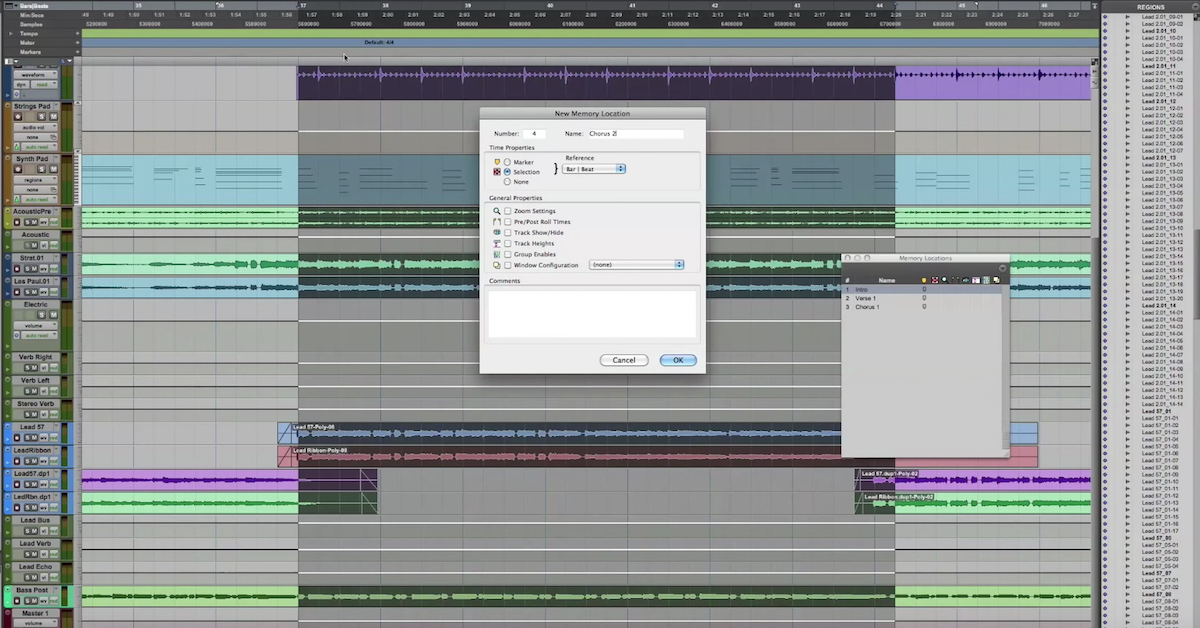
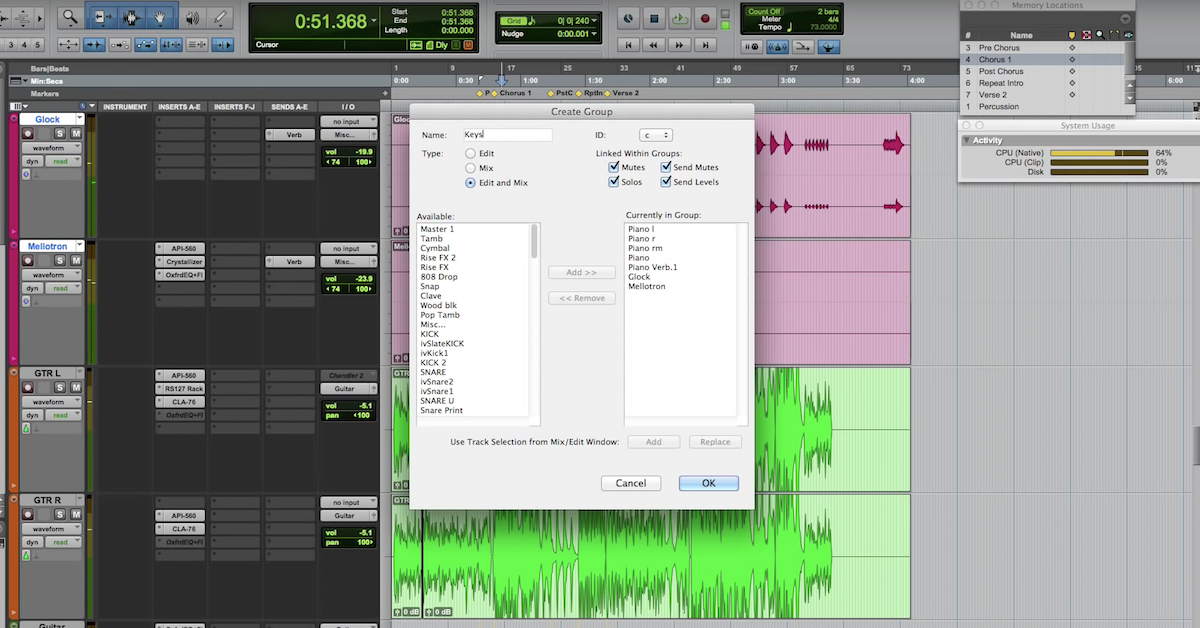
3. Color-coding, Grouping & Memory Locations
I’m a stickler for session cleanliness. Sure, a perfectly organized session doesn’t make a song or film soundtrack sound better, but it certainly allows the engineer to navigate the session without feeling bogged down. I am of the belief that, as a music engineer, I am an extension of the band—I want to get an intimate understanding of each of the parts, the feeling of the song, etc. My favorite productions are the ones when I feel like I can really “play” with the artist. Personally, if my sessions aren’t organized, I find it hard to feel inspired enough to get to the point where I can play Pro Tools (or whichever DAW I’m using) as an instrument.
I also save memory locations notating important moments or transitions in a production (verse, chorus, etc.) and create track show/hide memory locations for the different groups (drums, guitars, all vocals, etc.) so that if I really want to focus in on particular tracks with minimal visual distractions, I can do just that with only a few keystrokes.
I’ve got my system for track order, color coding, grouping and creating memory locations, and I tweak it every now and then. If I can make a mix sound great in six hours instead of eight, that’s an extra two hours I have to mix another project, and staying organized within my DAW allows me to run an efficient operation.
4. Shortcuts (obviously)
To quote Avid Certified Pro Tools user Kevin Malone, “why waste time using lot keystroke when few keystroke do trick?”

Ready to elevate your ears?
It doesn’t have to take years to train your ears.
Get started today — and you’ll be amazed at how quickly using Quiztones for just a few minutes a day will improve your mixes, recordings, and productions!
Using the commands keyboard focus mode (and other shortcuts) is absolutely worth mastering if you want to save immense amounts of time.
Here are a few of the more basic Pro Tools shortcuts I use the most:
Zoom out with R, and in with T: I teach my students to use the mnemonic device “R to retract, T to telescope” to help them remember these commands.
B to “break”: Mixing isn’t just about using plugins and gear to make your tracks sound great — sometimes, editing is required to make individual parts as good as they can possibly be. Maybe a doubled vocal part is a bit laggy, or perhaps bass part isn’t sitting “in the pocket” with the kick drum. If I’m tasked with subtly improving these performative elements, I’m definitely using B or ‘break’ a whole lot to split the clip before nudging, or grabbing and moving it.
Tab to Transient: On a recent mix, the producer delivered an excellent sounding multitrack. One of the few issues that needed tending to was that the original snare drum was augmented with two additional samples, and those samples weren’t phase/polarity aligned with the original. Sure, there are plugins for this such as Auto-Align and Little Labs IBP, which are timesavers in their own right, but if you don’t have access to them, you can fix the aforementioned issue by hitting “tab, break” repeatedly, and then nudging the layered samples to be perfectly aligned.
These are just a few well-known shortcuts I use and recommend that any beginner Pro Tools operator get comfortable with. If you’re using a DAW other then Pro Tools, it’s absolutely advisable to learn keyboard shortcuts for faster operation.
5. Learn How to Use Control Surfaces
Some surfaces, like the Ableton Push, are designed to allow the user a different way of thinking about using digital audio workstations. Others are essentially large mouses (mice?) that are created so that the user can use DAWs with maximum precision and speed. I’ve learned how to use plenty of medium to large-sized control surfaces over the years — including the now dinosauric Digidesign 002, to the sleek and relatively new Avid S6, and many in between. Each has their pros and cons, but at their core, they are tools that you can employ to navigate sessions quickly and get tasks done correctly. A control surface can be a steep financial investment, but if you can accomplish your work even 10% faster for having used one, that’s more time you’ll have to pick up more work.
If you’re not in the market for a control surface, there are still plenty of more affordable tools out there that can give you an edge. I adore my Kensington Expert Mouse and strongly suggest anyone hoping to work in professional audio get used to using one.
6. Client Communication
I love my clients.
At this point, I’m working almost exclusively with people — producers, musicians, directors, etc. that are a bit more experienced, and therefore know that open communication is the key to a successful final project. I prefer to participate in either a face-to-face meeting, Skype session, lengthy phone call, or thorough email exchange before diving too deep into the work. I like to understand their artistic process, discuss and examine reference works, and simply get a friendly dialog going at the onset of the project. Without this, I risk taking their project in a direction that perhaps they don’t agree with, and depending on the terms of the project, I may have to go back and re-work what I’ve done. Revisions are an important part of any creative process, and I embrace that, including several revisions in the contracts that I use. What I don’t embrace is wasting time that could’ve been effectively used by having a clearer understanding of the clients’ vision at the start.
Summary
These are only a few of the time-saving methods I use to improve my efficiency as an engineer and musician, and I’m always adopting new ways to speed up my process. I will say as a caveat, there are situations in which getting the work done quickly absolutely needs to happen, but don’t make the mistake of sacrificing quality for speed. Use these and other methods to your advantage, but if you’re afforded the time and a slower method with achieving better results, go with what you’re most comfortable with.
Eleveate Your Ears