Mixing BFD3 Drums with iZotope Alloy 2 on the Drum Buss
09/12/2014
This is my third and final video in a series on creating a drum mix using FXpansion’s BFD3 and iZotope’s Alloy 2. Up to this point in the videos, I’ve showed you how you can start out with your drum performance in BFD3 and print those samples onto separate audio tracks inside of Pro Tools. Then, you can mix these audio tracks just like you would with any other regular multi-track drum recording.
Then I showed you some techniques that I like to use for processing these tracks using Alloy 2. Hopefully, I was able to demonstrate that this plug-in, Alloy 2, is a one stop shop, all inclusive plug-in that can accomplish almost any kind of processing that you’d ever want to do on the individual tracks.
In this video, I’m going to move on and talk about buss processing in your drum mix. Again, I want to show you that Alloy 2 is another great plug-in to use here. You might just normally think and want to use it on the individual tracks, but it’s also great as a buss processor, again because it has almost any kind of these processing modules that you’d ever want to use on your drum buss.
So let’s get to it. I’m going to go ahead and create my stereo aux track as my drum buss right here. Great, and I’m going to send all these tracks over to it. Great.
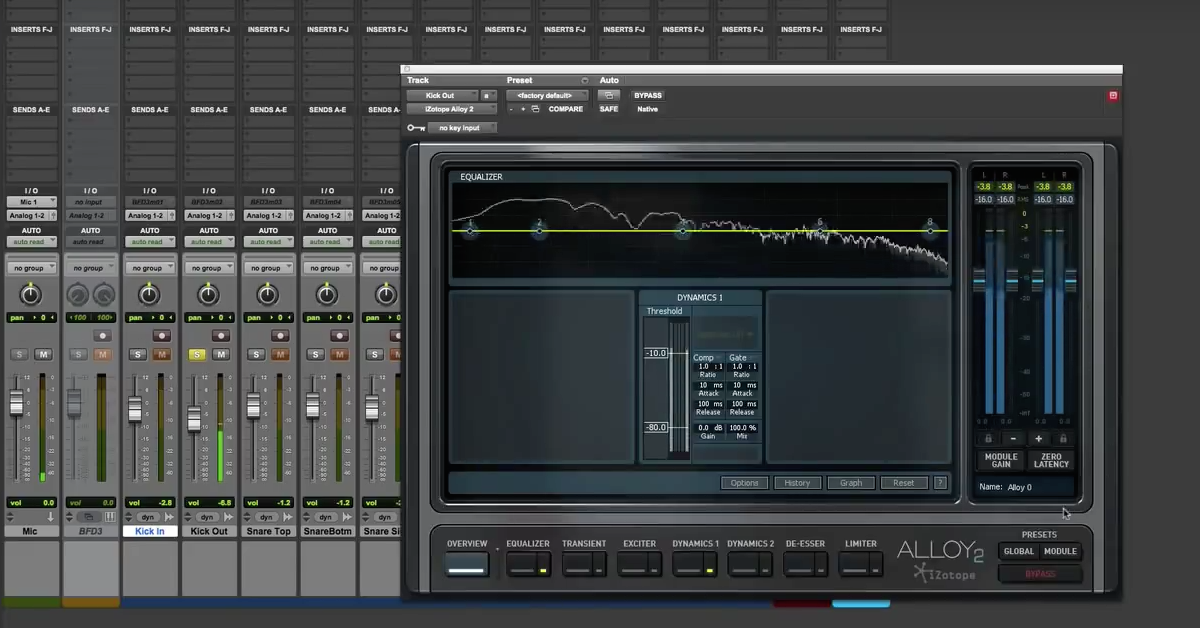
Next, I’ll insert the plug-in, Alloy 2, and we’re all ready to start mixing. One of the best things about Alloy 2 that I like is you can accomplish from within the plug-in a lot of the complex routing that you’d normally have to do with separate aux tracks and things like that, parallel processing and all this stuff that you’d normally have to do with Pro Tools on separate tracks, but you can do it right off the bat inside of Alloy 2, and I’m going to demonstrate some of those things.
To begin with, what I’m going to do is set up a limiter that I’ll come back to later on, because I like to mix into a soft limiter taking place on my drums buss. So I’ll play back the track and get to it.
[drums play]
Now, the limiter is going to be the last thing in my signal chain to make sure I’m not clipping at any point, no matter what processing I’m doing. I’ll come back later and make some adjustments, but I like to have it already open so that I can mix into it and try out different things that way.
So let’s get going back at the begging of the signal chain there. If I want to go in and I want to change the order of these things, I can pull up the graph, alright? What I want to do is initially start off with some dynamics processing and transient shaping.
So I’m just going to bring over my dynamics processor here to begin with, and pull over this one. I’m actually going to use the EQ then, and then go into my exciter, alright? We’ll look at this again later on.
So first up, we’ve got dynamics 1. Here, I’m going to be doing very low ratio compression, so just a 2:1 ratio, and what I’m also going to do is use my mix control so that it’s almost like it’s doing parallel compression, alright?
So let’s get this in action.
[drums]
So the first dynamics processor that I’m using is very subtle compression. This is just kind of like a leveler to hopefully even things out. Later on, I’m going to do more advanced compression, or more heavy compression using the dynamics 2 module. We’ll come back to that in a second. Come up here to the transient module that was next, and put it in.
[drum mix]
Here, what I decided is that I know later on I’m going to go into a limiter that’s kind of going to squash the transients, so I’m just going to stick up the attack a little bit here at this stage, so that relatively speaking, the attack is a little bit louder than the sustain.
[all drums]
Alright, next up is my equalizer. Here, I’m going to start out and cut down here with a low shelf, take out a little bit of the low end. That’s one thing you always have to watch out for whenever you’re mixing, you don’t want to have too much low end because it’s only going to throw off your dynamics processors, especially something like a limiter. Most people can’t hear the frequencies in this range anyway, so you might as well just back them off a little bit.
[drum mix]
Next, I’m going to find a nice range where I’m getting a lot of snap from the original drums, maybe around 1,500-3k.
[drums play]
Alright. I’m going to see if there’s anything up here with a narrow Q regarding my cymbals that are sounding too harsh, and see if I need to back that off.
Alright, pretty good so far. Next up is my exciter. This is where I’m going to get a lot of the energy put into my full mix, alright?
I kind of like what tube and tape are doing. Again, there’s not much that sounds better than printing your drums onto tape, but I like what tube was doing as well.
What I’m going to do, and the nice feature in Alloy 2 that you can use this for, is the mix control here. It’s almost like you’re setting up parallel overdrive or saturation. So I’m going to over-emphasize the drive, and I’m going to bring down the mix until it sounds not too drastic, but enough to make sure that I’m adding some excitement.
[drums play]
Alright, last up then is my dynamics 2. It’s after the exciter. It’s going to be the last thing I’m really going to use before I get into my limiter. I don’t need to de-ess at this point.
Again, the first dynamics section that I had, very slight compression. Now I’m going to overdo it, kind of like what I was doing with the exciter. Overdo the compression, then use the mix control to back it off a little bit, and then I’ll have the parallel compression that you’ll normally want to think of doing on your drum mix.
[drums]
Alright, now we’ve got our rock drums, but we need to back it off a little bit so that it’s not too much.
[drums]
Without any processing…
And that’s all there is to it. Hopefully, this video gave you guys some ideas about how you can use Alloy 2 as a great buss processor, because it’s got all these different kinds of modules if you want to do anything from heavy compression to tape saturation and tube saturation, to even shaping the transients, and of course, equalization. This is a great plug-in to use, not only on individual channels, but also on your drum mix. Take care, guys.