Tips for Using iZotope Neutron for Multi-Buss Mixing
11/20/2016
I’ve got a demonstration for you of the Neutron plug-in from iZotope.
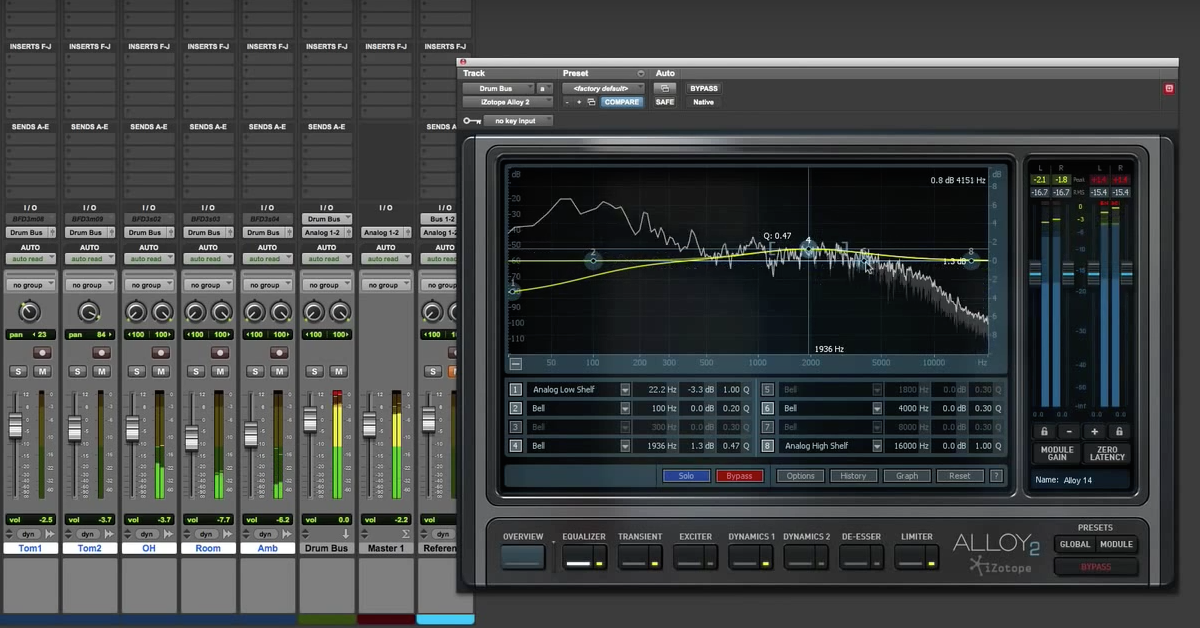
As an individual plugin and processor, it’s very powerful. Find similar kinds of tools in here that also show up in their other plug-ins, like Alloy, which is fantastic, and also Ozone, their flagship mastering processor.
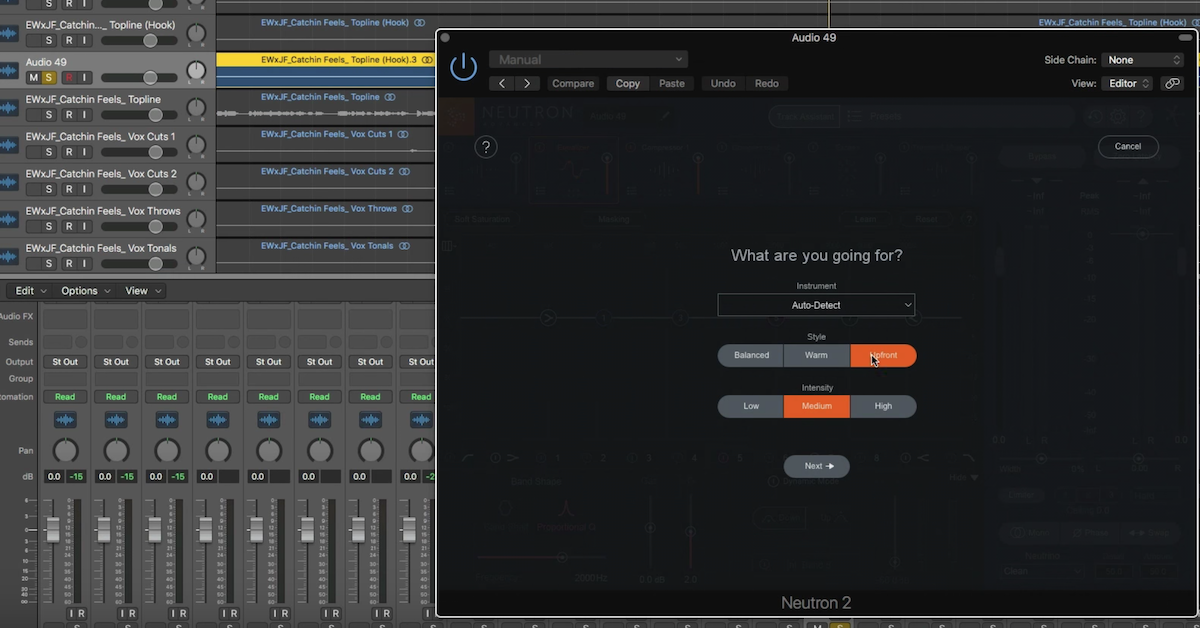
Neutron is probably more conventionally used in the mixing stage. What’s unique about it is when you think of it not just as an individual plug-in for an individual track, but when you open multiple instances of it across your session. You have the ability to link parameters together.
I’m going to demonstrate some of those things here in this video.
I’ve been working with it for a little while, and trying to figure out what this new way of thinking about mixing and linking things together, how can I incorporate that in a useful way in my workflow? I’ve tried it out on individual tracks, different instruments, on bass and drums, and you know, guitars, all that kind of stuff, and where I really found the most utility for it is to use it on my submix busses.
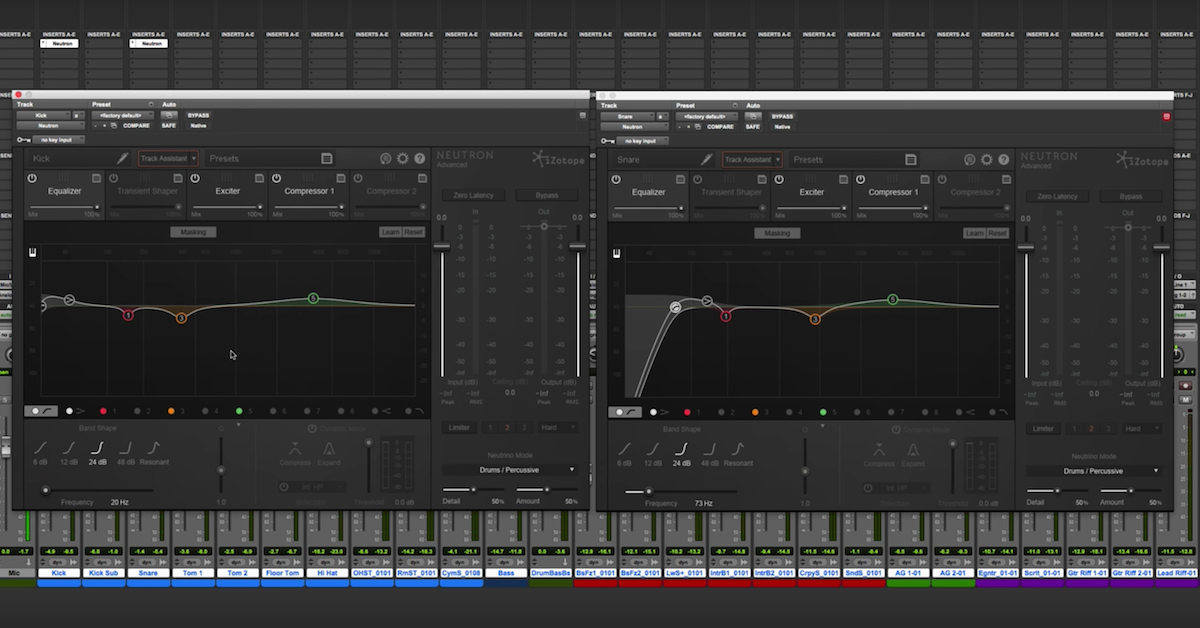
So in a typical session, the way that I’ll set it up is I’ll have a vocal buss and a music buss. Now, some songs I’ll split it up even further, like having the drums, and the music, and the vocals, and that kind of thing, but for this demonstration, I think you’ll get the point if I just link it here on these two different submix busses.
I’ve got all of the music in this session going in here, except for the vocals. The vocals are going in this other buss, and to me, this ability to link things together really is helpful at this stage. I didn’t really find that it was all that helpful when I did it on individual tracks, but you can try it out for yourself and see what you think.
To me, it became very tedious and difficult to keep track of all these different things showing up on different tracks, but for me, working it on the submix, maybe just two or three instances of it in my session, it became very useful.
This idea kind of goes — there’s an engineer named Michael Brauer — many of you have probably heard of him and read about his approach in his — when he’s mixing — of having these different busses, and having kind of compression and this kind of stuff linking together, or sidechaining this stuff together.
You can certainly go online and read it. It’s cool how he’s documented his approach to it, and you could even implement that kind of thing with Neutron. His approach to it.
Or you can come up with your own, that’s basically what I’m doing here.
So let me play back this music and then talk about how I’m going to use it to help a problem in this session.
[mix]
So here what I’m going to do is think about trying to deal with this issue where the vocals have some masking that occurs.
By masking, I mean you have these sounds like the horns and guitar that have some spectral overlap that happens, where certain frequencies come in and out — especially with the horns that overlap on the vocals, and kind of get in the way of the vocals.
Now some of that, I’ve already dealt with with panning and that kind of stuff in the session, but there are, you know, people will describe these things as spectral collisions, where it’s getting in the way of each other.
This plugin, Neutron, is really good at helping you solve those kinds of problems. So let me get to showing you how I’m going to use it.
So I’ve got two different instances. One on the music buss, and one on the vocal buss. Coming over here, the first thing I’m going to do to help me keep track of what’s going on is I’m going to name these different plugins. So this is where you can give them a name. Then, Neutron will talk to the different instances and keep track of which one is which.
So I’m going to call this my music instance of the plugin, then switch over to the other one, and call this one “vocals.”
Now, when I go to do the linking and things like that, it’s going to keep track of which one is which that I’m working on. Okay?
So the approach that I’m going to follow is to think of it as an equalizer here, but also a dynamic equalizer. So there’s this mode down here on the different equalizers that allows it to be somewhere — it’s a dynamic equalizer, some people will think of it almost like a multi-band compressor, where you can do compression and expansion, but it’s on these individual bands. They don’t really segment it off into these different frequency regions, but you can have it kind of this bell curve that goes up and down along with the music.
Alright, so let’s bring this back to unity here. Alright, there we go. Still getting used to the shortcut commands on Neutron compared to Ozone and other ones as well.
Okay. So what I like to do is think about on my vocals, bringing up certain parts, and trying to enhance them to help it stick out from the music. So the first thing I’m going to do is try and figure out what frequency regions I’m having these spectral collisions going on.
I’m going to turn on masking over here and find the other one. Right? Keep in mind, right now I’m on the vocals instance of the plugin. Now, I’m going to look at masking over here, and now I’ve got the — excuse me, the EQ down here for the music and the EQ up here for my vocals.
So I can play this back and look at where these spectral collisions, or masking, is going to occur. To help me do that, I’m going to adjust this sensitivity to look at where these things are happening.
[mix]
So it looks like there’s one over here maybe around 600, and it’s occurring a lot up here around 2000 too.
So this is where I’m going to try and kind of bring the vocal up, and bring the music down in a dynamic way by linking them here together.
So first thing I’ll do is bring up this menu here to help me work on that, so this arrow down here at the bottom. Let’s get one of these — this band here set at 600. So that should be good.
I’m going to bring up the gain, and I actually want it to kind of have more of a flat top. Let me bring this one off here for a second so I can focus on this one.
So to help me see, I’m going to use this kind of flat top one, and then bring the gain down. I don’t need it to be that much, but maybe bring the Q wider a little bit. There we go.
So there’s going to be a little bit wider. I’m not trying to do anything too crazy. I don’t need a lot of gain out of it, so then I’ll be able to turn on the dynamic mode and let it expand upwards.
So bring up a little bit here in this region.
[mix]
Alright, that’s great. Let’s work on this other band over here. Do a similar kind of things. Let’s do a band shelf. Very gradual. Kind of peak over here around 2kHz. As of right now, I’m letting the vocal on its own kind of breath a little bit. So just gradual upwards expansion.
[mix]
Alright, so that’s helping the vocal jump up a little bit to the music.
Now we’re going to switch over and work on the music track here, and specifically, look at how we can bring that same part down. So let’s turn on masking.
This is where — what we can do is look at what’s going on on the music track here, and the vocals track down below. In fact, if I want, I can even link these two things together.
So now, when I move the band five, it’s going to also move the other band. So here, if I want to bring this one down, I can bring the other one up, and so on. Same thing with three. I can link them together, so now this one is going to go down below like this, and that’s great.
That helps me kind of make sure I’ve got the correct frequency parts on both equalizers.
So it should be the case that this one is still going to be upwards expansion. Let’s try this out.
[mix]
Alright, so now what I’m going to work on is focusing specifically here on my — the music equalizer. Switch this one over to a band shelf. Don’t need a lot here. I’m going to widen it out though.
The idea is that it’s going to be a downwards compressor. Okay? That way, what happens is whenever the vocals come in, it’s just going to bring down the level of the music in this frequency region by a small amount. Just a few decibels, so that the vocals can cut through a little bit more.
It’s a very musical way of adjusting the level so that it’s responding. You know, as soon as the vocals cut out, then it should just go back to its original, correct sound. Okay, so let’s turn on dynamic mode.
This case is going to be compression. What I’m going to do is come over here, and turn on the external side band. This way, I can have it coming in and have it listen to that same band — that frequency region coming in from the sidechain.
So I need to turn the sidechain up here to my vocal buss. Now what’s going to happen is it’s going to respond, and we can watch the meter down here to the vocal. So when the vocal comes in, it’s going to start compressing that region by just a little bit.
[mix]
Then we can do the same thing over here for the fifth one. So let’s turn on the — I want to find the region. There we go. Alright. I don’t need a lot. Maybe widen out the Q a little bit.
Then right now, it’s on the internal sidechain. So it’s going to just respond to the music. That’s not what we want. We don’t want it just compressing whenever the music is loud in this region. What we want to do is have it responding externally to just the vocals.
So let’s turn this one on, turn on band five, great.
Now it will just start ducking whenever the music comes in.
[mix]
Sorry, the vocals comes in.
[mix]
So let’s turn on and off the equalizer.
Should just make a small bit of difference. It’s not trying to do anything too dramatic here on the submix busses.
[mix]
So there it is. That’s one use of using this Neutron plugin. This new way of thinking about how you’re going to do mixing and linking things together.
For me, using it on the sub buss makes perfect sense. I don’t know how often I’ll use it on individual tracks. I guess only time will tell as I start to work with it more and get more familiar with it.
But anyways, check it out guys, this is another sweet one from iZotope. They keep coming out with more and more cool tools.
Until next time, take care, guys.
Elevate Your Ears