The Mix Template Series — Effects (Part 7)
03/17/2017

I hope you’re doing great today. We’ve got the final video in The Mix Template Series for you, and we’re going to talk about effects. Before we do that, I want to ask you if you haven’t already, please subscribe to the YouTube channel. Would love to bring you some more free content. Make sure you get those notifications.
Also, I’ve got a Facebook page, David Glenn Recording. I’m going to be doing live Q&A and posting exclusive videos to that, so make sure you go like that page, we’ll get you those notifications as well.
I’m hosting some free files on my website, davidglennrecording.com. We’ve got my mix template, I’m just giving it away. The Pro Tools file. We’ve got a stock version, and my third-party, just my full master template, but I’ve also put together a stock plugins version for you, and then if not already, I’m going to have a bunch of DAWs.
So Cubase, Logic, Studio One, you name it, and I’m going to try to create those templates and be working with some of my members over at The Mix Academy to get those nice and clean and up-to-date for you guys, so that if you’re not on Pro Tools, you’re not left out. In today’s world, that’s not necessarily the industry standard anymore I would say. Tons of other DAWs doing some great things, so.
Moving right along, we’ve got — Oh, you know what, I forgot to mention, there are free multitracks included with this series as well, so go ahead and check out davidglennrecording.com.
Alright, so the — kind of the overview of my effects sends in my template is that I have a section of vocal effects, and then I duplicated those effects, because I found myself using them on more than just vocals, and I have a copy of them called — just with an “I” in front of it for the instruments, so instrument effects.
So my main modulation based effects, so choruses and imaging plugins, then I’ve got mono delays, stereo delays, and then I’ve got reverb. So my vocal effects sit just below the vocal tracks, makes sense, right? When I’m working with them, I’ve got the effects sends, and then I can easily EQ and get in, and I tend to spend a lot of time on vocals, and I like to have that right there.
For the instruments, I kind of know what I’m doing. Sending them to the modulation or the stereo imaging type stuff. I don’t tend to affect those as much with EQ. With the vocals, I like to get in and really EQ and shape them. We’ll look at reverb in a minute, but I like to de-ess in front of the reverb, so I like to be able to quickly reach for that and go, but basically, the vocal effects, modulation, delay, reverb, and then you scroll down below the busses, and I’ve got my instrument based effects, so again, modulation, delay, and reverb. Then some extra verbs and a couple of extra effects down here at the bottom as well.
So let’s take a look at the vocal effects. I’ve got a vocal imported, I’m not sure that I want to sit here and bore you guys with mixing a vocal, because I’ve covered that in tons of videos, and I have a whole course on that called Mixing Vocals. Check that out, mixingvocals.com, a little shameless plug, but I do want to cover and make this about the template, because the sooner we get through this, I’m going to actually create a whole series of videos on mixing a song from start to finish, so you’ll get to see that here on the channel and at davidglennrecording.com as well, but I wanted to get over the template stuff first, so let’s look at the modulation based effects, and this is in the vocal section here.
We’ve got gentle chorus, and I’ve pulled in the Nectar 2 effects section. I’ve got the modulate all the way up, and this was inspired by a gentle chorus preset in the Waves Mondomod plugin I believe it is. It says gentle chorus in the presets, so if you go to Mondomod and you see gentle chorus, that’s the one.
But just a straight forward chorus sound. I like to blend that in with vocals. I’m not a huge fan of chorus on keys, synths, piano, guitars. If it’s there, it’s usually pretty subtle for me, but on vocal, I really love what it does. Silky smooth texture to a vocal. I like to blend not just one version of the modulation, but I love to get multiple sets of modulation and blend a little of each, as opposed to using one big send of one effect.
So modulation number two in the vocal section is Dimension D. I’ve got this from UAD. They lost their license with Roland or whatever happened there, so it’s not called the Roland Dimension D anymore, it’s — I don’t even know what they call it, but this plugin is still available, it just doesn’t look like this. It’s a newer skin. New GUI.
I’ve got that on dimension mode two, and that’s just a mono instance. I’ll blend a little gentle chorus, and little mono Dimension D, and then the third one is this Cooper Time Cube vocal dimension preset. Just clicking through presets one day I found this one, loved it, put it in the template, and started using it on pretty much every mix that I do. The lead vocal gets some bit of this, so.
That’s in there, I follow it up with an EQ where I cut some lows, cut some top, but this is really here if I want to shape it. Honestly, I very rarely shape this effect, but the EQ has been kind of my template. I put an EQ, a de-esser, sometimes compressors, saturation plugins on the back end of most of my effects.
You can see down here all of these inactive are typically saturation plugins and other things. I like to just stack plugins and create effects on the fly when I’m mixing, so I’ve got some of my favorite effects already in, ready to go as part of the template.
Moving on from the vocal dimension preset, we’ve got the Microshift. SoundToys. Couple different versions of this. Very similar to the Dimension D, I think it even emulates that, but I just love SoundToys, and had that in there from a mix that I did and ended up using it, keeping it, and saving it to the template.
Then I have an instance of Stereo Dimension D, the first instance was a mono instance. This one is a stereo instance, so you get the spread on this. I use this a lot on acoustic guitars but for background vocals. A lot on background vocals. Sometimes, I’ll even make this the main sound of the background vocals, I’ll just drop the main fader and set it to pre-fader, then have some fun with that, blend that in and use it as the main source for the backgrounds.
Then we move on to Waves Reel ADT. This is — I use this more directly on a mono track to take a mono sound like an acoustic guitar or a mono vocal, and maybe a vocal they forgot to double, or it’s just a lone wolf down the middle. I don’t like to leave background vocals down the middle, so sometimes, I’ll take this and select the two guitars is better than one preset. I use that all the time, and it takes that mono source and splits it out to stereo. Gives you the impression of stereo. Nice way to push some — like a mono acoustic guitar or a mono vocal and get it out wide.
But I have this setup as a send, and I’ll just click through a preset. I don’t have the one that’s set there. It’s just from the default, because I just love the plugin, but moving on, we have a mono slap delay. I use this all the time on lead vocal.
We kick it off with the tape delay, and then I have an EQ to kind of pull that back so it doesn’t get too pokey. I find that sometimes with slap delays, the main kind of frequency range in the vocal, 800, 1kHz, somewhere around there, it can get a little bit honky, a little bit weird if I have all of that build up in the mono slap delay as well, so I’ll kind of shape that and pull some stuff out when I’m working with a slap delay.
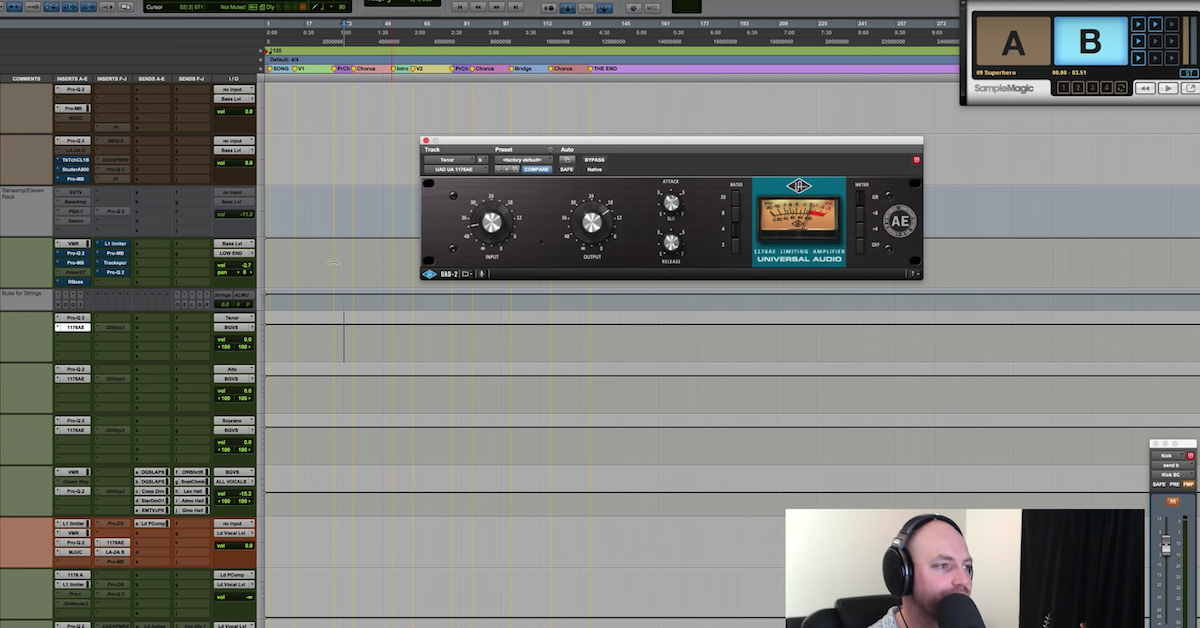
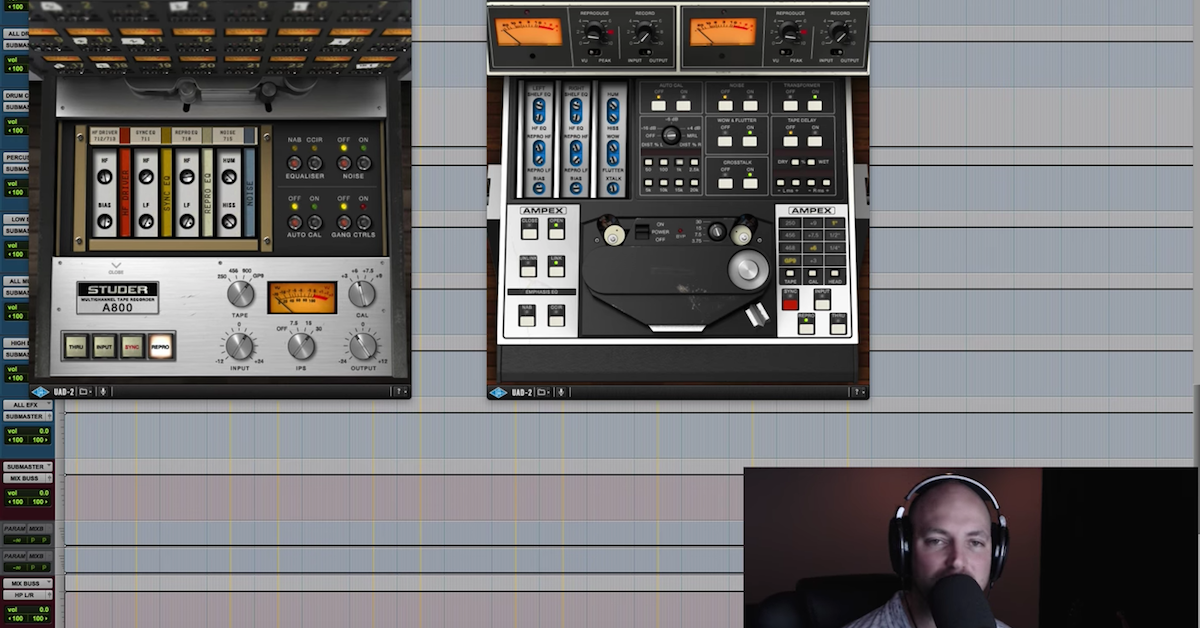
But I’ll swap that out. I think I have a couple more delays in here. It’s an EchoBoy, and then the Cooper Time Cube as well just as options, just there ready to go in case I don’t dig the tape machine. If you didn’t know, you can use this as a delay. You can come over here to tape delay, check it to on, then you come over here, you’ve got your wet, your dry, I’ve got that set to 100, and then for milliseconds, you can click through and go up or down based on the song, what you want to go for. I’d say 90 to 120 is a good range to look for for a slap delay using the ATR-102.
Moving on, we’ve got delays. Now, I’ve got to admit, it’s been a minute since I’ve just sent a delay to a vocal delay one, or vocal delay two. You can see them here. I typically replace these with EchoBoy, or even the stock Digi Delay, because what I end up — I said Digi Delay. The Avid Delay. New old school guys will know what I’m talking about with Digidesign.
But yeah, depending upon the song in the genre, I like to create. It’s kind of fun for me. I like to get to the foundation of the mix, the rough mix, the low end, all of that good stuff, that’s fun, but I have a lot of fun with effects, and so I like to get in and filter and do some crazy stuff, and so these — this is in here as a template, but I very rarely just throw up and — or excuse me, send into them and leave it alone. I’m almost always adding.
And what’s my new favorite? I haven’t added it to the template, because I’m being lazy, but output, movement. This plugin right here, I throw on the back end of delays and multi-effects all the time now, and man, this thing sounds incredible. I love this. This plugin, I just click through presets, find stuff that works, change the tempo — or the rhythms to fit with the song and the tempo that I’ve got going on, and that is huge. I love that plugin.
So a couple of vocal delays there. My main vocal delay, stereo vocal delay, I go to more than I should is the 8th note on the left, dotted eighth on the right. I’ve got some modulation in with this, I have two instances, the second one just has a lot more modulation, and I add the Plug-N-Mix Analoger on the back.
Don’t really mess with it, it’s just again something I did on a mix and then I saved it to the template.
Typically, this stuff ends up in the template if I’ve experimented and tried some cool things and thought, “Hey, I should add that to the template,” or if I’ve seen a tutorial — I create tutorials, but I’m a junkie. I’m a tutorial junkie. I love to go out and watch and learn, follow a bunch of the different YouTube channels and all the different subscription sites and whatnot. So I’m always learning, and if I see something I dig, I try it out, throw it in the template, and it’s there for me to use when I come across something that can be cool.
After the delays, I’ve got my verbs. This is the only verb on, because I’m a — I prefer to use delays on vocals as opposed to verb.
Now, if I’m working on an Adele type track or something where, you know, verb is the right call, then I’ll know that and kind of start from the beginning of the session. I’ll import some verbs and work my way through and kind of shape some tones to fit that song, genre, artist, whatever that I’m working on, but for the most part, I tend to go to delays first before using verb, and yeah.
So those are in there, but I typically start with delays. I’ve got a spring, the AKG from UAD, and I’ve got a vocal room. What is important for me to mention about the reverb sends is I start with a de-esser on here. It’s inactive because I don’t always de-ess my vocal reverbs, but I like to throw that on, just in case, because a lot of times, you guys know what you’ll hear, the singer and the sibilance will be okay in the track, it’s not overly harsh or sibilant, but when you pull in some verb, the verb tends to react pretty quickly to the sibilance, and so I’ll de-ess to get rid of that and take care of it before it hits the reverb plugin.
So let me show you a better look at that. So if we scroll in here, the vocal plate, you can click. I had my Nectar for the de-esser. You can put your FabFilter, your stock de-esser, whatever you want to use here. Then the EMT 140 is the verb, so we de-ess before the verb, and then I shape it with some EQ there. Cutting lows, cutting top end, could boost here, could add a compressor, all kinds of stuff you can do. Saturation plugins are fun, and actually, one of the reverbs I use quite a bit is the Manny Marroquin reverb from Waves, believe it or not.
I don’t have a ton of Waves, but the stuff I do are a lot of their specialty plugins. They’re pretty cool, because this guy has a distortion. They’ve got the dry/wet, but it’s got a phaser, distortion and a compressor built into it. So I’ll pop this on a track and automate it, when I’m feeling lazy and not want to create a send, having a lot of fun with that one lately as well.
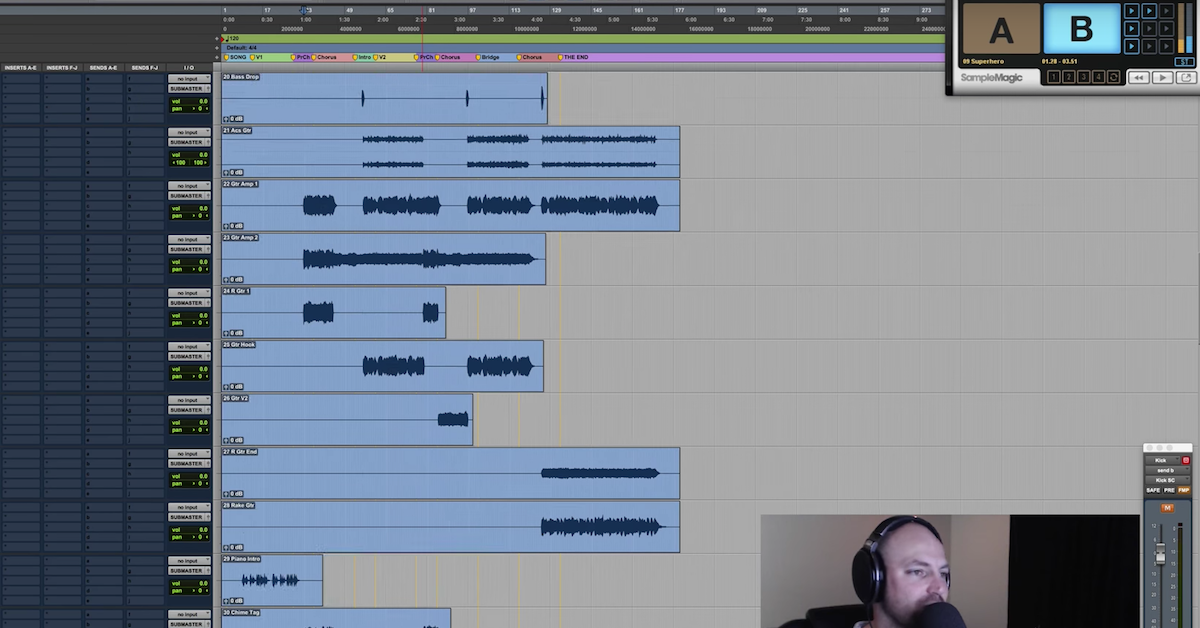
Now, I mentioned that I have the vocal effects, but I also have copied them. I found myself using them on acoustic guitars, and electrics, and pianos, and all that stuff, so I pretty much duplicated the vocal effects section that’s going to be down here below the buss processing, and I put an “I” in front of it, and it just stands for instrument.
So if I’m sending vocals to the gentle chorus, and the guitars, and all of that, just for whatever reason, in my mind, I like to compartmentalize, if I’m saying that correctly, to break things up into their own sends so I’m not overloading that one plugin with too much signal, so I have an instrument version of those same effects all the way through the mono slap, and that we already talked about, so we don’t have to cover that twice.
Then we’ve got slap delays. These, we talked about in the background vocals video. Excuse me, the vocals video. If you haven’t seen that yet, check it out. I think it was video six, the one before this one. I’ve just got a couple of slap delays.
This one is set to 98 milliseconds, and the one on the right is going to be slightly different. So 105. I will change these depending on the song, but I make sure that the left and the right are slightly different than each other. I mentioned in the vocals video what it can do for me is background vocals, it can help to create the impression of more singers, so if you only had four or five singers and you want it to sound like ten, you can use a little slap delay, left and right, and create the impression of a larger vocal group.
Guitars, if I pan a guitar, hard panned to the left, but I don’t want it to just be off on that side by itself, I could send that left guitar to a right slap delay, and just bring a little bit of that in and you can feel how it kind of offsets a little bit of the stereo image. Gives it a nice vibe.
So that is how I’ll use those. Moving on to the delays, pretty straight forward from here. I’m not going to blab too much more. I want to get to the mixing, but I’ve got a couple of delays setup, and you can see the EQ curve in the de-esser is there, just in case anything gets too crazy sibilant, and we’ve got analog, classic analog delay, these are two that I used in the song, I loved it, and I just threw them in. I’ll throw the saturation up and do some cool stuff with that.
Probably more important than breaking down every single one of these, because they’re pretty standard from here, is to note that I’ve got these effects on the back end. We’ve got Lo-Fi, and then we’ve got Patchwork with the cassette deck preset here, you can see from UAD. Love that effects deck. Excuse me, effects cassette deck preset. I’ll drive the snot out of it, back off the output, and then blend. You can see the mix knob from Bluecats Patchwork. Excuse me. A lot of talking, losing my voice.
After that, we’ve got SansAmp, gotta love it. Then the raw pedal from UAD. This could be anything. This could be the Waves guitar plugins. This could be your default clipper, it could be Lo-Fi, it could be FabFilter Saturn. Whatever you have, I like to just have them in there, inactive, ready to go so that I can get creative and just kind of go at it instead of like I’ve mentioned a couple of times, coming over, clicking, harmonic, which one is cool?
I know I’ve had experience working with those plugins, I know that they sound great. More about making a decision and moving on quick, so stacking on the back end of reverbs and delays, the instrument delay again is the same thing. Eighth on the left, dotted eighth on the right, and then at the bottom, I’ve got my reverbs.
Similar to the drums, I have a short room, and then I’ve got a chamber. We’ve got the Lexicon Hall, a sub splash, we talked about that in the drums video. The Lex 224 set to an atmospheric hall, I believe it is. A certain preset on there that I really dug. Yup. Then from there, Gino Hall.
These are just verbs that I like. So it doesn’t have to be these plugins, it doesn’t have to be whatever, this is just what I’ve come to work with and what I’ve built into the template. The main gist of it is just to add plugins that you dig. Short room, chamber, hall, the sub splash is a specialty thing, just things that you dig.
I really love this Gino Hall, because of the modulation. You go to pitch shift here, and you can see, there’s — you can keep going and it’ll get pretty extreme, but I like just a gentle modulation to my reverbs. You guitar players will know, the Boss RV5, RV6 has a modulated reverb setting in the Christian music, and modulated — excuse me, Christian music and live Gospel kind of stuff, the big guitar swells and some of that kind of stuff. It’s a great sound, the RV5 is incredible. Made popular by a lot of that stuff.
U2, a lot of that has it. Coldplay, some of the modulated reverb, modulated delays, but anyways.
I’m yapping, and I stayed up through the night to create this series. It’s now 8:40 in the morning for me, and I started this just before midnight I think, but the last effect in this chain — in the template is the mono spring. If I’m not using a — the UAD AKG, then I’ve got this guy in here from Softube. It works incredible. I like to send vocals to this, guitars of course, sometimes drums for some crazy parts. I’ll just send it to the spring verb, distort it, and do some cool things. But that’s the template.
So just things that I’ve used, things that I’ve done over the years, watched tutorials and learned, imported them in, and I’ve got this ready to go. No matter what genre, I’m ready to go with some effects. I was going to do the vocal stuff, but I covered the vocal effects in the video. If you haven’t seen it, go to YouTube, David Glenn Mixing Vocals. Not only do I have a course, but I have a whole video, and I think I did Mixing Vocals with Slate VMR, so I gave Slate some love there where I break down the whole mixing vocal process, and then I layer the effects.
So I don’t want to go too much into that. I want to move this on so we can get to actually mixing the song.
If you enjoyed this series, please comment below. I would love to hear from you. Support@davidglennrecording.com, and if you haven’t checked out yet, themixacademy.com. Each month, we get a new song, we mix it together, it’s a membership site where you get the multitracks, you mix it along with me, you can add it to your resume, build yourself a portfolio, and gain some experience mixing. I’m there every step of the way mixing it myself. You can take what I do and tweak to taste and grow as a mixer.
So I’m yapping, I hope you guys enjoyed this, davidglennrecording.com, download the free mix template, the multitracks, and we will see you — we’re going to mix a song together in the next series. I hope you enjoyed this, and we’ll catch you soon.
Elevate Your Ears