Mix Template Series — Drums (Part 3)
03/17/2017

We’re in video number three now of The Mix Template Series. Free series we’re doing here on YouTube and on my website at davidglennrecording.com. Video three we’re going to be looking at the drums, so if you’ve missed it, video one we talked about the utility plugins and the master fader, video number two we looked at the buss processing and the stereo buss. Kind of a mixed buss, stereo buss masterclass update to some of the previous videos I’ve done, and now we’re going to look at the drums.
Before we dive too deep, just want to give you a shout to check out the website, davidglennrecording.com. I’ve got free mix templates for you to download, and I’ve got a streaming player of all of these videos, nice and neat and organized so you can see them all, and then also including some free multitracks for this series. So be sure to check that out, davidglennrecording.com. On the home page, you should see a banner that says, “The Mix Template Series.”
So click that, check it out, then also like my Facebook page, facebook.com/davidglennrecording. I’m going to be doing live Q&A and all kinds of good stuff over there, part of the series as well.
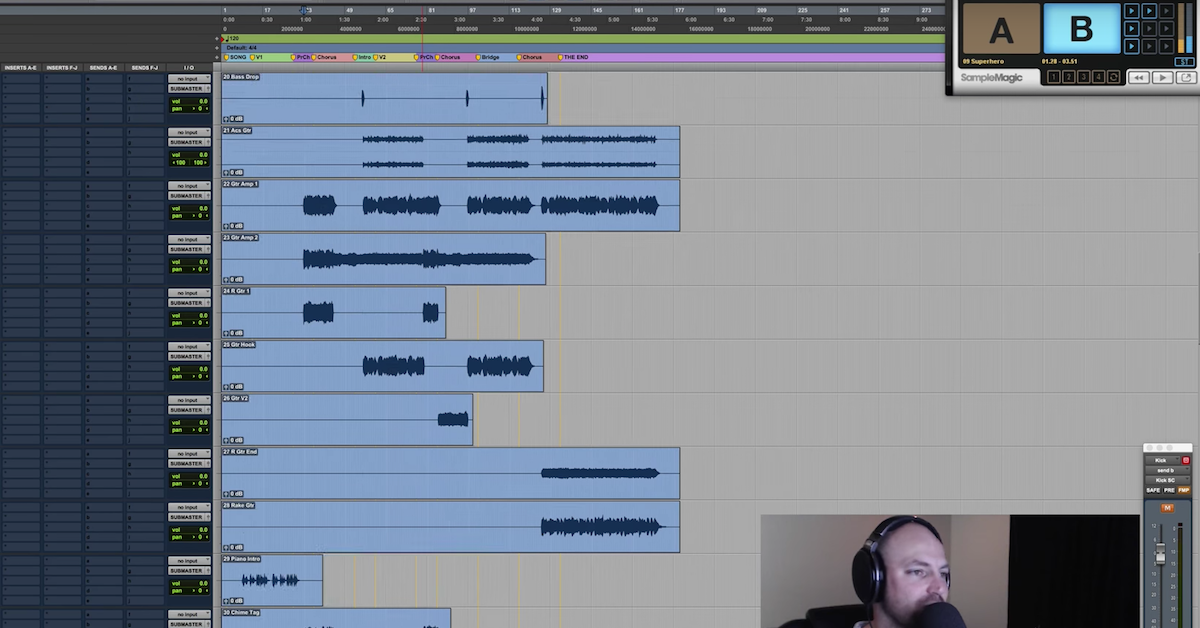
Moving right along, we’ve got the drums, so I’ve included some multitracks. I thought about importing them in and kind of going through it, but we’ll save that for the next couple of videos.
Basically, I just want to give you a look at my thought process, my template, what I’ve got in here and why. It’s going to be less about which plugins I’m using and more about which type of plugin I’m using, be it an EQ, a gate, a transient shaper, etcetera.
The first plugin in my template is actually for when I’m doing EDM or Pop style stuff. Even some Hip Hop. It’s the track here, DG Kick in orange. Let’s blow that up real big for us. I’ve got kick two on there from Sonic Academy. This thing is amazing.
Go check it out, go to their website, sonicacademy.com, and you can learn more about it, but I’ve talked about this in a few videos, you’ve seen me use kick version number one, this is number two. Even more features, more layered clicks you can do and all kinds of great stuff.
But basically, this is in here for when — I’m sent a lot of productions that are up and coming producers. Younger guys, and just kind of pick sounds and go for it. They’re not so much engineers or experienced producers that are picking kick sounds based on the low end, or necessarily what even fits great with the songs that they’re working on, so as politely as I can say that, whenever I’m working on a track, and I get kicks that just don’t feel right, I’ve got this in as a quick way to just throw this in, dial in a couple of presets — I’ve got some kicks that I like to use with it, I’ve got some patches saved, and from here, I’ll just replace their kick, or maybe blend something. Sometimes it’s live drums, and then I’ll blend something from kick in, and add a little bit of the programmed stuff to it.
But the processing is very similar to what we do down here at the live kick in, kick out, and kick trigger mics, so I’m just showing you that for the kick 2, and then we’ll break down the processing, one element at a time on the live kick mic.
So I’m going to put that away, and let’s open up — before we look at every track individually, let’s talk about this for a minute. It’s kind of the big picture for me is if you’re mixing on a console, you’ve got this right in front of you, right? For all of the different tracks that are laid out on the desk.
So I’m thinking for my template, a lot of what I think is coming from this mindset of the channel strip. So I’ve got the SSL here. Your high and low pass filters, your dynamics section. You’ve got a gate, you’ve got an EQ, and you can do the pre-dynamics or post-dynamics, and you’ve even got kind of a de-esser setup in there with the channel strip.
This is kind of the bread and butter of mixing, right? You get a channel strip, some guys, you just throw a channel strip across everything, and you’ve got what you need right there to go to work and make a great mix.
Well for me, what I like to do, I like to have the SSL, especially on my drums and my music tracks. This may be the first plugin in the template, but there’s some other plugins that specialize in being a better gate, maybe, or I like to use transient designing, shaping, multiband processing, and that kind of stuff. So I have the SSL, or I have a channel strip in, but then what I like to do is I’d like to show you some of the plugins that I use that I feel like are the ones that work for me, and then you may use your stock plugin, or your stock version, whatever.
But let’s take a look at the kick drum. So we’ve got a kick mic, we just have one kick, I’ve got a kick track. I’ve got a kick in, kick out, sub, I’ll throw those across here, and I may buss them or group them. We’ll get to that, but basically, the first channel — the first insert that I’m looking at is typically going to be a gate on drums, right? So kick, snare, toms I take care of separately, we’ll talk about that later, but the first thing I’m thinking is a gate.
Do I want to gate and remove the bleed? If I do, then I’ve got that there, right there ready to go. To me, in my opinion, Trigger number 2, one of the best gates you can get. The FabFilter is incredible, there are other gates out there that are really great. This one is just stupid simple and easy to use, and I’ve found that it works perfect for me.
So to use Trigger 2 as a gate, if you don’t already know, you come over here to the mix knob, just set that to zero percent wet, turn this button on here for the gate, and you’ve got yourself a gate. The default settings work incredible. I find that I only have to really mess with the release, maybe the hold a little bit, but just about always, it comes down to the release once I get the detail lined up with the signal coming in.
Moving on from Trigger — now, that’s going to be on my kick in, kick out mics, kick sub mics, it’s going to be on my snare top and bottom mics, and then anything that I’m replacing, I’ll use Trigger 2 for, and I’ve got Trigger tracks setup here for kick trigger and snare trigger, if I choose to blend or replace the drums.
Next up, I’ve got the Virtual Channel from Slate. It’s in my template, it’s there. Sometimes, I bypass it, but most of the time, it just stays on, and I’m rocking that.
Third in line, SSL Channel. So if I’ve chosen to gate, then I’ve got the SSL Channel. A lot of times, I start here for EQ. High pass filter, I’ll use this. There’s a little trick. Kevin Ward did a video on this. He did a way better video than what I’m about to — how I’m about to explain it, but basically, I have a one knob compressor setup in here, and you can click on the compressor in, and then basically — and actually, it’s not setup this way for the kick mic, but you can crank down on the threshold and pull the ratio back all the way. The fastest release, and then the fastest attack right here, and when you turn the compressor on and you just pull up the ratio button there, the ratio knob, that’s going to be a one knob compressor.
So similar to like, an L2 or one knob limiter type thing. Or the Waves One Knob compressor. So you just kind of push that up, and that’s going to start compressing, and you’ll see three dB, six dB, whatever is going on there. It’s a great way to just kind of get in, quick and dirty, and then if you want, you can take off the fast attack and tweak to taste, but a little one knob compressor trick works really well on a lot of things. It’s almost always my go-to setting and on the other tracks that it is setup as a one knob.
But anyways, enough about that. You got to turn the dynamics on and then put the compressor in, but I rarely use the gate in the SSL Channel because of how good Trigger is, or if I’m in a specialty situation, I might pull in Sound Radix — man, I forget the name of it. I’ll find it. Sound Radix — I don’t want to leave you guys hanging — Sound Radix Drum Leveler.
Incredible plugin when you really, really have to do some work on hi-hat bleed. Hi-hat bleed is crazy, or snare bottom mic.
But Trigger 2 for the gate, and yeah. We’re moving on. So next up, we’ve got EQs. It’s not so important which EQ. The Helios, I like this one for the bottom, for 60Hz. I saw Andrew Scheps using this, and I was like, “Ah, that sounds kind of cool.” So I put it in the template. It’s rare that I go to it, but it’s there if I want it.
My first EQ of choice with the kick drum is typically the Pultec and the Pro-Q 2. The Pultec for either 30, sometimes even 20Hz, but whatever I’m feeling. Just kind of click through, boost it up, attenuate a little bit, sharp or broad, just kind of feel that out to taste.
But that is my go-to, and then for the more surgical stuff, I’ll click over and get this Pro-Q 2 here, put that in, don’t really know why that’s there. Just maybe being OCD one day, but yeah. So [laughs] Pro-Q 2 for surgical stuff, I’ll even boost a little bit, cut a little bit, come over here, find the click, what do I want, kind of shape that with that, and then kind of more broad stuff with the Pultec.
But put that back. So we’ve got Channel Strip, we’ve got EQ covered, let’s look at R-Bass. It’s in the template, but I got to say from Waves here, I will only use R-Bass if I have a single kick drum mic. If I have a kick in, kick out, kick sub, anything other than just one kick mic, I won’t use R-Bass. I find that it can really jack up the phase between those multiple mics.
So what you may do if you start using R-Bass on the kick and you really love what it does, maybe you commit that and then Auto-Align, slide for phase, check phase, but definitely be careful with using this across multiple kick mics.
So that’s there in the template, it’s very rare that I even use that, but it’s there if I need it, I can pull it open.
I’ve got 1176 for compression. Pretty straight forward stuff. We’re going to get to actually mixing a tune together and you’ll see me using the compressor, but that’s there if I need it.
Then the last thing I’m thinking is transient shaping. So we’ve talked about gating, so we’re going to cut sustain, if we’re going to tighten that up, then maybe we’re going to use compression to lengthen a little bit, or get some tone or character.
I like to go to — I’ve got the SPL. I use that for if I just want a little bit of point, nice and quick, just pull open the attack, give that a little love, but this guy right here, I’m a huge iZotope fan. I’m a huge plugin fan, but I’m a huge iZotope fan, and I’ve used Alloy 2 for a really long time, but they’ve stepped it up big time with the Transient Shaper inside of Neutron.
This thing is a beast. You’ve got the multiple — what are we even calling them? The envelope response. So the shape of the transient, attack and release, incredible plugin here, and I use this a ton. A ton. Not just on drums either, I use this for if you get a track and you’ve got too much reverb tail, man, pull this open, you can really get in. If you only want to pull out the top end of a verb, you’ve got a track, maybe a guitar, and the guitar is tracked with maybe this big soaked reverb, but then maybe you compress it and it enhances the verb or creates more sustain, and you want to get a little bit of that tone out, you can come in here and really just dial it back with the sustain.
You’ve got three bands to work with, but this is a go-to for me on kick, snare, and definitely toms as well to get a little more attack on the toms. This is great, you’ll see that in a minute as well on my toms buss, but that’s a go-to for me, and just about every tune, I’m pulling that open.
Another one that’s not on that buss there we’ll look at on the snare is Pusher. Kush Pusher. This is an incredible plugin. I love what this does. Again, in line of transients, compressor… But there’s a couple of presets that I use. What’s the one. Clarify Transients is my go-to. It’s the first one that I try, and then the other one is Slap Happy. It’s somewhere in here. Yeah, drum Slap Happy.
If you really want to get aggressive, then Slap Happy, Jerk Insanity, those two, some serious transient love going on there.
But yeah, so one more thing to talk about with the kick drum, we looked at actually a couple of things. If I’ve got kick in, kick out, kick trigger, I’ve blended it, I’ve done my thing, I may create — if I go Option+Shift and go new track, I may create a new track, call it kick drum, then send that to all drums, get the blend that I want between them, and then maybe do some of this. The gating and the processing on the buss.
Totally cool you can do that. I think I’ve seen Jonathan Roye from Mixnotes.tv handle it that way. Totally cool, I just for whatever reason have these broke out in individual tracks, and then if I do want to buss it out, I’ll do that later, because it’s just a clip of a button, and I’ve got the buss setup.
The last thing to note about the kick, I do this with the snare as well. Kick track, I’ve got the processing here. I don’t like to see any of my faders above zero. So I’ll pretty much get my rough mix with the kick, the snare, the bass, the lead vocal, snapped at zero.
I do a little bit of parallel compression as you’ll see once we get to mixing it, which elevates the level even more, but if I get to the middle to the end of a mix, and I feel like I’ve done the parallel compression, I’ve got the kick, it sounds great, but maybe I put the guitars or something a little bit on top of the mix, and I want a little more punch, a little bit more from the kick or the snare, I’ll send it to the sub master.
Now remember, the sub master goes straight to mix A. Mix A right here. Input, sub master. So the drums are normally going to hit all drums, and then that signal goes to drum crush, where I’m using parallel processing. The sub master, sending the kick or snare directly to the sub master is going to send it — it’s going to bypass that, and it’s going to be sending a clean copy of that kick, and then I can just kind of lift up a little bit more level.
So if I come over to the bottom right of the screen, you’ll see this fader here, and I’ll just kind of lift that up until I get the amount of kick that I want. Then I don’t have to — maybe a little OCD of me, but then I don’t have to push that above zero, and then I can kind of get that to the level that I’m looking for.
So a little trick there. Could help somebody out if you’re OCD like me.
So that’s basically it. Just looking at the channel strip with the SSL, and anything else I need is there in the template ready to go.
There are times that I pull a kick in, especially a beat production kick, and I’m not paying attention to any of this, I’m just going to pull open plugins and get to work. I have it in my mind, certain plugins that do a certain thing. I’m not like, “I have to use a template,” but at least that stuff is in there. It’s a quick Command+Control+Click, and bam, it’s active. Ready to rock and roll.
The kick trigger, pretty straight forward on this one. I’ve got the option to click Option and click and drag down to the kick trigger if any of this processing — if I want to pull them on to the kick trigger, but for the most part, if I’m triggering, I’m going to try to find a sample that works, and then I’ll just have the SSL channel if I want to tweak a little bit of EQ or shape it a little bit, but for the most part, that’s pretty straight forward.
I do a lot of transient designing to samples, so I’ll pull that down and copy it, but yeah. So snare drum, pretty similar. I’ve got the Trigger 2 for the gate, I’ve got VMR for the channel, and then I’ve got an SSL. Really straight forward there. Where it differs a little bit is I really love the Neve 1073.
So you can put whatever EQ you want here. Maybe you like a Pro-Q 2, just to be surgical, maybe you want to pull out some ring, you want to have that on there, but for me, I’ve got this in. The 1073. I love to get a little bit of grit out of this, back the input off. I love the shelf, 7.2. My go-to frequencies for me on the Neve.
Then this trick, I can’t remember where I’ve learned it. I know I’ve seen Matthew Weiss do this, Andrew Scheps, a couple of guys pull open the Lo-Fi, and this distortion right here on the snare sounds incredible. A little bit of point, kind of bring the snare forward a little bit more. This one is really great. Even just a little tiny bit, 0.1, 0.2 can go a long way, but I’ll even push the envelope quite a bit sometimes and crank it.
But that’s in the template, just in case. We talked about Pusher, Clarify Transients is a great one, and the other one was Neutron.
Now, something that’s not in the template, it used to be, would be Bluecats Patchwork, and I would put Bluecat in, and I just kind of know that I do this, but you go to Bluecat Audio right here, Patchwork, and I mentioned it in the stereo buss video, because a lot of the UAD plugins, they don’t have mix knobs, right? It sucks. That’s like, the whole point of digital and all of that is to give us the versatility and the options, but the Studer doesn’t have a mix knob.
So I throw it through the Bluecats Patchwork and I’ll use this, then kind of dial in some percentage here. Maybe the 1176 for parallel compression right on the track. I’ll throw it in through Bluecat, then adjust the mix to taste. Parallel processing right then and there.
I use the Slate a decent amount, and that’ll be a click button to — I had a Pro Tools crash and had to reinstall everything, so some of my stuff is not up to the top, but anyway, the Slate stuff, the VMR has a mix knob on just about everything, so that’s a great feature. I think a mix knob should be on almost every single plugin.
Okay, so snare top, snare bottom, same thing. If you want to buss those, you can select them, Pro Tools guys, new track, name it snare, you’ve got a snare blend. Same idea with the snare bottom mic, I’ll just drag those on top of these and then this here Trigger, very similar to the kick trigger, where I’ve got Trigger 2 for triggering it, and then I’ve got a Channel.
So pretty straight forward there, I’ve got a stick track for side-stick, and I’ve got a couple of samples in my library. My personal library that I like to drag in if I’ve got a live Gospel track or a Country tune and we’ve got some side-stick, I like to replace those.
Then we get to a snare distortion. Hardly ever use this, but it’s in the template if I want to. Parallel distortion, and I’ve got Saturn from FabFilter and the Saturation Knob. You could layer this with plugins, and then you’ve got a parallel saturation to go to if you want.
I could see that actually moving its way out of my template, because of being able to put Bluecat and just use parallel right on the track, but the snare verb, I’ve got the EMT 140 from UAD. Then I have an EQ. Just about all of my reverb sends will have an EQ on them. This is an older send. I’ve just left it alone because I’m lazy, maybe?
[laughs] But I’ve got the snare verb and that EQ if I use it, I can pull it in. I think I just about always come up here and drag that guy on, but then you might shape the verb a little bit, take out some bottom, take out some top, that 1.2, whatever it is can get annoying and drag that down, notch it out.
But I’ve also got the option to go to EchoBoy. EchoBoy has got some incredible drum presets. Hardly ever make up my own thing, I just pull open a preset. ’80s snare, what’s the other one, the bright ’80s gate is incredible for stuff that’s not even ’80s sounding, that can be really fun.
Lots of stuff in there. Find a preset, tweak to taste, moving on, and then I’ve got the AMS 16. I think I put this in, I bought it, I said, “Do you know when I need to use this?” I’ve used it a few times.
I love it, it’s a great plugin. It can definitely create some cool tones, but the point is not necessarily what plugins that I’ve got on here, it’s just that I’ve got options so I can quickly make inactive, you may fill this up with all your reverb plugins if you’ve got the Valhalla, or man, the Plug-N-Mix stuff, or your stock reverb, whatever it is, throw those on there and be able to dial something in pretty quick instead of having to come over here, click and drag, and reverb, we’re ready to go, right?
Okay. So that snare reverb. Let’s talk about the toms.
The toms, we’ve got rack tom 1, 2, and then floor tom 1, 2, 3. Mix a lot of Gospel, live Gospel, so they’ll have four or five toms, six toms sometimes. So I have all of these tracks in the template ready to go, so then whenever I click and drag, if I’ve got one tom, or two toms, I’ll drag them on, pick the panning, and delete the others.
Basically, I’ve got VMR for the Virtual Channel. I just leave it alone. Then I’ve got — actually, sometimes I’ll drive the Virtual Channel. For some reason, on toms I’ll just kind of drive it to where it clips and get some cool tones from that, but pretty subtle stuff.
The Pro-Q — now, this is going to be for each individual tom. You can see, I have the toms bussed to a toms buss, so all of these get treated individually, but then they go to toms.
We’ll talk about that, but the basic gist is, a lot of times, you’ll get — let me say it like this.
Rarely do I receive recorded live toms where they all feel consistently smooth, fat, low end is equal between them. So I have the Pro-Q 2 here. I like to high pass my toms, 55, 60, 70Hz sometimes and below is high passed, but the rack tom almost always feels like I got to go in and boost 100, 150, 200 to get that to feel as full or warm sounding as the larger toms.
So I’ve got this here as an option. Can also go in and kind of find what’s not working. You know, the mid-range, the boxy stuff, pull that out. If I want a little bit more top, I can do that here, but for the most part, the EQ right here is for the low and low mids in the toms to make sure that I get those. I’ll listen, I’ll find a section with the tom fill, and I’ll solo the toms, and I’ll loop that fill and just kind of EQ my way through it so that they sound cohesive, so that rack tom 1, 2, 3, floor toms that they all feel like they’re the same sounding tom. Then sometimes, very rare, but I hate with a passion, I hate triggering toms, so I try not to do that, but sometimes, it’s necessary.
Alright. Toms buss, VMR for virtual channel. Pretty consistent. Then I’ve got the multi-band from FabFilter. The Pro-MB. It looks crazy, I promise you, it sounds awesome.
So this to me brings the energy out of the toms. This preset has come from the Waves Multiband — the linear multiband, I think it was. There’s a floor tom 1 preset, and I pretty much just copied all those settings into here, and I love this on toms.
I can’t explain it. I can’t go through and just say, “Oh, hey, here’s that, and there’s that,” copy the settings, do your thing. Listen to it, bypass it, it’s like, an excitement. It’s just awesome. It feels really, really great, and and I’ve never been let down or turned this off. It’s just always there for my toms.
I shouldn’t say that. Very rarely, if I want boxy, indie type toms — a lot of times, this stays on. Very rarely do I turn it off, but in that case, I may bypass this and move on without it.
Neutron is next. This use to be Alloy 2 for the multiband transient designer, and I love to get the punch right in the toms. I like the stick hitting the head. I like that sound to come through if it’s fitting to the track. Sometimes you need a little more of a dead sound, you don’t want as much attack, but for me, kind of my default go-to is to have the attack boosted, a little bit of sustain under control instead of using a gate. Kind of use that to kind of suck in and control the sustain.
Sometimes, I take this and just go nuts, and I drag it all the way down, but my default is a little bit of boost to the attack, and a little bit of cut to the sustain.
I don’t typically boost the attack in the mid-range, but I do for the click. The stick hitting the head, I like to boost 2kHz and above, and I’ll drag that range around a little bit depending on the tom sound, but this is a great tool, man. I really love Neutron. Izotope are killing it. Love the new GUI. The older GUIs were ugly, but they got some good designers working for them. I love the new layout, super easy to look at, and man, this plugin is incredible.
I have a copy of Neutron over here, and it’s inactive. I don’t like to boost too much with any one plugin. I’ll — I mean, I’ll push this four, five, six, seven dB of attack boost, but if I get going, and sometimes, it’s just not enough. I’ve got another instance of it that I like to use, so.
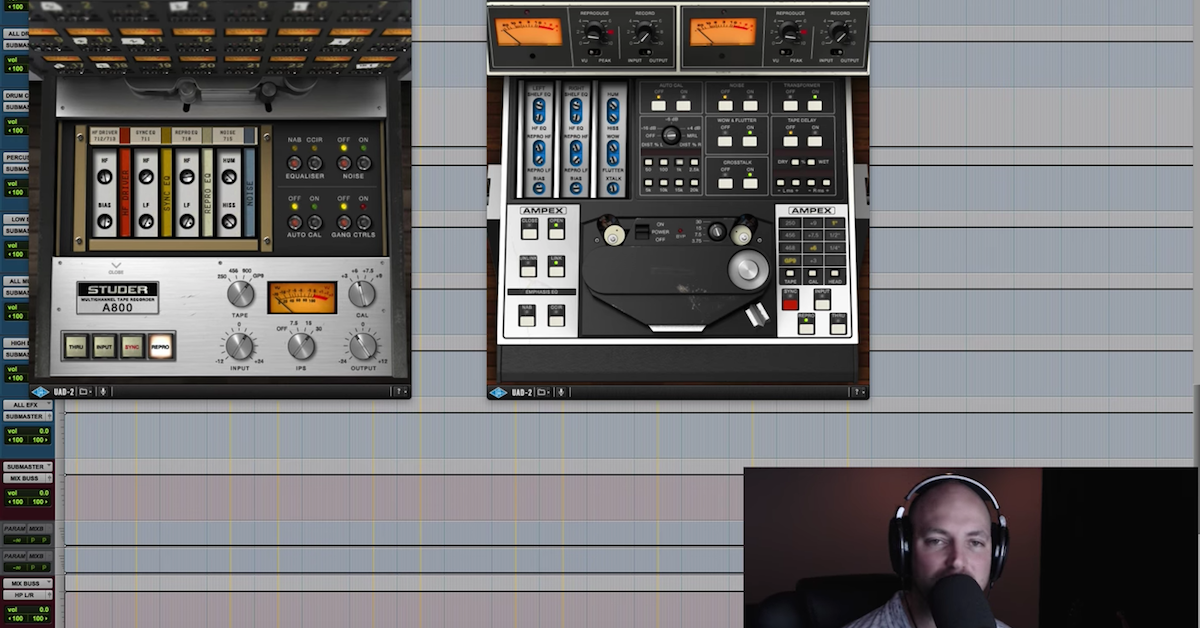
After that first instance of Neutron, I’ve got the UAD Studer. This is a go-to for me. You may have the Slate, you may have the — I keep forgetting, there’s another brand out there that has a pretty sweet tape machine, but this is a go-to for me. Depending upon the style, I’ll drive it until I hear some distortion and then back off the output, or if I want it to be just a nice, warm, clear sounding tom, I’ll put that in to where it’s hitting and sound the way I’m wanting to.
Tweak to taste, but this is in my template. Those are the settings, and it’s just always been something that I really like is the tape sound on toms.
Next up, I’ve got verb sends, I’ve got a drum crush send, very rarely use that, and then the sub splash.
You know what? I’m going to go get some samples imported in, and we’re going to talk about the sub splash for a minute.
Alright, so just for example’s sake, I’ve pulled in one tom track, and we’re going to look at this sub splash, because it’s worthy of its own little section. If you guys have stuck with me this long through this video, hopefully it’s not too dry or boring, you deserve a little mixing tip/trick kind of thing here.
So something I love to do with toms, bass drops, kick drums, I’ve got this preset in my template called sub splash, and we’ll scroll all the way to the bottom here, and there it is. Kind of lift that up and I’ll almost always drag this to whatever it is I’m going to be working on, and I’ll throw it up here. We’ve got tom 2, and I’ll just set it underneath the track, and now, I’m sending the toms buss, I have it setup there, but almost always, I’ll go from the track itself, but for now, we’ll just work with that.
So if I’ve got sub splash, it’s set to 0, and we’ll come here, and maybe there’s a fill, you know, [imitates toms] and hit the floor tom for this one. [imitates toms] So maybe I don’t want it on the first one, but I want it on the second hit. I’ll go to slip mode here, I’ll extend that section out, and come over here to the sub splash send, Command+Control+Click on — actually I’ll mute it, Command+Control+Click on the mute, and then from here, go down to the toms track.
I’ll lift the sub splash and automate it open, so here’s with no sub splash, and then here’s with it.
[sub splash, on and off]
Okay. You might not be able to hear that. This isn’t a mix that we’ve got rocking. I’m not sure what those levels are doing. Let’s see. You know what, toms are already down — they’re all the way down at minus 20. Let’s do that again.
So here is no sub splash.
[no sub splash]
There we go. So here’s no — and then with it.
[toms with sub splash]
So you’ve got that ring out. Basically, I’ve just got a reverb here setup. With the toms, I would open it up a little bit more than that, but I’ve got — all the top end is gone. It’s just low end, and I’ve got that going into a reverb. Then for the lows, I may increase that even more. I may cut it. Depends on the tune and the tempo of the song, but for this, let’s exaggerate it, set it up to 10.
The reverb plugin is not important. I just love the Lexicon, because it gives me the bass, the mid, and the treble decay rates. The reverb times. Independent control of those, but because we filtered it out so much, you could really just put any reverb you want on there.
So one more time, with it.
[toms, with sub splash]
That’s a little bit higher tuned tom. I would do this on a floor tom, most likely, or a kick, or a bass drop to add a little bit of low end sustain to the sides. Cool little thing that we do. I think I actually even did a video on this. Look up David Glenn sub splash, and I’m pretty sure there’s a tutorial where I talk about using it in multiple scenarios, but I saw that send there, and I wanted to give you guys a little something there.
So pretty cool idea. If you have a tom fill, you’ve got left/right stereo image going on, you know, [imitates toms], and it kind of hits and then expands stereo. Could add a nice little something to the track, but for now, we’re going to take and put this all the way back down to the bottom of the template. Ah, we’re not going to wait that long.
We’re moving on. So there were the toms. Did we forget anything? No.
Hi-hat. Hi-hat, if I have a ride mic, I’ll just duplicate the hat mic, and label it ride. I’ve got the same stuff here. It’s just an SSL and the Slate Digital Virtual Channel. That’s it.
Like I said, if I want to work on snare bleed or anything like that, I’ll pull in Sound Radix Leveler. Drum Leveler. But for the most part, that is just straight forward, a little bit of top end, filter out or boost, depending upon the tune, some bottom, and we’re moving on.
The overheads, I’ve got this first plugin is one of my favorite plugins. Oceanway from Universal Audio. A lot of times, I will use this to — use it in remic mode. You can see, I’ve got two modes with Oceanway. Reverb or Re-mic. With Re-mic, I guess you can kind of figure out what that’s doing, however, it’s doing its thing behind the scenes.
It’s no longer just a reverb of the room, they’re actually emulating as if you recorded with these microphones. So however that works, or whatever the trickery is, it actually sounds really good. So worry less about what’s going on, and just use your ears and figure out what you like.
So I’ve got that in re-mic mode. If I get home studio overheads and I want to give a little bit of depth or dimension to them, then I’ll just throw this on. It’s kind of a go-to for me. If I have drums that were recorded in a really nice studio, I may not need this or use it, but that is an incredible tool for adding a little bit of, you know, the good stuff to drums.
Drums are meant to be in a room, so that’s kind of a first step for me on overhead mics to help them feel a little bit more natural.
Next up, we’ve got VMR, again, Virtual Channel. Straight forward. Now, for whatever reason, I like the top end on the API. I’ve used this for a long time. I come in here, the first step, overheads. Do I want them more? Sometimes they’ve been boosted already in the recording, so I just leave them alone, or a little bit. Sometimes I crank it and boost a lot of top.
I don’t really care for super sizzly cymbals in mixes typically, but sometimes it calls for it, and this is my go-to EQ for that. A little bit of compression, but I’m almost never looking at that. I’m almost always looking at the top end and the overheads in this API Vision has been my go-to, so.
If you’re building your template, following along, you may put an SSL Channel there, you may put FabFilter Pro-Q, you may put the Neve, whatever. Whatever you like, throw that there and you’re rocking and rolling.
Then I have the Pro-Q, I’m going to delete this and not even talk about it, because that was a bad idea that I had some mid/side processing on it a long time ago, and it’s just been there. I’ve been lazy to pull it out, but basically, just high pass filter on overheads, sometimes, I come in here, Chris Lord-Alge style, and I’ll boost low end in the overheads and go crazy, but it just depends. This is just there for me to get in, surgical or not, I’ve got a Pro-Q 2 there, and we’re moving on.
Now, I can’t even remember what this is. It might not even show — yeah, plugin missing. Probably the Studer. On the overheads, it’s probably the Studer for parallel saturation, and then after the overheads, we get into our room mics.
So I’ve got all of these right here. If I boost these up just a little bit, I’ve got Oceanway setup. Oceanway A drums preset. We’ll talk about the processing. Basically just an EQ to shape the sound of the room and a compressor on the back end, if I want to compress the drums.
I’ve got Oceanway B setup. Same thing, sometimes a little bit of A, a little bit of B goes a long way. Both of them together sound great. Maybe throw a compressor or something on the back end.
Then I have this — You know, I haven’t used this in so long, I haven’t even used this plugin anymore. I’m a Slate Everything bundle subscriber, and I think this is the one that they — yeah, anyways, it’s inactive, but 480 plate, the 480 room. I don’t use those. They’re in the template because I haven’t changed it up.
I use the Bricasti Close, Far, Large, Wood, and Room, and then the Arena sometimes for specialty stuff, but these three right here, man, these are my go-tos. I absolutely love these three mics. The sounds of these.
So let’s not make it about which ones I’m using, although I’ll tell you, and just make it about the fact that I love to have a close room mic, a far room mic, and then a specialty room mic sound, and then I’ll blend. The verse I may have it less ambient. Maybe the little bit of the close mic, and then the B section or the chorus, I may let the far mics come in and add some life or some depth to the drums, and then maybe at the bridge, it gets really big, or — I’m just, you know, giving examples of how I may use this.
Basically, it starts with the reverb. I’ve got the Bricasti M7 samples from samplicity.com. You probably already know about these. If you’re a subscriber to David Glenn Recording, I have a free VIP Mix Training Bundle where I point people to these, and then I also have a bunch of free impulse responses that our man Joe Salyers recorded off of some gear, but these are at samplicity.com. They are like, donationware, so toss a tip, give some money for the guy who took the time to create these, but they are incredible. They sound absolutely insane, and I use them all the time.
These for drums, and then the sunset chamber is one of my favorite sounds. If you’re not dropping the money for a real Bricasti, this is a close second to be able to access some great tones.
So Bricasti Close, it’s the Studio B close mic. The Bricasti Far, Studio B far mics, and then I like to have the EQ on the back end of all of it so I can shape it. Maybe I want a bit more mid-range to come through to this, I’ll sometimes add compressors like I mentioned, but it’s here. It’s ready for me to go. Large wooden room, again, Nectar is, if I remember, for transient shaping, let’s go ahead and pull that open. No, you know what, that was for de-essing, and it was for if I send a vocal into this, I’ll have a de-esser that de-esses — I’m rambling here and stumbling — a de-esser that will de-ess before, but it’s very rare that I’ll ever send a vocal into one of these rooms.
But they sound good, so it’s there as an option.
The Arena is the Chris Lord-Alge effects plugin from Waves. I very rarely use it, but it’s there ready to go if I want to call upon it. This is a great plugin. Lots of cool tones. You can drive and distort, and do some cool filtering effects. You can see the options there, but that’s there as an option, and those are the verbs.
So if I’m sent verbs, I’ll just pull those tracks down, route them out to the high end, and tweak them to taste. You know, crush them, Decapitator, saturation, distortion, all kinds of cool stuff. Sometimes, I’ll take a stereo room, collapse it down to mono and blend that in as like, a trash mic if I don’t have the Neve for that, because I like the close or the far better than what it was recorded, yadda yadda.
But basically, we’re done with the drums. Those are the room mics, and I’m trying to think if there’s anything else we have to talk about when it comes to the drums. Let me look at my notes here, but pretty straight forward. The… Creating a dirty mono mic, I wanted to mention that. I did briefly about collapsing room sounds down to mono.
Sometimes, the overheads, I’ll blend those to a mono source, and then like I said, throw a saturation or distortion on it. Trash mic. We’ll show that whenever we do the mix, we’ve got a cool indie rock tune that’s got some — got a sweet vibe. We’ll definitely be doing some distortion on that one.
Routing. So we talked about the kick, snare, toms going to the all drums, and the metal of the kit going to high end. Just like to keep them separate. I like to smash the shells and blend that in nice. If I — if I choose to compress the overheads or the hat, the ride, any of that stuff heavy, I’ll do that at the track level and blend to taste, but I’ve yapped.
Not a lot of A/B examples in this, it’s more about the template. We’re going to get a lot of the sounds coming through once we mix the tune together, but basically, just to help you follow along, take a look at what I’ve got going on in the template. One last thing, I have the Oceanway A.
If I am not provided room mics, or even in that case, if they don’t sound very good, I will sometimes route my own blend from the sends from the kick, the snare, the toms, to Oceanway, and then bounce that and commit it as a drum — I’ll create a drum room from there, so sometimes, I don’t just route it and leave it through the send, I’ll actually send it, commit it, and then create an audio track out of it. That’s another cool way to work, but there we have it. Drums.
If you have any questions, man, please, post in the comments below, go to the Facebook page, David Glenn Recording on Facebook, like, send me questions, we’ll do live Q&A, all kinds of stuff over there, and if somehow you missed it, don’t forget, the free mix template for my exact template that we’re going through here, as well as the stock plugins version for as many DAWs as possible, go to davidglennrecording.com, and we’ll catch you guys in the next video.
We’re going to take a look at the bass, the bass guitar, sub frequencies, a little referencing technique, and we’ll see you in the video. Thanks again for checking it out, and we’ll talk to you soon.
Elevate Your Ears