Tips for Mixing Screamed Vocals
07/26/2014

It’s the 4th of July today, it’s very hot in here, so I’m kind of glossy because I turned the AC off so that it doesn’t bleed on the video track, and you’re probably going to hear some fireworks going off at some point, because the neighbors have had a couple of beers and they’re already getting started, so I apologize for that.
Today we’ve got a cool video. We’re going to talk about mixing screamed vocals for metalcore or hardcore. We’re just going to start out focusing on the basics. I’m going to show you some basic approaches that I utilize for compression and also EQ. So let’s go ahead and jump right into Pro Tools and I’ll show you guys what we’re working with today.
Okay, so here we are. First thing to note is there were two screaming vocalists for this. Brandon is the top and he’s the lead vocalist, and we’re going to focus on him and work with his tracks today, so I’ll play his verse with all of the processing on there, so here’s kind of what I ended up with.
Okay, so that’s like a melodic hardcore sound. By the way, the band is called Search Flies. They’re local here from Boise, my town. They kind of have a Ghost Inside type sound to them.
Brandon is really raw, we recorded with an SM57 into an ART preamp that I have through a Pro VLA. There wasn’t much compression I needed to apply. The way he projects it already kind of had a really compressed sound to it just the way he pushes the air out of his diaphragm there.
Mostly was I was concerned with, there was a couple of EQ things that I’m going to show you, and again, we’re just going to focus on the EQ and dynamics here to get a good base sound to work off of.
So I’m going to go ahead and do some A/B comparisons. I’ve duplicated the track, so I’ve got both the processed and our raw reproduction of that track. So let me just kill the automation so we don’t have to fight with that.
So, here’s the processed track soloed.
[scream vocals, processed]
Okay, and here’s the raw track.
[screamed vocals, unprocessed]
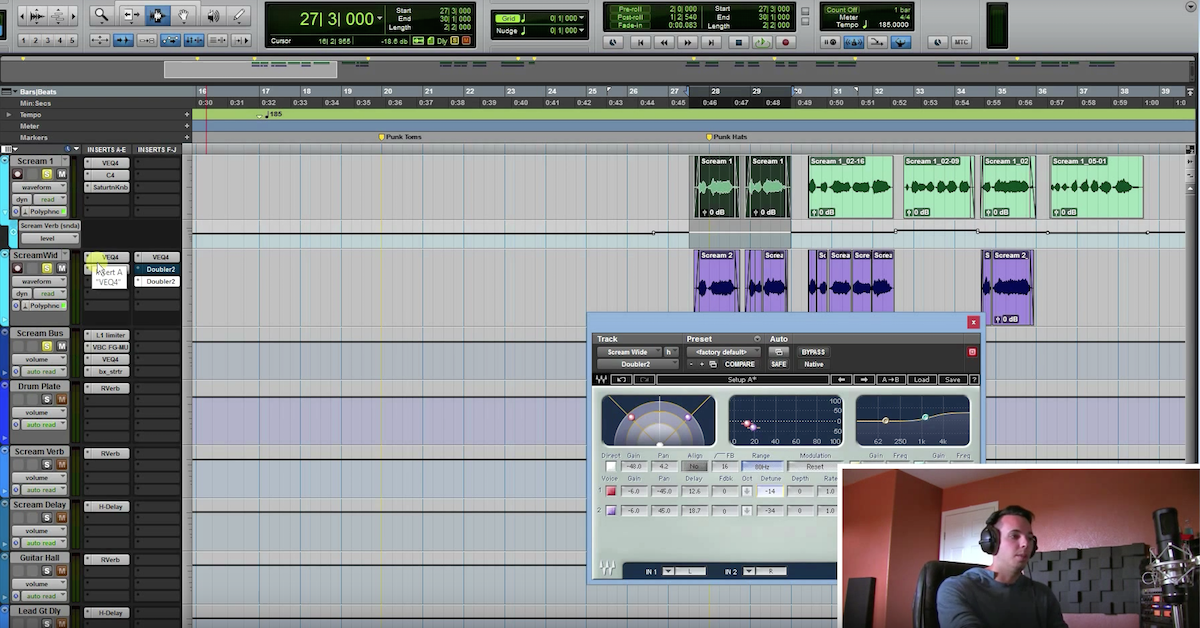
So you can see that there is some stereo width being added. We’re going to focus on that in another video; the stereo width on the processed track that is. Also, it’s a little bit muddy and it doesn’t sit as well or shine as well, but it was well recorded and he did a good job on the performance, which is the most important thing.
So we’ll just focus on the subtle EQ and compression changes and application that I made there. Just about with any vocal track, you guys are probably already doing this, I just throw a high pass filter on there. A good trick to find a good place for it is you just keep bringing it up until it takes away from the performance. This is what I’ll do to find a good spot for it.
[vocals, adjusting high-pass filter]
So it gets thin when you get up to 270. 150 seems to be pretty safe.
[vocals]
So that’s good. And that’s really just there to make sure I’m not sending any unnecessary low frequency information to stuff later in the chain. I’m not even going to use that as an EQ because I’m going to show you guys a new approach that maybe you’ve heard of that I totally recommend using, and that’s using a multi-band compressor as an equalizer. Essentially, it’s just four compressors, and one where you can dictate the frequency range to which they control. So it’s more intuitive than an EQ in that it only works when you need it to. If you have a certain frequency that’s jumping up at certain sections of a song, like if a vocal’s overly boxy in the bridge or whatever, you can dial this in to control that in that one section, whereas an EQ is going to pull that frequency out by a set amount for the entire song. So this is just more intuitive and it’s dynamic, and it’s more powerful. My opinion, it’s probably the most powerful tool you can have as a mix engineer.
So I’ll show you guys how I generally dial it in. I usually work in the mix, we’ll work both in context of the mix and without. Dialing it in, I’ll show you before, and I’ll bring it in, then I’ll start tweaking. You guys can kind of watch how I work with it, and I’ll explain a few things. So this is before it’s been introduced.
[vocals before processing]
And we’ll pull it in now, and I’ll start making a couple of tweaks. I notice when I’m listening to the vocals, just so you guys know, it’s kind of harsh up in that 2k range. You can kind of almost hear his lips and stuff like that, and some of that is just kind of unnecessary and not really appealing to me. There’s kind of some boxiness in the mid-range. I hear a little bit here and there, so let’s dial this in to kind of remedy some of those issues.
[vocals, upper-mid band soloed]
So when I solo that upper band there, we’ll try and keep that between 3k and 8 or 9k. Watch when he says struggling. On the “s,” it pulls it way down, because it’s more or less acting as a de-esser. That’s what a de-esser is, it’s just a compressor that controls the sibilance in the higher frequencies. So let’s go ahead and listen to the top end on there.
[screaming vocals, high band soloed]
None of that was too concerning. We could pull off a little bit up top to help reduce some sibilance and some of that nastiness. I’ll listen to the mid-range.
[screamed vocals, low-mids soloed]
That was kind of boxy.
[scream vocals]
So that pulls out some of the mud and some of that nasty boxiness in there, so that’s a good start. We didn’t really have anything below there since we high passed at 150, so none of that was going down below there anyways, so we don’t need to worry about the low band.
So now what we’re going to do is pull this back in the mix, and we can make changes based on the mix and make sure it’s going to fit well with everything. So let’s pull that back in real quick. Here’s everything; it’s going to need a volume boost I’m sure.
[song]
Okay, so I almost think we pulled out too much of that mid-range. What we can do here since we’ve pulled out about 3-5dB, we can add another 3-5 here. So let’s just start adding to it.
[song]
So that adds a lot of good things to it. I feel like when we pulled the mids back in there, it creates a really nice contemporary and modern sounding screamed vocal, it’s really aggressive. That’s the thing you’re going to notice about screams when you listen to them, they’re not so much centered around the upper frequencies to get that really overly present sound like a lot of clean vocals are, especially like dance music and stuff, there’s so much top end and vocals. This is focused more on the mid-range, and getting really aggressive, and sounding raw without being nasally and boxy.
[music]
So, that’s sounding pretty good for starters there. That’s how I would approach the EQ and compression. Again, it wasn’t really a matter of controlling dynamic range, because you can see how flat it already was, the way he screamed it. Again, it was just to be more of a dynamic equalizer. This is how I approach it, it’s not perfect, I’m sure I’d make some tweaks, but that’s a good starting point.
Also, the performance was good to start with, which always helps. You shouldn’t be having a whole lot of EQ or compression that you’d probably need anyway. That’s just how you approach it, and now we’re set to add harmonics, to add doublers to make it wider, to add overdubs or anything like that. We’re ready to add in some of the sweet stuff to make it really cool, but I just wanted to go ahead and show you guys the basics here before we move on to that, which we’ll talk about in another video.
So I hope you guys enjoyed it, and I hope that helps you make a better scream track, and makes it better in your metal or hardcore or whatever genre you’re working with.
Again, this is Derick from the Equinox Project Studio and the Pro Audio Files. Please stop by my website at www.equinox-ps.com, I’ve got tons of content on there, and also be sure to check out The Pro Audio Files as well, as always. Thanks for watching guys, hope you have a safe 4th of July, we’ll talk to you later!
Elevate Your Ears