Mixing Screamed Vocals with Waves Doubler and Harmonic Saturation
10/23/2014
Hey, guys. This is Derek here, with Equinox project studio and The Pro Audio Files.
We’re here today with part two of the screaming tutorial. We’ll pretty much be focusing on adding harmonics to the scream vocal, and also playing with the stereo field to kind of get it to be wider, a bit more aggressive, and help it sit better in the mix.
We’re going to be working with the same band as last time. It is going to be a different song, because I wanted to choose a song that kind of showcased the wider vocals a little better, so I’ll play the first verse here and you can kind of hear how that width really helps the vocal.
So let me go ahead and make sure I have all this set up and we’ll listen to that first verse.
[music]
So, you guys can hear that it sounds pretty big and in your face. You can compare that to what just a single take would sound like without the double there. Here’s just the single vocal.
[music]
It’s night and day. You get such a big stereo effect when that double is on there. It really brings it to life in my opinion.
I’ll show you guys how I do it. It’s really a simple process. You’ll even notice, I’m not using a true double. I’m using a doubler for this. It works great, it saves time… I just think it’s one of the best ways to do it. If I had the choice between recording an actual double and this, I find that this sounds just as good, and we get it a lot quicker. So this is usually my choice rather than recording a real double.
So we’ll go through the process right here. As you can see I’m using the Waves Doubler here on my double track. Any doubler will do just fine.
Let’s go ahead and bypass that and we will go ahead and add that in again, and I’ll show you guys kind of my work flow when I’m working with the Waves Doubler here.
So let me go ahead and mute this, and I’ll just solo the doubled vocal just for the purpose of showing you guys what it sounds like. So here’s how I’ll usually process it, we’ll just loop this area here.
[vocals play]
First things first. I pull out the center channel on the doubler because you don’t need it at all. We already have that single top take up there, which is going to occupy the center of the sound field. We don’t need anything else from the doubler in there.
You can go ahead and ignore the gain, because we have a discrete channel we can use to adjust that. Leave them panned hard left and hard right. I find that’s usually best. You can adjust how wide you want it with the fader level, so don’t worry about the pan.
The things you do need to worry about specifically with this Waves doubler is going to be the delay and the detune pitch, okay? You can kind of play with those to taste, and any extreme values, you start hearing some negative artifacts that don’t sound too pleasant. So just play with it, we’ll start with the delay first.
[vocals, adjusting Waves Doubler]
The main thing to focus on when you’re using the delay values is to kind of create a deviation between the left and the right side. There should be a good amount of time in between them to – I mean, the more time in between the sides, the wider it’s going to appear, so you should have a pretty good deviation in the delay time between the left and the right side. Too much can kind of get loose sounding, especially when you add the center. So anywhere between 6-15 or so is what I’ll put it in.
So that’ll be good for that, and we can go ahead and work on the detune. Again, going with values that are too extreme can create some nasty sounding artifacts. We’ll just kind of play with it and get it to taste here.
[vocals play, adjusting Waves Doubler]
Want them both a little lower to get a little more beef out of it and make it sound a little more guttural, which I kind of like on a double to usually be a little bit lower.
That sounds good right there. We can go ahead and bring back in the center vocal and see how that sounds.
[screamed vocals, center and doubled]
Sounds good! It’s really occupying and filling up the sound space a lot better. It’s a lot more aggressive, and it’s a lot more engaging to listen to. It’s not going to be super plain Jane or boring right up the middle. It’s not predictable, it’s just a lot better sounding in my opinion.
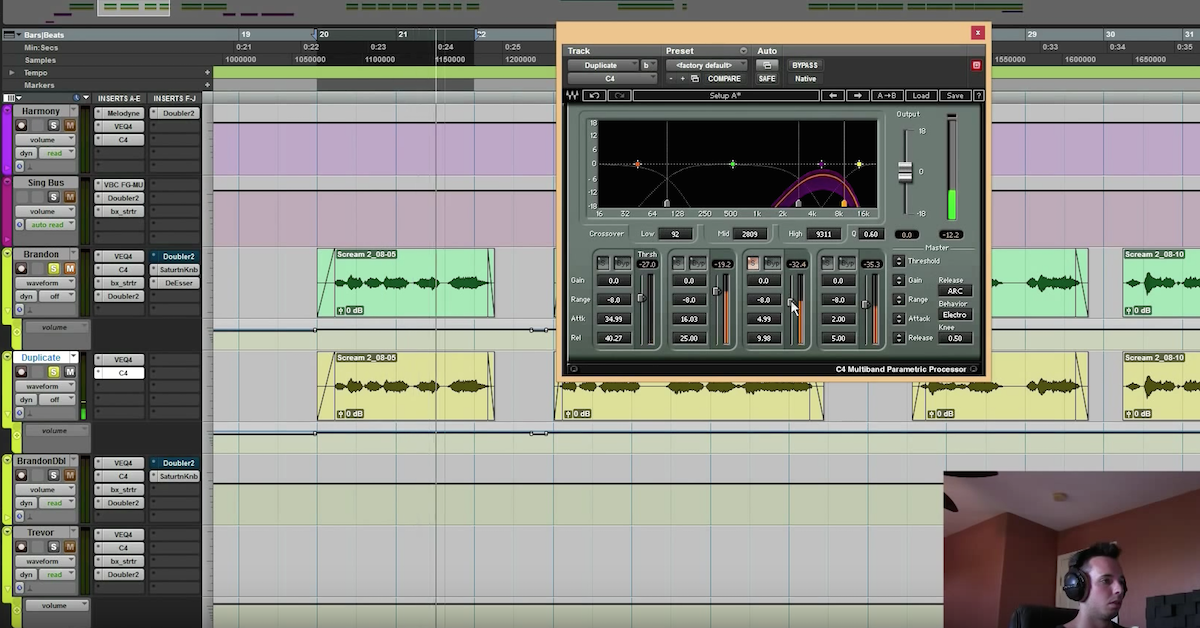
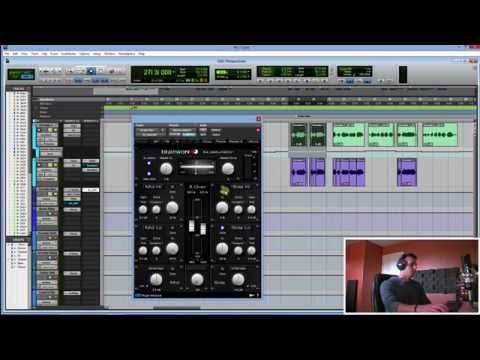
That’s what I’ll do usually for vocals. I’ve sweetened up the sound field of the vocals a little, and now I’ll talk about the harmonics, which I actually took care of predominately on our buss channel here. I used my trust [Brainworx] bx saturater, which I absolutely love. It’s one of my favorite plug-ins, period.
We’ll go ahead and look at that here, and I’ll start from scratch on this as well, and we’ll pull that in again and I’ll show you what my work flow is on this. You know, it’s probably not going to be the exact same as I had it, because sometimes I find I like different things. So there’s not really a right or a wrong way to do it.
We’ll go ahead and start. I usually start with the middle here. You guys probably know, this is a mid/side plug-in where you can adjust the center separately and the sides separately. We’ll start with the center, and we’ll start with the low and find a good crossover. And again, let’s solo it just for the sake of hearing what’s going on.
[scream vocals, lows soloed]
What I’m looking for here is the real guts and kind of the balls of the sound right here. This is where the real aggression is going to be for the most part, is in that really low resonant frequency of his voice, so that’s what we’re looking for.
What I like to do, is just really really over saturate it and get it filthy and clipping if possible.
[screaming vocals play, lows soloed]
We got that clipping pretty good there, and that’s just really going to make it a lot beefier sounding, I find.
We can go ahead and move into the top frequency and adjust that accordingly. Be careful of the top frequencies. Anything above generally even 1kHz or so can get you into trouble with sibilance, so you need to be careful. Again, we’ll listen to that and be careful adding these harmonics.
[scream vocals play, highs soloed]
So that sounds okay. We may have to back off from that a little bit. Let’s go ahead and focus on the sides here, and again, we’ll kind of find the beef of the sound.
[vocals, lows soloed]
Add a little bit there. We don’t need so much. I’m mainly adding the harmonic content to the center channel of the vocals there. So this is just kind of a little bit here, and I generally don’t want to add much, if any top end. You guys can kind of hear it sounds a little funky, like there’s a little phasing. There will be a little phasing caused by the doubler. Essentially what it’s doing is moving the same waveform out of phase a little bit, and there’s one on the left, as well on the right, which will kind of have a phasey sound, which isn’t noticeable at all and it doesn’t take anything away when we listen to it in context.
Let’s go ahead and play back everything with the harmonics and the doubler, and see what we have with the mix here, and I think it’s going to sound pretty tasty.
[music]
So that’s how I generally process scream vocals as far as the harmonics and the stereo field manipulation go. I hope that you guys found it helpful, and I hope that it helps you take your screaming vocal production to the next level.
This is Derek signing off for Equinox Project Studio and The Pro Audio Files. Hope you have an awesome week, and I’ll talk to you later.
Elevate Your Ears