Empirical Labs Arouser: Attack and Release Characteristics
05/7/2016

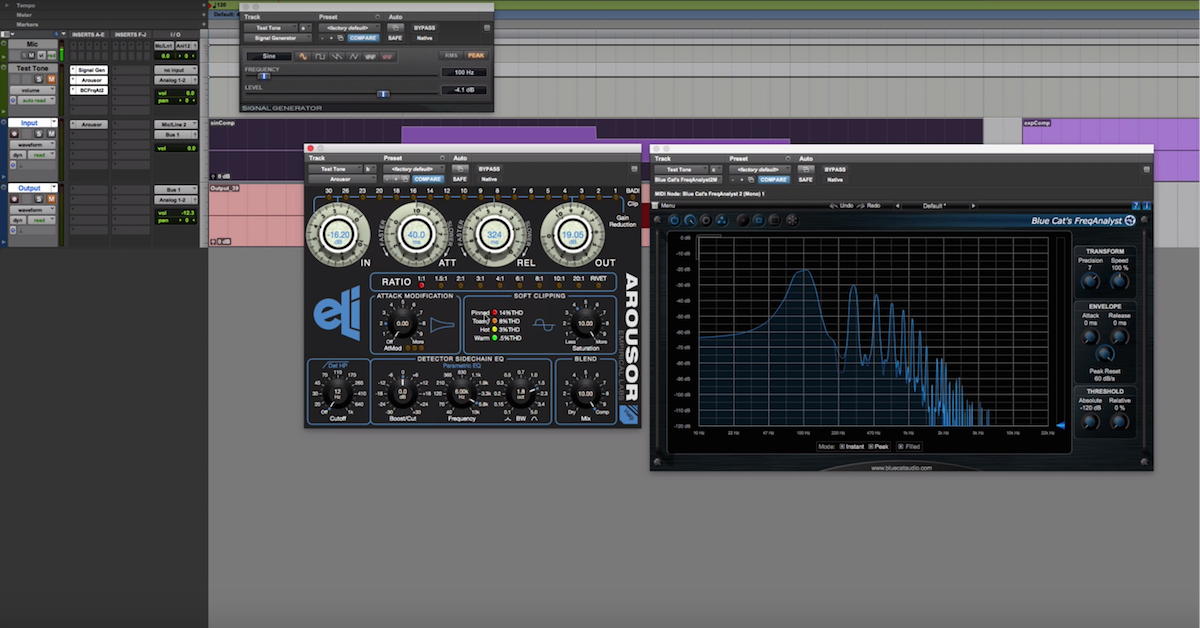
As of the making of this video, very recently, Empirical Labs released their first ever Native software plug-in. It’s called Arouser. You’re looking at it right here. You can download a free fifteen day demo of this plug-in off of their website.
As far as I can tell, it’s not even for sale yet. I assume it will be in the near future. This is probably some kind of final beta version to work out the last of the bugs.
As long as you’ve got an iLok 2, it’s compatible with AAX, VST, and AU plug-in formats on both Mac and Windows. This is a highly anticipated software to finally have running inside of the box natively. For a long time, Empirical Labs I guess had really only had a plug-in on the Universal Audio platform where they licensed their brand over to them.
As a company, they’ve actually been outspoken for awhile about how they didn’t think modeling and digital processing was up to the level to really capture what’s going on with their hardware. Their hardware is beloved by audio engineers and widely used for saturation and compression.
They’ve got the Fatso, they’ve got the Distressor… People love it. It has it’s own kind of sound, and it’s own kind of features and controls. You can use it for drums, vocals, guitars, just about everything, and it does it’s own kind of unique and cool thing.
So it’s awesome now for those of us that like to work inside of the box with software to finally have a plug-in that at least gets us most of the way there and sounds pretty good.
I’m excited because it seems like Empirical Labs, they put in the time, they put in the effort, and they’re willing to put their name on this and say, “You know what, this is going to give you what you’re looking for when you think of Empirical Labs. This is going to get you where you want to be.” So this isn’t an exact one for one replica of the Distressor or the Fatso. It’s got similar kinds of features and controls, but it’s not exactly going to be one for one parameters that you can set to do the same thing as a Distressor.
For the most part, it’s a compressor, within features, it’s also got some saturation going on too, so you know, try it out for yourself and see what you think. There’s lots of other great demos online too with people trying it out on drums and guitars and all of that kind of stuff.
When I opened it up and I started testing it out, I started wanting to get into the nitty-gritty and understand what’s going on. You know, what are these kind of unique features all about that give it it’s characteristic sound.
For the most part, you’ve got controls for a compressor like the input and the output that help you set the level of the signal driving into the threshold of the compressor, then you’ve got attack and release that you can set. Pick the ratio. Everything from 1:1 up to extreme settings. I’ve got gain reduction meters up here. You’ve got lots of side-chain controls, whether you want to roll-off the low frequencies or kind of enhance something in the mid-range or even upper-mid range to really drive into the compressor.
You’ve got the wet/dry mix for parallel compression in here, and you’ve got these other kind of unique controls like attack modification. You can turn it off, or turn it up, whatever that’s supposed to mean, and also soft clipping.
So as soon as I started playing around with it, I started to want to analyze what these things are all about and understand what is this attack modification? Is this feature giving me something that’s different from other compressors that I’ve already got? So in this video I’m going to focus on analyzing this parameter and give you a better idea about what it’s going to do, and then in my next video, a follow up one, I’m going to analyze some things about the soft clipping and see what’s going on with that there too.
So the best way to do this is to actually kind of rip off a video that I’ve done in the past to analyze compressor plug-ins, where I use a specific test signal that you’re seeing right here. It’s just a 1kHz tone, and it has two different levels.
I picked these levels specifically so that I can analyze the characteristics of a compressor. This first part of the signal, I set to be above the threshold of the compressor. So I can watch what happens to this signal when it first jumps up above the threshold of the compressor, and then I can analyze the attack characteristics.
I’ve got this part of the signal over here where the signal is intentionally below the threshold. You know, if you have any questions about how this exercise works, definitely check out some of my other videos. It’s great to see and look side-by-side, you know. What is an 1176 like? What is the Arouser like? What is other kinds of software compressors like? The dbx 160 and so on.
You can see what is it that gives one sound versus another one? Is that what you’re hearing? Are you hearing those subtleties and the difference between different kinds of compressors? So what I’m going to do here is run this signal through this compressor, look at attack characteristics, look at release characteristics, and print this signal over here on this other track down below called the output.
So I’m going to record it on this one, and then what I’ll do is just adjust some of these basic settings to begin with, like set a pretty fast attack and a pretty fast release and see what this is all about.
So I’ll print this one down here below and then start to adjust some of the parameters.
[printing 1kHz tone]
Alright. So you can hear, that’s just a 1kHz tone at a couple of different levels and look at what the effect is that is controlling the amplitude.
I’m going to mute this one, because it’ll get pretty annoying pretty quickly.
So this compressor has a very fast attack. You know, this is on the order of what you would think of with an 1176. This isn’t even the fastest settings that I’ve got. It is immediately squashing that transient. Very fast release too. I could even shorten it up more and see what that’s all about.
[printing with shorter release]
Almost instantaneous for the most part as far as compressors are concerned.
Then the interesting thing is to back some of these things off. Let’s look around maybe 300-400 milliseconds for the release, and maybe closer up here to like, 15 milliseconds of attack.
So let’s print this one and watch what the difference is.
[printing with longer attack and release]
So look at the slope now for the attack and the release. Right? This is not a linear sort of thing. It’s a — you know — exponential kind of decay going on in each of these things. I think this resembles kind of an opto sort of compressor where it’s curved like this.
Attack, right? Even on the longest setting, 40 milliseconds, let’s have a look at what that looks like.
[printing with longest attack]
So 40 milliseconds. What I can do is undo and go back. That’s fifteen milliseconds, and I’ll go forward now, and that’s 40 milliseconds. So it also seems like even with the longest attack, there’s also something going on with the ratio, or the amount of compression, at least at this limiting state.
So what this is going to bring me to is let’s look at attack modification, what that’s all about.
So here, let’s go back and I’m going to type in — one of the cool things about this plug-in is you can do perfect recall by typing in the numbers here rather than try to pick and line up the knob here. So that’s nice to have.
I’m going to stick with the 10:1 ratio. I’m going to increase this attack modification. So I’ll start out and print a fresh brand new one here to look at.
[printing new tone]
Here is at 15 milliseconds. Alright?
Now let’s turn up the attack modification and see what this is all about.
[printing with attack modification]
So the attack modification, if I switch back and forth, what it’s going to allow me to do is have a much longer attack. As it’s described here in the help if I click on this one — it might be difficult to see — the attack mod is a unique proprietary control that lengthens the initial attack time, especially on transients.
So for drums, what this is going to allow you to do is kind of set your compression that you like, but if you want a little bit more transient coming through to give your drums more energy, just turn up the attack modification a little bit.
Now, this isn’t extreme control. There are other plug-ins you can come across, like the H-Comp that has an attack sort of thing that does it’s own unique weird thing to the attack characteristics.
This one still has a similar kind of shape here. At least for this kind of input signal. So not a whole lot dramatic going on. I can compare this one to — this is the longer one — let’s step this up all the way to 40. Let’s compare the one where I’ve got the longest attack modification. I cranked it all the way up here to 10 on 15 milliseconds, let’s compare that with 40 with zero going on right here.
[printing new tone with attack mod at 10]
So this is 40 milliseconds, this is 15 milliseconds with the attack modification turned all the way up. It’s a subtle difference, but this is where the attack modification actually allows you, if you turn it up enough, it’s going to give you something completely different.
So here, you can see that the attack modification really gives you some control to lengthen the amount of attack that occurs.
So if this was a drum hit, you could allow that transient to peak through without being squashed too much.
So that’s all I’m going to show you here in this first video. I’m going to post then a follow up video where I go in and analyze some interesting characteristics about the soft clipping.
Hopefully this video gives you a better idea about the behavior and controls of the Arouser plug-in. Download this one for yourself, try it out, and really hear how it sounds on more musical instruments.
Until next time, take care, guys.
Elevate Your Ears