The Beginner’s Guide to Signal Flow for Mixing
05/5/2021
Article Content
Something that comes up pretty often in conversations I have (with members and with students & friends looking for help with their home recordings) is a lack of understanding of basic principles of signal flow.
On one level, it makes sense. It is most certainly possible to make it through a mix without routing the output of any track anywhere besides right to your mix buss. But on another level, producing music without understanding signal flow is kind of like being a basketball player who can’t dribble. Maybe you’re great at hitting shot after shot from way across the court, but it’s hard to think you couldn’t stand to improve your game by picking up that very basic skill.
What Is Signal Flow?
The term “signal flow” describes the path audio takes from its source to the output. In a mix session, the “source” refers to the audio/virtual instrument tracks that make up your production. The output is your monitors and ultimately the stereo bounce of your mix.
Though there’s nothing inherently all that complicated about signal flow, there are a whole lot of interesting twists and turns we can send that audio signal through on its path to becoming a stereo mix. And the choices we make around signal flow can have a huge impact on the sort of options we have for shaping sounds during mixing.
How Do We Use Signal Flow?
In practical terms, there are basically two categories of ways to direct signal in digital music production. One involves splitting tracks down a parallel path (the aux send) where effects processing can be controlled separately from the dry source track. The other involves routing multiple tracks to be grouped and processed together in a submix.
Even if you’re new to the concept of signal flow, you have probably at least heard of using aux sends for effects in a mix, and you may even have a pretty solid grasp on how to use this kind of signal routing. When you use an aux send, you are effectively splitting signal down two paths — the original straight line from the audio track to the mix buss, and a second (auxiliary) path that you’ve just made. It’s like a fork in the road, except the signal travels down both paths simultaneously.
With this kind of aux routing comes a few options for just how that source signal will flow down its parallel path. Generally, you’ll be able to choose whether your signal is sent post-fader (meaning the main fader setting on the source track will affect the amount of signal that reaches the aux) or pre-fader (where the full amount of signal will reach the aux send regardless of the fader setting on the dry track). Aux sends are used primarily for effects processing, whenever we want the ability to do something to the effects track that we don’t also want to do to the dry tracks that are feeding it.
The other main way we direct signal in a mix session is via group busses, also known as submixes. Where the aux buss is like a fork in the signal path, bussing tracks in this way is somewhat the opposite — merging multiple tracks into a single destination. In these scenarios, there is no pre/post-fader option because we’re routing the main output of the source tracks to the group buss. We’re joining paths, not splitting them, and the fader controls how much signal is flowing through to its destination.
The uses of this type of signal routing can be harder to appreciate for those who are new to it, but suffice it to say, it’s a huge part of mixing. You could even argue that this type of signal flow is the essence of what mixing is, because it’s all about mixing multiple tracks together at a single destination point.
This type of signal routing is essential whenever we have multiple tracks that need to be processed together. For those of you that want a deeper dive, I wrote a whole other article on reasons you might want to buss tracks in this way. The short version is that any time you’ve got multiple mics used to record one instrument, stacked takes of a single part (or stacked harmonies) or a group of tracks that generally function together in some way, this sort of bussing is probably something you’ll need during a mix.
Why Should You Care About Signal Flow?
Signal flow is a tool, and potentially a powerful one. It can be harder to understand how signal flow shapes sounds than a tool like compression or reverb does; routing signal to a buss doesn’t inherently change the way it sounds. Still, the paths we route signal down and where & how in the path we choose to process it can have an enormous impact on what we’re able to do in a mix session.
Once you get a handle for how routing signal can create new ways to sculpt sounds in a mix, it starts to become apparent that the possibilities are pretty close to endless. For now, here are a few common mix scenarios that can help us understand the role signal flow plays.
Submixes/Group Busses
This is probably the simplest signal flow application, and it’s the one covered in depth in the article I linked to above. The concept is pretty simple: a track in a mix session is going to have two output sections — a place to assign aux sends, and then a primary output. To group a set of tracks together in a submix, create an aux track and then route the main outputs of whatever audio tracks you’d like to group to the input of that aux.
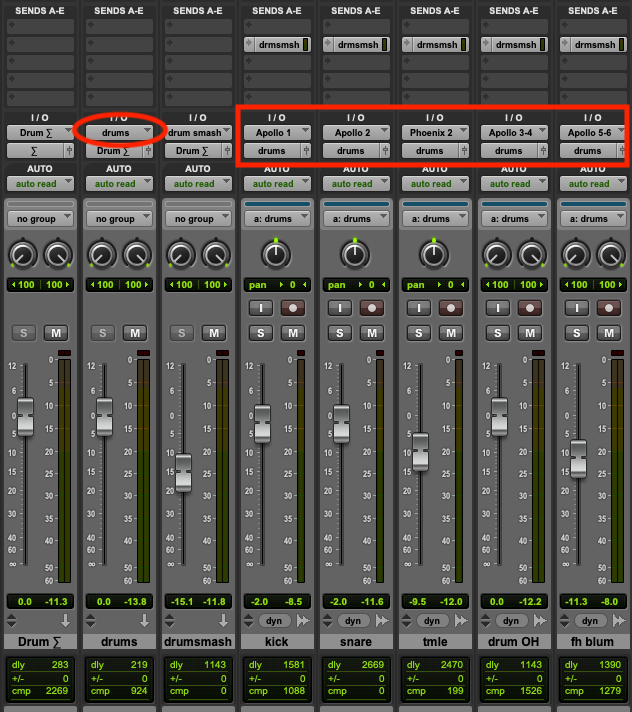
That’s it! There’s really not much to this one as far as routing the actual signal goes — connect the track outputs to the aux input and you’re done.
Remember, this is different from the sort of parallel aux routing commonly used for effects like reverb (more on that below). This is just adding a stop on a track’s journey to your mix buss. So if I route my drum tracks to a drum buss, I have control over the whole group on that aux track. If I mute it, the drums disappear. I can raise or lower the level of the drums as a group, and I can process them together.
Being able to control the volume of the entire group in one place has obvious benefits for the efficiency of your workflow. Processing those tracks together not only has that same efficiency advantage, but in cases where multiple mics were used on one instrument, it also tends to sound better.
Effects Sends
This type of signal routing brings us back to that idea of creating parallel paths for signal to travel down. The most common applications for this type of signal flow are ambient effects like delay and reverb. Chances are if you’ve mixed with effects busses, you’ve used them in that way. If you haven’t, here’s a quick primer on how to make it happen. For this type of signal flow, you’re going to use that other part of a track’s output section — assigning the send output to the input of your effects aux.
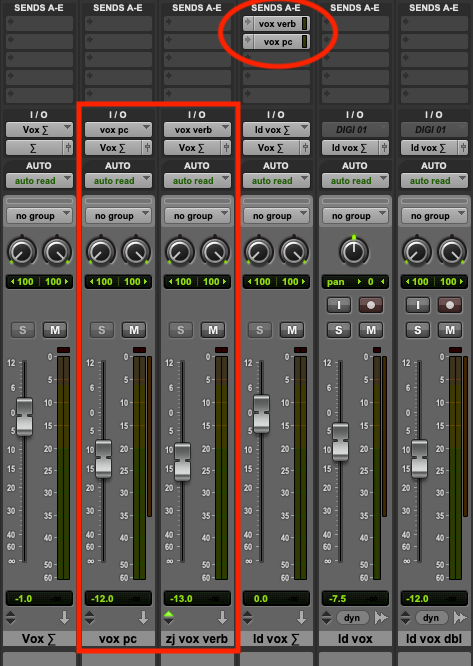
Send outputs are routed to reverb and parallel compression busses.
Unlike routing the main output, you can dial in an amount to send (pre-fader or post-fader), giving you control over how much of this effect will make it into your mix. If the effect in question has a mix knob, leave it at 100%. You’ll control the blend by dialing in either the level of the send or the fader level on the return track. Dialing down the mix on the plugin is going to re-introduce dry signal, and that can cause problems in your mix.
At this point, I want to address a question I’ve seen come up a lot with regard to this type of routing: why bother? If a reverb isn’t inherently going to sound any better on an aux, why should you care?
One answer is efficiency. If you’d like to have all your vocal tracks share one reverb to glue them together in a cohesive space, it’s much easier to send them all to the same effects buss and call it a day than to dial in separate reverbs on each track. You can easily make some wetter than others, and if you decide you want to change settings on the reverb, you only have to do it in one place.

Ready to elevate your ears?
It doesn’t have to take years to train your ears.
Get started today — and you’ll be amazed at how quickly using Quiztones for just a few minutes a day will improve your mixes, recordings, and productions!
The other, more important reason is control. Take this hypothetical as an example:
Let’s say you want a reverb to be part of a multi-effect chain. You want to add some movement to it by placing a modulation effect like chorus or tremolo in line with it. You want to filter out the mud with a fairly extreme high-pass filter with a cutoff at 500 Hz. From there, you want to add some saturation to bring out the tail and help it stick out in the mix.
That all sounds like a pretty cool plan to me, but there’s a good chance it would simply not work using those effects in line on the original source track. Say you want chorus on the reverb — do you also want it on the dry track? What about that aggressive high-pass filter? It probably sounds great on a reverb send, but it might ruin the source track.
The bottom line is that using sends for effects like reverb and delay opens up a world of possibilities that are either unavailable or prohibitively inefficient when using those effects as inserts on the source tracks. Do you always need that level of control? Probably not. But “don’t always need” and “never need” are absolutely not the same thing.
This type of routing is also at the core of a lot of parallel processing techniques apart from ambient effects — notably parallel compression. Though not all parallel processing requires the use of aux sends, many are hard to achieve any other way including some personal favorites I took a look at in this article.
Cascading Busses
Hopefully by this point in the article, you’re starting to see that signal flow is not a one-size-fits-all concept. It’s an adaptable tool that can be made to serve widely varying purposes in different situations. With that in mind, I want to consider some more advanced signal flow applications involving multi-level buss architecture. Take this example:
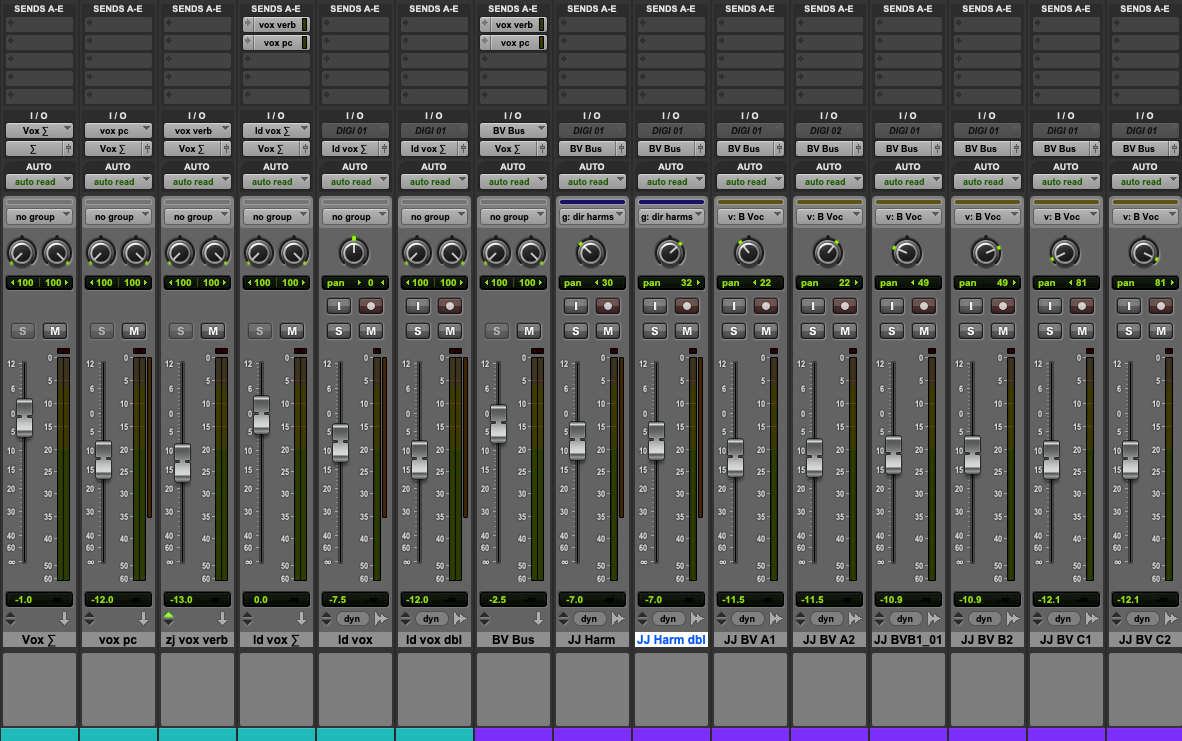
The vocal section in a song is comprised of ten audio tracks: a doubled lead vocal, two more tracks of harmonies, and six tracks of oohs and ahhs. The doubled lead vocal may want its own buss, as those two tracks are essentially functioning as a single unit. The harmonies and oohs and ahhs could each warrant their own submix, but because I want to control their dynamics together, I join them in a single buss. All of the vocals get sent to a parallel vocal compression buss (from their respective submixes) where they receive some heavy compression and high shelving sparkle (like I outlined in my parallel compression article). Similarly, the two main vocal busses are sent to a vocal reverb, with the backup vocals getting sent more heavily so they sound like they’re physically behind the lead. All of these vocals are then routed to a primary vocal buss, the vocal submix. The output of the lead vocal buss is routed there, as is the output of the backup vocal buss, as well as the outputs of the main vocal reverb buss and the parallel compression buss. Now you have one easy place to raise or lower the level of all vocals at once, as well as to apply processing that will affect the entire group of vocals.
If you had trouble following the logic in that buss structure, don’t worry, there isn’t going to be a quiz at the end of this article. My point isn’t to say “this is how you structure your vocal tracks,” it was to illustrate how bussing can be used to suit your needs and the needs of the song. Here’s a screenshot of the actual buss structure I was just describing. See if you can follow all the ins and outs I listed:
At each stage, any new juncture in the signal chain should be treated purposefully. Understand why you’re creating a new buss, and how it can be used to make your mix process more effective and better sounding. And of course, never just send a track to a buss because you “think you’re supposed to.”
Conclusion
I hope that at the end of this article, you have a sense of how you might be able to use signal flow to help you achieve better sounding mixes.
The point wasn’t to say that you have to use reverb as a send (I often don’t) or that you need to only process drums at the buss level — again, it depends on the situation. The point was that routing signal is a tool that can enable you to do more with your productions. If you’ve been ignoring signal flow, now might be the time to try something new. What exactly that means for you is up to you, so I encourage you to experiment with some of these ideas and see where they take you.
Premium Mix Training