5 Ways to Make Your Drums Punch Harder
Article Content
Punchy drums. We all LOVE them! Here are five ways to make drums punch hard in your mix:
1. With Good Phase Coherence
The foundation of a tight, punchy drum sound lies in achieving good phase coherence between individual channels before you even begin applying any additional processing.
What do I mean by “Phase Coherence”?
Phase coherence, in the context of drums, means getting the individual mics/elements of the kit to “push” and “pull” in the same direction (within reason), eliminating any major phase cancellations from occurring while allowing everything to punch significantly harder.
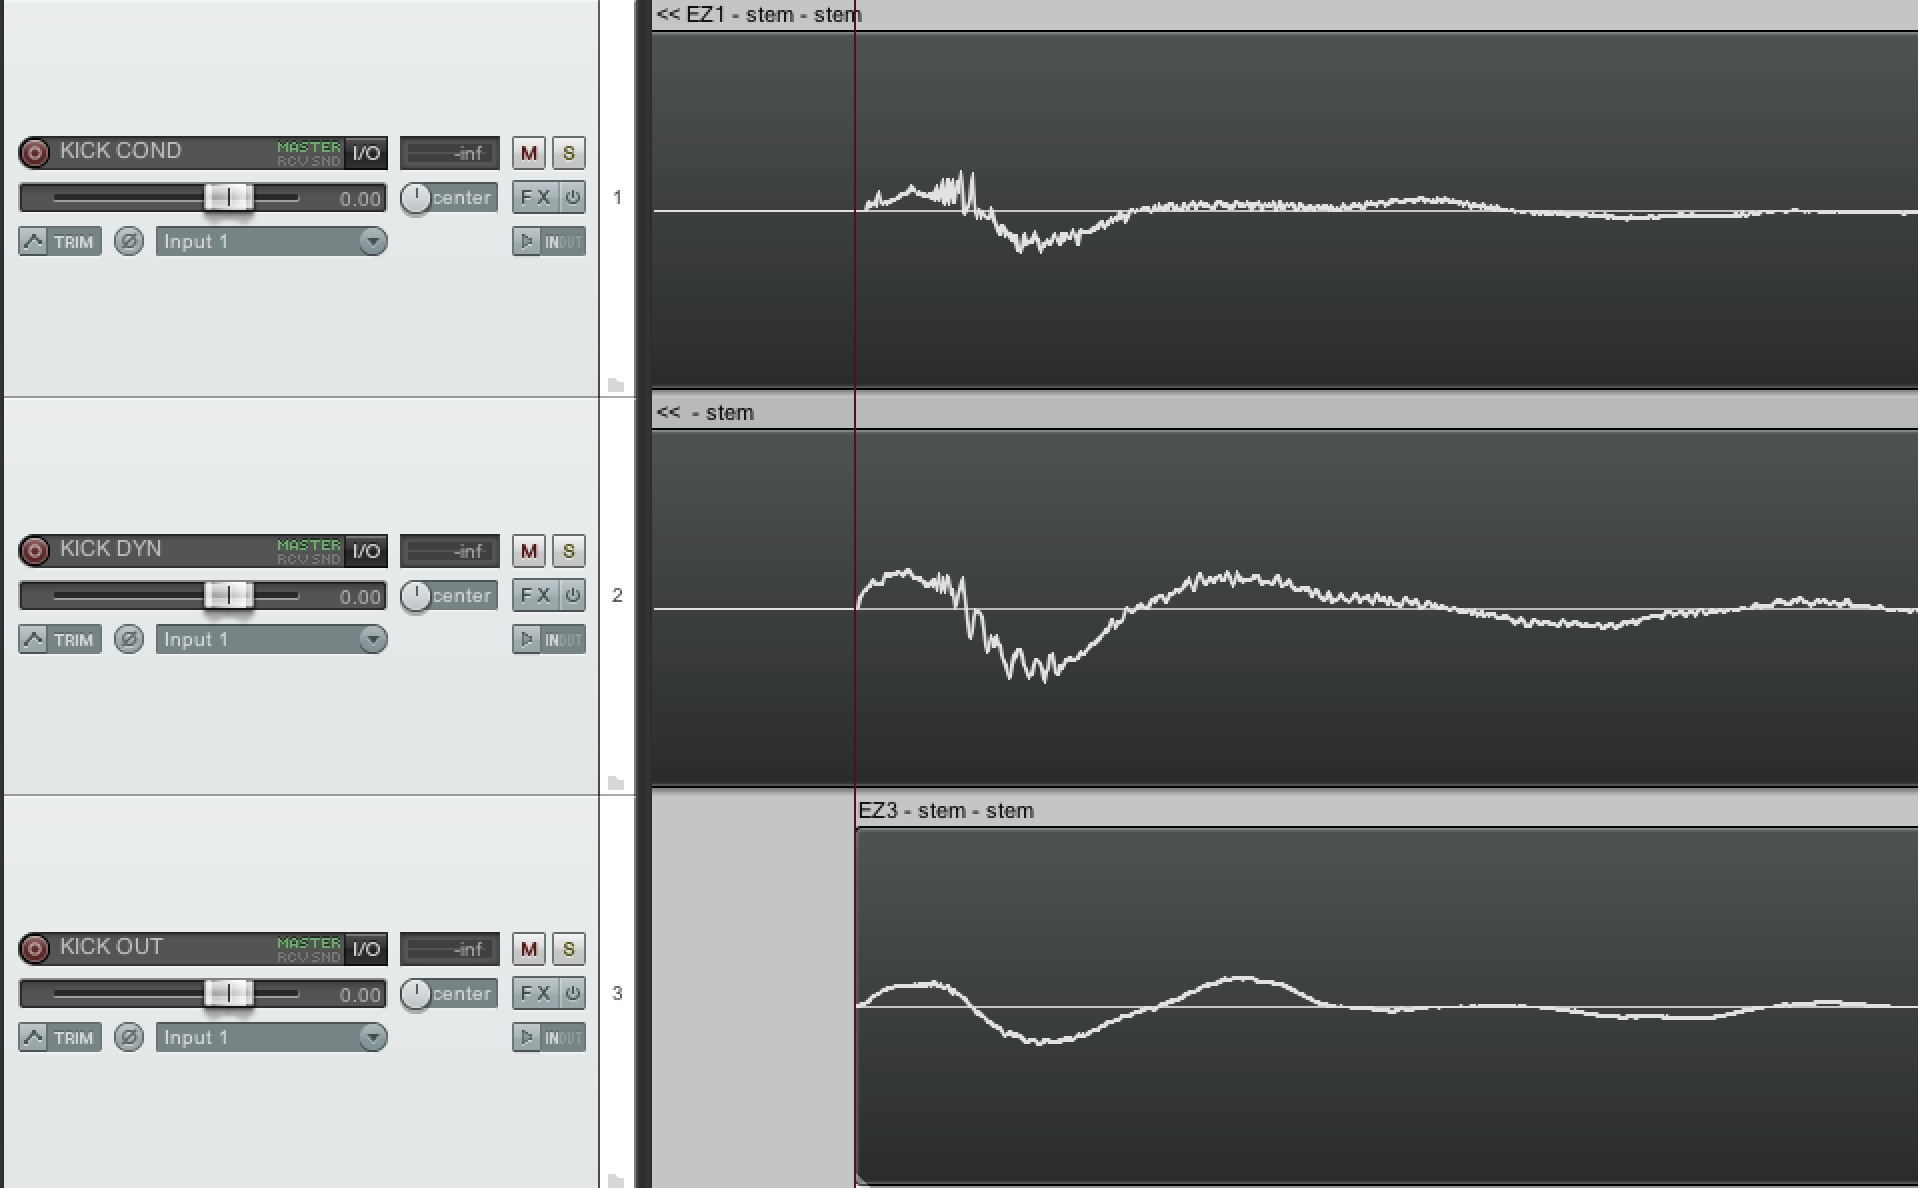
In the following example, I have a single kick drum which was tracked with three separate microphones, each serving a slightly different sonic purpose in the mix:
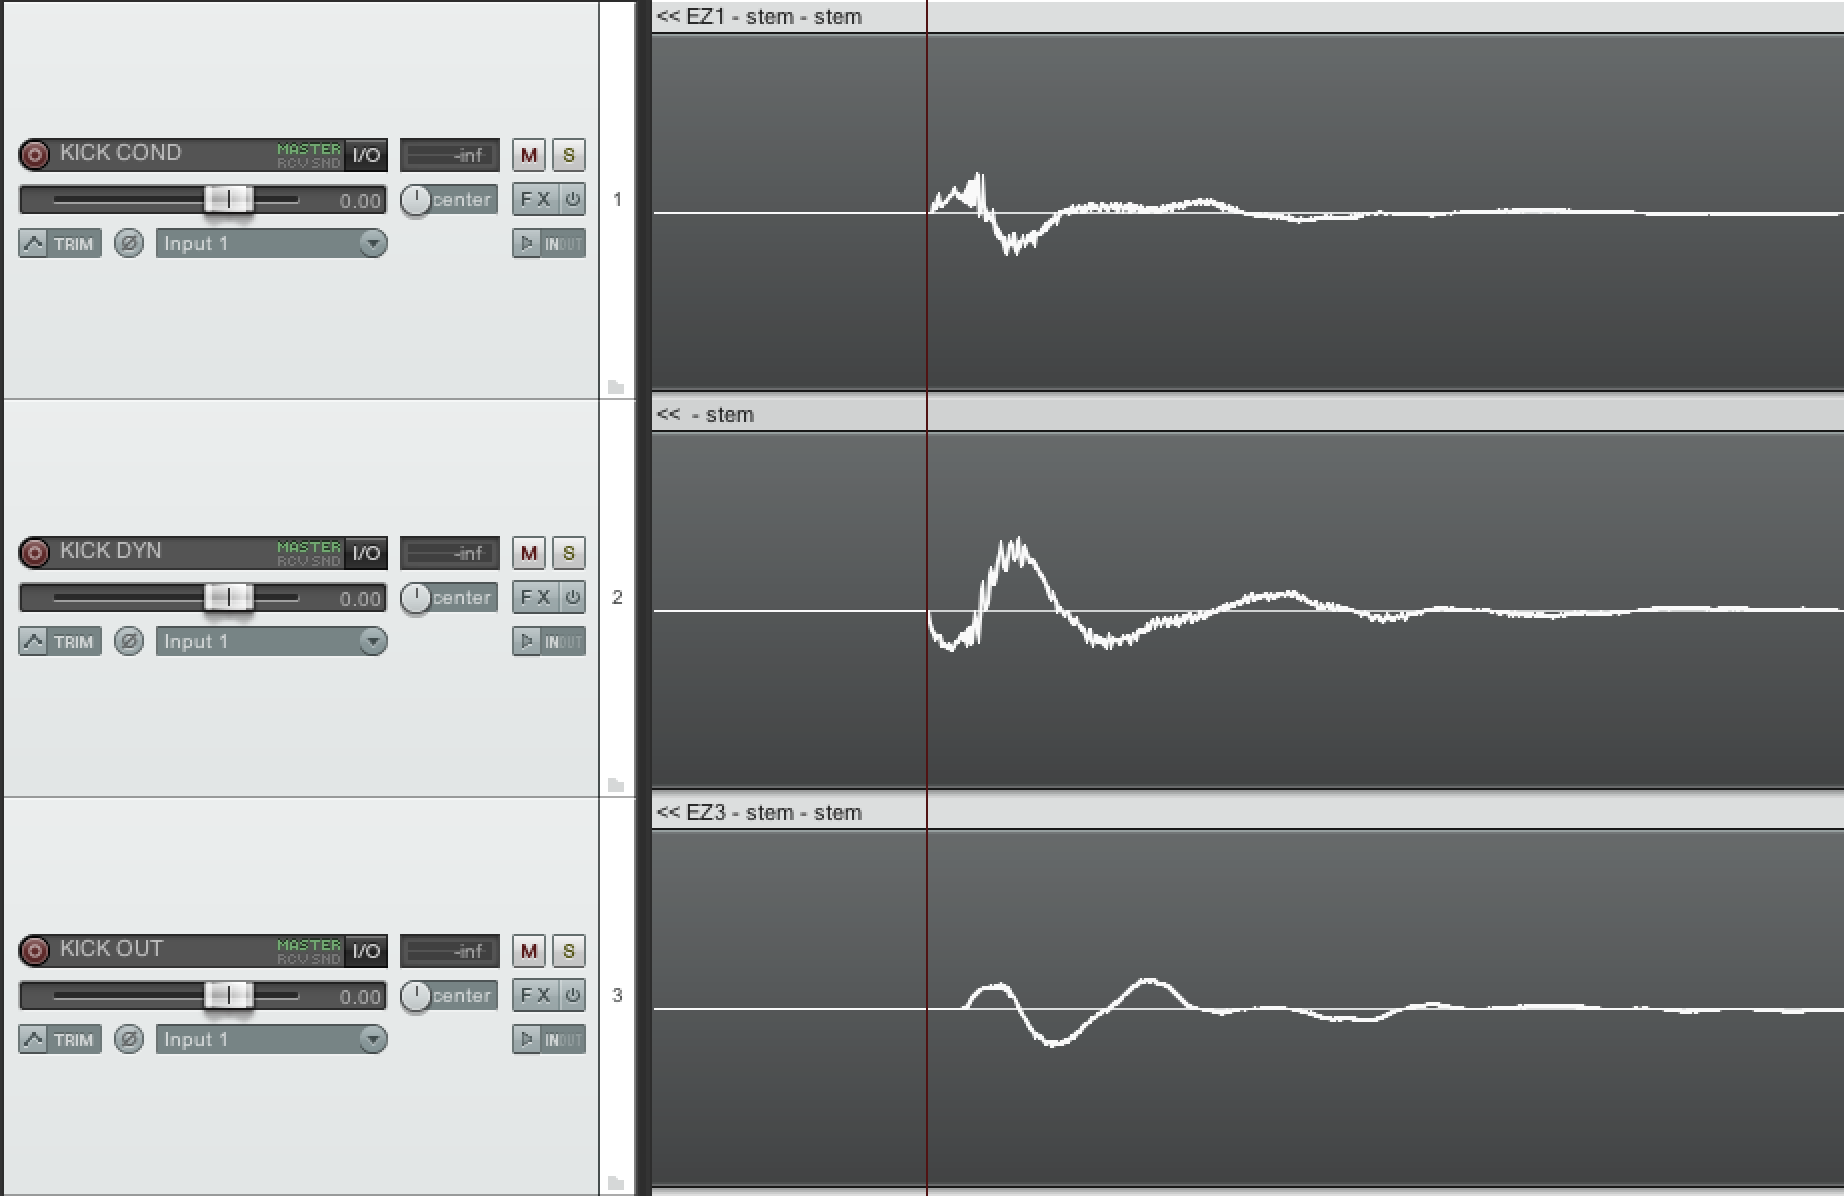
Three kick mics all somewhat out of phase with each other.
Notice how the waveform of the 1st kick is pretty much a mirror image of the 2nd kick (the two kicks are 180° out of phase with each other), and how the 3rd kick is coming in slightly late in comparison.
When all three are played back at the same time, the fact that the first two waveforms are attempting to push/pull in opposite directions simultaneously results in a pretty serious cancellation in low-end and transient punch, while the third kick coming in late results in a smearing of the overall kick attack (a kind of “flamming” sound with a lack of definition).
In order to resolve the first of these issues, I simply hit the Polarity switch on the second kick channel, flipping the polarity of the waveform by 180° and getting the “peaks” and “valleys” of the two signals to line up almost perfectly “in-phase”.
For the third kick, rather than messing with the polarity switch, which would only offer an in-between solution to our problem, I manually shifted the entire recording to the left until the waveform lined up nicely with the other two channels.
The end result of making sure all three kicks are working together in unison is a much more powerful low-end punch, a much more defined high-end attack, and no weird “hollowness” going on the mid-range.
The three kicks perfectly in phase. Second kick: Rendered sample after flipping polarity. Third kick: Trimmed and nudged.
When this same logic is applied across an entire drum kit (ex: the kick is in phase with the kick bleed in the snare and tom channels, the snare drum is in phase with the overheads, the overheads are in phase with the rooms, etc.), the culminating result is a night and day difference in the quality of your overall raw drum picture.
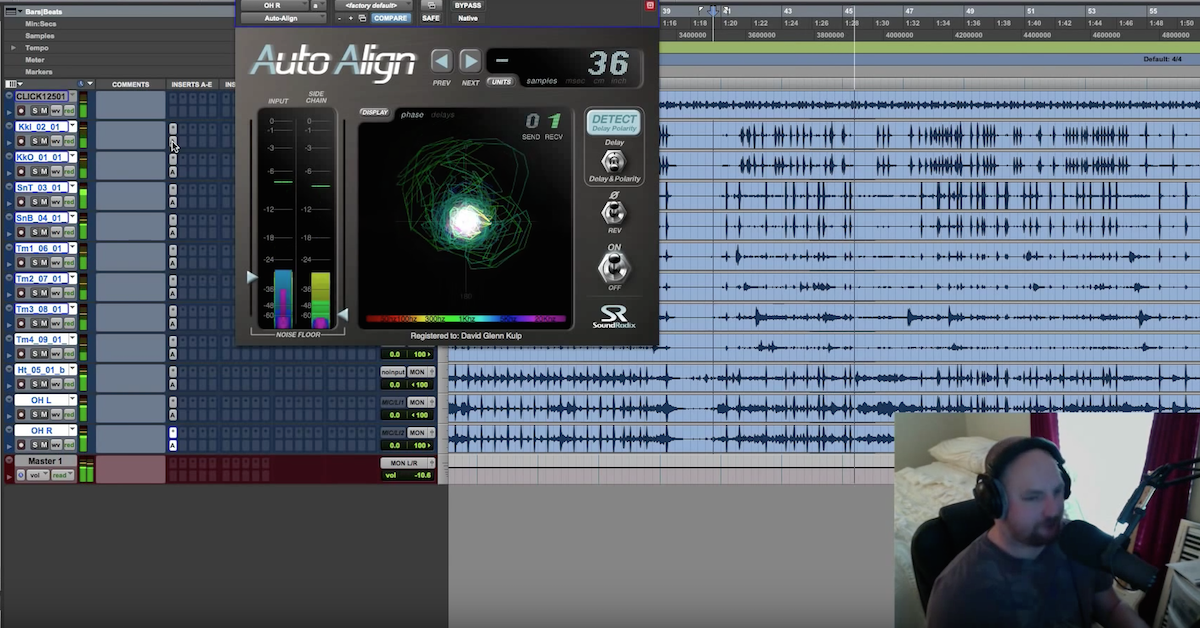
P.S. While there’s absolutely nothing wrong with resolving phase problems manually as I’ve demonstrated above, I highly recommend also checking out some of the modern “auto” alignment solutions available nowadays, such as Sound Radix’ incredible Auto-Align.
2. With EQ
Probably the simplest, most common method of enhancing the attack of a drum is through the use of high/high-mid EQ boosts.
Upon visually analyzing some of my favorite kick and snare samples within a spectrum analyzer, and then attempting to split them into their individual low/mid/high elements via the use of filters, I came to the fairly obvious conclusion that the stick/beater attack of a drum tends to start from around 1 kHz and can extend all the way up to 14-15 kHz.
Funnily enough, this also coincides with the fact that my favorite method for adding high-end to a drum signal (and the favorite of A-list engineers (such as Chris Lord-Alge, Andy Wallace, and Randy Staub) happens to be the 8 kHz high-shelf on an SSL Channel Strip, which starts boosting at around 1 kHz onwards.
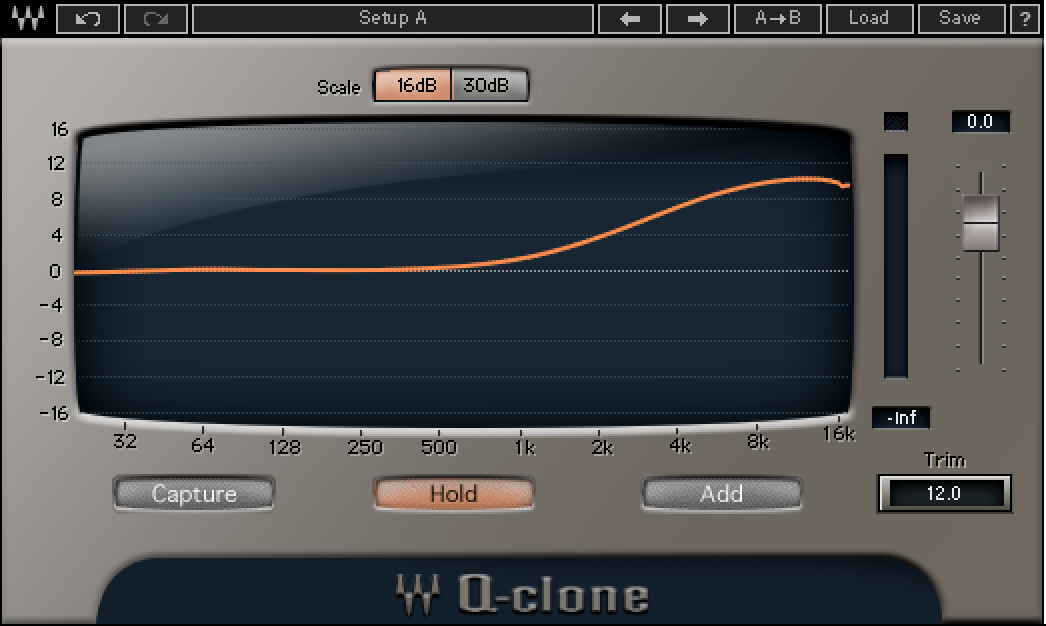
Visual analysis of a +10dB 8kHz boost on an SSL E-Series Channel strip.
The great thing about the SSL high-shelf is that it’s pretty foolproof, and sounds extremely musical. Simply crank the 8 kHz until you reach the desired amount of attack, set, and forget!
P.S. Unfortunately, I can’t give you exact numbers for how much you should be boosting, as they’re entirely dependent on your source signal, and genre of music which you’re mixing. All I can really say is: Don’t be afraid to go drastic! Some of the best drum tones of all time are the result of an SSL EQ being pushed HARD.
3. With Compression
Although when first starting out people tend to think of compression primarily as a method of dynamics control, the attack and release parameters of a compressor can also be used as a powerful ADSR manipulation tool.
Simply put, the attack parameter of a compressor determines how long it’s going to take for the signal to reach it’s fully “compressed” state after exceeding our predetermined threshold.
In the following example, for the sake of visualization, I sent a 1 kHz sine wave with some drastic volume fluctuations through an SSL E-Channel compressor in order to help you understand what this parameter is actually doing. (Everything going on here also applies when compressing drums):
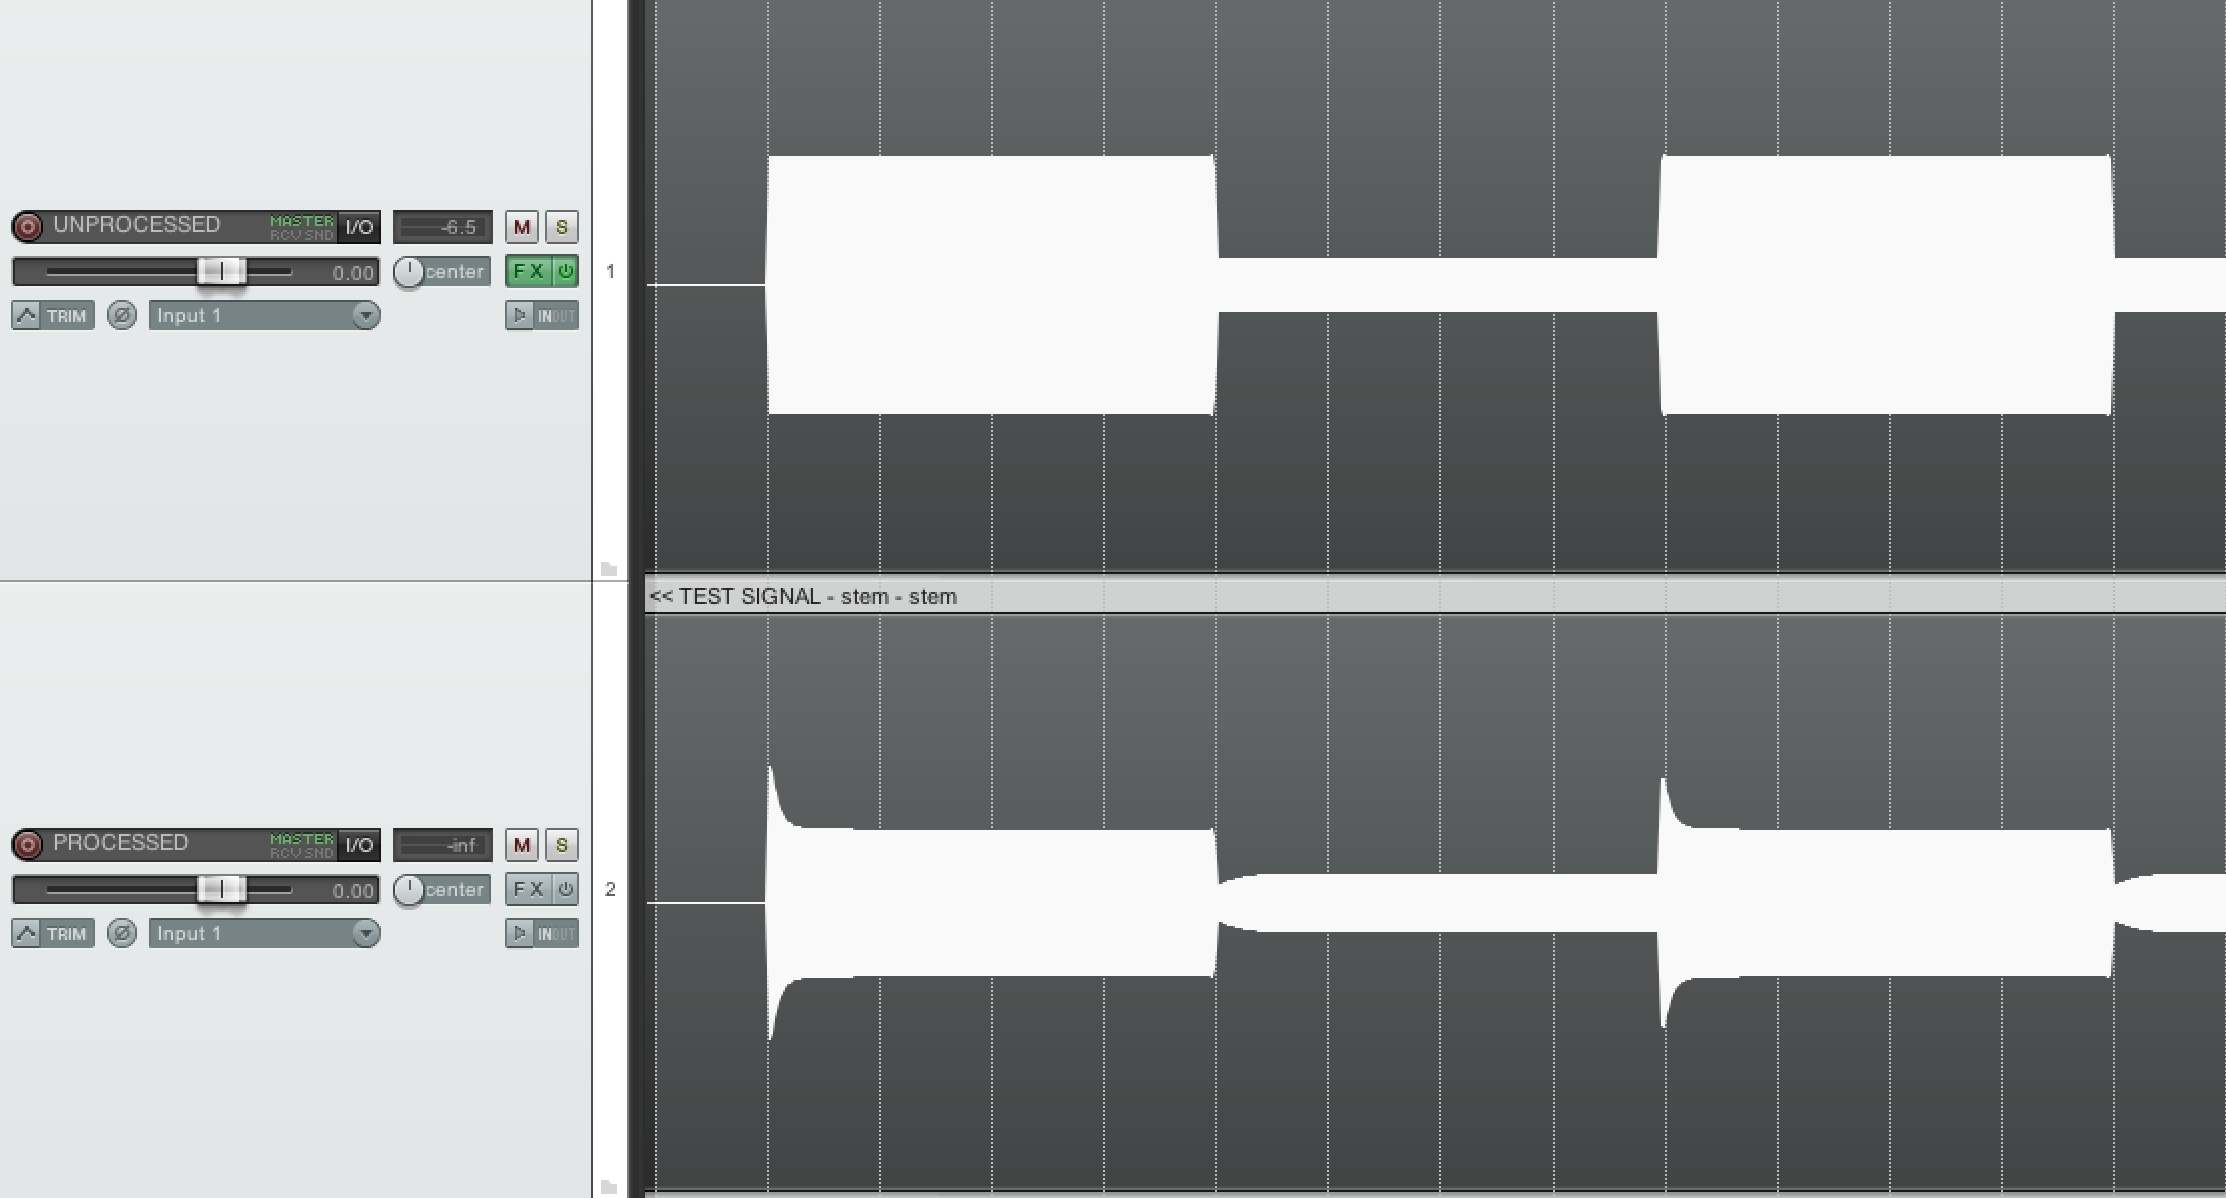
Top Channel: Our unprocessed sine wave, with some large volume fluctuations. Bottom Channel: The same sine wave processed through -6 dB of Waves SSL E-Channel 4:1 ratio, slow-attack, fast-release gain-reduction.
As you can clearly see in the comparison above, our full -6 dB of gain-reduction didn’t kick in instantaneously. Instead, the compressor gradually clamped down on our signal within 30-40 ms of it passing above the threshold (due to the “slow attack” setting we selected).
As a result, yes, we’ve reduced the dynamic range of the signal by 6 dB. HOWEVER, after applying +6 dB of make-up gain to this signal, what we’ve ALSO effectively done is add +6 dB of initial attack to the signal!
The main conclusion we can arrive at through this little experiment is: If you want total dynamics control without drastically affecting the envelope of a signal, you might want to consider opting for faster attack times. If you’re looking primarily to enhance the attack characteristics of a signal, you probably want to experiment with slow attack compression.
4. With Transient Designers
Transient designers operate under a similar mentality to the “attack enhancing” compression process I outlined in the previous section, with the primary difference between the two methods being the fact that unlike compressors, transient designers aren’t limited by a fixed threshold, and instead offer level-independent dynamic processing of transients based on the input signal (to a certain degree).
Taking this even a step further, certain transient designer tools, such as JST’s Transify, allow for attack and sustain manipulation on a Multi-Band scale, giving the user a microscopic level of control over the ADSR envelope of a drum hit.
In the following example, JST Transify was used to enhance the high and mid-range attack information of a kick drum without affecting the lows or low-mids:

Boosting attack on a kick drum using JST’s Multi-Band transient designer “Transify”. (The first two kicks are with Transify disabled, while the last two kicks are with Transify enabled)
By using this method, we’re able to increase drum attack without making the lows sound overbearingly boomy or the mids sound tubby and loose.
5. With Volume Automation
A less common, but incredibly customizable and controlled method of enhancing drum attack is through the use of volume automation.
In the following example, I processed a kick drum sample through 8 dB of 4:1 ratio, slow-attack, fast-release Waves SSL E-Channel compression. (Fairly typical settings when trying to enhance a drum’s transient punch, albeit slightly exaggerated for the sake of this demonstration).
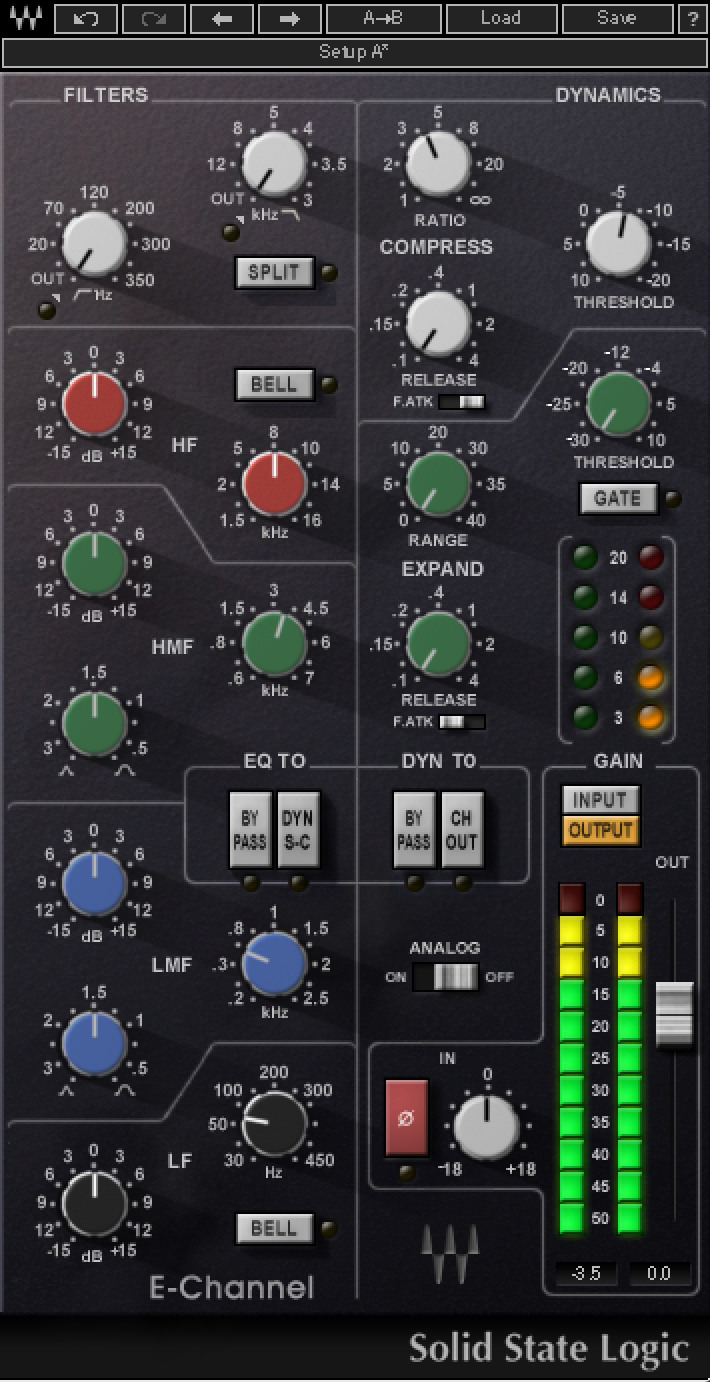
Waves SSL E Channel settings
Next, I placed my processed and unprocessed kick drums on top of each other within Reaper’s editing window, allowing me to compare the waveforms of the two signals.
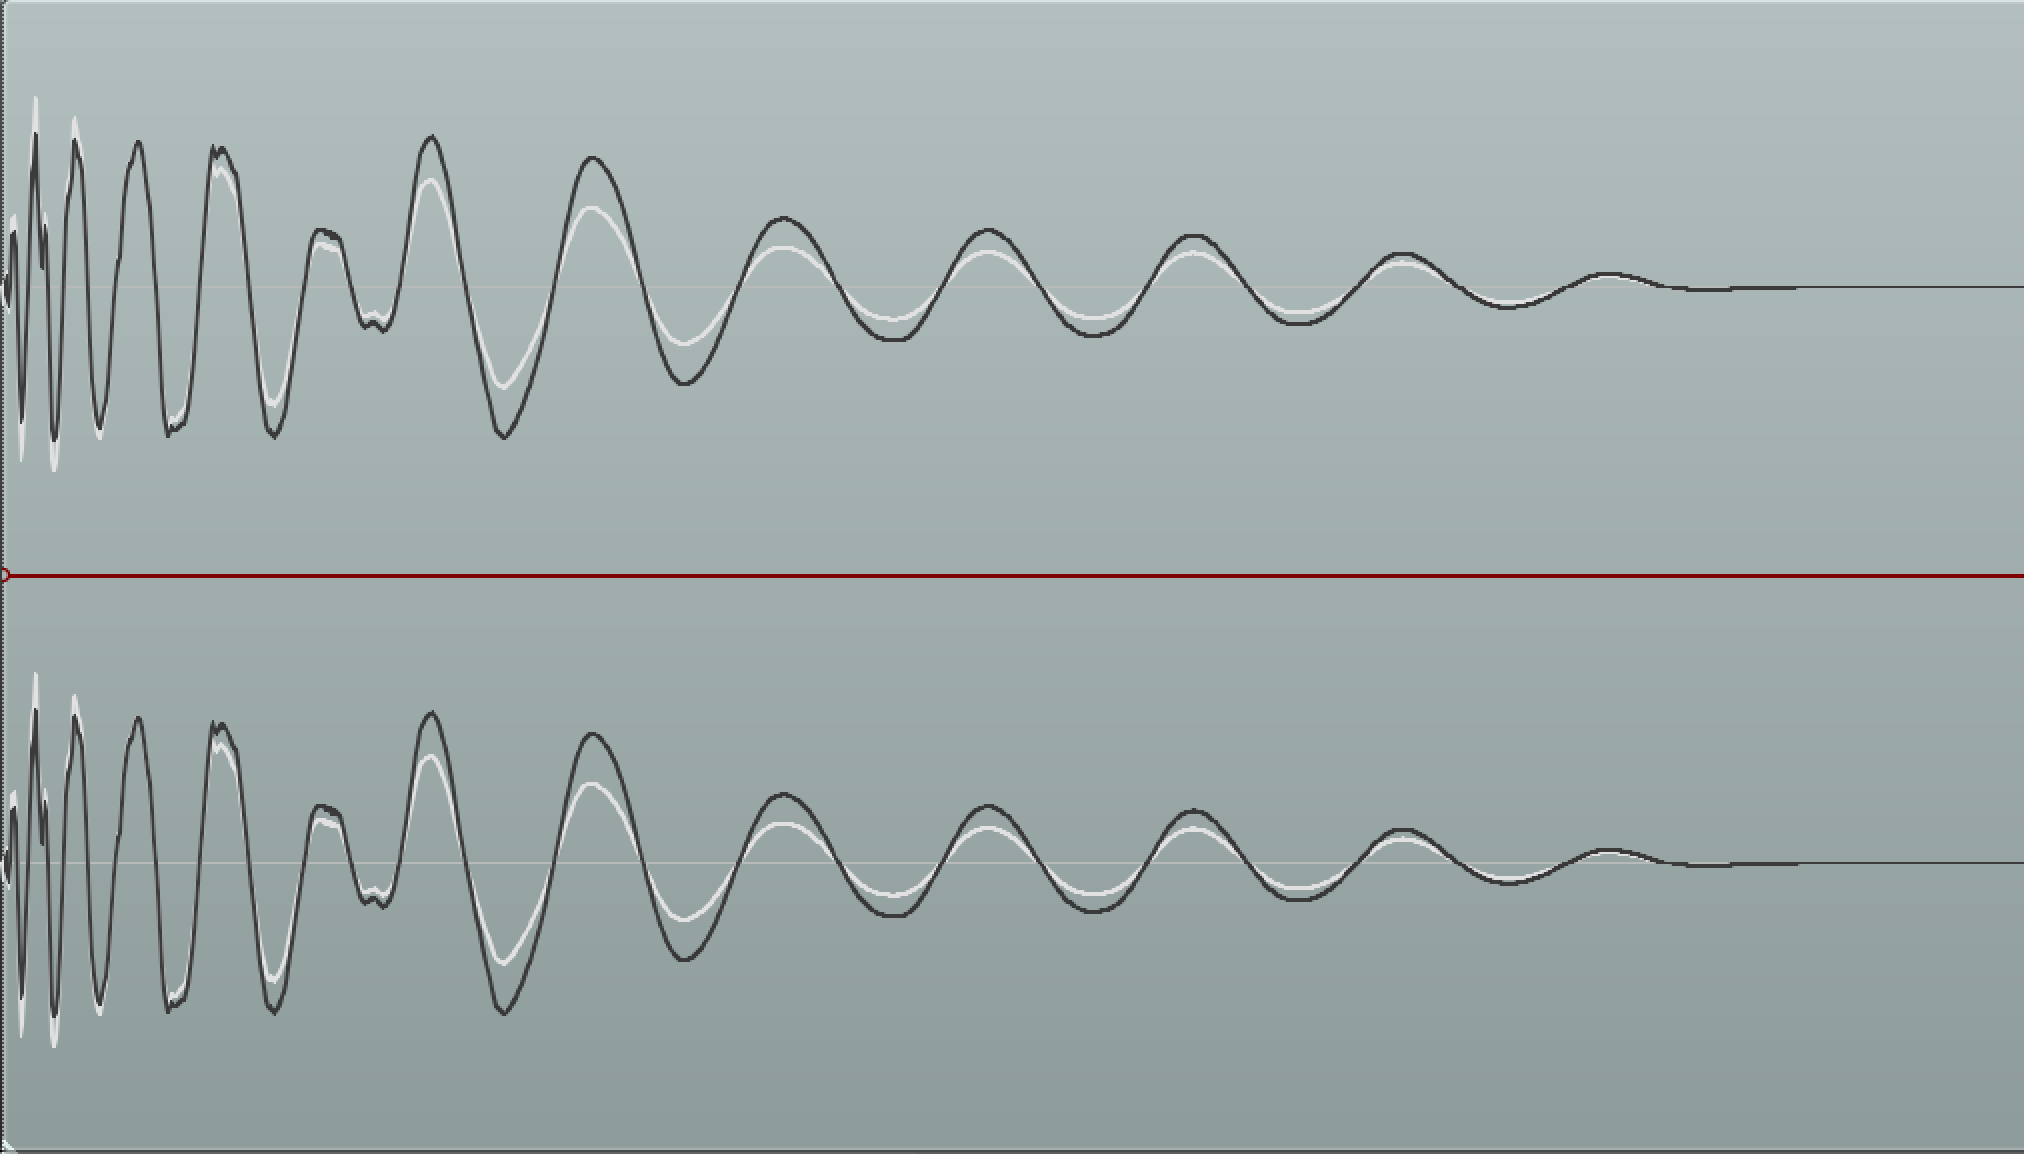
Our processed (black), and unprocessed (white) kick waveforms compared visually in Reaper.
Finally, I applied a custom volume automation curve to the processed signal in order to match the two waveforms as closely as possible.
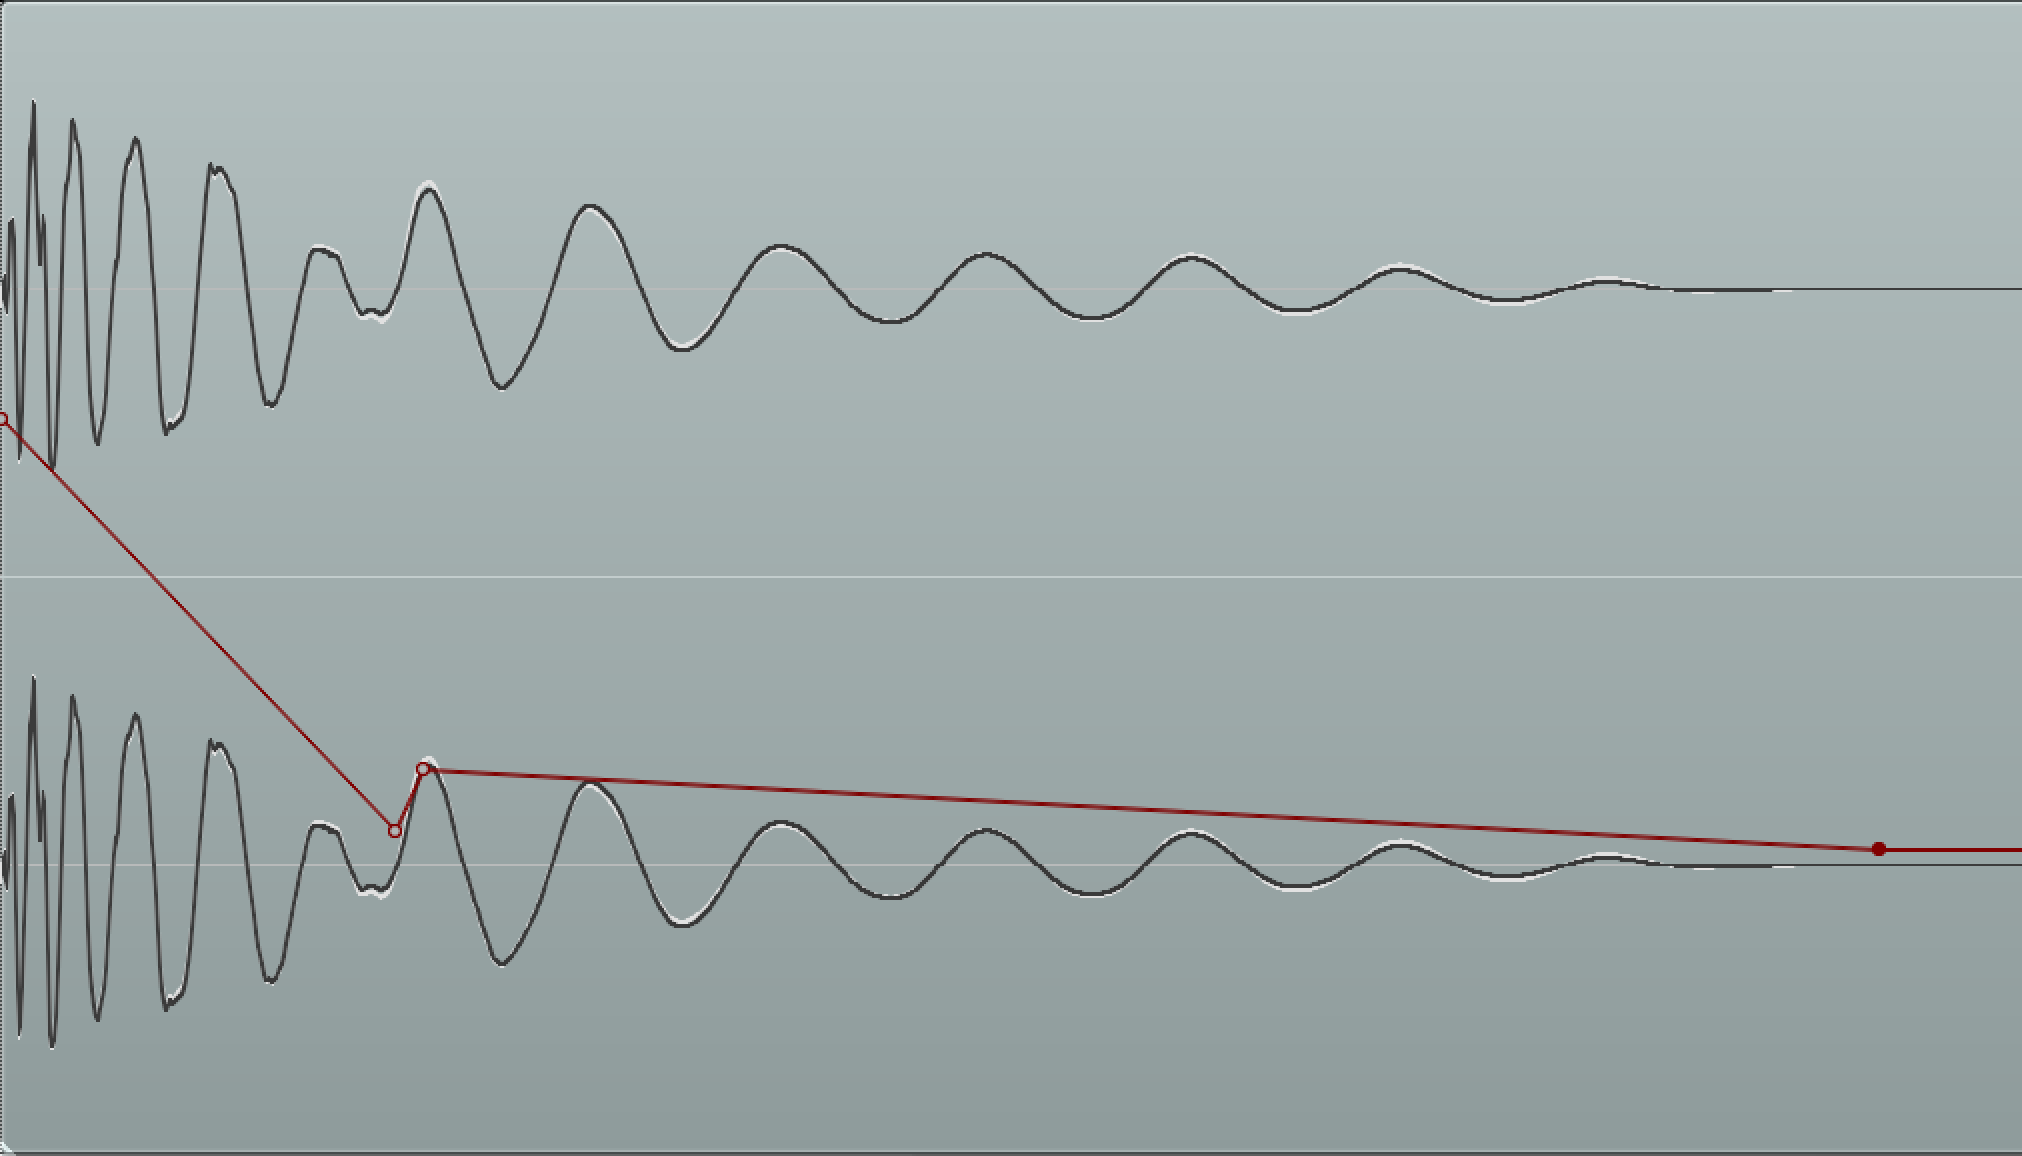
Both kick drums closely matched using the processed kick’s “Take Volume Envelope”.
As you can see in the example above, the primary difference between the two waveforms was pretty easily balanced out with a 30-40 ms long, 8 dB “attack enhancement curve”. Almost exactly what you’d expect given the SSL compressor settings which were used.
Sonically, I could hear no distinguishable difference between the kick processed through the SSL, vs the kick processed using volume automation.
My Point — Why would you bother with volume automation over EQ or Compression?
- You can use this method to enhance the attack portion of a drum signal without altering the sustain or release envelopes whatsoever.
- When dealing with acoustic drums, high-end EQ boosts and transient-enhancing compression can cause an increase in drum/cymbal bleed between hits, which is often an undesirable side-effect. Volume automation of this nature allows you to manipulate drum attack without adding a huge amount of additional kit “wash” to your signal.
- When compressing an acoustic kick drum mic with a lot of bleed, loud snare and tom hits will often cause the compressor to clamp down unnecessarily. In sections of the song where the kick/snare/toms are playing several notes in quick succession, this can cause the kick attack to get somewhat “blurred”, the exact opposite result to what we’re actually after.
Final Words
While coming up with the examples for this article, I was struck by the fact that there really are so many different ways of achieving the same end goal when it comes to processing audio — you just need to know how to use the tools!
Know of any other unique or interesting tricks to make drums punch harder? Be sure to share them in the comments section below!


