5 Favorite Tips for Mixing With Reverb
01/26/2022
Article Content
It’s easy to fall in love with reverb. It has an almost magical ability to smooth out a rough performance, blend sounds in a musical way and transport the listener. What’s not to like about being able to recreate the sound of a grand concert hall or a top-tier studio from your humble bedroom recording setup?
Well, it turns out it’s also really easy to screw a mix up with reverb. “Too much of a good thing” is absolutely possible, and that expression most certainly can apply to reverb. On top of that, plugins often come with a confusing array of options that might not be intuitive to use, especially for the uninitiated.
I recently wrote articles about two classic types of reverb: plate and spring.
In this article I’m going to take a look at a few favorite (and easy) ways to get more out of any type of reverb in a mix. Let’s do this.
1. Time the Decay to the Song
There are few ways to ruin a mix as time-tested as overly long reverb tails. Don’t get me wrong — long decay times can be great, and certain types of mixes really need them. But going overboard with reverb decay can ruin the clarity of a mix in a way that sounds unmistakably amateurish.
The good news is that getting reverb decay right is really not that complicated. The basic idea is that reverb should linger in spaces, but not stick around past the beginning of the next note or phrase. Letting the tail ring too long risks hurting the overall clarity of the mix, as well as removing the sense that the song has any kind of natural “breath” to it.
A common example could involve a mix where the lead vocal needs a long, vibey reverb (hint: a plate, chamber or hall reverb is probably what you’re after). Dial the reverb decay so you hear the tail between vocal phrases, but it’s cleared out by the time the singer begins again.
The same principle could be applied to drum reverb. Snare reverb should be done decaying by the time of the next snare hit. More realistic room ambience might call for an even shorter decay.
A great reference to have is a chart like the one below. It shows how tempo in beats per minute correlates with length of notes in milliseconds. Don’t trust numbers alone to give you the “right” decay time, but find a note length that makes sense as a starting point and find what sounds right from there.
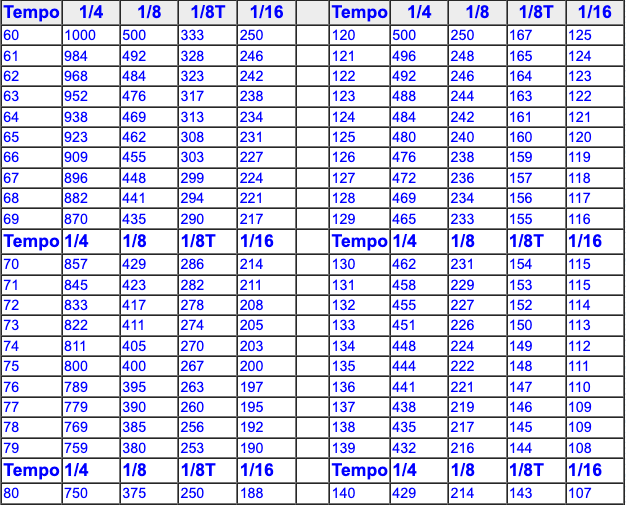
Yup, this thing again. It’s in my bookmarks. I use it every day.
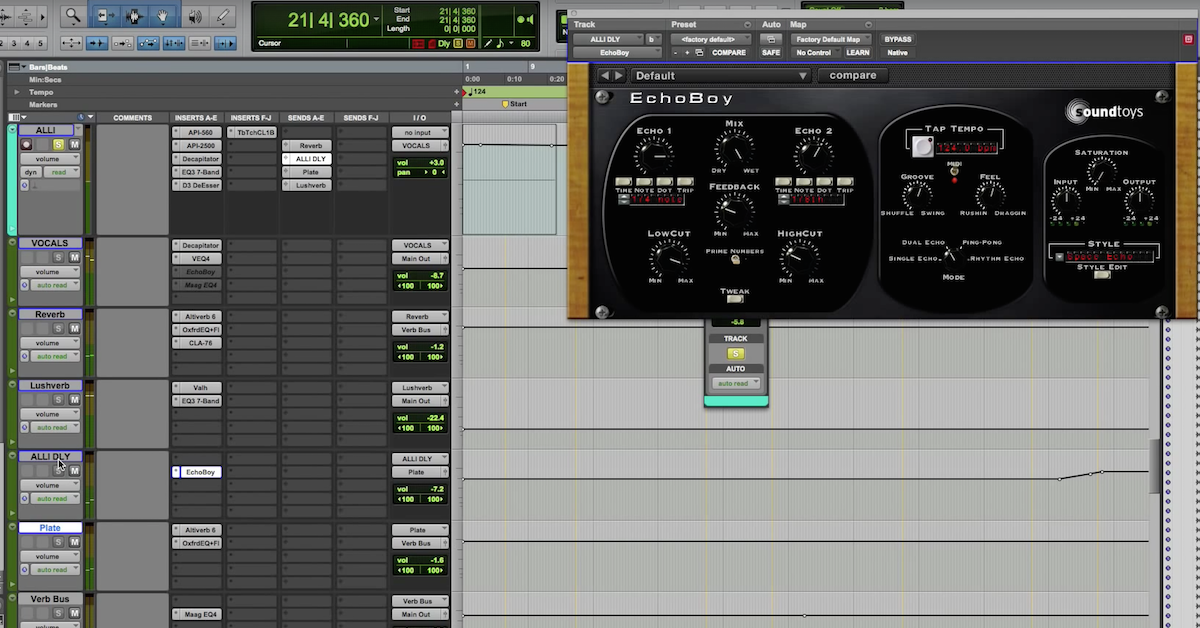
2. Use a Few Different Types
Just about any DAW is going to come loaded with several types of reverb and will offer the ability to pile on about as many instances of those reverbs as you could possibly want. All those different reverb algorithms (room, hall, chamber, plate, etc.) really do all have their own uses. There are lots of different reasons to use reverb, and for each purpose there’s a type of reverb that tends to work best.
Need to bring a bunch of close-miked overdubs into a realistic space for some glue and cohesion? That might be a job for room reverb. Or maybe you want orchestral arrangements to feel a little more grandiose? Try a hall (or a plate, depending on how they were recorded).
It’s also not uncommon to hear multiple types of reverb on a single instrument or group in some cases. On a recent mix, I used a room reverb on a group of layered violin overdubs to give them the feel of a string ensemble recorded live. Then I also gave them some plate reverb to add some classic vibe. Two different purposes, two different reverbs — one for realism, one for mojo and polish.
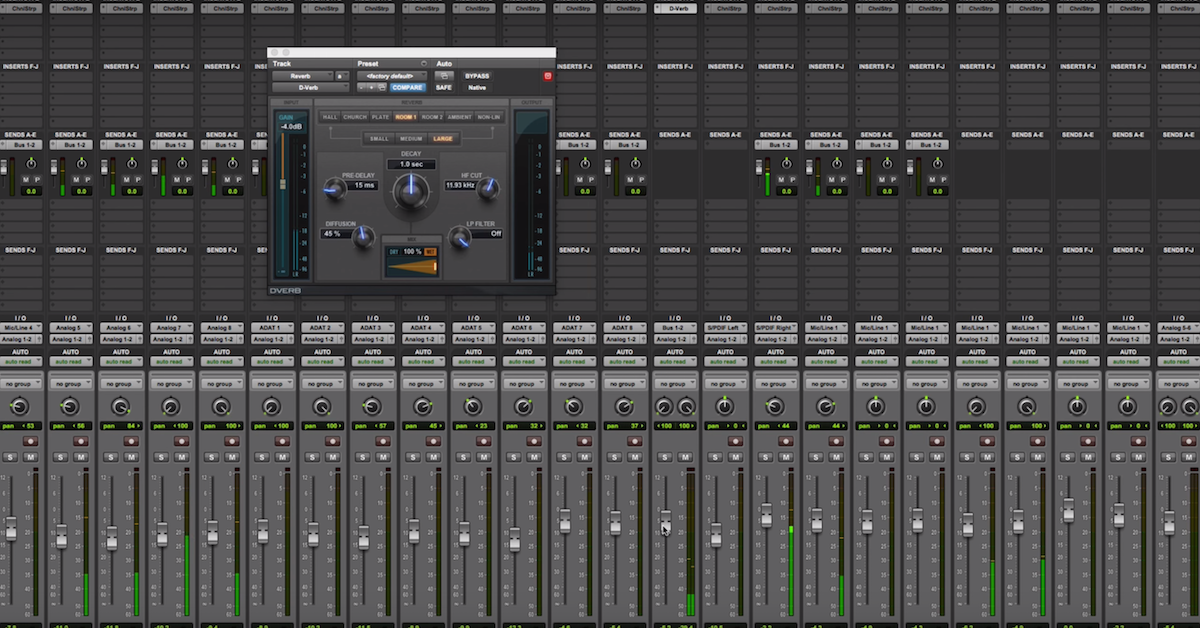
3. Send or Insert? It Depends!
 If you hang around long enough on music production message boards or subreddits, you’re likely to see some variation on a familiar theme. A new producer chimes in asking what the big deal is with using sends and aux busses for effects. They just put reverb in the insert chain right on the track they want and it works out great. Why do all these blowhards on the internet keep insisting that reverb has to go on a buss?
Usually, the original post has the tone of somebody who feels like they’ve just stumbled onto some incredible discovery that the rest of the world was too stupid to figure out. And usually, the board regulars jump on them and explain all the reasons to use reverb with a send — which the original poster was apparently too stupid to figure out. I imagine, occasionally, a respectful and enlightening conversation results from this process. Occasionally.
In reality, of course, this is not a black-and-white issue. There are valid reasons to put reverb on an effects send and valid reasons to put it in line right on an audio track. Putting reverb on an effects send is perhaps the more traditional approach. The most common scenarios usually involve using the same reverb for multiple source tracks. It’s generally more efficient to have just one instance of reverb that those tracks all feed into than to duplicate it across every track. Reverb sends are also handy in cases where we want to do something with the reverb only, and not the dry tracks. Examples of that might include stacking reverb with other effects (more on that later) or automating the reverb independently of the dry track (and vice versa).
The case for using reverb as an insert on a track, on the other hand, starts with simplicity. Fewer headaches, streamlined workflow, less to think about, less to get confused over. When the reverb is only for one instrument, when I’m not trying to process the reverb differently from the main track, and when I have no complicated automation plans, it’s often just simpler to have that reverb as an insert on the track in question. More importantly, it actually works better in some cases to have the reverb on a track insert. It tends to be a more effective way to get a whole lot of reverb on a track, for instance. Usually when I’m using reverb as an insert, it’s to make just one track stand out with some un-subtle reverb that will set it apart from everything else in the mix.
The simplest path, with the fewest problems, that leads to a result you like, is almost always going to be the correct one. In some cases, the demands of a particular application mean we have to use an effects send. In others, putting reverb on a send may just create additional steps that don’t add any value to a mix. Avoiding something that seems complex just because it’s unfamiliar is not going to work forever. Sticking to a needlessly complicated process because you think “it’s just how it’s done” isn’t either.
4. Use Filters
Lower midrange and bass frequencies coming from a reverb really don’t tend to communicate well to a listener. On top of that, reverb in those frequencies can add a lot of mud to a mix that will hurt its overall clarity.
As a result, a common practice is to use a high-pass filter on reverb busses. Reverb really has little to offer a mix below, say, 100 Hz, but it’s not uncommon to filter much higher with cutoffs around 500-600 Hz. The frequency range above that point will be much more audible to a listener, and removing the mud below will only help to open up the rest of the mix. Additionally, low-pass filtering can help mellow out a splashy reverb, as well as contribute to a sense that tracks feeding it are in the background of a mix.
Of course, if you’re using reverb as an insert directly on an audio track, extreme filtering can hurt the dry sound. Before you go reaching for a filter or EQ plugin, check the controls on your favorite reverb for built-in filters first. Those filters will clean up the effect while keeping the dry sound intact. Even when using reverb on a send, it’s good to see if you can get the sound you want with the built-in controls first before you start adding to your effects chain.
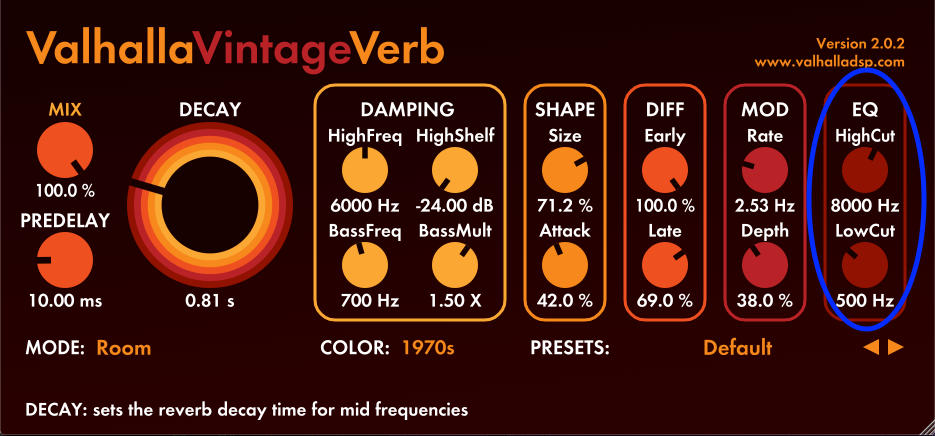
One of my ride-or-die verbs, Valhalla Vintage, has a very handy filter section, circled on the right.
Try experimenting with putting filters both before and after reverbs in the signal chain. Filtering before will send filtered signal through the reverb, while filtering after will filter the reverb itself. The difference between the two may be minimal or quite noticeable, depending on the particulars of a given situation.
5. Compress + Saturate Your Reverb
If you’ve found it’s hard to strike a balance between too much reverb cluttering a mix and not having enough for the sound you’re going after, there’s a good chance that compression and saturation are they key to getting reverbs to work how you want them to. Both can be useful tools to enhance presence and extend the decay of a reverb without being overbearing. They can also really help to balance dry and wet signal, maintaining clarity while preserving long tails.
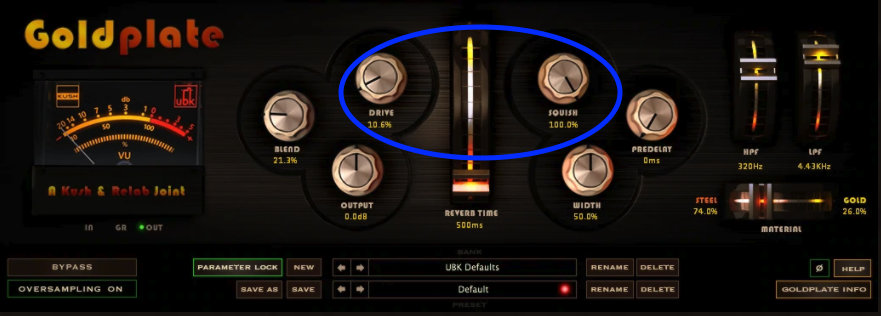
Kush Goldplate, another favorite, has compression and saturation built in (drive and squish). Also, check out those filter controls on the right.
Try adding compression or saturation (or both) directly after a reverb in the signal chain. This can work both for insert and send effects chains. Use compression primarily to enhance tails, saturation primarily to enhance presence, and expect to have to dial back your decay in both cases. Dial in gain reduction so the compressor “breathes” in spaces, allowing reverb tails to bloom.

Ready to elevate your ears?
It doesn’t have to take years to train your ears.
Get started today — and you’ll be amazed at how quickly using Quiztones for just a few minutes a day will improve your mixes, recordings, and productions!
When using reverb as an insert, you can very simply build this sort of effects chain. It’s one of the reasons I often actually prefer reverb as an insert in cases where I know I will only be using it on one instrument.
Using reverb on a send opens up some other possibilities. One approach would be to do what I outlined above on a reverb buss. A sometimes more complex and often more rewarding approach involves routing the outputs of dry and reverb tracks to get compression/saturation in one place, like on a submix. An example might be to use reverb as a send for a group of vocals, and then to route both that reverb bus and the dry audio tracks to one vocal submix.
On that submix you might use compression to glue it all together, providing dynamic continuity. Saturation can further enhance the presence of the whole submix. The compression will also keep the reverb tucked behind those dry tracks and at the same time bring forward the reverb tails between vocal phrases. You end up with less reverb when it might get in the way and more when it can really stand out. You may find after using these effects that you end up needing less of that reverb send or a shorter decay time, as the tails will be much more pronounced.
Try tape emulation for saturation/compression on a submix. Don’t hit it too hard!
Conclusion
These tips are most certainly not the only ways to do reverb right, but they’re a few of my favorite ways.
As I came to the end of this article, I realized I might have to come back and do another for some of the other ways I didn’t get to!
Premium Mix Training