Mixing Kick Drums w/ That Sound + Slate Digital Blackbird Samples
06/14/2016

We have a monthly coaching call, we do — a private community, all kinds of cool stuff over there. Mix a song, use it for your resume, etcetera.
Right now, we have a sweet thing going on. If you’re watching this video, then we have an exclusive deal for you. You have 30 days for just a buck. You get in for a dollar, and you can try it out, feel it out, decide if it’s for you, and go from there.
Maybe you just want to do it for a dollar and then cancel it right away. You can totally do that too, but hopefully you’ll stay around. You’ll enjoy what you experience, your mixes will be better, and you’ll want to continue, but if you want to bypass the $1 trial and go to a monthly, it’s just $27 a month, and with the $27 a month or the annual plan, you actually get to pick up a free bonus course, which is around $57 to $97 each.
You get to pick one of those for free at $27. That’s there for you as well.
So thanks for giving this a look. Either way, I would love for you to enjoy the tutorial. We’ve got the kick drum tutorial coming now.
Alright guys, we’re going to take a look at the drums. Usually, I start out trial and error, just kind of feeling it out, moving things around, gating, pushing up on the console, that kind of stuff.
For this one, I went off camera and I blended the drums a little bit, because I chose to blend Triggers. Actually, for the kick, I chose to replace it, but I blended a — kind of a Pop cinematic kick with a — well, let’s take a look.
So I’ve got — first up on the kick drum, I chose to mute and note use the live kick. Boo, right? Not that it wasn’t usable, it was just that for me, kind of going through it as I messed around with it, I felt like this is going to take a little more work than if I were to replace.
The samples now are so good. Especially Slate’s Blackbird bundle and the way that it tracks the dynamics of the player. I love it.
So for me, time is money, I was going to go ahead and make that happen quickly. So let’s take a look at the original kick. I’ll mute my second sample.
Here’s the original.
[kick]
Okay. And so we could gate that, and we could go in and clean up some of the mid-range, we can add a little more click, we can tighten it up, we can use transient designers and give it more punch and attack, we can use multi-band transient designers, and give more oomph to the bottom and the top, and all of that. We can stack plug-ins and have fun and go to town with this.
But for me, I was just like, you know what, I know there’s some great samples in my bundle here, so I went ahead and went to town.
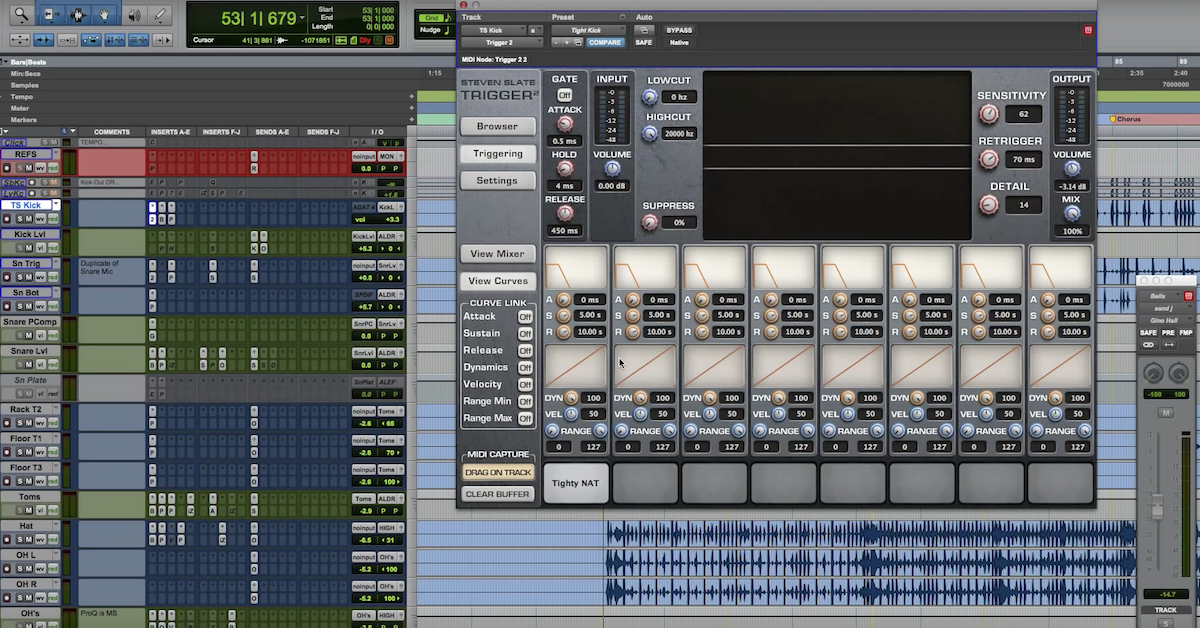
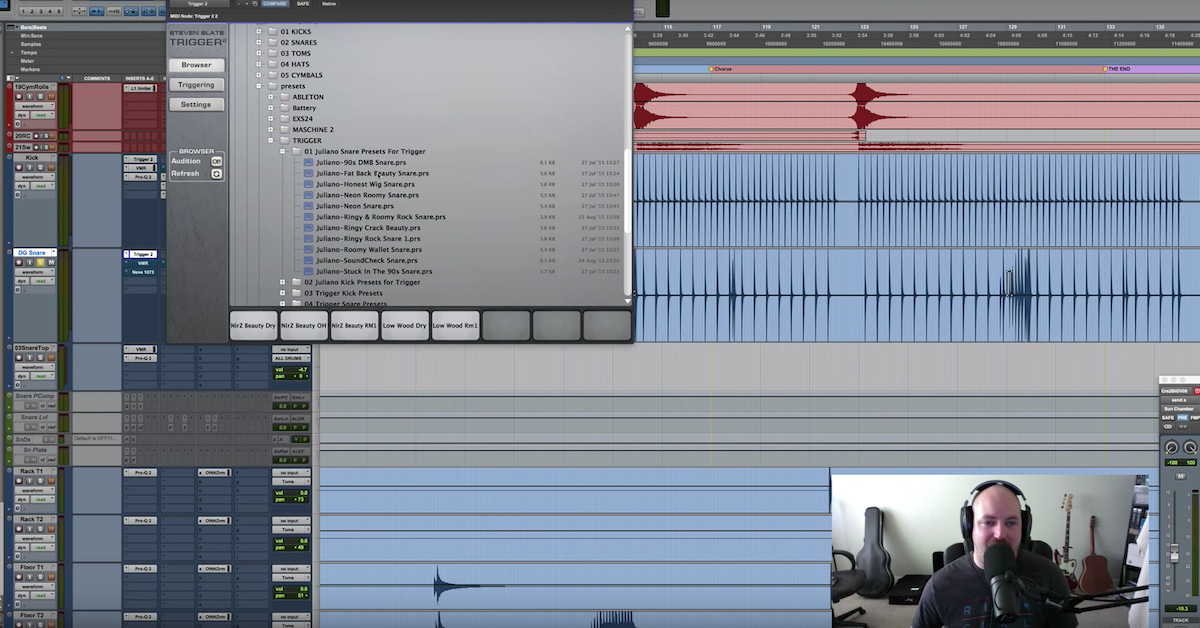
So here’s what I did. First up, I chose to replace it with the Gretsch preset in the Slate Blackbird bundle. You’ll hear me talk about that a lot. I love the way that they’ve recorded multiple velocities, so you can really retain through some trickery with Trigger and playing with the dynamics and velocity settings and parameters in Trigger, you can really retain a lot of what the drummer recorded, and so I like to use that for this.
Let’s go ahead and hear the trigger.
[triggered kick]
So kind of a boxy kind of thing going on, but I liked it for this song. But you’ll see in a second what we did to kind of emphasize some other things in it.
So what did we do? We tightened up the sustain and the release for the direct mics. Kick in, kick out, kick FX. I left the overheads and the room mics open, the full sustain and release, the decay is there.
But then for the dynamics like I talked about, I restricted their range first of all, for 115 to 127. That’s going to be medium to hard, and all hard hits. There was no where in the kick that I felt like he was playing really soft and then building or anything like that, or I would either go in and open that range a little bit, or automate it so that it felt a little more natural.
But these are mostly medium to hard hits. The dynamics and velocity, you can see here, you’ve got the full range of dynamics, I’ve just restricted that again. Not anything in this kick performance that I felt like needed a really soft hit through to a medium or a hard hit.
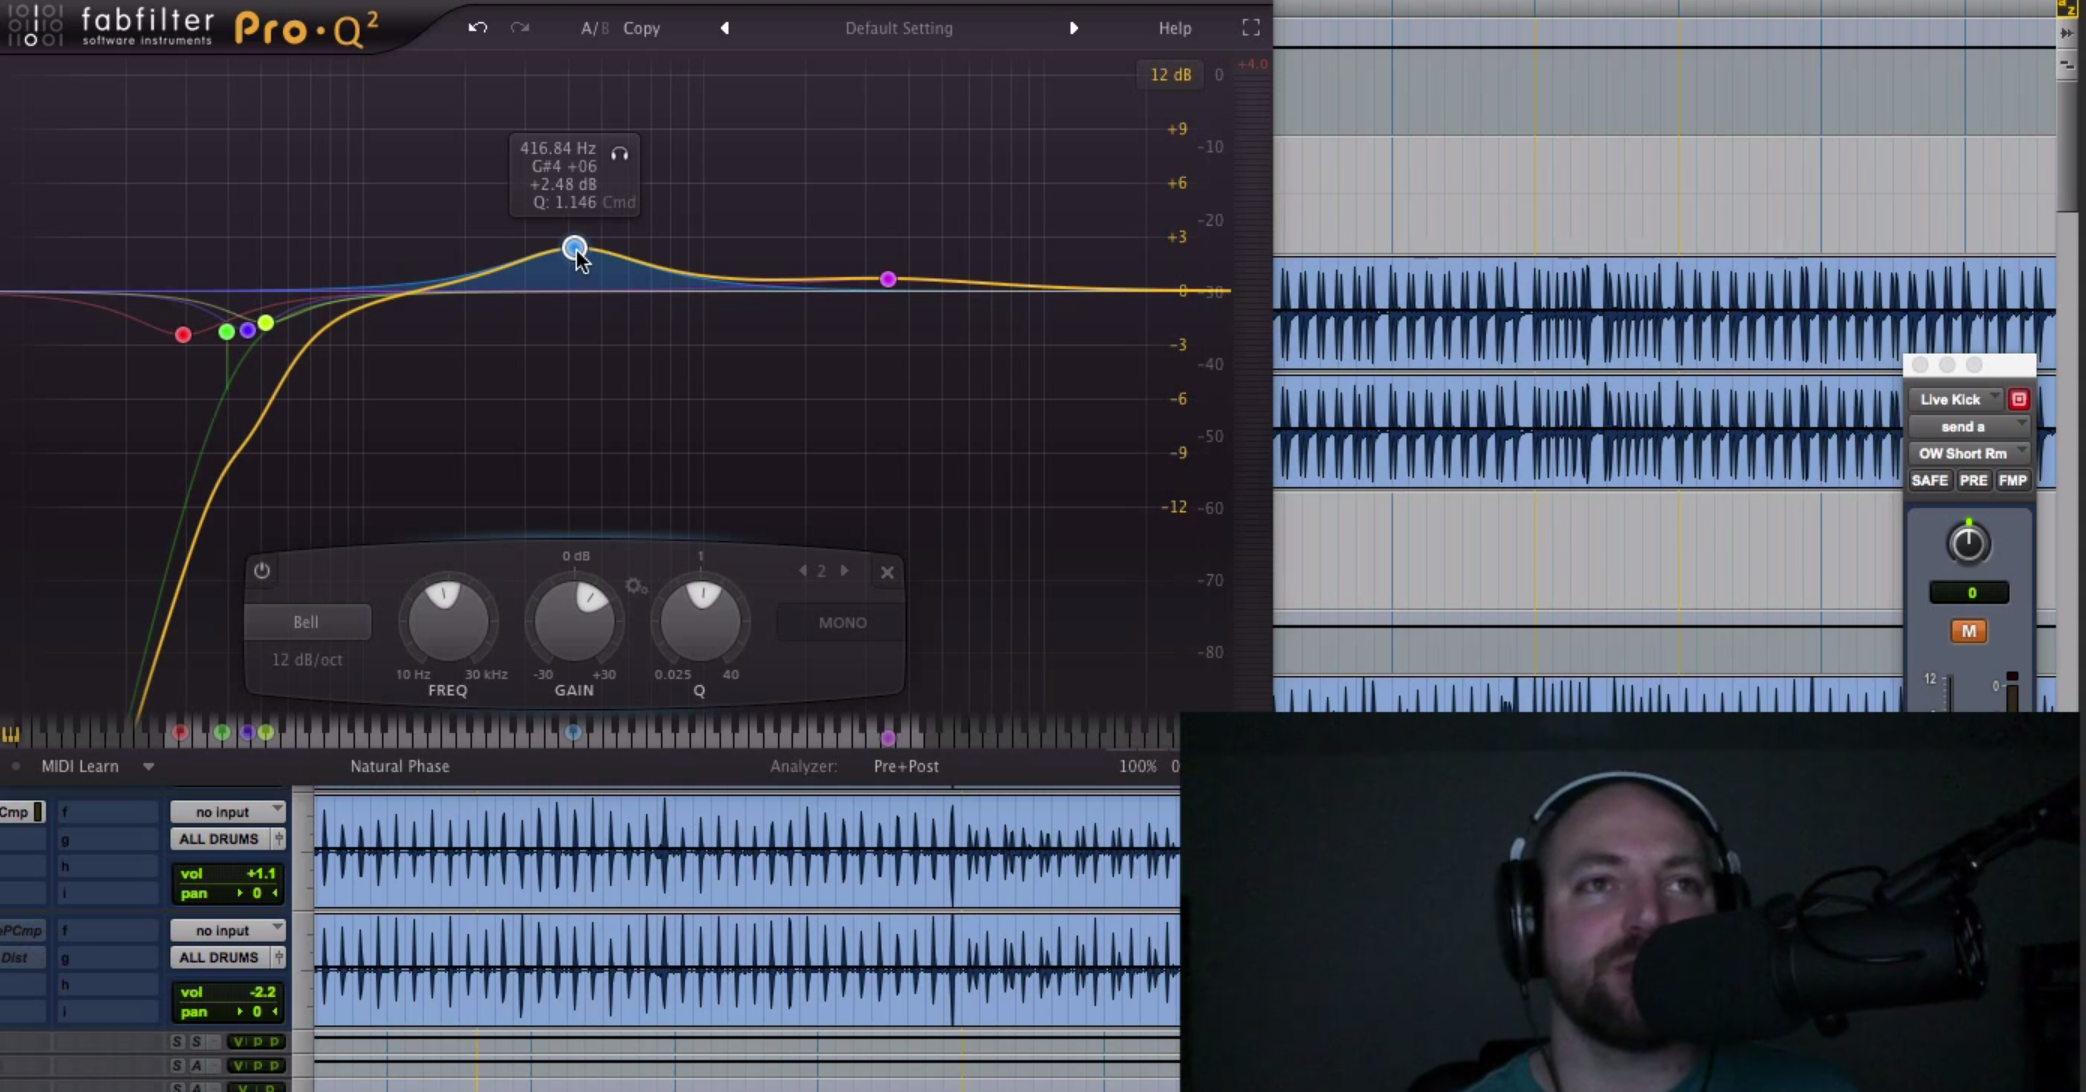
That was a kick for that. Then I went to the EQ. Looks a little crazy, but I wanted a little more punch in it, and I wanted a little bit less of the mid-range stuff. I like that it was a different kick than I’ve used in previous months and just kind of switching it up, but there was some stuff about it I just wanted it to change.
Then I blended in another kick, so some of these EQ moves are to allow the other kick to do its thing.
So here’s before.
[kick, before EQ]
After.
[kick, after EQ]
Okay. So we’re really cleaning up the room mic mid-range there. We’re restricting how much that’s going to go on, but the punch, a little bit punchier. There’s a little something weird around 180, and obviously, that room — this is a big difference here.
Alright, here’s without it.
[kick, before EQ]
With it.
[kick, after EQ]
So we’re just shaping the mid-range a little bit. That’s a pretty common move. A lot of guys like to take out mid in the kick. It’s definitely a little more of a rock thing. Some indie singer/songwriter stuff you maybe want to boost some of that.
But I wanted this kick to kind of have more definition and be more about the direct mic, and not so much about the room.
So that was that. The next one up, because I used a mono to stereo instance of Trigger, you guys who follow me every month, you’re members, you’ve been a member for awhile, you know I like to take these stereo instances of Trigger, and I like to take the 140Hz and below, the low end, and collapse that down to mono.
So that’s all this is is an imaging plug-in to take 140 and below and make it mono.
So we still have some warmth on the sides. You know, 140 and up is stereo so we’re getting a decent perspective of the kick in the rooms, but everything 140 and below is down to mono. Real focused.
Next up, this is one I need to start using more, because this is an incredible plug-in. There’s so many different tones, especially for sound design. For kicks, snares, toms, anything like that. You can really get some great stuff.
This is the Kush Pusher, and I’ve chosen one of my favorite presets is Slap Happy. This just takes a kick, a snare, or even toms from being just kind of natural and chill to being super punchy. Just punches you in the face. I love what this does.
Let’s hear the before and after — actually, I’m going to reverse it. For this one, I’m going to show you with it in, and then I’m going to take it out. I’m going to bypass it.
[kick, with Kush Pusher]
Yeah, Pro Tools didn’t like that. Let’s try again.
[kick, without Kush Pusher]
Okay. Just punch, man. It sounds awesome. I love that.
So we’re going to leave that in and I’m going to show you the second kick that I’ve blended.
I was listening to the Mercy Me track, and I dislike it more and more as I listen to it. It’s just crushed to death, so I don’t feel any punch or any transients, but I think the reason why they did that is because the character of it, they like the grit and the distortion, so they added even more in the mastering phase.
I’m not sure because I wasn’t involved in that, so I’m not completely sure what they did, but I can hear and kind of reverse engineer what’s going on, but if we listen to that, there’s — it’s got more of a pop kick.
[mix]
It’s real aggressive and kind of crazy, so what I did is [laughs] come back over here. I added in this kick, which by itself, doesn’t fit this song at all.
[synth sounding kick]
Let me take out my EQ.
[kick, before EQ]
Okay. And I got that from, if I remember correctly, the Cinematic Pop library from the guys at That Sound. It’s the attack kick folder in Cinematic Pop drums. It’s the attack kick number eight.
Then I was just like, “You know what, some bottom end, just some modern, pop bottom end.” I wanted to take out the punch, because I like the punch in the Gretsch kick, and I like the click in the Gretsch kick, but I want the bottom end to be a little bit more modern.
So I blended this in. Here’s without the EQ.
[kick, before EQ]
Here’s with it.
[kick, with EQ]
You can hear, we’re really just focusing in on the low end. Now the two together. Here’s without that kick, just the first kick.
[natural kick]
[kick with Cinematic Kick]
Together. More full. More punchy. I think they work well together. The only thing that I did want to mention is I reversed the polarity on this second kick through the Pro-Q2. So no matter what EQ you’re using, you probably have a polarity switch. Just go ahead and reverse that.
If you’re following a lot of this — or test it out and see which one gives you more bottom end. Sometimes, when you reverse the polarity, things get really thin, and you can tell that it’s out of phase, so that’s fine.
Sometimes, when you reverse it, you gain a bunch of bottom end, and that’s probably what you want, but then other times, it’s kind of in between, and it only just shifts the sound. It doesn’t necessarily make it super thin and out of phase, and it doesn’t give you a bunch of bottom end. It almost just kind of shifts where that bottom end is.
Sometimes it will be low, subby bottom end, and you gain that, other times, it will shift the focus from a low, subby bottom end to maybe a 70-150Hz punchy kind of bottom end.
So then you just got to listen and be the judge for yourself. Trust your ears. Whatever you like, whatever fits the song you’re working on.
So I rambled enough about kick drums. Those are the two kicks and the ways we processed them. You can see that was about 8dB or so at 105, 103 with a pretty sharp Q on the slope here. I’ve got 36 dB/octave slope, and that was that.
So moving on to the snare, I worked with a live snare for a minute, and I liked the — like I said, the natural vibe of this.
[snare]