Adding Snare Production to a Ballad Mix
12/3/2014

Today, I want to show you how I’ve added production to a song that I’m mixing, and I say production, it’s a snare. Don’t let me try to take too much away from the producer himself, but he’s a friend of mine, so it’s okay.
Anyways, we’re adding a snare, and I’m going to pull it from the loop. So I’m going to dive right in, I’m going to show you a couple of tools I’m using, and how we’re using some effects sends too to give the track a little bit more of a ballad-y vibe.
It’s a ballad, the loop came to me dry, so it’s my job to create that ambiance and get that working.
Here we go. I’m going to play a snippet of it, and then we’ll bypass what I’ve done so we can hear before and after, and then I’ll walk you through the processing and my thought process of what’s going on, so.
Here we go.
[song plays]
Okay. So, what I did is I added this snare. I’m going to mute it now and play just the loop, just a couple seconds here and we’ll hear the difference.
[song plays]
Cool. So, just adding a snare, adding a little bit of reverb to it. A couple of different types. Let’s go over that.
So, the first thing that I did to achieve this was I went in here and I took a snippet, used Shift+Tab to Transient, and found that snare that was in the loop originally, and I broke it up, and then I pulled it down to a new track. I created a new stereo track, and then split it so it was just mono, so now I have a mono snare that came from the sample, and here’s what the snare sounded like.
Let’s bypass this stuff – just coming from the loop, this is what that snare is.
[snare]
Okay. I’m going to bump that volume up a little bit for you guys.
[snare]
Okay. So, I didn’t mind that, but I already had that sound in the loop, and it didn’t have much of a defined… I don’t know, not crack. It was lacking a little bit of oomph, and so I thought, “hey, let me pan this one to the right,” and you can see I pushed that out to the right a little bit, and let me pull in one of my own.
So, what I did, is I pulled open Trigger, I put that snare manually throughout the track, and you can see all those right there, and what I did is I went to my library, pulled in one from the “That Sound” library called “Tight Snare,” and I got that from the future kit that they’ve got over there. Go check out “iwantthatsound.com.” This sounds like this. I’ll select it and loop it real quick.
[snare drum]
Cool. And then, I threw that through some reverb.
[snare drum with reverb]
You can hear that decaying. One more time.
[snare with reverb]
Cool. And then I felt like it could use a little bit more of a raw kind of vibe, so I put it through the Ocean Way and the short room. You could use kind of a studio sound to get this.
[snare with Ocean Way reverb]
Okay. Without the long verb.
[snare plays without long reverb]
Mute it.
[snare, no reverb]
Back in.
[snare drum with Ocean Way reverb]
And then the trail.
[snare drum with all reverb]
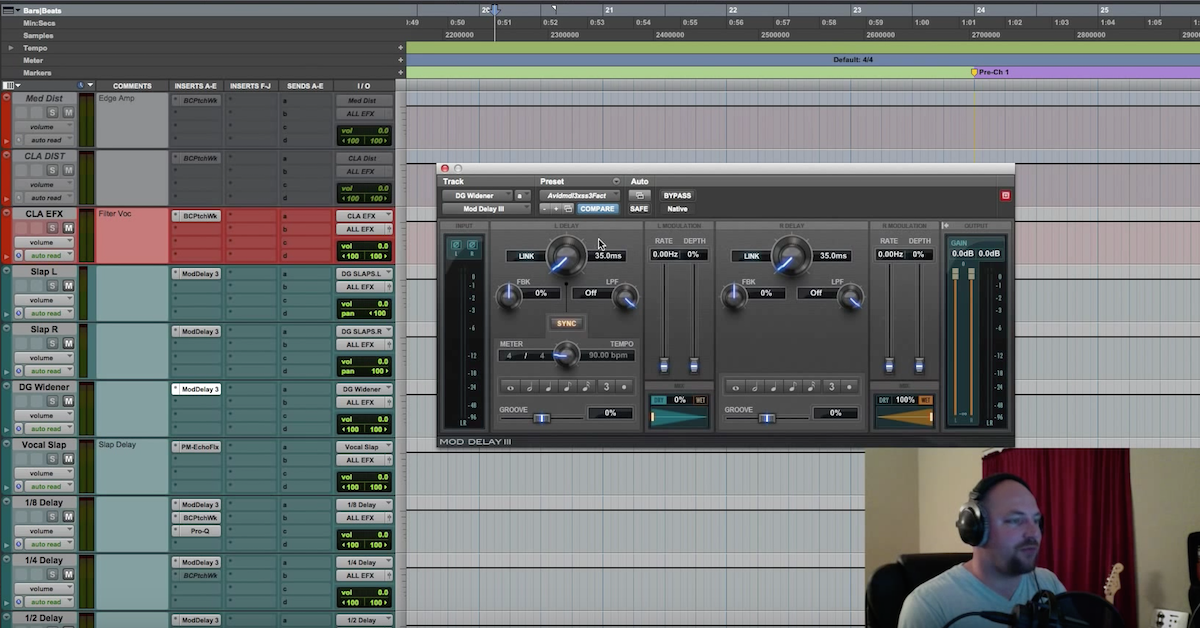
Cool. So, now I felt like I wanted a little bit – in the mix, I felt like it had this nice little articulate poke, but I wanted it to have a little bit more oomph, so I went to my new best friend, Slate Digital’s VMR, and I pulled open – you could do this with any 1176, I’ve got the Neve module just adding a little bit of top end sheen, I’ve got this free module called Revival that I’m using to oomph it up. Really adding a little bit of clarity.
Really, this is just me getting used to this. I think I had this for 24 hours at this point, so just trying to mess with it, fill it out. My favorite part of VMR at this point is having this mix knob that I’m lacking on some of my other 1176 emulations, but let’s hear what we’ve got going on. Let’s bypass the whole thing, and then we’ll put it in.
[snare drum without VMR, then with]
Cool. So, under the hood, what do we have going on? It’s a 4:1 ratio, we’ve got the input driving for quite a bit of compression, but then I’ve got the mix knob dialed back all the way to 34%. Let’s turn these off and hear just that so you can get a feel for what this is doing. Here’s 100%.
[snare drum with 1176 emulation, 100% mix]
Yeah, so it’s smashing it. So we’re loosing the transient. We’re not getting any of the attack.
So then I bring that back…
[snare plays, 34% mix]
Now I’m getting kind of the best of both worlds. Getting a little bit more of the smack from it, and I’m getting the transient, and it sounds pretty cool to me.
So trial and error. Test out attack and release times, have some fun with that. Really will help you to learn compression, and then the mix knob is amazing.
Moving on to the Neve, it’s just pushing up the high shelf a little bit, a little bit of 3k, just to kind of brighten it up.
Before and after.
[snare drum plays, before and after Neve emulation]
Okay. And then this one really helps it out. I’m really digging this shimmer. Using that quite a bit.
Let’s hear that before and after.
[snare drum, before and after Revival Shimmer]
There’s more than just Shimmer going on there. I really dig this one. This one is free, I covered that in a tutorial. Go check out slatedigital.com. You can download Revival. That one to me has got some character to it. Really digging that.
That’s the snare. Let’s hear it before my processing and after one more time.
Here’s the loop when it comes in.
[music]
Cool. And then with it.
[music with processing]
And then, something I did, this was before I made this tutorial in the other session, I was working on this song, and I automated the ginormous hall that I’ve got setup here, and I’ve got it to where it triggers a longer decay. I automated the reverb so whenever everything comes back into the mix, the first hit is like, you hear “here,” but then the second hit is a “paaaaaah” with a longer decay time, so it creates a vibe. A shorter, and then a longer sustain.
Anyways, David Glenn, davidglennrecording.com. Hope you dig that. Don’t be afraid to take these loops, take little snippets of it, copy them down, get creative with it. You can do this with kicks, snares, shakers, anything like that.
Check out theproaudiofiles.com, themixacademy.com. Feel free to like, subscribe, we appreciate you for it. Comment below if you liked this, if you want to see more like this, feel free. Hit me up, davidglennrecording.com.
Thanks guys!
Elevate Your Ears