Tips for Mixing a Stereo Drum Loop
11/6/2014

Super excited about today’s tutorial, I’m going to be talking to you about how to get creative with a stereo drum loop. I’ve got a mix here I did for my buddy Abner Sapeda his band is called Sons of God, and I’ve got a pretty sweet track. we’ve got some strings, we’ve got a loop, we’ve got some piano, and all kinds of good stuff.
Put this one in maybe like a pop-rock/country type vibe. Modern country. The loop was sent to me as just one stereo drum loop. A lot of times, that’s great. I do production. I’ll drag loops that I like and create around it, and that’s totally cool, it happens all the time. But in the mix stage, I wanted to get a little bit more creative with this loop, and so this is inspired by a tutorial I saw years ago from Russ over at Pro Tools Expert, where he took a loop and duplicated it a bunch of times, and then he would go in and hack up the kick, the snare, the hat, and break it all up, and then he ended up changing the groove of it and doing something different with those same sounds.
Well, in this case, we’re going to keep the groove the same, and we aren’t going to hack things up so-to-speak with audio by cutting and cropping and putting them on the grid. Instead, we’re going to duplicate, we’re going to use EQ, compression, transient designing, automation, reverb, all kinds of good stuff, to try and bring this drum loop to life.
So the first thing I’m going to do is I’m going to play it for you. Then I’m going to show you the original, and I’m going to walk you through step-by-step, track by track, so you can do something similar in your own production and get creative next time you’re sent a limited stereo file.
So, here we go. Here’s what I did to the loop, and then I’ll show you the original.
[loop plays]
Cool. Pretty straight-forward, but a little bit cleaner. Let’s hear the original. So now, this up top is the original where the producer had a multi-delay, and I’ll show you that. We’re probably seeing before and after. Here’s his loop before the delay.
[loop plays, no delay]
Okay, and then we’ll show you after the delay, and actually that reverb was mine from the loop.
[loop plays with delay]
Cool. Pretty straight-forward. We’ve got just a loop multi-tip, left and right action going on. Helping to create a groove.
Let’s hear that in the track. I’ve got my automation turned off.
[song plays]
Okay. So, it’s a taste thing. His loop has a lot more resonant low end, but I felt like that tone didn’t match the vibe of the key of the song. So, what I did is I did a little bit of a trick with the subs, so instead of having a big ringy sub right down the middle, and it just sustains, and it’s just one loop doing one thing, I got kind of creative with it.
This is a track where pretty much all I did was I duplicated it once to create a “loop lows,” and I went in and removed all the highs. We’ll touch that in a second.
Then I have a loop where it’s the mid-range, and all of the lows are gone from this track, and I took the sizzle out of it, so 10k and up is gone. And then I duplicated this one down here called “sizzle verb,” where it’s just the top end above 3k, and then I also cropped the snare right here, and that you’ll see there’s no volume to it, and it’s going pre-fader just to a Sunset chamber from the Bricaste M7. We’ve got those impulse responses from the Simplicity website. That sounds like this.
[snare verb plays]
And that’s all it is. That snare.
So, the low-end, let’s break this down. Here’s in solo. You’ll see this automation. Let’s zoom in a little bit.
[low frequencies of loop plays]
Okay. I’m going to bring back this sub splash reverb, but pretty much what I’m doing there with the automation is I’ve got the Pro-Q2, and watch this thing and how it’s setup.
[low frequencies of loop]
Okay. So, bypass is automated on and off for this right here. You’ve got 50Hz and below is going to be in for the first hit, and the reason why I’m doing that is because I’ve got a reverb automated as well. A sub splash. And I’ve got that coming on only for that first hit. You’re going to see it’s muted for the second hit, it’s there for the first hit. So let’s listen to that sub splash.
[sub splash]
I said that backwards. It’s muted for the first one, it’s in for the second one.
So we’ll listen to that one more time. So there’s a clean kick, and then you’ve got a sub splash that fills the side of the speakers with low end reverb.
[low frequencies of loop plays with sub splash reverb]
Pretty cool, right? That sub splash is set up down here, and I’ve got this going to the 224 with just some low-end decay around 4 seconds or so, and then I’m EQing that a little bit unique here. I’ve got a mid/side EQ, and I’m pulling out the lows from the middle, because I want the loop to be in the middle, not the sub reverb splashes. Follow me with that. I’ve got the reverb in MS mode, removing the signal from the middle so that it only has low end and shakes the sides a little bit.
So, I’m boosting here, you can see “S” for sides, I’m boosting all of that around 40Hz or so, and I’m removing it down the middle. So, boosting on the sides, cutting down the middle, and then I’m limiting this to just the 100Hz and below.
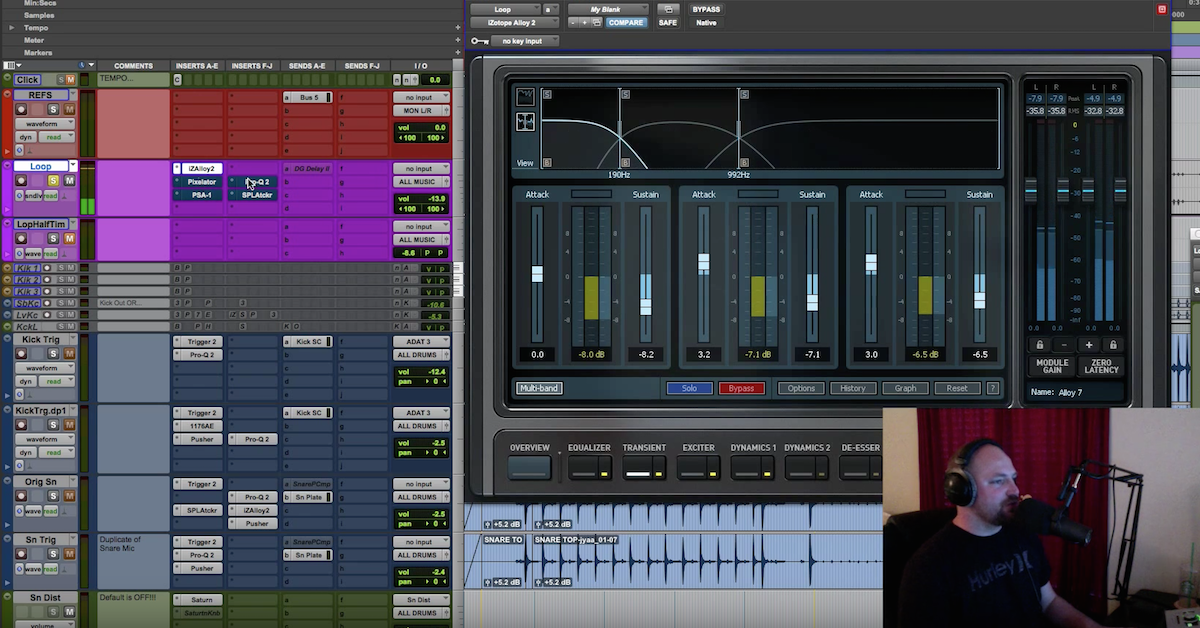
So, that is the gist of that. The only other thing that I did processing-wise was I boosted the attack in the sub frequencies. This is a multi-band transient designer from iZotope’s Alloy 2, and you can see everything below here is going to get a little more punch, and I cut the sustain on it, because I wanted to be able to control it with that EQ, so that first one is kind of a low frequency “doooom” kind of sustainy kick. The second one is tight, but it triggers the sub splash, so it’s got this little tug-and-pull kind of vibe going on. Without it, it would sound like this.
[loop without Alloy 2]
With it, it sounds like this.
[loop with Alloy 2]
Cool. Chokes it a little bit, right? It gives it a little more of a tighter, controlled feel, and I really like that when I’m working with kicks. So I can create around that rhythm, rather than it just kind of being fluffy and sustainy like a pillow. I don’t know how to explain it, but I liked it, and that’s what I did.
Moving on from there, we’ve got Pi*** on all my tracks. You’ll start seeing that in the tutorials, but the loop goes to a buss called “loop,” the sub splash goes to “All EFX,” and that will be important in a second, I’ll explain all the subs and low-end in mono.
Next up, we had this track, and all I did for this one was EQ’d it, and then brought the level in. This one was simply this.
[loop with just mids plays]
Cool. So that’s the loop just EQ’d so that I can control the level of those elements within that EQ range.
Next up, I have the snare broken apart, I already showed you that. We’re going to the Sunset chamber.
[snare verb]
And that’s all it is.
[snare verb]
Just triggering that reverb so that it gives it a little bit of a space, and then that also has Pi*** on it.
Moving on from there, I have a track called “sizzle verb.” Here again, it’s just the regular loop, before any processing.
[loop]
Cool. Then I’m EQing it to remove everything below 3k or so.
[loop plays with just highs]
Cool. Remember, we still have our snare going there, so here it is again.
[loop plays with just high frequencies]
Okay. And then I added a D-verb to it to give it a little bit of a washy vibe on the top end.
[loop plays with highs and reverb]
So it’s subtle. It’s nothing crazy that’s going to pop out of the speakers, but just having some fun with it.
Moving on from there, everything that you just saw me break down, with the exception of the sub splash, is headed into this buss called “loop,” and in the loop I’ve got the Culture Vulture from UAD. This one just came out a few months ago, and this is actually the first time I used it. I think I even forgot that I owned it until I pulled it open for this song to give it some use, and I really like what it did. It just gave it a bit of grit.
Let’s bypass everything, we’ll walk through it. Here’s without it.
[song]
Let’s play just the loop so we’re not fooled by the music going on there. Here’s the loop without it.
[loop without Culture Vulture]
And then here’s with it.
[loop with Culture Vulture]
It’s subtle. You get a little bit of grit from the kick from that low-end, but it’s just giving it a little vibe.
Moving on to this one, it makes a big difference. Pay attention, the depth is only at 10% and watch how awesome this affects the high end.
Here’s before.
[loop plays Xfer OTT]
And after.
[drum loop after Xfer OTT]
Before.
[drum loop before Xfer OTT]
Pretty neat, right? This is a free plug-in. I’ve mentioned that before. I think you can Google Xfer records, and type in OTT and you’ll find that one. It’s AAX as well.
Moving on, I had the multi-delay that I mentioned that the producer had, and that just kind of…
[drum loop plays with multi-delay]
…creates a movement, pretty sweet.
Last, but not least, I’ve got Ozone 5 imager, and remember I talked about the sub splash reverb, and how it was automated to come on for just the second hit.
Well, by removing the middle content, the stuff down the middle from the sub reverb, I was able to get that out wide and concentrated on the sides. Well, now what I want, is I want the low-end of the loop itself, like the kick and any meat from that snare below 200Hz or so is going to be mono and central now.
So you’ve got the splash that’s going to give the sides some oomph, and you’ve got the middle that’s going to just suck it in. It’s a stereo loop, and I wanted to make sure the kick and snare were right down the middle, so I did that with this and dropped it right down the middle.
Here’s without it.
[drum loop without Ozone 5 imager]
And then with it.
[drum loop with Ozone 5 imager]
Cool. So not that much of a difference, but if there was anything just kind of sneaking out of the middle a little bit, this keeps it locked down right there front and center down the middle, and all is well.
So there we have it. That is hopefully going to help you to be creative when you’re sent a stereo loop. It could be a loop of anything you could do that with. Various sorts of percussion, drums, stereo full drum kit with kick, snare, toms, the whole deal, break out the cymbals, you can have fun with that.
So feel free to shoot me emails at david@davidglennrecording.com, don’t forget theproaudiofiles.com, and my new site, themixacademy.com.
We’re going to take a song each month, I’m going to break it down, I’m going to mix it from start to finish, and record the entire time, just like I showed you this tutorial, but you’re going to get starting the song, me hearing it for the first time, all the way through a finished mastered product, as well as three, four, five tutorials. I’m interviewing the producer, I’m interviewing the song writers, and then I’m going to give you tips, tricks, strategies, there’s a forum, I’ve got some of my good buddies in the industry, all working professionals that are going to be chiming in. All kinds of great stuff to come with that.
There’s a bonus. If you mention that you found me on The Pro Audio Files YouTube channel, I’m going to give you a sweet surprise in addition to the bonus that I’m already offering, because you’re going to get a free course from me that’s going to be included with your membership.
Just $27 a month, go check that out. Themixacademy.com, emails to david@davidglennrecording.com, and I’ll catch you guys soon.
Elevate Your Ears