Mix Critique: How to Improve Your Mixes
05/24/2015

Today, I have a special video for you. I’ve got a custom mix critique that I’m doing for my friend Matt McQueen, member of themixacademy.com, and this service is also something I do with the upper tiers of all of my courses.
You can check out more of those in the links below, but Matt’s got a song that he sent my way. I’m going to take a listen. I’ve got this pulled open in Pro Tools, and typically what I do is I take a bunch of notes in my Task App here called Wonder List.
A lot of you guys have heard of it. It’s completely free. It’s got a nice list management system. But anyways, you can go check that out as well.
But I just go through and I give a bunch of notes and I give some thoughts. I’m going to pull open and show some techniques and concepts, and some things to check for your own mixes. I thought that it could relate. Matt was super kind enough to allow me to share this with you.
So, lots of concepts, lots of things that are going to apply to his mix here, but lots of things that will definitely help you with your mixing as well, and things you can keep and ear out for.
I’m blabbing, let’s jump right in. We’re going to take a look at his song and give a little mix critique.
Alright, so the first thing we’re going to do is we’re going to take a look. For those of you watching, man, sit back, enjoy the ride, I hope you learn a ton. I’m going to be speaking specifically to Matt about his mix, so I hope you enjoy it!
So, Matt, I’ve got your track open and I’m going to take a listen to the first little bit so those watching back can kind of get a vibe of what we’re dealing with, and then we’re going to click over and reference. I’m going to put you on the spot, man, and I’ve got one of my favorite tracks open by Chris Tomlin, called “Awake My Soul,” and I think that this would be a great reference for your mix with the changes that I talked to you about here.
So, let’s give a listen to yours.
[song plays]
Okay. Let’s come out here with some vocals.
[song plays]
Okay, cool. I had another note there.
Alright, man! So there’s that. Then here’s Chris Tomlin’s mix.
[reference plays]
And there’s a big pause…
[reference plays]
I’ve got Lecrae coming in with some good stuff, man.
Okay, so you hear the difference. It’s pretty dramatic, but at the same time, I think we can do some stuff to tighten your overall frequency range, the stuff going on… I’m going to give you some tips for – I hear some pumping in the limiter, so I want to talk to you a little bit about that as well, but I think that you’ve got good balances. You’ve got some great stuff going on.
Let’s get in and try to take this a little bit closer. The first thing I want to look at, is I’m not sure if you’re doing much referencing when you’re mixing, but I highly, highly recommend it.
I’m going to do an EQ match, but before I do that, I’ve shown this a couple times in some of my other videos, and you being a member over at The Mix Academy, I know you’ve seen me do this, but I can’t stress it enough, man. This could really, really help you out.
I’m going to throw this – actually, let’s put this right there… I’m going to throw this down to like, 30Hz, and I’m only going to listen to your track at 30Hz, then we’re going to check out Tomlin’s.
So, those of you listening back, and then Matt, if you’re listening to this, some good headphones or a system with a sub, or if you’re listening on monitors in a good treated room, you’ll hear this sub stuff going on, but if you’re on a laptop or a phone, you probably won’t hear this stuff.
Here’s the sub region on Matt’s track.
[subs play]
Okay, kinda cool.
[subs play]
And then on Tomlin, you can hear it’s a little more leveled out and a little more compressed. Things are pretty – I don’t want to say flat, but they’re nice and smooth, nice and tight.
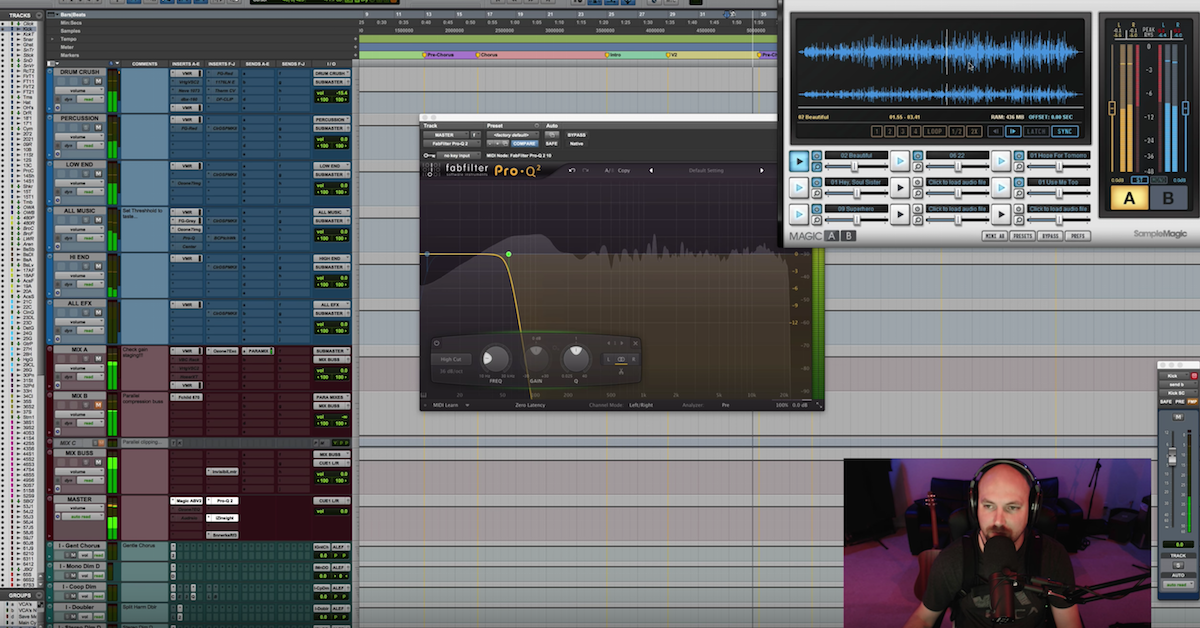
Alright, Matt. So you’ve seen me do the EQ trick on my stereo buss – actually, the master fader, but for those of you guys watching back that haven’t seen it, what I have is in my mix session, I’ll have everything going to a set of busses I kind of adopted from the Dave Pensado, All Drums, All Vocals, All Music, Low End, High End, All FX, different groups… sometimes All Guitars, it just all depends.
But those pre-stereo busses go to my stereo aux track called the sub-master, which is my stereo buss. The stereo buss thing goes to the main outs – the master fader.
The reason why I do these stereo auxes is because then I can have my reference track solo safe’d, going out to my main outs, and then say this is my stereo buss right here. That then meets it at the master fader, but all of the processing goes to the stereo buss, and not the main outs.
I hope that makes sense. If not, I have a whole course on that called the mix series. It talks about session workflow and all of that good stuff. We’ll have the link in the description below, but just to kind of help catch you up, this is how I’m able to help reference, and this EQ here controls both of those.
Once again, let’s take a look at this, because Matt’s seen this, but for those of you that haven’t, I’ll take an EQ, it’s typically the Pro-Q2, and I’ll just go up the frequency range here.
So here’s 35 and below.
[35Hz and lower plays]
And then now I’m going to click over to the reference track and check out 35 Hz and below.
[reference lows plays]
More power, right? So, there’s a lot more going on. I checked Matt’s track, and he was at about a -8LUFS or RMS level, so it’s mastered. This is a mastered track.
So anyways, moving on, we can then pull this up and hear Tomlin.
Let me hear Matt, pull it up a little more.
[alternating between reference and Matt’s track; filtered]
Nice. And we can make our way up. For me personally, once I get to about 100 or 150, what I’ll do is I’ll add a low-cut/high-pass filter, and I’ll do the same thing, but now, I’ll take these two bands and link them, so I can hear everything except for the subs, and really just focus in on 100-200, 100-150, whatever you want to do to taste. You can sit here and have a blast with it.
[alternates between reference and Matt’s track; filtered]
Okay. Then we can just keep sliding up.
[continues alternating between reference and Matt’s track; filtered]
So we’ve got some good stuff going on. I feel like when we get to the top end, that’s when we start to have some issues.
[alternates between reference and Matt’s track; filtered]
A little more energy in Matt’s mix there and right here.
[continues alternating between reference and Matt’s track; filtered]
It’s a little more tame on the Chris Tomlin mix. Then as we get to 3-5kHz, it gets a little bit out of control on Matt’s mix.
[alternates between reference and Matt’s track; filtered]
Just a little bit harsh right there. It starts at about 3-5kHz. Let’s pinpoint that region there.
[plays Matt’s track; filtered at 3-5kHz]
So anyways, it was meant to be a quick overview, but I’ll go through, and I’ll just kind of compare and I’ll listen. You’ve got to be careful what reference tracks you pick, and different styles of music… Sometimes I take a rock song when I’m working on a hip-hop song, it just depends.
With things like Spotify and internet radio, we’re competing across genres of music, but anyways, hopefully you get something from that. If you guys haven’t done that, I highly recommend checking that out.
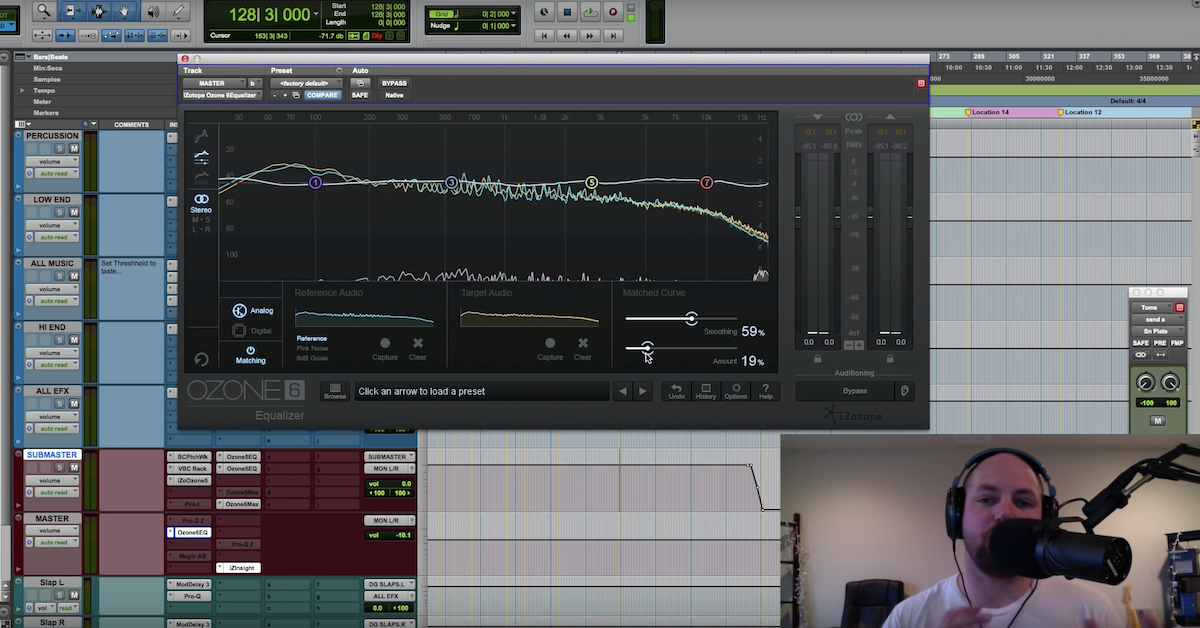
What I’m actually going to do is I’m going to do an EQ match, and I’m going to use the iZotope Ozone equalizer, and I think this is going to be a big difference. Then we’re going to get into talking about the low end triggering the buss compression.
So here we’ve got EQ matching. I’m going to go ahead and come over here to Matt’s. I’ve got a marker for your track, and I’m going to capture your reference. Let’s see here… I do this all the time and I’m drawing a blank.
Let’s capture the reference first.
[reference plays]
Okay. You could let that play as long as you want. For those of you guys watching it back, I tend to let it go for 30-45 seconds sometimes, just to capture enough of what’s going on, but then I’m going to come over here to Matt, your track…
[Matt’s track plays]
Okay. So now it’s captured an image of both of those tracks, and then whenever I engage EQ matching, it’s going to give me the matched curve, and so I can take that and you can see how much brighter – and I’ve put in my notes it was about 5-7kHz, and you can see that giant dip right there.
Give a shout out to QuizTones, because I’ve been playing with that lately, and I’m going to credit me being able to pick out 5-7kHz to me messing around with my buddy Dan Comerchero’s app, QuizTones, so go check that out.
Let’s take a listen now at what we’ve got here, but instead of having this EQ here, I want it to only be applied to match tracks. So I’m going to pull that there.
[Matt’s track plays]
If I bypass it…
[Matt’s track plays; sans Ozone EQ match]
Now when I come over and compare to Chris Tomlin…
[reference plays]
[Matt’s track plays]
Okay, so I have a feeling that this EQ – the EQ decisions you’re making, Matt, are coming from your listening environment. I may be wrong, but a lot of times, your room is going to contribute to stuff like this. You’re not maybe going to hear things as bright, so you’re going to go boosting… I don’t know how long you’ve been mixing, but for me, man… All of my early mixes were crazy bright. It was really, really annoying when I go back and listen to them.
But there you can already hear, we’ve got a little bit warmer track. Things are much, much more easy to listen to, and we’ve made a lot of progress from just this one technique. So, that was my first thing was just overall EQ matching would be a huge time saver for you, but then it also – let me talk about this – instead of just EQ matching and then calling it a day and bouncing your mix again, what you may do is study what the EQ match is doing.
So, you can hear we’ve got the 5-7kHz. So you may want to go back and listen to what’s happening in that frequency range. What energy is causing the harshness?
It could be your overheads, it could be the cymbals, it could be the esses in the vocal, it could be the vocal itself, you may have boosted some of that… try to reverse engineer what the EQ match is doing for you.
Your low end was pretty close. I think that some compression would be – some multi-band compression on the low end would benefit from that, but we’ll talk about that in a minute.
Mostly just that upper top end energy is off a little bit from your mix to the reference that I’ve pulled in here.
So, a couple of rabbit trails in there, but I think that’s going to be really huge, is reverse engineering it and learning from it, then applying that to your future mixes so that you don’t become so dependent on EQ match as a technique to save your butt.
It definitely can, and I do it. If you see me in themixacademy.com, my members over there, I do it all the time, so sometimes I leave it, sometimes I take it off and I use it to reverse engineer and go find the problem areas and correct them.
I think I’ve said enough about that. We’re going to move on.
Alright, Matt. So the next thing I want to talk about is your limiter. I hear it pumping, and I think I have a good idea of what is causing the pumping. I think it’s your low end energy triggering the buss compression.
I don’t have your 2buss in front of me, so it’s hard for me to say, but maybe we can get you contributing in the comments below, and then of course, you and I are going to talk through e-mail.
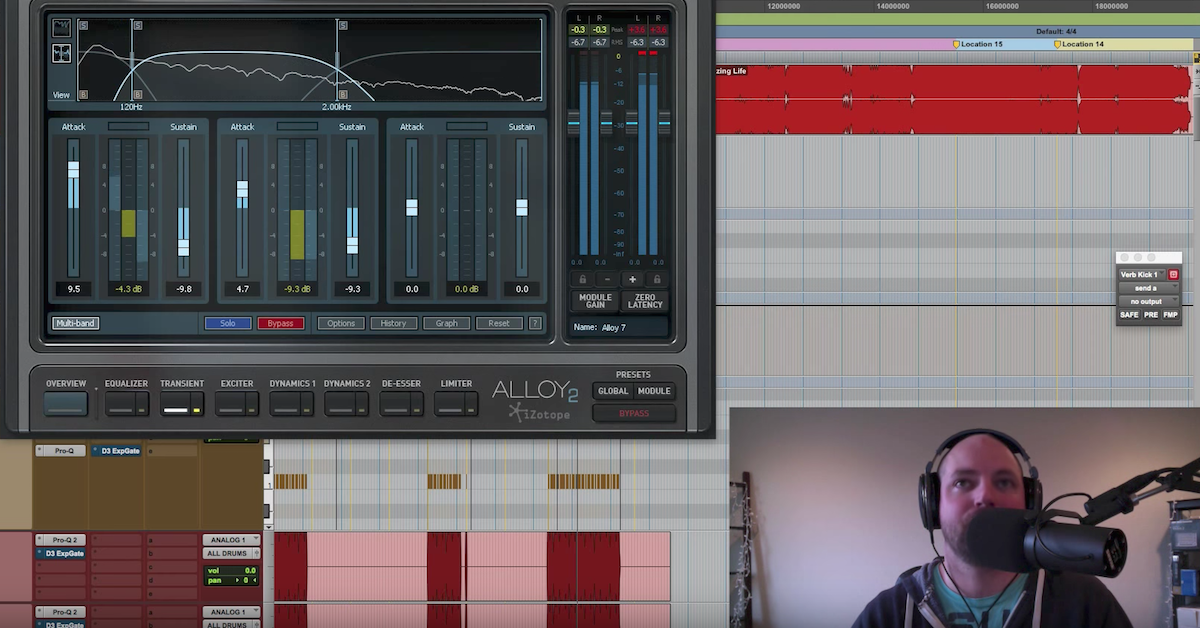
Some compressors – a lot of compressors – will have a high-pass filter. I’m going to come in here and take a look at one. What’s a good one to use as an example… We’ll use Slate.
We’ll pull open the VBC rack, and just come down here. I use this on my 2buss quite a bit, and if you’d look down here, we’ve got the high-pass/low-cut filter. What this is, is if I boost that anywhere from 50, 70, 100Hz, it’s going to prevent those frequencies from triggering the compression. The compressor will not react to those frequencies, so this is a huge benefit to us, because low end energy – I don’t know if you’ve looked at an EQ curve of a finished master.
Actually, let’s take a look at that for example’s sake. If we come back over here to our reference mix, you take a look at the frequency range, we analyze the reference track and we analyze yours, your top end was a lot brighter, right? But your curve is still low end is apparently louder, and then the curve slides down, right? That’s because we hear higher frequencies louder. We perceive them to be louder.
So, taking a look at that slant from top left to bottom right, kind of that movement, why is that important? Well, the compressor is going to hear and feel the low end, unless we use this high-pass filter. Then what we’re essentially doing is helping it to focus on – if you stop at 70, 85, 100Hz, it’s going to focus on everything above that, and so you’re going to get a much more balanced compression to your overall mix, and I think this could really benefit you.
If you’re using a compressor that doesn’t have that, what I would definitely encourage you to do then is to grab you – I don’t know if you have the Pro-Q2, but your stock EQ would work great as well – you can come in here, grab a 48 dB or so per octave and go to mid/side mode. If you go to mid/side mode, you can have this guy right here be for the middle, and you can have that set to say, 20-25 Hz, something like that, then we can come in here with another one and we’ll set that one at 48 as well, and for the middle, you may have it at like – I’m sorry, for the sides, you may want that up as high as 50-60, maybe even 70-80. It just depends on the song and what you’ve got going on on the sides and how much low end energy you want out there.
So now, effectively what you’ve done by using this mid/side high-pass/low-cut EQ setup, is you’re preventing all of this extra energy down here from the middle and from the sides from triggering your compressor.
So this may be a big deal, it may not, it just depends on what you have going on below 20-25Hz, and then what you’ve got going on with the sides below 70, 80, 85Hz. I think I have my high-pass filter set to about 85Hz on my 2-buss. Somewhere in there is a good start.
But take a listen to what it’s doing, then ultimately watch how the compressor is reacting. Let’s take a look at that right now. I don’t know which of these guys are on… Let’s turn this one off and we’ll leave this one on, but let’s turn the ratio to 1 so that it’s not triggering any compression, and then this guy we’re going to back off the attack a little bit and speed up the release just a little bit for now, and we’re going to play with this.
So let’s watch when we trigger this compression…
[Matt’s song plays]
Okay, so you can see the needle jumping when the kick hits. Take a look again, I’m going to exaggerate this.
[Matt’s song plays]
Okay, it’s jumping quite a bit.
So now, watch what happens when I raise up the high-pass filter.
[Matt’s song plays]
It becomes much more mid-range and top focused. The compression does, as opposed to being triggered by all of that extra low end. I probably could’ve said that a lot better, but hopefully you guys are diggin’ that.
Using the high-pass filter could be a huge benefit to your sound. I just – that little bit of pumping, you may like it, you may not, but that could be a great way for you to change it. Then also the Pro-Q mid/side EQ, making sure that you have that stuff cleaned up before it hits your buss compression or any of your character plug-ins if you’re using a setup similar to me.
Next up on the list was – let’s take a look here. Cutting before the stereo buss overheads… I don’t know, there’s something weird going on with the overheads for me.
Let’s take a listen again.
[Matt’s track plays]
Okay, so I hear the cymbals mono right there, and I can’t tell if you’ve got a hat mic that you’re panning just a little bit left and then a ride mic, or if you’ve got mono overheads, but I feel like there’s even some left to right movement kind of going on, and I don’t know if it’s phase issues or what, but a couple of things you could do.
I would recommend pulling your overhead mics down in the mix, possibly even turning them off. Just experiment. But what you may want to do is blend in some cymbal samples. I’ve got a tutorial that I’ve shown where I do that and just kind of drop in some cymbal samples, go pull your favorite bundle. I love the stuff from That Sound. Go to Iwantthatsound.com. I’m sure you’ve checked those out.
I would just get a good stereo spread for your left and right crash. I don’t think you need to do it with the high-hat or the ride, but just a couple of left and right cymbals to kind of help pull the drums out of that middle section there.
Once again, listen to that.
[Matt’s track plays]
Yeah, so the overhead’s sounding like it’s right in the middle. You may like it, you may dig it, it’s totally a taste thing. I think you could also take the quality of the drums up a notch by using some cymbal samples there.
So, let’s see here… Next up, I have here the snare isn’t bothering me as much now that we’ve done the EQ match. It was a little bit bright. It was smacking pretty good in the 3-7kHz region, but I think we’ve kind of worked with that. Your vocal, the cymbals, and that snare you may want to go check that 3-7kHz region.
Then also, your vocal – de-essing your vocal manually by going in and dropping down all of the esses. I think you’ve seen me do that, but a lot of this stuff, man, sometimes we get going with mixing, and we get creative, and we start pushing faders, and then we kind of forget some of the foundational things that help us to stay in check with our mixing.
What I would recommend is watching this back. Man, take some notes. Get a pad and paper out. Write down some of these techniques, and before you print a mix for a client, pull this out, take a look, hey, check my esses. Have I checked my limiter? Is it pumping? Do I hear too much low end on it? Have I referenced? Maybe try an EQ match if you’ve got the Ozone or any other bundles that do that.
Actually, the FabFilter Pro-Q2 does EQ matching as well. So all that kind of stuff, just jot you down some you know, sticky notes or whatever. I’ve got my app and I pull it open and just kind of go through checking in the car, checking my mixes on smaller speakers, my iPod buds, and that kind of stuff. I think that will really help you to kind of put it in a list.
So as you learn this stuff, add to your list, and it’ll just have a better and better list as time goes on of stuff to check before you bounce a mix and send it off to a client.
But anyways, snare, we’ll move on from that, manually de-essing, maybe hitting a little bit more of a de-esser and focus a little bit more on that region there to see what’s happening.
But then, getting into some fun stuff and some creative things. The song that you’ve got here lends itself to the hook, the chorus getting bigger, wider, fuller, all of that good stuff. What I want to do is show you how – let’s come out here.
[Matt’s track plays]
Let’s turn that compression off, that wasn’t meant to be. That was for example’s sake.
[Matt’s track plays]
Okay, so let’s pretend this was my stereo buss. I would drop your overall level on your stereo buss down minus 1 dB, and then come in here to your chorus, and lift it back up.
[Matt’s track plays]
Let’s find that.
[plays song, finding chorus]
I think it’s right there. Anyways, you’ll get the point. I’m not in tempo with your song, but then what I’d do is I’d highlight the hook and pull it back up 1dB. It’s going to sound a little weird not being right at the chorus. You could even make a little build there, so that this automation takes you from one level to the next to help it explode a little bit.
[Matt’s track plays]
Okay, so now that’s at zero, but let’s watch what happens whenever I go back to the verse.
[Matt’s track plays]
It gets louder, right? Alright, so that’s one way. The other way, I would do this – I actually add this to my little check list because I love what it does. You come in here to Waves S1, you may use the Ozone, whatever you dig, let’s take a listen to what this will do.
[Matt’s track plays]
Okay, so that’s going to be maybe exaggerated a little bit. I’m going to arm that for automation. I’m going to bypass it, but then at that same section here, where I have this getting louder, Command+Control+Click and pull open that automation lane, I’m going to activate it so that we get 20% wider only at the chorus.
[Matt’s track plays]
You can see it kicked in a little bit late there. Let’s try to get that dead on there.
[Matt’s track plays]
Okay, so you get the point. For it to hit the chorus and get a little bit wider, and then turn it back off when you go back to the verse. Let things kind of open up whenever you get to that chorus, let it explode a little bit.
I felt that would be a good fit for this song, if one dB on the volume is too much, you may just try 0.5. If 20% is a bit crazy, maybe just do 10%, it could be just 5% helping to create a little bit of separation between sections.
Moving into some of the instruments happening, as a mixer, sometimes we’re presented with arrangements where things just aren’t working. Things are clashing, or the rhythms are pushing up against each other, and it just kind of creates a mess.
I don’t know your involvement of the recording of this track was. I think it’s recorded fairly well, but what I’m hearing to my ear and my taste that I wanted to present to you is the piano and the guitar.
The piano I think fits really well in the verses, where the guitars are chill, and it’s really tame, but then I think at the chorus, the piano is doing it’s thing, it’s getting a little bit bouncy on me, and I’m losing some of the power of the guitars.
So let’s find actually that section.
Hear what I’m talking about right here.
[song plays]
And that right there is a good example.
[song plays]
Okay, so I would say, go into your session, and either mute the piano at the chorus, or turn in way down, or maybe do something – maybe it’s MIDI and you have control over that, I would change it to some padded chords for impact instead of it being busy.
Just to my ear, I feel like that’s getting in the way of the song. I feel like your vocals are getting drowned out by the action on the piano, and the guitars are losing their power by having that piano bouncing around a little bit.
If you have control over that, I would say go back and at least give it a shot. Take a listen, see what happens whenever you take the piano out. Let the guitars drive the hook, and let the piano be the verse like you have here.
[song plays]
Yeah, so that was that next note.
Moving on from the arrangement, I would take a listen to your drums. I like what’s going on with your drums. I think I could use some drum room. At least on the snare. I don’t know if you’ve got anything. Maybe it’s tucked way down, but I would love to hear a little bit of ambience to these drums, and I think a simple D-Verb room would sound cool. I don’t know if you have OceanWay from UAD. That’s one of my favorites. Anyone that’s purchased Mixing with Reverb knows I love me some OceanWay.
Some kind of small room sound, or something to give it a little bit of ambience. Then again, you may ride the volume of your drum room and let it be kind of chill at the verse, but then maybe it gets a little bit bigger at the hook and the chorus, and it comes up maybe 4-5 dB.
I would love to hear a bit of drum room. For future vocal thoughts, I had pictured as I was listening to this, at the chorus, your vocals, your lead vocal changing sound so it’s not the same as the verse, but then also having stacks left and right. Doubles and triples of your lead vocal so that it really gives it an impact.
I feel like we kind of drown the vocal out with the guitars, and especially with the piano at the hook. Let’s take a look at that.
[song plays]
Not there…
[song plays]
Okay, and you have some awesome vocal harmonies at the end. I put a note here that I loved the harmonies.
[Matt’s track plays]
There it was, right there.
[Matt’s track plays]
Okay, don’t be afraid to boost those, man. I like what’s going on there. Maybe not hard panned left and right, but maybe 75% left and right could sound really cool. Stacking that lead vocal, some harmonies for the chorus, I really, really, really would love to hear some of that stuff. Some cool effects for us, some modulation, some gentle chorus would be really cool on those backgrounds.
The song length, if you have control over that, again, I’m not sure how much – if you’re in the band or if this is a buddy of yours or whatnot, but I would recommend doing a radio version. I think the song drops off twice. Am I wrong about that?
[song plays]
And then again.
[song plays]
Okay, so a small tip, but you may consider doing a radio version where you maybe either don’t go low there, or don’t go low here, one of the two. Or maybe you find a way to shorten some stuff. Maybe shorten up the intro.
Three to three and a half minutes might be kind of cool to have a radio version of this one. A lot of you guys are screaming at me about that note.
Let’s go to “oohs” and “aahs.” Maybe it’s phrases, words, the vocal producer in me just had a vocal session the other day, and produced a whole thing. The artist came in, really talented singer, and he didn’t have anything really written for it, so we took a lot of time, wrote out, took some notes… Take some time, man.
Listen to some of your favorite records. The Chris Tomlin stuff, Matthew West, a lot of those guys in CCM… Listen to their vocals and different arrangements that are going on with their vocals. Steal from that! Listen to what they’re doing, then take some “oohs” and “aahs” and harmonies and apply it to your own stuff.
I think the vocals are way underproduced for this one for the potential the track had. Give a listen to that and pull from what they’re doing. Then do more of those harmonies, man. I heard the harmonies just at the end there, and that’s like a super tease, because I could hear pockets of harmonies, maybe not in the first verse, but every section after could be cool to have some harmonies.
The chorus getting wider we talked about, the reverb on your voice at a couple of these sections, like that break right there…
[song plays]
It sounds like a reverb throw. I would take a low-pass filter/high-cut, and I would go in and pull out some of the top end on your reverb channel. So we’ve got your reverb send – excuse me, I would go and just take out some of this. Start it at about 6-7kHz, and see if you like that. See if you hear it being a little warmer and a little smoother.
It didn’t really annoy me, but I just think it’d be something you could check out is EQing your reverb sends to reduce some of that top end. Maybe even compressing that reverb to give it a little more fullness would be kind of cool.
You’re probably screaming at me. I think you have Mixing with Reverb that I just released, and so you probably already are implementing that, but anyways.
The other thing was auto-tune. My friend, back off of the retune speed. I don’t think you need it for this type of song, I would much rather hear your voice or who ever’s voice this is a little bit more natural and less of the auto-tune.
If you want to go all out with the tuning, man, do Melodyne or send it off for some editing and get someone to Melodyne it so that it’s a little bit more natural. I don’t think the auto-tune sound that I hear – I think the first verse is where I heard it pretty prominent.
[song plays]
Yeah, so a little bit thick for me. There’s a couple parts where I heard it really working in action. So, back off, man. Trust that the song will carry you. Do a little bit less with the tuning.
Those were my notes, man. I think that is it. We started with a track, I didn’t really keep any of the settings, but we started with this track.
[song plays]
Kind of bright, a little bit harsh.
[reference track]
This is our reference, and then we ended up with something a little bit more tame.
[Matt’s track]
I think you’re really going to love blending cymbal samples. I think that’s really going to take these drums to the next level. A little bit of a room sound underneath, and I think you’ve got a great thing going on here.
Man, Matt, thanks again for trusting me to hear your work and give a little bit of constructive criticism. I hope that those tips have helped you, man, and any of you guys watching back, I hope you enjoyed that.
Again, this is the custom mix critique service that comes with the upper tiers of my courses. You can check out the links in the description for those.
Also, themixacademy.com members get access to a discounted custom mix critique where they can get it just on it’s own. They don’t have to buy a course and get it through that.
Anyways, thanks again Matt for letting us hear your song and give a walkthrough.
Guys, I hope you enjoyed it. More at davidglennrecording.com, theproaudiofiles.com. Please like, subscribe, share with your friends. If you think this could bring value to someone, please, man, help us out. Share that, and we’ll appreciate you for it, and we will catch you in many more to come. Thanks!
Elevate Your Ears