How to EQ Layered Synths in a Mix
06/2/2014
[song]
Alright, cool. So I’m still mixing this one but I thought that this was worthy of a good video to show you guys some of the basic here. So let’s solo the bass. And let’s listen to just that. And we’re gonna loop this section so we can kinda add each element one at a time.
Alright cool, so I’ve got kind of a full bodied bass. I’ve duplicated the bass, and treated it with some distortion, some crazy limiting, a little bit of sidechain compression. Some stuff going on there, but I want you guys to pay attention to what I do with the hook synths and the strings to kind of fit them into their own frequency spectrum. So actually let’s take out the bass, and let’s hear just these hooks — synths, let’s scroll down and show the strings. And I’m gonna solo these guys with no processing and let’s listen to what’s going on.
[bass + synths with no plugins or processing]
Ok so it’s not horrible, but I think we can tighten up the sound and make it sound like one cohesive section rather than a bunch of things just doing their own thing. I hear a lot of low frequencies getting in each other’s way. I hear a lot of highs going on in every one of these tracks. So what I want to do is I want to come in here, and one at a time, I’m gonna un-bypass the EQ’s, and then we’ll take a look at what each EQ is doing. So playing it one more time we’re gonna loop it and I’m just gonna go one by one and un-bypass these plugins.
[synth loop + individual EQ processing with FabFilter Pro-Q]
Alright cool, so now it’s worth probably — so that last one, I lied, so it’s not just an EQ, I had Sansamp and then I have an instance of OTT. This is mentioned in Pensado’s Place, can’t remember the episode, but if you google Xfer records, Xfer records, and the plugin is OTT you’ll be able to find that one. It’s a great plugin for dialing back the depth and just pulling it up, usually between 10 and 35% is where I usually land it. It gets pretty crazy if you go higher than that. But hear the difference with those. Now it’s probably worth showing — let’s go ahead and bypass all of those and these two, and then what we’ll do is try to bring them in quick so we can hear the difference.
[synths with/without FabFilter Pro-Q EQ and OTT]
Yeah, for sure. Now you can hear we lose all the low end pretty much below 100, and I’ve done that on purpose. And the reason why I’ve done that is because we have the bass, and I don’t have the bass in what you’re hearing right now, so we’ll do an A/B on that as well. But let’s go ahead and walk through a couple of things.
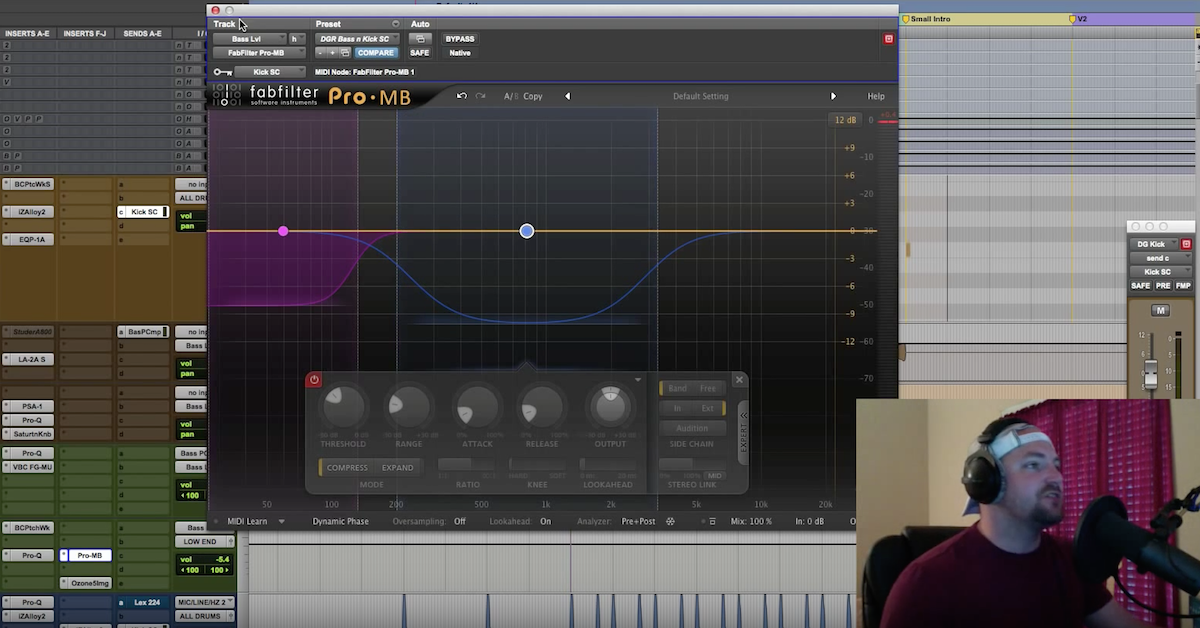
When I’m mixing I’m gonna use the high-pass filters for pretty much everything, except for kick and bass, and actually that’s not even true. Depending upon the style of music I’ll take a high pass or a low cut and pull that up on the kick to like 30 Hz or something like that. Maybe 50. Depends on the song. Maybe 70, who knows. But in this case, focusing on the music I typically am gonna get rid of everything below 100 when there’s a bass present. Because I want the bass to be from 100 and below. I want it to dominate there. And I want to be able to control my low end with the kick and the sidechain compression that I’ll apply. And I’ve covered that in a recent video. If you haven’t seen that check that out.
Alright I’m gonna try to stay on topic for you guys. What I want to do is I want to go one by one through the hooks and I want to show you how they relate to each other and how they work up against the bass. So we know the bass has a lot of sub frequency dominance, we’re allowing that to happen. I’m gonna bypass and you can see in this particular synth — the hook synth — I liked everything that was going on up here. And I just took everything out that was below 100. So let’s hear an A/B of that.
[synth before/after FabFilter Pro-Q HPF EQ]
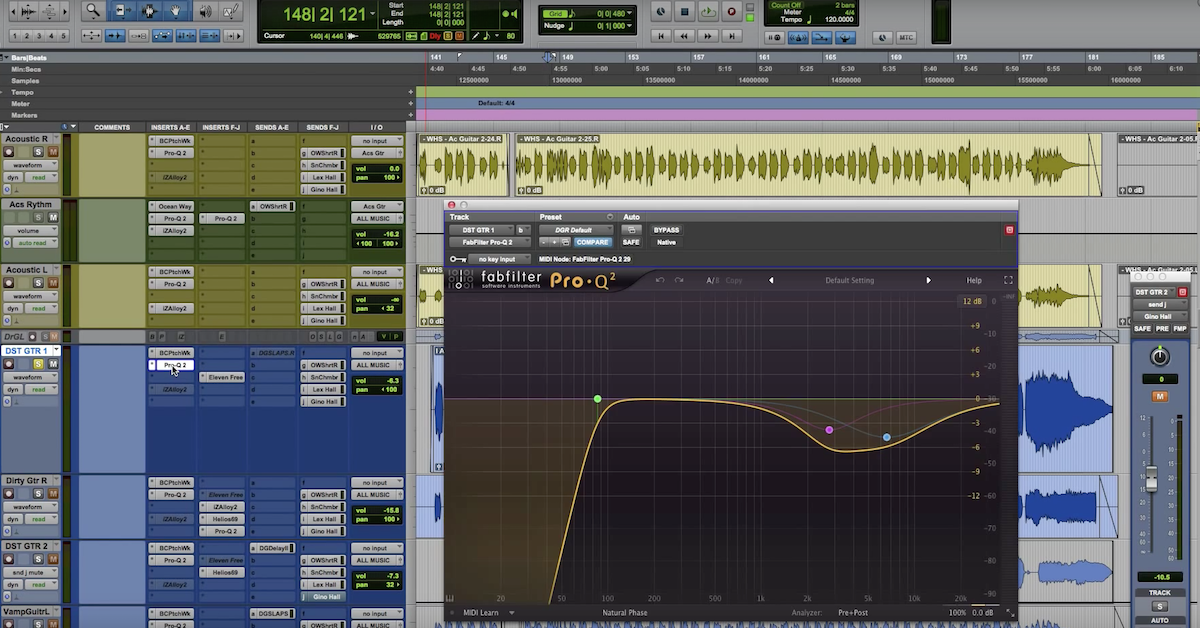
And now active. Cool, so it keeps it short and sweet but I like the way that it clears out everything below 100. Let’s move on to hook synth 2. And you’ve got another FabFilter Pro-Q. Same thing. Cutting below 100 and we’re gonna actually increase the cut by a bell curve right here. You can see this one right here. So that’s working there. Let’s play that before.
[synth before/after FabFilter Pro-Q bell cut]
And now after. Cool, so you can just hear whenever we instantiate the FabFilter that that EQ is just helping the frequencies — they were nicely recorded, the synths work well together. We’re just gonna take out some of the stuff to kind of clean up some of the space that we don’t need. With the multiple synths. Let’s go on to the third one, we’ll see that this is the same thing. I’m cutting below 100. It’s pretty consistent across most things that I have in any song. Aside from kick of bass. And then you’ll see I’m taking out at 1k and I’ll explain that after we hear the difference.
So here’s before.
[synths before/after EQ]
And after. Now let me mute it. Back in. And bypassed. So some good stuff going on in there. The reason why I pulled down 1k is I felt like there was quite a bit going on there and I like to keep in mind that — something I picked up from Dave Pensado on Pensado’s Place — an ITL on mixing vocals, he mentioned how he’ll look for a sweet spot in the 1k region, so it’s not always 1k, maybe 1.2 maybe 800, spending upon the vocalist and the song. And he’ll look for a spot there to boost a little bit, and then he’ll look for a spot just below to kind of make a soft cut, who knows however much. Just depends on the song. I started applying that technique and it works really well. Well the other thing that I take note of is while I’m mixing, whenever I’ve got multiple elements with a lot going on in the 1k region, what I do is I dip a little bit there so that it’s creating even more of a — call it a hole, a gap, a space — for the vocal to live that nice sweet spot of the 1k to live. Maybe I should do a tutorial on finding that spot and nudging it up a little bit but moving on.
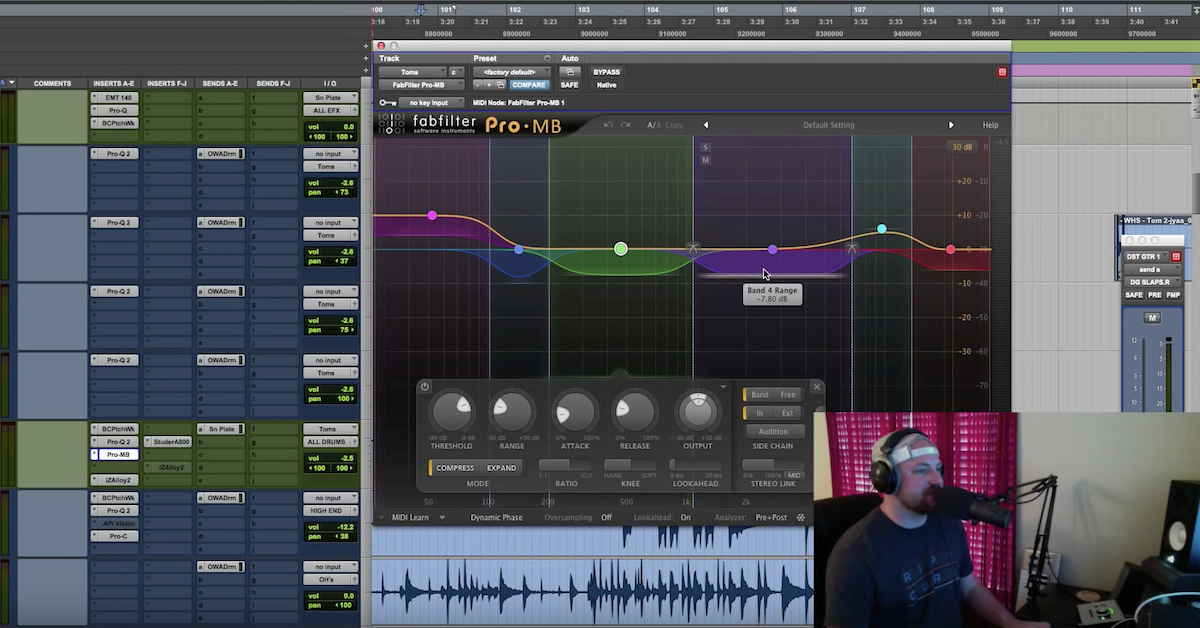
That synth is souring great. Pulled some of that out, it’s helped the vocal. It’s already got some of the sizzley thing going on. Moving on the the next we’ve got another chorus synth. Let’s pull open this and I’m gonna bypass OTT and then you’re gonna fall in love with that plugin — it’s actually a free plugin — another Pensado specialty. And here we go. You can see I’ve been really drastic, I’ve committed to cutting everything below 1k out. And you’ll hear how OTT kinda helps bring some of that back in. But let’s play it before.
[Synths before/after OTT + FabFilter Pro-Q EQ]
Now after. Ok, now listen — that’s pretty drastic, but whenever I engage OTT you’re gonna see how that kinda makes sense. And this is the sound that’s gonna be more like a texture, underneath the vocal — is doing an oh, oh, oh kind of thing — so by adding the OTT in, it’s gonna kinda add that texture underneath the vocal and it’s gonna sound pretty sweet. So here’s before OTT.
[synths before/after Xfer OTT]
After. Now if I bypass. See, that’s too big. If I let all of these sounds have all of the space, then nothing is working together and it’s just a bunch of big sounds that — it’s just gonna be messy and it’s not gonna be a clear mix. So that’s the main thing I want you to take from this video. If I move on we’ll show you real quick, the strings, I’ve used a similar approach to — OTT is a multiband compressor from Xfer Records. Google that: Xfer Records. OTT. And a little tip, dial back the depth all the way to zero and rise that up, raise that up to give you the effect you want. 100% is almost always kinda crazy and overkill.
Moving on, the strings, we’ve got the strings part, let’s hear that by itself.
[strings]
You can hear on the left ear there if you’re on headphones, or. And if I pull in Sansamp, it’s a drastic difference. And soften it up a little bit. Bypass both of them. Cool, so you can hear the sound. Why I’m showing you before is because it’s gonna help you to hear the difference up against those other synths, there’s a couple of them that have a high sizzley thing already going on. So it didn’t make sense for me to have just another one in there. I felt like it would just get a little too messy. So what I did is I tried some sound design by applying Sansamp. Gives it it’s own tone and then I used an EQ afterwards here to kind of shape that sound. Took out some of the what I felt was a little bit too harsh, a little bit too — harsh, tinny, just kinda like cutting through, hurting my ear a little bit. So I reduced some of that just using my ears, pulling down some bands there. And then gave it a little bit of fullness in the mids. And now let’s hear that up against these other sounds, so. Let’s come up here, all of these, solo them and we’ll play before and after.
[strings before/after FabFilter Pro-Q EQ]
Cool. Now let’s play it here. Engage Sansamp and then we’ll do another one with the EQ.
[strings with Sansamp before/after EQ]
So Sansamp definitely helps it stand out, but I think it stands out too much so I used the EQ to soften it up a little bit and here’s that. And I’ll bypass both of them now. So here’s without either one of them. Yeah so just kinda pokes it out a little bit in that — I’d say midrange, upper midrange a little bit.
Alright guys, so sometimes I get to yapping so forgive me for that. But hopefully you’re learning something for this. This is a concept, it’s a principle that you can apply across your mixing sessions. This is not just a here’s five synths and let’s get them working cohesively. This is an EQ technique to use for everything. So, between kicks, between multiple snares, how the drums relate to the bass and the bass to the other elements. And the vocals and the background vocals. Look for and listen to the frequencies you want to enhance and remove that from other elements around it. So, hope you’re getting something from that. Love that you guys are tuning in. Feel free to like and subscribe, I’ll keep bringing this content to you guys. davidglennrecording.com, I’ve just released my latest training course, it’s called the Mix Series. davidglennrecording.com/mixseries. Hope you like that. And as always theproaudiofiles.com with an amazing amount of free content. And we’ll catch you guys on the next one. Thanks!