Full Breakdown of David Glenn’s Stereo Buss
03/30/2016

First off, you’re going to see it’s labelled, “Sub Master.” Back when I did my Pro Tools Expert certification, version 6, 6.4, I can’t remember what it was… The instructor called it the Sub Master. But it stuck with me.
But Sub Master, Mix Buss, Stereo Buss, all the same thing.
My Sub Master, or stereo buss, is a stereo aux track in Pro Tools. That’s really, really important. Stereo auxes are — the gain structure is post-insert. So if I come out here and I write automation to the stereo buss, it’s not going to affect the signal going into this first plug-in here. It’s going to be post. So it’s only volume after the processing, which is huge if you’re using EQ and compression on your stereo buss.
You may not want — in most cases, I’d say you probably don’t want — that level to change with automation. I do a lot of automation on my 2buss for songs that call for a bigger hook, a bigger chorus, to explode and get louder.
I may drop my stereo buss -1 dB for the whole song, and pull it up to -0.5 at the Prechorus, and then explode it up back to 0 at the chorus. I’m sure you’ll see that in this mix for The Mix Academy. I do it in just about anything that has a big chorus.
So we’ll probably see that. But if I was to use a master fader and plug-ins on the master fader for that, then if I come in here and drop -1 dB, well that’s one dB less going into my first set of plug-ins, and that could be bad. It could be what you want.
So it just depends on what you’re going for, but I like to make those moves as a whole shifting the volume, not the gain staging, so.
Kind of a long winded, janky way to explain that to you, but I hope you picked that up. If not, feel free to e-mail me any time you see any of the stuff. Hit me at david@davidglennrecording.com with any questions.
So let’s take a look. The first plug-in here is the Blue Cat’s Patchwork, and this guy — what it does is I like to layer a couple of different plug-ins and have the option for more, depending upon the song and what I’m working on, and Pro Tools gives me 10 inserts, and sometimes, because I layer these UAD plug-ins here for color, I can quickly run out of inserts on my 2buss.
It’s a little bit crazy, but I don’t mind. Judge me, it’s okay. But I’m going to explain why.
The first plug-in in the chain is the Slate Virtual Mix Buss. I’ve used this for quite awhile, I like it. If I bypass it, I definitely notice a difference. It’s not some magic, huge thing that you have to have, but if you have it, I like it, feel free to use it.
For me, it’s the first plug-in in my chain. Next up, sometimes I use a little bit of widening, or stereo imaging. So I have the Waves there. This is off from the get go because I can’t remember if I mentioned this in the All Busses, but I like to do some widening at the All Music Buss, so if I do it here, it’s very minimal. Another 5-10%, depending upon the song. I’ve been known to push it even harder, and I know a lot of guys have to.
So that’s there. It’s off, ready to go if I need it. Next up after that, I used to use this in every mix. Let me tell you why.
For those of you guys who have followed me for any amount of time, you’ll know I used to use the UAD Studer A-800 Tape. There’s the preset. I love this sound.
The problem that I’ve experienced in the last few mixes was the Redimi2 record that I was recently mixing, the low end for me, I was beating my head against the wall trying to get the low end to work, so I started going through the different plug-ins in my chain, the all busses on the tracks… I was just trying to figure out trial and error why can’t I get my low end to work? I got to the 2buss, I went plug-in by plug-in, and when I bypass the A-800, my low end was completely different. So, the tracks that I was receiving and sending in at 15 ips, there’s quite a bit of a bump down at 30, 40, 50 Hz. I don’t know. You guys who are smarter than me can correct me on that in the forum, but that to me was making me have to work harder at the track level to get a tighter bottom end.
I like tight, punchy kick drums in most of the things that I mix, not big, boomy, lots of low end sustaining. I like the low end to kind of punch you in the gut, punch you in the rear as you’re driving down the road, and then get out of the way so the bass can be the sustain or the extension of the low end.
That being said, as a mouthful, the 15 ips setting was kind of making that hard on me, so for my personal taste and preference, what I’m doing now is if I like the Studer, I’m using that at the track level and just hitting it harder and getting the character saturation that I want for the individual tracks, as opposed to using it in a top down format here.
So that’s there. If I want to call upon it and test it I can, but that’s a pretty drastic difference that this is going to give you, so I recommend trying that early with your rough mix, seeing how you like it if you do or don’t, and then turn it off, but keep in mind your low end, especially if you’re like me and want to have nice, tight kicks.
After the Studer, I have the UAD Pultec. You can see there’s no EQ. Sometimes I EQ, but that’s not why I put this here. I put this here because Universal Audio did a great job of emulating analog hardware, and a lot of guys like to have Pultecs on their stereo buss.
Well, for me, I like the color of this plug-in. However, they get that plug-in color, the hardware emulation, whatever they’re doing behind the scenes — there’s a little bit of a volume bump, but there’s a little bit of warmth we’ll call it, a little bit of low end that kind of gets jacked up a little bit.
Oxymoron there… Jacked up a little bit. But this affects things in a nice way and I like it, so I layer this one, and then the modeling that they did for the LA-2A, the grey, I like as well. So I use those two. There’s no compression here. You can see the peak reduction and the gain is set to continue the gain staging so that things don’t get louder.
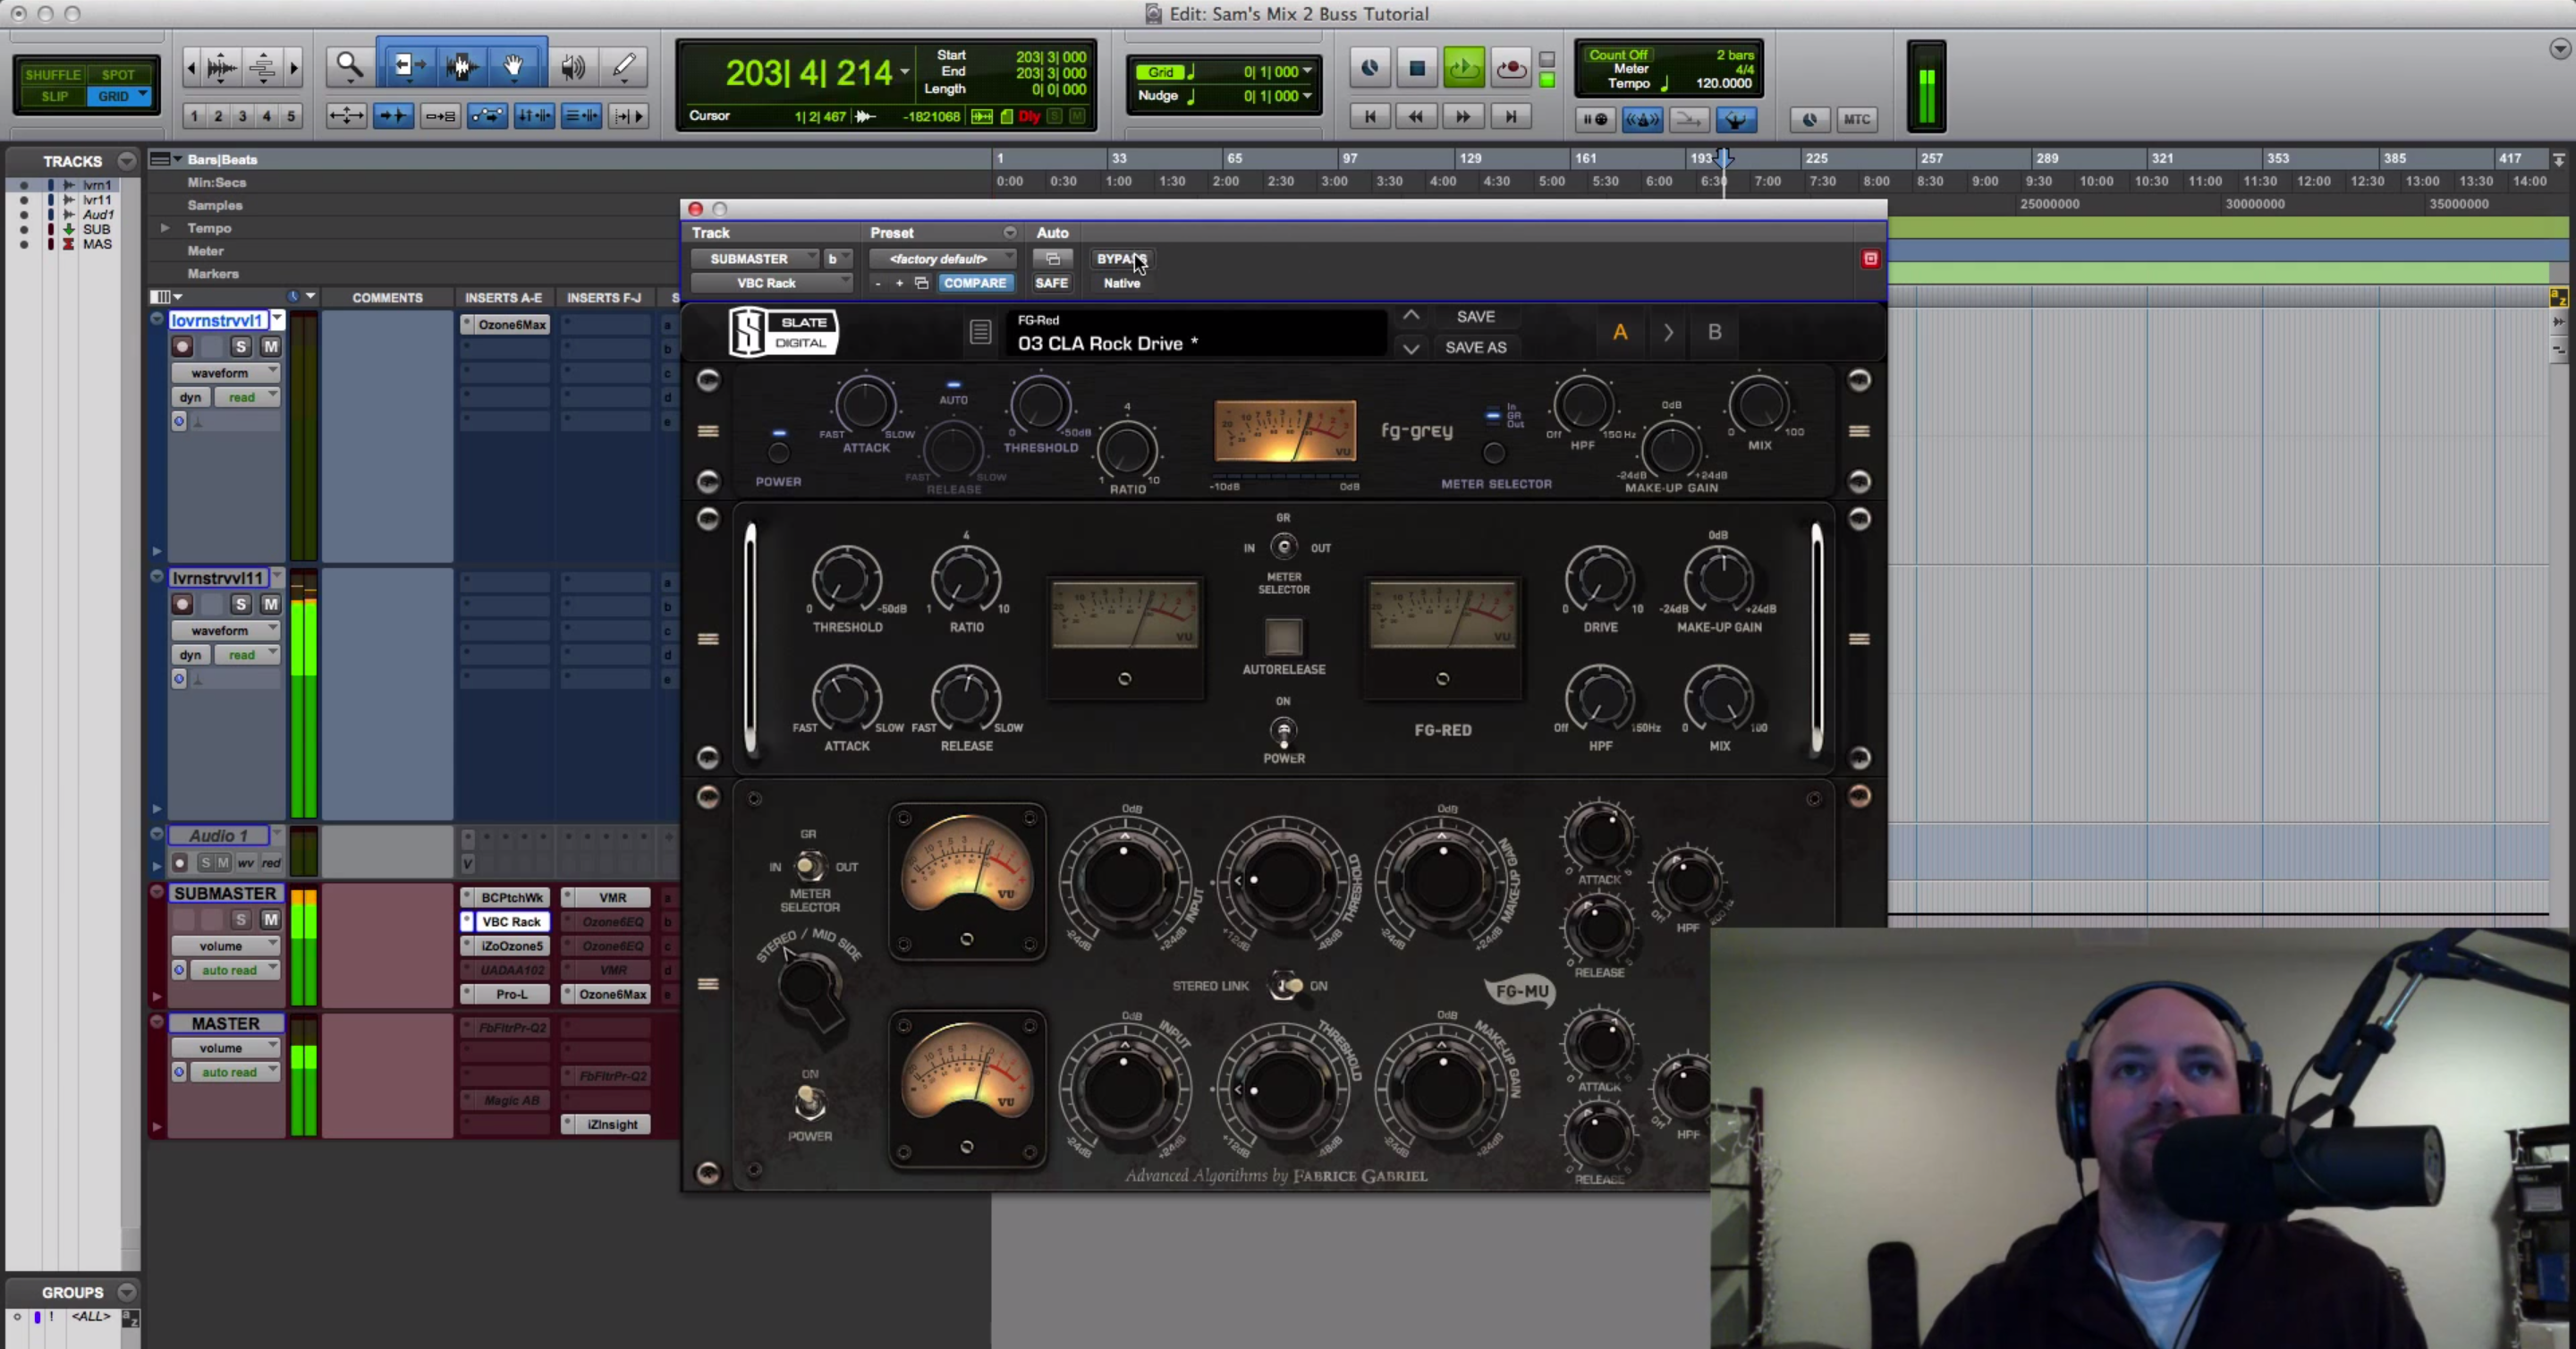
So there’s the first chain of plug-ins, and then we’re going to move into VBC. This one from — I want to say the first week or so that it was launched, I’ve had it on my 2buss. It shapes the sound pretty drastically. There’s going to be a little bit of a drop in 100Hz, and there’s going to be a little bit of a boost at 3-5kHz or somewhere up in the upper mids, and there’s a schematic or an explanation. I think it’s on Sound on Sound or something we’ll have to look up and give the proper link, but…
I like what’s going on behind the scenes. Again, the character. You can see the only thing that is happening here is sound is passing through it for the color, for the emulation behind the scenes, Fabrice is a genius. I love their work. I use most of their plug-ins, and you can see that that’s simply there.
There’s a 1:1 ratio on both of these so that there’s no compression happening, and the only thing I’ve done is backed off the gain by 2 dB, because there’s a gain lift in this plug-in just from having it on, so I want to stay true to the gain staging, and I want to hear a proper A/B if I ever go to turn this on or off.
I don’t want to be fooled by the extra volume. That’s the VBC.
Moving on in, now we’re going to get into a plug-in that I like to do actual compression with. This is my buss compressor, it’s my go to. Sometimes, I’ll swap it for something else, but for the most part, this is going to stay at a 4/10 auto setting. It’s actually not there because I just updated my template and forgot to put it back, but this is going to be a 4, 10, then auto is what I would say 90% of the guys who are using SSL style buss compressors are going to land on.
Depending upon the song, you may crank the attack and go a little bit more aggressive, you may feel it out and do some stuff — excuse me, not the attack, the release. Some guys will crank that up and test it out, but for the most part I’m landing there, and I like to use the side-chain filter — the 90 Hz side-chain filter is going to prevent the low end from triggering the buss compression, and it’s going to make it a little bit more balanced, and that’s a good thing.
Buss compression, the Vertigo VSC-2 has been a favorite of mine. I’ve actually been using that up here on my drum buss as well. That’s just recently switched from the U— not even the UAD. The Waves dbx 160. I’ve switched in and started using the Vertigo.
Then even that I’m swapping out all the time on the drum buss, so.
Moving on from there, because the VBC has a little bit of a dropoff at about 100Hz, I’m going to go ahead and lift a bit at 100Hz and then some, because I like to boost a little low, a little bit of top. I look at this sort of as my console, so if my console has more bottom and more top, then I hopefully have to do less work at the track level to kind of get that Fletcher-Munson curve where we get a little more lows, a little bit of top. It’s pleasing to our ears.
You can go Google Fletcher-Munson curve if you’re not familiar with that. After the boost there with Hoser on the bottom end, I’ve got Revival. Whatever the harmonic excitement is, or — I have no idea. It’s a secret sauce, apparently for Slate and Fabrice, but Revival, I love this plug-in. It’s a free one for those of you guys who don’t know. If you go to Slatedigital.com, as long as you have an iLok, you get Revival for free when you download VMR.
It doesn’t expire, it’s absolutely free, and it’s an incredible plug-in. I use it all of the time.
So I have this on. You’ll see that in action when we get to the phase where we setup our tracks, whatever song we’re working on this month, whatever track we’re doing, you’re going to see that in action.
But a little bit of bottom, a little bit of top to do it in stages a little bit at a time. And again, there’s some other love going on behind the scenes there.
Lift — there was a situation where I was working with my mastering engineer, Joey Fernandez was always kind of coming to me, “Man, there’s always something at (I can’t remember what frequency), hey, it’s bothering me, can you do something? There’s always something in this one frequency range that you’re lacking in your mixes.” And so, I remember throwing on Lift and boosting that a little bit more than what this shows. I don’t know, what are we at here. 0.7. I think it was like a 1.5 or something on the mix that he called me out for, but nonetheless, this is something that he liked. I did that. That was the only move I made, he loved it, he was like, “There it is, done deal, let’s print the master.” So I made that change to my permanent template — or permanently in my template, and it’s been there since. So I’ll turn that on and off after the rough mix, see if I like it, if I don’t — the only consequence, I’ll say — there’s pros and cons to different workflows — the only consequence I’d say for adding so much top to my template is if I decide to replace the kick drum or the snare drum and I pull in a sample that was Slate, the guys at That Sound are my favorite drum samples, my buddy Jordan has hardcoremixing.com I think is his new site or heavymusicmixing.com, he changed it, so forgive me, but his drum samples are incredible, That Sound, tons of different great drum sample companies out there.
Well, if they’re EQ’d with the right amount of top and you boost top on the stereo buss, when you push open that sample, you may be fighting against the click in the kick a little bit, so what I find is I just get to the kick track, and I’ll pull back the click, and I’ll shape the kick drum a little bit differently at the track level as opposed to changing this, because I look at the pros of having the added lows and top on my 2buss as an overall win — an overall gain. A victory for the overall mix.
I’m okay with manipulating a little bit in the kick drum to make sure that things fit a little nicely together, but…
That’s the only thing I’ll say about boosting the top is I have to shape kick drum samples a little bit more, and just take some of the click out, because it kind of fights against it.
So then our friend Trimmer here to pull back the gain staging so that if I come here in Pro Tools, we can hold Control and click on the first plug-in, it will bypass all of the plug-ins in the chain. By doing that, I can listen to what the mix sounds like — or my rough mix sounds like without the added stereo buss love, and then I can click back it in, take it out, put it back in, back and forth and make an adjustment if I need to, and it’s a relatively same volume.
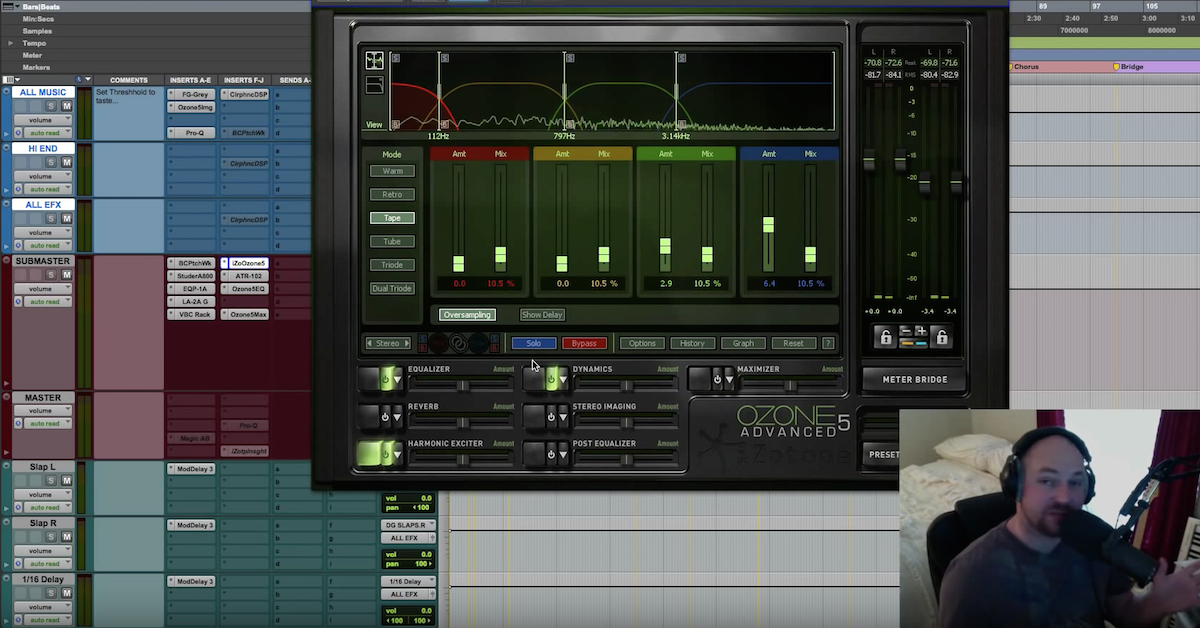
After VMR, I go into the Ozone 7 Exciter. I used to use Ozone 5 on the stereo buss with the Multi-band and the EQ. I swapped the EQ out for Hoser, and then — because of the way that I routed into VMR, and then I swapped the exciter for Ozone 7’s exciter because I got rid of using the multi-band.
Personal preference after watching the way I was using it. I was compressing really hard against the kind of 110, 120 to 500-600 range, which helped me get louder mixes probably a little bit easier, but I finally got sick of fighting against that. I love a really chunky snare, and if you’re compressing 4-5 dB against the low mids, it can be kind of difficult. You’re pushing way more in that snare, and you end up fighting against the limiter, and it just wasn’t working out.
Long term, I’ve done a ton of mixes I felt like sounded great. I was happy with that in, I decided to ditch it, and it’s just a different season.
So this is the tape saturation that is in from Ozone 7, and then these extra couple of plug-in inserts I’ll use for EQ matching. If you’re not familiar with EQ matching, it’s okay. We’re going to see a video in that in whatever mix I do, because I do it in just about everything.
Sometimes, I’ll use the EQ match process to reverse engineer what the EQ analyzer shows me, and I’ll go back. Maybe it shows that when I reference, it’ll take a snapshot of the frequency range from a reference track.
If it shows that I’m way off on the low end with a kick or the bass, or what have you, then I may ditch that EQ match, go back to the kick and bass, and work on it again from there, or it may be a subtle change in the mid-range or something that impacts the track nicely, and I may dig it, I may live with it and keep it.
But you’ll see that in action in the mix as we get going through the track.
So more on that to come. Now let me break over — I do — let me show you the limiter I use. The AOM Invisible Limiter. I switched from using the Ozone 6 limiter to this. I haven’t tried the Ozone 7, but I love this guy. AOM Invisible Limiter. It sounds great.
You’ve got the oversampling. Crank that to 16x whenever you print. It’s got suppress, clip, and through. Clip is cool. Some heavy rock stuff, I use clip. Suppress is awesome. The only other thing I do sometimes to make a creative decision to do is clipping with the 2buss. It just depends on who I’m mastering with or what I’m doing there, but I use the IK Multimedia Classic Clipper.
I’ll show you that.
This guy right here. And I’ll go for half a dB, maybe a dB. dB and a half, just depends on what sounds good. If it sounds good it’s good, but we’ll take a look. I don’t know that we’ll be doing that in this mix, but tons of applications where that can be really cool.
Moving on from the actual stereo buss processing, I’ve got my master fader here with some handy tools.
The first one is — I’ve recently fallen in love with Sample Magic A/B version two. Version one was great, but there were some things that kind of made it difficult for me, and you may have seen in a previous video here in the Mix Prep series that I have a “refs” track at the top of my session.
The top of my session, that’s going to be for the rough mix. I’ll pull in industry references. Whatever I feel like for the particular song that we’re doing. First off at the Pro Mix Academy is going to be an Imagine Dragons track, maybe an Everclear song or something else. I’ll pull those in up there.
Well, as of late, I’ve been using this guy. Sample Magic A/B version two. I think it was like, a $30 upgrade from version one, and you’ve got latch and you’ve got sync. So I can pull in the rough mix, go find it in my hard drive, pull it in, and as long as I set it to the same starting point as the session and sync it, I can click here and go between A will be my mix — excuse me, and then B will be the rough mix.
I can click back and forth, I can level match them — excuse me again, and I can level match, listen to mine, listen to theirs, and make a good comparison there. Then I can have industry tracks mixed by records that I love, mixes by Tony Maserati, CLA, in this case, Warren Huart…
Any of those guys that I respect their work, I’ll pull them in, listen… Warren has got me listening to Train, Hey Soul Sister. He loves Mark Endert and that vocal. So I’ve got that in as a reference, but anyways. There’s Magic A/B. Really, really cool tool.
Kind of blowing through this pretty quick for you guys. Again, if you have any questions, feel free to hit me in the Facebook group or e-mail me.
If we scroll back down, we’ll take a look. I want to show you guys my Audreio. I just recently picked this up. This is a — I think it was like, a $20 or $30 app, and very straight forward. What this does is you make it active, and you have your iPhone or your iPad, or your Android device. You download the app and it will find your device if you’re on the same internet connection or BlueTooth, or whatever. I think it’s WiFi.
It will stream whenever you turn that on to your phone. So you can check your mix on your phone. I have an iPad Pro that I don’t recommend anybody go get. It’s a very expensive Netflix device, or in my case, reference speakers. The speakers on it are incredible, so if you want an iPad with better speakers, by all means, go spend the money on it.
But anyways, so you can reference your mixes to your mobile devices with this guy. Again, it’s — let me click real close so you can see. Audreio. Go to Google, search Audreio, you will find that, and that’s a great tool.
Next up is a version of Pro-Q2 here. This could be — it’s on a separate screen. Let me pull that over. This could be any EQ for you, I just love the Pro-Q2, so that’s my go-to. Pretty much, I have a high-pass and a low pass filter.
You’ll see me do this in the mix process. I will take and listen to — I’ll turn this guy on and I’ll listen to what’s happening 20, 25Hz. I just want to feel, are my subs shaking the way that my reference track is shaking?
I’ll listen and then I’ll kind of open this up a little bit. 5Hz at a time. Go to 30, 35Hz. Check out mine, check out theirs. I’ll go up to about 50. I’ll check mine, check theirs.
70, 100, etcetera. Once I’m happy with my low end, this is really going to reveal to you guys. If you haven’t seen this, I hope this helps you a ton, because I get more e-mails and more compliments about this process, especially from us home studio guys, than anything else.
So 100 Hz and below, I’m going to get my bass right. I’m going to get my kick right. If I don’t feel my kick punching as much as I feel industry tracks, then I know I’ve got some work to do.
If I don’t feel the sustain in the subs and the bass the way that I feel it in the reference mixes, I’ve got some work to do.
Once I get the low end right, I like to kind of move this up. 150-200, and then I like to activate the high pass filter, the low cut. I’ll pull that up around 100.
Now, I can reference the low mids, and I can work my way up from there, etcetera. So once I get to about 1kHz or so, then I’ll kind of slide that up and check up here and work my way through the top end.
So that’s my personal way of using it. You may prefer to do other frequency ranges. You may prefer — maybe you want to leave this open. Maybe you want the whole thing and you keep the bottom end there.
But I like to work the bottom end that would be the equivalent of turning your mains off and only listening to the sub, or once you get to 100Hz, it would be the equivalent of turning the sub off and only listening to your mains.
So I like to do that. I find that it helps me a ton when I reference, and you will learn more about the reference tracks, how much low end, or low mids, or mid is in the vocal, how much top end if you reference yours and you click over to theirs, and if you hear that yours is piercing in 3-5kHz, guess what. You’ve got some work to do in 3-5kHz.
Now, it’s not a perfect science, because different tracks, different singers, different artists, different… All of that kind of stuff, but it’s definitely going to be something that I think will help you a ton.
My metering is iZotope Insight. I like to use this. I used to — Young and dumb — would be aiming for a specific LUFS. Now, I like to just mix the record, and whatever I end up feeling that out at, whatever sounds good to me, then I like to for big projects, I like to kind of gauge that and aim for a close LUFS, or RMS for you guys using the RMS system — keep an eye on that for a project and keep close.
I’m happy with -8, -9, -10. I’m not happy with anything that pushes the crap out of it too much further than that, and I’ve actually noticed lately I’m doing things to different tracks and different busses to get volume out of them as opposed to volume out of the entire mix, if that makes any sense.
Doing things a little bit differently. So.
Being a little more conservative with that, and the final plug-in, I think I’ve already talked about this, but it’s Sonar Works. This is the only plug-in that if someone’s starting out working in a home studio, I say, “Man, go buy this plug-in.” This is a must have. In my opinion, my perspective, my way of working, this is a must have. Yes, I’m weird, and I like to work on headphones. It kind of came from necessity, but I also grew up listening to music on headphones. Kind of that generation of the iPod/Sony Walkman transition to the iPod and all of that.
So long story short, I like headphones and I find that this could be — even if you have a great room, you think you have a perfect room — there’s no perfect room — but even if you think you have the best room and the best setup, and the cloud, and the reflections are covered, and everything’s great, you’ve got your bass traps that you’ve spends thousands of dollars in your room treating it…
Go check out the free trial of Sonar Works and see what this does for you. They’ve got a whole list of headphones that work with their plug-in, and this is just absolutely incredible. It was life changing for my mixing.
The very last thing that I’ll say about it, just in case you haven’t heard of it, the green line is — let me zoom in. The green line here is the corrective curve, you can see. The blue, the natural curve of these headphones, the frequency response… I wasn’t hearing anything around 30, 40, 50Hz, and I definitely wasn’t hearing it accurately.
So you can hear from 70Hz and below, there’s a pretty steep increase, and what that increase is there for is to flatten the response of my headphones. So now, when I go to boost 30, 50Hz in the bass or a kick drum, I know when I start to hear it and feel it well, that’s accurate, or at least closer to accurate than what my room would have given me.
Then whenever you see the low mids, you can see there’s a pretty decent boost naturally. 2-3 dB or so in the low mids of these cans, and there’s a corrective curve to help pull some of that out and get a flatter response. A more balanced tone from these guys.
So it’s getting late. I’m a little bit tired, so forgive the rabbit trail, but you can see what that’s doing. Go look up Sonarworks.com, check these guys out. They’re doing incredible things, and they have a lot more coming.
So there it is! The 2buss. Lastly, very very last thing, you will notice in the videos, my Master Fader sometimes at -5, sometimes at -10, that is only because I don’t want the output clipping Screenflow, the recording app that I use to do the screen recording, and that is it.
There is no logical reason or method for the audio — for the Master Fader volume there. It is just because of the video recording.
Elevate Your Ears