Stereo Buss Masterclass with David Glenn
07/27/2014

I’m excited about this one. I say that every time, but this is a stereo buss masterclass, we’ll call it. David Glenn’s way. This is not for everybody. My walkthrough – I’ve done it a little bit before, but I’ve got a few updates to it, so I’m going to walk you through.
I get asked this more than any other question. “Hey, what about your 2buss? Your stereo buss?” And I say openly, “I mix into a crazy 2-buss,” and I’m going to walk you through it. I’m going to bypass some plugs, let you hear it. I’m going to explain it, and you guys can make up your minds if you like it. If not, I don’t care, it’s totally cool. Find your own way, go your own way, and if you do, great, I hope that it inspires you to give it a shot. I love what it does for me and I get some great results in my opinion, so moving on from there, this is a taste thing.
So jumping in, I’m going to hit play, and then I’m going to bypass and walkthrough – but I’m not just going to bypass, I’m going to try to explain why I’m using it and what I’m using it for.
So here we go, I’m going to hit play.
[music]
So, to kick it off, I’m going to first say that I do a really detailed explanation of my bussing, my routing, I’ve got a training course called “The Mix Series,” so give a little plug for that, you can go over to davidglennrecording.com/themixseries and you can check that out, but the gist of it is, in my mix, I take every single track – so like I’ve got kicks going to a kick level, and that goes to all drums.
If you scroll down, the snare goes to all drums, the toms go to a toms buss, I treat them that way, and then they go to all drums. Bass is going to parallel compression, and then that goes to low end. The music pretty much all goes to “all music,” and high end elements like hats, cymbals, swells, reverse swells, if I’m working on an EDM tracks, I’ve got high swirly stuff, and that’s going to a high end buss, and those are down here, you’ve got all my vocals and stuff that goes to all vocals.
So any tracks that I send to busses, those busses all meet at one of these right here. These are my pre-stereo buss busses. So all vocals, all drums, percussion, low end, all music, high end, and all FX. There’s a more detailed explanation, like I said, in the training course of why and what and how I’m treating individually with compression and so on, but it’s important to see that I’m compressing the music before it hits my stereo buss a little bit. I’m doing some imaging, some EQ there, I love this Kush audio Clariphonic, I’m using that a little bit now. The Slate Virtual Buss compressors, I’ve got the FG-Red on my drums, sometimes it’s a Studer, sometimes it’s both, sometimes the L-2007, it depends.
Anyways, this is where I’ve got control over those elements coming through before it hits my stereo buss, so that’s worth mentioning, but then all of those hit the sub-master which is my stereo 2buss.
Just a name I learned back when it was like, Pro Tools 5 Expert Certification that I did – Pro Tools 6 maybe.
Moving on, this video. The stereo buss masterclass.
So, this song is a live Gospel track from an artist Javis Mays, this song is called Greater, produced by my very good friend David Outing. Super stoked to be working on their record. We’re doing incredible stuff. Really proud about the team work that we’ve got going on and the collaboration.
I’m kicking it off – why I say that is because we’ve referenced some mixes by my new friend, and I’m super excited to be connected with Salvo out of Nashville. He’s mixed for Israel Hougton, who performed on the Pensado Awards with Matt Maher and Erin Lindsey back on the keys, so shout out to those guys. Great stuff coming out of their camp.
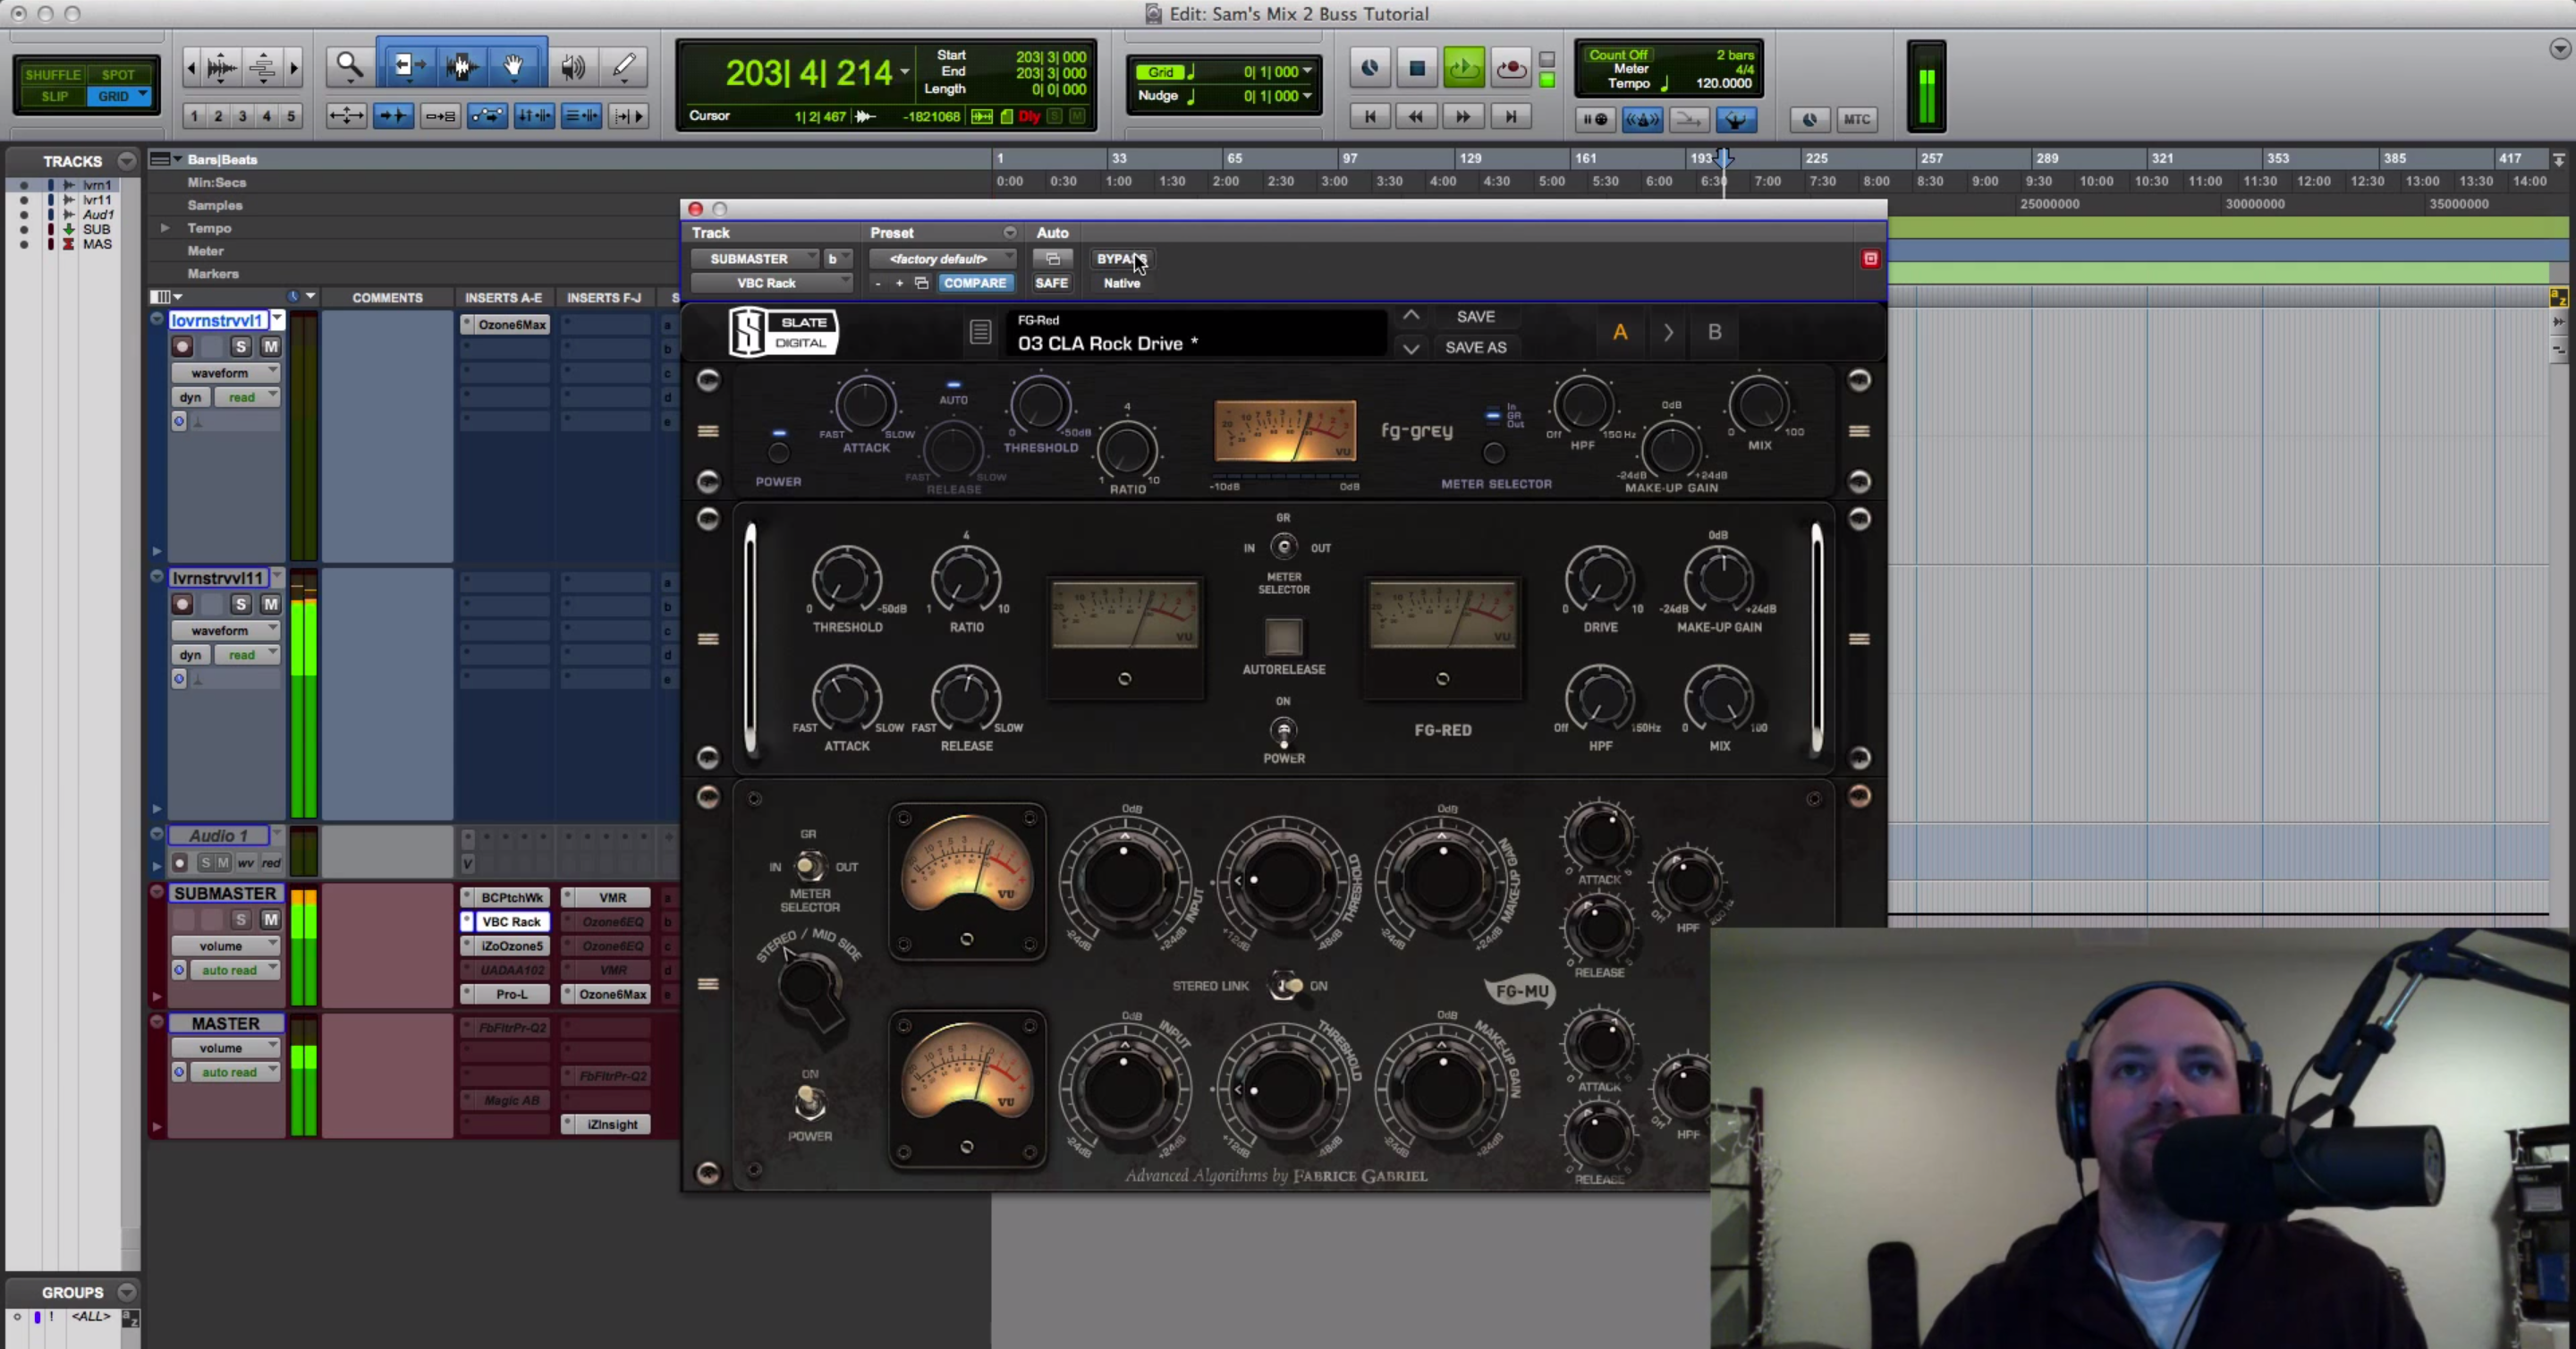
We referenced mixes by Salvo, produced by Erin Lindsey and whenever I compared my mixes to his, I noticed that I felt like his were wider, and so I’ve heard and seen guys using the S1 on their stereo buss, so sometimes I’ll use that on my music buss and I’ll automate it, and I’ll turn it on and off to get it wider at the hook. You guys have seen that when you’ve seen my automation series, but the thing I’m doing now is I’m putting it on my 2buss and just kind of nudging it up a little bit. Sometimes it’s 1.05, sometimes in this case, it’s 1.15, sometimes it’s a little bit wider than that. It just depends on what the track is calling for, and what I’m referencing so I can make sure that I’m in the ballpark of the width that I’m trying to get for the song.
So, first thing up is the S1, and then I’m using the Bluecat Patchwork, because I’ll want it to also include the Fab-Filter Pro-Q, and as you can see, I’ve got it in Mid-Side mode. In this case, I’ve got a really big low end. I’ve got subs and kicks with lots of sub in them, so I’m not doing too much on this, but on a pop song, or a country song, I probably wouldn’t have my low cut/high-pass filter set so low, they’d probably be up a little more towards 30 or 40 or 50, maybe even 60 depending on the style of music. Pretty much what this does is it gives me control for my mid low cut to be at 20, because we’ve got so much sub frequencies in the kick and bass. I want that to be central and to keep it in the middle, but then the sides I don’t want so much of that, so I’ve scooped it up to around 30. Not that big of a deal on this song, like I said, but this will give me the flexibility to slide either of those up according to the mix.
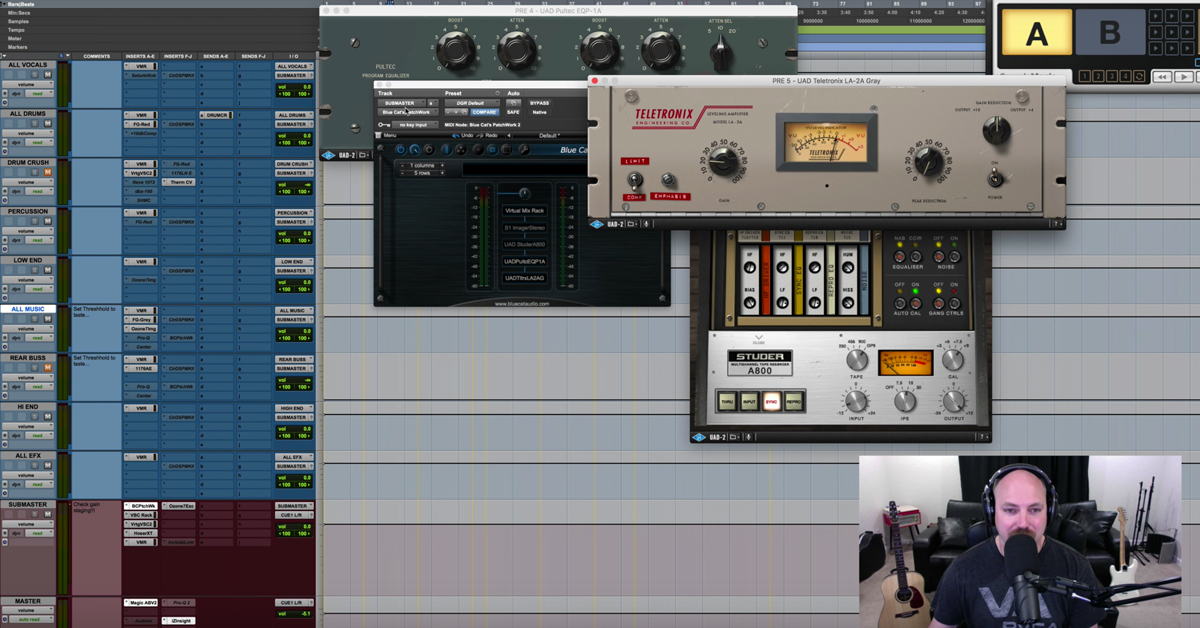
So, those are the first two plug-ins. The second on is really critical, this is the Studer A-800 from UAD. I’ve got this dialed in, I’ve got my own little setting here. You can take a look at that, but it’s pretty much just a gentle input, boosting the output for matching the volume, and that’s it. This thing just gives a little bit of tape saturation, a little bit of color, and I love what it does. If I showed you the mix before and after in stages, this is kind of a big deal. So we’ll walk through it, and then I’ll go through and bypass each one.
Next is the UAD Pultec, and this generally doesn’t get touched. I usually don’t put any EQ into my mix. I like to address any equalization issues in the mix, and within the busses themselves, but whenever I bypass this, they modelled the transformers of them, and it does something awesome to the track. I love what it does.
Moving on from that, it’s the exact same concept. I don’t do any compression with this, but this is the UAD LA2A grey. It’s my favorite compressor that they make, it’s absolutely insane. I use this on tracks all the time just for color and fullness, and then I’ll print it. I do a pre-mixing session where I do some editing on drums and auto-aligning the phase and that kind of stuff, and this and the Studer would be something I would process to those tracks before I pull them into a mixing session. I put it on the 2buss and almost always leave it on. I love it, there’s no compression, I just make sure that I’m careful about how much gain gives it a little color, and I like what it does. It warms it up, fills it up, and it’s beautiful.
Goes without mentioning that I’ve got the Slate VBC. How I’ve got it is the FG-Grey, the SSL emulation up top. That has no compression, the ratio is set to 1:1. This is simply for color. It does a great job at what it does. I use it for compression in the All Music, so again, none of these so far are really doing too much compression, it’s just the Studer hitting it a little bit for that saturation.
From there, I do use the FG-Mu for compression, but I’m barely kissing the needle, as you’ll see in a minute. I’ve dialed that in, I’ll crank the threshold so that I’ll really see some compression happening, and I’ll dial in the attack and release. I do use the high-pass filter, and I set that to between 75 and 100 usually. Then I back that down to where it just kisses the needle a little bit, but I’ll bypass that and again, you’ll see a huge difference.
Moving on, I use Ozone. This EQ, I just pulled open a preset Dave Pensado mentioned. I like what it did. If I bypass it, I miss it, so I leave it on. I mix into all of these, I have to say that. I mix into everything here from the very beginning. These are not things I bypass and pull in as I’m mixing, these are in place from the beginning. I mix into it, and I love it. It saves me some time. I like what I get from it. Same thing with this harmonic exciter, I’m 100% in the box, so I like what these do. Not much to explain there, but I’ve got the oversampling on, and I’ll play with that from time to time, but for the most part, this stuff stays put.
This is where you have to really pay attention to things. The beginning of my mix, I’ll throw the threshold all the way up on my multi-band here. I’ll do a rough, kind of get things where I like them with levels where I feel comfortable, and then I’ll dial down the threshold until I get an appropriate amount, and I say that because I kind of reverse engineered this preset that Dave Pensado mentioned on an ITL. I can’t remember what preset it was, but I’ll look that up for you guys.
But you can see here that it called for 3.2 dB of makeup gain, so go figure I thought around 3.2 of reduction is what the preset was aiming for. So I’ll kind of dial that down and listen.
Usually, I’m only at around 1-2 dB of reduction now, but sometimes it’s as much as 4 or 5, and that just happens to be what I like per the mix, and using my ears. So I’ll dial in the attack and release a little bit sometimes, but for the most part they work well.
Same thing for this, this has got 4.5 of makeup gain, so I’ll go in and I’ll kind of feel it out and see how my mix is reacting to that. I’ll do this setup generally just after I get a rough mix in. I’ll spend 20-30 minutes getting the rough mix, and then I’ll go to this and kind of set this to taste.
Moving on from there, I go into the UAD ATR-102. If I take this off, I miss it. I pull it back in, and then I’ll dial in the settings for drive and go through that.
This right here is a step in and of itself where I get to the end of my mix. I’ll mix it, I’ll reference while I’m mixing, and I’ll try to do the best I can to my ear between speakers and headphones and DropBox to the iPhone to pick out frequencies where I differ from the reference tracks. In this case, I used an Israel Houghton song. I’m referencing, I’m tweaking the mix, I’m referencing, I’m tweaking the mix all day. All kinds of stuff to that, and then at the end of the process, when I’m getting towards the end of my mix and I’m happy with it, what I’ll do is I’ll pull open the Ozone and I’ll pull open the snapshot EQ. So I come over here, take a snapshot of his song. In this case, I used his song called, “Jesus, the Same.” This song is called “Greater.” I’ll take a snapshot of both of those, I’ll come over to matching, and I’ll go to the EQ matching feature. You’ll see Salvo is kicking my butt, still had some extra subs that I didn’t. There’s a little dip at 100, maybe I was pushing it a little bit too much. Some low-mids, this is really gentle.
Then, instead of cranking it, I would just kind of add a little bit of oomph to it and kind of finish it off. Then from there, it goes into my Ozone 5 limiter. I’ve got the IRC 3, I’ll test this out. Usually it ends up between 2 or 3. I do that towards the end of the process because it taxes the CPU pretty good.
I dial that in for compression, so then the character transient recovery is incredible. It’s like throwing a transient designer back into the back end of your limiter to add a little bit of the transients back in.
Anyways, that’s a quick walkthrough. Let’s go through one by one and let’s hear the mix.
[song, no 2buss processing, bringing in plug-ins occasionally]
Let’s instantiate the widener.
It just kind of pushes it. Just a little nudge to the outside of the speakers.
Moving on, let’s hear the A-800. I’m going to try to follow my buddy Bill Cammack over at Pensado’s Students, Pensadia. He mentions in a thread about not breaking the – you know, if I hit play, and then say “Here’s on, and then here’s bypassed,” I’m telling you. That’s triggering our brains to look for something different. So I’m going to try to follow his advice, and I’m going to hit play and so you have to look when I’m bypassing it so you can hear the difference yourself, without me telling you, “Hey, this is different.”
Let’s give that a shot. Here’s without the Studer.
[song plays, Studer bypassed and re-enabled]
So with this one, we have a volume boost, but I think you can hear that it got a lot fuller. It gave it some balls, it gave it some oomph, and I really love what it does. So that’s an incredible thing there.
Like I said, I mix into it, so I’m not level matching it for what’s coming out of my other busses, but that’s still doing something great.
Now let’s hear the UAD Pultec.
[music, Pultec bypassed and re-enabled]
I think you hear that. I hear it, I think it’s incredible, and it’s even going to get better. Watch what happens when we un-bypass the UAD LA2A grey.
[music, LA2A bypassed and re-enabled]
So, like I said, I experimented, I loved it. Not doing any compression, this is just going through the plug-in the way that they modeled it, and we’re going to move on.
Here’s the Slate VBC rack. Remember, I’ve just got the Grey and the Mu, the Red is off. This one isn’t doing any compression, but this one is doing a kiss of compression. So here’s before.
[song, VBC bypassed and re-enabled]
Yeah, so you hear the upper-mids. They come to life. Everything just gets clearer, everything just gets beautiful, and I just love what that’s doing. So again, I don’t even think the needle was moving on that one.
Moving on to Ozone, this is going to be a pretty big difference as well. We’ll leave it off and bring it in.
[song, Ozone bypassed and re-enabled]
Very cool. So we’re getting some of that fullness back that maybe the Slate VBC left us hanging with. And then we’re going to move on to the ATR-102.
[song, ATR-102 bypassed and re-enabled]
This one for me is obviously giving me the tape effect. It’s giving the nice Ampex, beautiful, color… I’m just in love with what UAD has done with their plugs. But for me, it kind of levels things off a little bit. It compresses it to just tame things. It helps bring up some level on some things, knock down the kick and bass from being too powerful in the middle. I think it’s doing a great job. I think it fits with the sound and with the direction of having a finished master. That’s probably worth saying. I master all of my own songs, and this is pretty much how I do it. Very rarely do I pull it into another session where I’m treating it there. This is my mastering chain. This is what I’m doing. My clients have gone to me for mixes and masters. That’s how it’s worked. I think one song over the last three years has been sent off to a proper mastering engineer.
I’m not saying do it this way, and change everything you’re doing and stop using mastering engineers. I think mastering engineers serve a great purpose and there’s an incredible role for them. I just think that for me personally, the role of a modern mastering engineer to take on things like multi-band compression and the EQ and all that kind of stuff, I want to be responsible for. I want to learn, I don’t want to have a crutch in a mastering engineer. I want to learn and give the best darn mix that I could possibly give, mastered or not, ready for iTunes and for people, especially my clients, who are not major label clients going to the top mastering engineers at Sterling sound or Bob Boyd or Chris Athens. My clients aren’t going to those guys, so I’m what they have, and I’ve learned to do a good job, and I feel like this 2buss helps me to save time a little bit, as well as give a great result by applying these techniques the way that I have. You saw the EQ matching that I did with Ozone 5, so let’s do a before and after of this one.
[song, Ozone 5 EQ bypassed and re-enabled]
It’s subtle, nothing crazy. I’m not allowing it to be anything too impactful. Just a nice little taste of some balancing of those frequencies, and then last, but not least, the limiter. So, let’s hear this one come in.
[music, limiter bypassed and re-enabled]
You saw me move my mouse over the gain reduction meter, telling you how much reduction was going on there, because when I reference, I’m hearing what I need to hear. I’m not necessarily paying attention to that, and then looking at it is kind of frightening.
But I like the way it sounds! I love what’s going on here, and I use iZotope Insight for RMS levels or LUFS. I love Ian Shepherd and everything he does over there. I’ve actually got his Perception plug-in, and I’m going to be doing kind of a feature on it, and how I’m using that. It’s going to be incredible. It’s just changed everything for what I’m looking for in a final mix and how I hear things.
But there you go! David Glenn Recording’s stereo buss masterclass. I hope you like what’s going on. Nothing too crazy. I call it the crazy 2buss, but honestly like you saw, it’s a little bit of color, a little bit of tone from multiple plug-ins doing very little, and it’s got results coming my way for people that are liking it. Clients are coming for more.
So I hope you dig it. If not, tell me why in the comments. If you love it, tell me why in the comments. Feel free to message me at david@davidglennrecording.com, and then be sure to check out the products and training courses at davidglennrecording.com, and of course, theproaudiofiles.com for incredible stuff over there as well.
So I hope you loved it, we’ll catch you guys on the next one!
Elevate Your Ears