Creating Rhythmic Effects in a Mix with Output Movement
05/21/2016

Today we’re going to take a look at Movement. It’s made by the good people over at Output. They make incredible plug-ins. If you’re a keys player or producer, you’ve probably already heard of Rev, Signal, their other stuff is incredible.
But this is their first multi-effects processor. I don’t really do gear reviews or plug-in reviews, it’s not my thing, but I love to show how I’m using plug-ins that I go and I buy.
I want to show some love. A couple of guys that I hang out with in the group, I’ve got a Facebook group called The Mix Academy Mad Men. Neil, Pete, Ben, Lee, these guys were raving about this, so shout out and kudos to them. I went and checked it out and I fell in love with what it was doing.
I hit play on the sales page there from the guys at Output, and I think it took all of 30 seconds before I was checked out and sold on it.
So we’re going to dive in. Let me show you a couple of things that I’m doing with it. The first thing that I thought of was I’m mixing a song for The Mix Academy. That’s my membership site. You can go check it out. A dollar gets you in, gets the multi-tracks, you’re following me start to finish in the tutorial, use the multi-tracks for your resume. Once you’re done mixing it, show it off, grow your business, that whole thing.
A little bit of a plug there.
But I’m doing the vocal module for the song, it’s called Shipwrecks by Above Giants. It’s a part in the song — a part in the mix where I’ll usually go in and look for delay throws, reverb throws, modulation effects… Anything I can do to kind of automate and create some interest to the vocal performance. I’m there, I’m recording that video, and I wanted to shoot over and share this with you guys here on the channel.
Let me actually put Movement away for a second. Let me play — this is like the pre-chorus section, and it’s the first time I really wanted to introduce a delay throw, and I’m going to show you, there’s no Movement here.
This is just a basic half note delay. I’m using the Pro Tools stock EQ, and it’s set as such, and then I’ve got an EQ after it. Love to EQ my effects. You can see that there. Sometimes I get in and it’s a whole spaghetti mess, it gets all crazy, different filters, all kinds of stuff.
But for now, we’ve just got a basic setup with a clean delay, and this is what it sounds like.
[mix]
Okay. So just a clean, pristine delay. There’s nothing good about that other than it’s the right timing.
So what I wanted to do, and what I’ll typically do is I’ll go in, I’ll throw tremolo effects for side movement, then stack another one for the vertical movement — actually, the vertical movement is a tremolo — I’ll do auto-panners with tremolo. Create that kind of thing going on, maybe stack another delay, saturation plug-ins… The sky is the limit, man. I sometimes just have a full plug-in slot there. Inserts are filled.
You can see I’ve got all of these on the back end, and I just go crazy with effects. I love it. I’ve got a whole course called “Mixing with Special Effects.” I love to get creative and add plug-ins and do my thing.
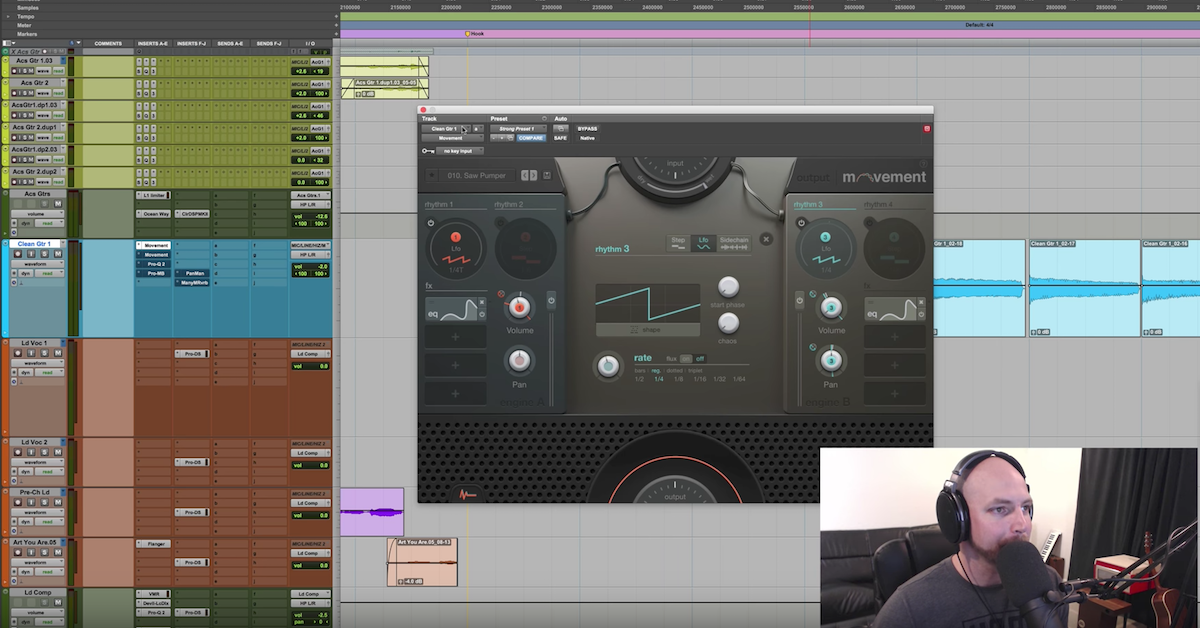
When I got Movement, I started thinking, “Man, that would sound really great on the back end of a delay.”
So I have this clean, pristine delay from just a stock, boring thing going on, and then adding Movement to it is going to create some crazy stuff.
Now I’m not going in and tweaking these knobs very much. I think I changed on a couple of the presets that I pulled apart, I changed the timing of the delay from dotted to regular, but for the most part, I’m just going in and picking some presets.
Let me solo the vocal and let’s hear this one more time, this last phrase with no Movement. This is bypassed.
[vocals with delay]
So that mono delay, right down the middle, is our half note delay.
Now, let’s do this. Let me scroll over so we can still see that on the screen, but we’ve got Movement now.
I’ve sent the vocal to the half note delay. You can see it opens up right here. It’s unmuted. So that’s where we get the half note automated on.
Then, let’s unbypass — let’s go to the first preset I pulled open was number five. Now again, I didn’t really touch these presets. So you can just click through and do your thing.
This is 100% wet because I’m using it on the back end of an effect. Let’s take a listen to what this sounds like.
[vocals with delay and Movement]
Okay. So that verb maybe goes a little bit crazy. We can come in and tweak some of that stuff, but in the mix, you don’t really hear it decaying like that, so it sounded pretty gnarly.
Let’s go to number nine, and then this one I changed the timing on rhythm 2 to a dotted eighth I believe. Let’s check that out.
[vocals with delay and Movement]
Cool. And again, that little bit of out of time thing going on, let me actually play that in the mix, and you’ll hear, it really adds this nice, cool little stutter thing.
[mix]
So it’s not a boring, clean delay anymore. Let’s go a couple more. Let’s look at number 10. Let’s see, what is this one called, “Saw pumper.”
Actually I think this is one I’m going to end up with. It was subtle, but it had a nice vertical movement to it. It kind of disappears and then comes back in.
[mix]
It’s got a sweet little vibe to it. One more, let’s look at number 12. This is Furiousa Flux’d. Okay. I love the names.
[vocals with delay and Movement]
That one I could definitely hear. Pop, EDM type stuff, and it actually sounds pretty great here. Let’s hear it in the mix.
[vocals with delay and Movement]
So for me, any of these now, we could tweak it a little bit. We could add compression on the back end, I could add another EQ, I could come in here and maybe take out some of the top end on that so it’s a little bit warmer.
[vocals with delay, EQ’d]
And the way that it’s coming in is a little bit maybe pokey, so we could come in and probably manipulate that in the plug-in, but like I said, I just got my hands on it, so I have not experimented with all of the parameters. I’m really just trusting the presets, and the presets rock, so…
So if you’re a beginner and you’re worried about this plug-in being too advanced because there’s all these different modules, man, the presets are nasty. Got to love that.
Alright, so that’s one way that I’m looking at using it. The other way that I used it in this song was pretty subtle, but it’s a great way to save on time when you want to be creative.
So out here I have an acoustic guitar, I’ve got it inactive right now, but I’ve just got a pretty straight forward acoustic. This is actually a mono acoustic. Here’s before.
[acoustic]
Ah, that’s a little bit harsh in the attack in the end. Let’s come to something a little bit more chill.
[acoustic, long strums]
Okay. So I wanted that to be a stereo acoustic — the impression of stereo, I pulled open the Waves ADT, gotta love that. Threw it through some processing, compression…
[acoustic with ADT and compression]
Alright. But at this part, I felt like a little bit of something extra might work, because it’s kind of chill and there’s not a lot of effects going on. The synth that’s in the other sections of the song is kind of dead right there.
So I want to pull open and show you what I did with Movement. Again, this is a subtle thing, but it adds a little bit of texture to this part. Again, I just pulled open a preset. This is number 15. This was just me messing around. It’s how easy it can be.
I pulled this open, and let me show you once again, here’s in the context of the mix, bypassed — it’s actually going to come in. So let’s show you — we’ll make that inactive one more time. Here’s in the context of the mix.
[mix]
It’s a little bit loud so you guys can get that, but now check it out when Movement comes in with a little bit of delay and some Movement going on.
[mix]
Okay, so that’s pretty chill, but let’s come back out here in solo.
[acoustic]
It has a nice, smooth vibe to it.
So a couple of preset clicks in I found that. I automated the master bypass, and I’m off and running.
There it is! There’s a couple of ways that I’m using Movement on the back end of tracks, the back end of effects… In the demo video, I highly suggest you check it out, go to output.com. I think it’s still the main plug-in on the home page there.
Click learn more, and they have a pretty sweet audio player where you can hear acoustic guitar. I’m producing a new song, I’m doing a chorus featuring it, and I’ve got a new module I’m doing where I’m just going to layer strummed acoustics and play some basic, simple chords on a keyboard controller, layer some pads, and then throw Movement on as a production step almost.
This plug-in has now kind of taken it’s own checklist step in my production process to add another level of creativity to it.
So shout out to these guys. They’re doing great stuff. If you have any questions at all, tell me, ask me in the comments. I will try to answer. I’ve got a couple of buddies who have been using it longer than I have. I’ll try to get them in, maybe we can answer those questions.
But please, as ever, like, subscribe, thank you for watching. I hope you enjoyed this. Again, don’t forget the VIP Mix Traning Bundle over at davidglennrecording.com, and we’ll see you in many more tutorials to come!