What is Stem Mastering?
09/7/2019
Article Content
You may have heard the term “stem mastering” mentioned recently, and this article serves to clarify exactly what stem mastering is, its benefits and drawbacks, and when it may be preferable to more conventional mastering practices.
In the pre-digital days, mastering was essentially the act of transferring a recording from analog tape to a master disc, which was then used for duplication and distribution. Initially, transfer engineers were responsible for applying equalization during the transfer process, to ensure optimal playback results once a recording made it to vinyl. Eventually, the Recording Industry Association of America developed and implemented the RIAA equalization curve, which was an attempt to standardize the frequency response of playback systems. A recording is created with low frequencies attenuated, and high frequencies boosted. Upon playback, the curve is inverted, with the lows boosted and highs attenuated. The added benefits were longer playback times afforded (due to more grooves being able to be cut on the surface of the vinyl), as well as reduced stress on the stylus.
I cite this process to illustrate how engineers have ingeniously done whatever was necessary at the time to achieve an optimized playback and listening experience. As we’ve moved away from vinyl as our most commonly used playback medium, and into the digital realm, the process has certainly changed. We now have lower noise, greater headroom, and a wider variety of tools at our disposal for the optimization of recordings.
Mastering is an art and a science that consists of several components, with using signal processing such as equalization and compression to alter the sonic qualities of a recording only making up a part of the bigger picture. Beneath, I’ll clarify uncertainties around “stem mastering”, and will go in-depth into what exactly stem mastering is when you might want to use this method rather than the traditional approach, and best practices when doing do.
What is Stem Mastering?
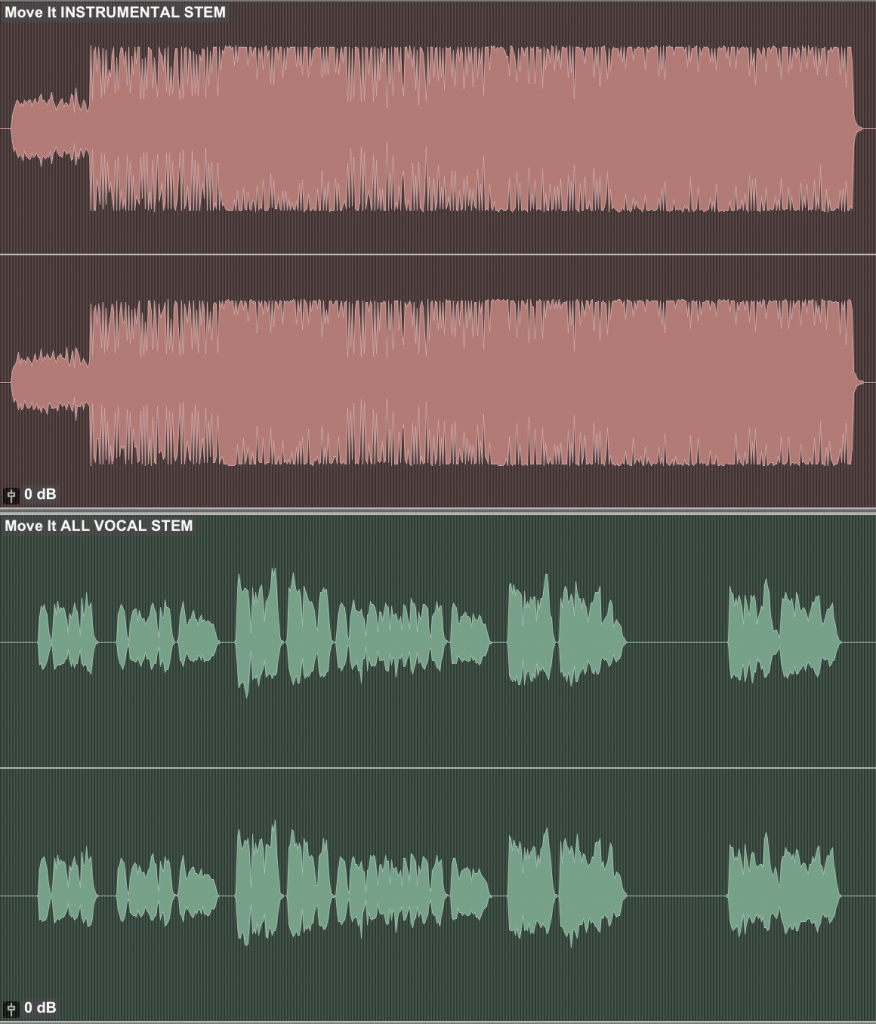
Rather than sending a stereo bounce (or two-track) to work with, a client could alternately deliver “stems” which the mastering engineer can use to create the final master. In my experience, these stems are usually the instrumental and the vocals (or A cappella). Hypothetically, the client could break down the elements even further and send stems consisting of drums, bass elements, lead vocals, backup vocals, etc.
Considering at this point the mastering engineer is capable of making drastic changes to balances and interaction between elements, one might ask the question …
Isn’t That Just Mixing?
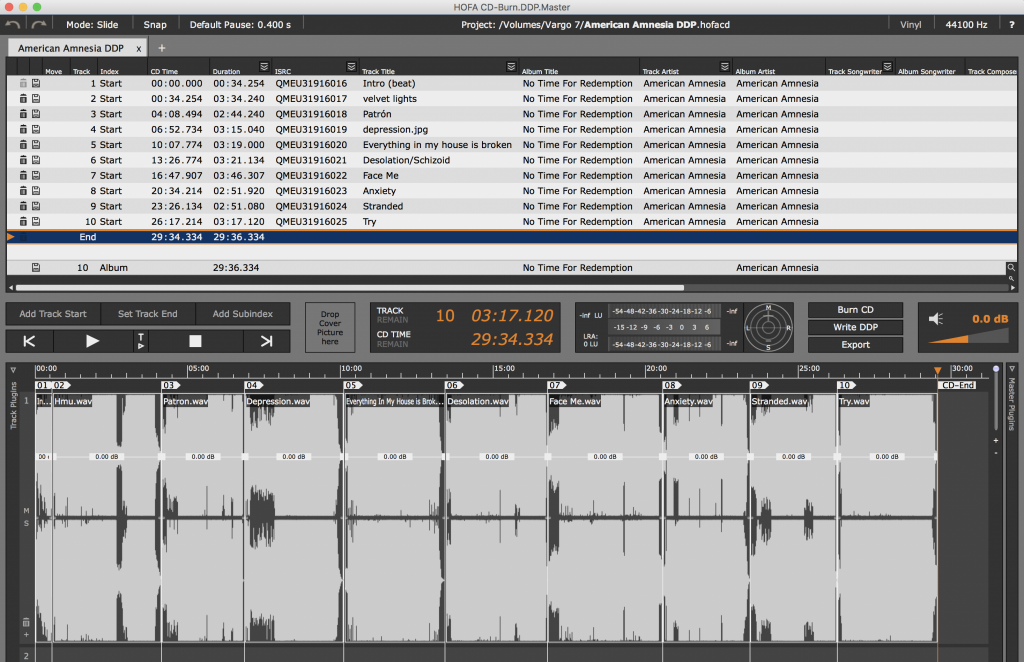
Well, yes. With that level of control, and with the mix engineer unable to make a true commitment to a final mix, one could technically argue that stem mastering is “still mixing” and I wouldn’t feel confident debating them. As a mix engineer, I’ve never delivered stems to be used to generate the final master, but I also don’t judge anyone that feels the need to try something unconventional when trying to make their music sound as good as it possibly can. After the mastering engineer uses the provided stems to generate an optimal-sounding master, they will still need to embed metadata and deliver appropriate assets as required for the specific needs of the project. Check out this excellent article by Justin Perkins covering the benefits of using a mastering DAW.
Why Stem Mastering?
In cases in which the client (or mastering engineer) believes that further improvement to the sonic quality of the final product can be made by “separating out” what they deliver to the mastering engineer, stem mastering is an option (if the mastering engineer is willing). I would certainly recommend working to get the mix to be as close to finished as possible, rather than adopt the “just fix it in post” attitude, as the honest truth is a mastering engineer can not fix a poorly mixed song.
The level balances, sense of space, dynamics and overall all tonality should be established when printing stems to deliver for mastering. Generally, stems I’ve received to be mastered are representative of mixes that are really, really close to finished and the client simply wanted to give me a little bit of extra control when mastering. For when the team believes there could be a greater level of clarity, punch, or detail by giving the mastering engineer more flexibility, then it’s an option worth considering.
How to Approach Stem Mastering
Frequency-Based
So there are a few techniques that I like to use when stem mastering. Again, most of the productions I’ve stem mastered were separated so that I was delivered an instrumental and vocal. In one such example, the hope was to create a better sense of separation between the two. I noticed that there was just a bit of excess low end (a bit at 180 Hz and 250 Hz) in the vocal at certain moments, which was causing conflict with the kick drum, which was a combination of an 808 and a thumpy element that had a slightly higher fundamental frequency, which also felt a bit excessive at times in the 100-200 Hz range.
I fixed these issues by applying a multiband compressor to the vocal stem, setting the threshold so that every time there was an excess of low end, a gentle amount of compression was applied at those frequencies. Additionally, I applied dynamic subtractive equalization, using the mid-side feature on the Fabfilter Pro-Q 3 to target content that sat straight up the middle, and leaving the sides untouched, removing a small amount in the 100-200 Hz range, only at the moments in which the song needed it.
In another such example on a rock song, again in which an instrumental and a vocal stem was provided, there were moments when the vocalist would sing certain phrases and unwanted resonances would pop out in the upper midrange. I used soothe, a brilliant dynamic equalizer from oeksound, to target these specific frequencies, applying attenuation only when necessary. It was beneficial to have had stems in this case, because the instrumental track was pretty flawless in the upper midrange, and I didn’t want to change the biting electric guitars, grinding electric bass, and perfectly punchy snare drum. Had I not had stems, it would’ve been more difficult to remove what I disliked about the vocal without diminishing what I liked about the instrumental.
Plugins for these applications:
Dynamics-Based
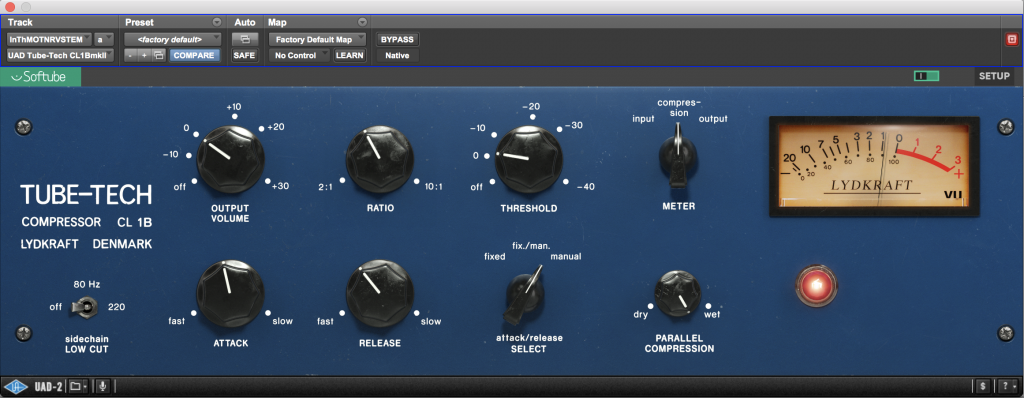
On a Hip-Hop track in which I was delivered lead vocal, backup vocal, and instrumental stems, the lead vocal was slightly over dynamic. The instrumental was nearly perfect and delivered with a subtle amount of compression that ensured it was consistent and genre-appropriate. The backup vocals were also nearly dialed-in, and never conflicted with the sense of space and tone of the lead vocal. To fix the issues with the lead, I chose one of my absolute favorite compressors, the Tube-Tech CL 1B from Universal Audio, which has since received a MkII upgrade, and is also available from Softube. It has a super-rich, pleasing coloration to it that further benefited the vocal. I carefully set the threshold, ratio, attack and release so that only about 1 to 2 dB of gain reduction was applied at certain moments, gently taming the lead vocal to sit more comfortably within the instrumental and backup vocals.
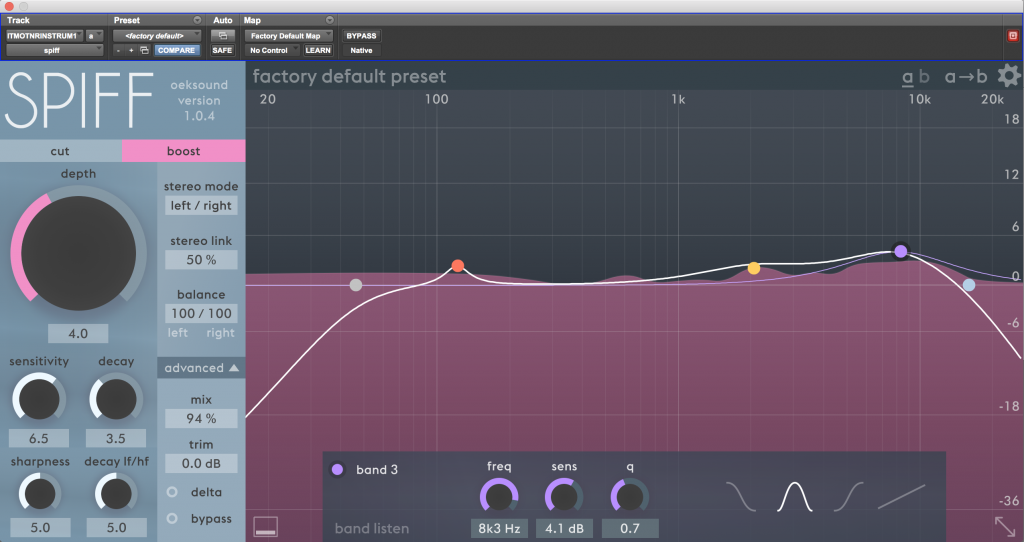
On a Pop track I mastered earlier this year, I was delivered stems of the drums, bass synths, additional synths and guitars, lead vocals, backup vocals. I often take a “larger than life” approach to mixing pop music and try to make every element sound as big, punchy and steroid-induced as possible. One of the issues here is that the kick, snare and toms simply weren’t as punchy as they needed to be. One of my favorite tools for making percussive sources really stand out is SPIFF from oeksound. spiff is an adaptive transient processor that does an incredible job at allowing one to alter the dynamics of their material. I wanted to enhance the perceived impact of the drums, and I did so by hunting down a few specific frequency ranges (around 120 Hz, 2 kHz, 8 kHz) that needed a bit more transient emphasis, and using SPIFF to provide subtle boosts at those areas of the frequency spectrum, most gently at 8 kHz. The kick, snare and toms all benefited from the thickness and warmth of the boost at 120 Hz, the emphasized beater and stick sound at 2 kHz, and the hyped brightness at 8 kHz. The other elements, in particular the synths, absolutely didn’t need extra transient presence at these frequencies, so it was helpful to have been delivered the separate stems.
Plugins for these applications:

Ready to elevate your ears?
It doesn’t have to take years to train your ears.
Get started today — and you’ll be amazed at how quickly using Quiztones for just a few minutes a day will improve your mixes, recordings, and productions!
- oeksound spiff (for drums and percussive sources)
- Opto Compressors similar to the Tube-Tech CL 1B, LA-2A, LA-3A (for subtle compression on vocals)
Space/Stereo Field-Based
On that very same pop track, the sense of spatial definition between the backup vocals and other elements (specifically the lead vocals and synths) was somewhat lacking. The backup vocals didn’t quite sound wide enough, and it became hard to really focus in on the centered lead vocal, and not-quite-all-the-way panned synths during the choruses because of it. To remedy this, I enlisted the SPL Vitalizer MK2-T, (which also happens to be a mainstay on my master buss). As an insert on the backup vocal stem, I used the stereo expander at about 40%, and a subtle boost at 10 kHz using the “process” control to further separate the backup vocals from the somewhat bright synthesizers. The clarity between elements was instantly improved, and I enhanced three separate (and quite important) parts of the arrangement with a singular insert applied to only one stereo track.

Plugins (or hardware) for this application:
- SPL Vitalizer MK2-T (from UAD or Plugin Alliance)
- Brainworx bx_masterdesk has an excellent stereo enhancer and is also available from both UAD and Plugin Alliance
- iZotope Ozone Imager
- Kush Clariphonic MS 2 (Hardware)
Vibe and Coloration-Based
My final example is another Hip-Hop track in which I was delivered an instrumental and an all vocals stem. The instrumental had a deliberately lo-fi feel to it, and consisted of some really unique samples, many of which were full of character and attitude. From a performance perspective, the vocals were great too, but they lacked the vibe and harmonic content of the instrumental. They were tracked and mixed incredibly clean, and felt as if they existed within a different context than the sample-based instrumental. I, of course, conferred with the client first, to see if they’d be interested in me “dirtying up” the vocals a bit, and they were on board.
Ultimately, I settled on a combination of the Ampex ATR-102 from Universal Audio to add harmonic content and an analog “edge” and a subtle high cut at 20 kHz using the iZotope Ozone Vintage EQ to remove a bit of the digital air from the vocals. I dialed in a sound that helped the two stereo stems sound more cohesive, and then mastered as I would normally.
The instrumental certainly didn’t need any more analog coloration than it already had, and may have suffered from pulling out additional top end, so it was beneficial for me to have had access to the stems. Lately, I’ve been using an incredible piece of hardware, the Overstayer M-A-S which is awesome at adding harmonic content and a sense of cohesion, or “glue”, to whatever I decide to run through it.
Plugins used for this application:
- UAD ATR-102 and Studer A800
- Vertigo VSM-3 from UAD and Plugin Alliance
- Several modules within iZotope Ozone including Vintage EQ and Vintage Tape
- Overstayer M-A-S (Hardware)
Additional Details:
If you decide to print stems before mastering, it’s worth considering how you want to handle time-based effects such as reverb and delay. Usually, I would print any such effects along with the respective stem, so if you’re printing a vocal stem, print all the reverbs and delays that are fed by the vocal as well. In certain sessions when mixing, I have a separate “effects aux” that includes all reverb, delay, etc. applied to all elements, and in this case, it would acceptable to print this effects aux and deliver it as its own stem. Additionally, it’s recommended to print your stems at whatever sample rate your session is at and without dithering.
Lastly, whatever processing you have on the master buss can be left, but keep in mind that the processing may behave differently when the entire mix isn’t being fed into them while printing. As with conventional stereo mixes, it’s advisable to ensure that not too much compression and limiting is being applied, as the result can be squashed, lifeless-sounding stems.
The aforementioned advice will allow the mastering engineer additional sonic flexibility that they may not have had otherwise, and depending on the scope and budget of your production, stem mastering may benefit the overall quality of your final masters, and that is which truly matters most.
Eleveate Your Ears