Tips for Mixing R&B Synth Pads
08/6/2014
I just want to sort of conceptually help you understand what I was trying to do when I was mixing this. So, with this particular record with this pad, I wanted it to be sort of a mysterious type of sound, because the original sound was cool, it already gave me this haunting kind of mysterious vibe to it, but I just wanted to enhance that a bit and just accentuate it and sort of make it more obvious that this is sort of a haunting type of sound.
I’m a very visual mixer, and what I mean by that is I don’t mean like with an EQ graph, and like, “oh, look, I can see what I’m doing.” I don’t mean it like that, I mean that I can visually see the sound in between my speakers, and sitting in between my speakers, and I view that as my canvas.
So to give you a visual perspective, let me just quickly go into Photoshop here, and this will give you an idea of what I’m trying to do.
So this green circle represents the vocal. This blue egg shape kind of represents that pad or e-piano thing that I was talking about, so right now it’s kind of in the center, it’s very direct, you know where it’s coming from, and the vocal sits out just in front of it, and that’s why I’ve put this blue circle just behind it.
But again, it’s two sounds that are very direct and very present and very obvious sounding, coming straight from the middle. So what I wanted to do is I wanted to get rid of that one and create something like this. So I’m trying to go for something that kind of takes up a wider spectrum in the stereo, but also kind of wraps around the vocal, and then to take it one step further with some EQing and some shaping of the sound, what I’m trying to do is I’m trying to carve out some space so that vocal is even clearer now.
So now, you can see that green circle is really really obvious where it is, it’s in the center, and then everything else is kind of around it. So this is your focal point, and this blue stuff over here is just your ambient, haunting, mysterious sort of vibe that’s going on the record.
So, let’s show you what I’m talking about from the start and finish.
[e-piano pad without processing, then with processing]
Okay, so let’s see what this sounds like when I add the vocals in now. First, we’ll start it with the plug-ins off.
[vocals and pad play, pad without processing, then with processing]
Okay, so you should be able to hear it now. It’s really, really sort of wrapping itself around the vocals now. It’s hugging it, it’s giving it more of a mysterious type of vibe. I’ve also done a lot of cleaning up to it, and I’ve done some leveling off as well, that way it’s not sort of bouncing up and down so much dynamically, and then it’s a little bit easier to place in the mix.
So let’s just go through one at a time, I’m going to try to explain them as best as I can.
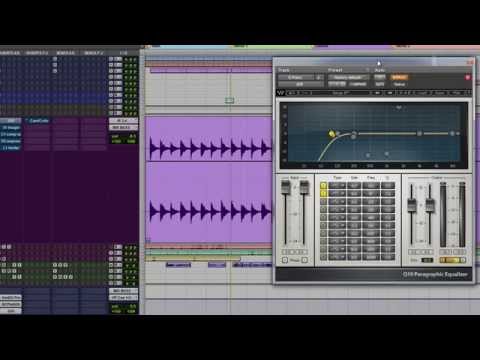
First is the Q10. Pretty self explanatory, I’m just taking off some of the bottom end here. I used two of these slopes here for the high pass, just so it makes it a bit tighter. You can see it sort of steepens the slope a bit. I set them to about 100 Hz or so, that’s where the frequency cut-off is. So let’s take a listen to it. The reason why I’m doing this is because this particular sound had a lot of junk, and I don’t want you to get too excited here about the high-pass filter stuff, because I’m not a huge high-pass filter type of person, but in this one particular situation, there’s a lot of bass in the kicks, and in the actual bass itself. It was just really really deep sub, so in this case I decided to use a high-pass here because this sound was very dynamic, especially in the bottom end. Mixing that with the bass and the kick kind of got a little bit sloppy. So let’s demo this, before and after.
[pad, before and after Q10]
Okay, so you should really be able to hear that bottom end. It got cleaned up, and it’s not quite as boomy anymore. So it’s a little bit more focused in the mid-range, which is sort of what I want.
Then we have this S1 Imager, and this is really doing all the work as far as spreading things out and making things a bit phasey. This is sort of the crux of what’s giving it that sort of mysterious sound. So I have it basically cranked all the way up to width 100 and 2.94. I don’t know why I decided not to go all the way, but whatever, it happens.
And then I have the asymmetry here, it’s set to -18 as you can see, and what it’s really doing is making the left and right channel not quite as even. Again, there are just some of these things where you really can’t explain, but when you twist them around and you flip the knob or whatever it is, it just kind of gives you a cool sound, and that’s exactly what happened here, so I left it.
Basically what it’s doing is not making it quite as even in the left and right channel, and helping along with that kind of mysterious type of vibe. So let’s play this before and after.
[pad, before and after S1 Imager]
So, really opens up the sound and it’s not quite stereo where it’s just left and right, there is stuff in the center still, but again what it’s really doing is creating that blanket so it can surround the vocal around the center, and it really phases out that center channel a little bit so it doesn’t sound quite as direct.
So then we have this C1 Side Chain here, and what this is doing is around 250, there’s a little bit of a bump. I don’t want to call it a resonance, but every time this thing peaks, like you’ll see here on the transients, it just sort of peaked up around that 250 zone and was really resonant and boomy, and was stopping me from getting it to really really gel with the rest of the sounds on the record, so I added one of these things.
I started with the preset that I have called MM vocal low resonance, and ratio is set to 4.7:1, attack is really fast because I want this thing to hit it really hard, and the release is really just set to as much as I can get it set to the waveform of this particular sound, so it will kind of bounce off of it in a musical way. It just releases it just in time as that sound is sort of starting to dissipate a little bit, so it doesn’t hold on to it too long, because that’s what I don’t want.
But anyways, let’s check it out.
[synth pad, before and after C1 Sidechain]
And again, this is used for cleaning. It’s really just helping place it in between the speakers. It’s not really helping with the haunting sound, it’s more of a corrective type of thing.
Then we have the R-Compressor. Similar thing, it’s just helping smooth out those peaks. Fast attack, fast release, 3.5:1 ratio, I’m knocking off about 3dB. Again, this plug-in, though I wouldn’t call it a transparent compressor, it also allows you to sort of hit a sound pretty hard. In this case, I’m only doing 3dB, but you could go as high as 6dB of reduction, and as long as you set the parameters up properly, it doesn’t sound like it’s really killing the sound, which is what I like about this thing.
So anyways, I’ll show you what it’s doing. Again, this is more for a smoothing out of a thing so it’s easier to place it between the speakers.
[pad plays, before and after R-compressor]
Again, it’s really just focused around the peaks, like the tops. I’m just trying to shave off just a little bit. As much as I can get away with, anyways.
And then we have the L1, and this is just kind of the last line of defense. I’m not trying to hit anything too hard with this, but it’s just there just in case something gets out of hand. So let’s play it.
[pad, before and after L1 limiter]
Then we have the Camel Crusher, and this is really just to add a little bit of color. Adding some tube and some mechanical distortion here, so a little bit of lower-mids and some upper harmonics, and again, it’s really just for some color, just to make it a little bit more gritty. Nothing too crazy with this, but I can do the before and after, check it out.
[synth pad, before and after Camel Crusher]
So, I really tried to let this one play quite a bit, because I wanted to see if as I’m flicking it on and off, if you could actually hear that mid-range color that it’s adding. Again, it was just to give it a little color, a little clarity, and some grit.
That’s it! That’s how I was able to achieve that sound, and hopefully my explanation and everything was able to help you understand why I was doing it, and why I did what I did, but that’s it! So thanks for watching, and I will check you on the next tutorial.
Elevate Your Ears