Mixing with Waves SSL G-Channel and E-Channel Plugins
01/15/2014

There are three sections: one section is the filters section, which consists of a high pass and low pass filter. Another section is the 4-band equalizer, and the last section is the dynamics section which consists of the compressor and expander/gate. Internal routing options can be used to change the order of these sections such as putting your equalizer before you dynamics section. Or put you dynamics section before you equalizer.
You can also use the internal routing options to do more advanced techniques such as de-easing. Why don’t we get to an example and I can show you all the different options.
Here I have a multitrack drum recording with consists of several different microphones on the drum kit. I have kick drum over here, snare drum, toms, overhead and a couple room mics.
[drums]
On some of the tracks I’ve inserted the E-Channel Strip and on other ones I’ve inserted the G-Channel strip. Because the routing is a little bit different on each of these plugins.
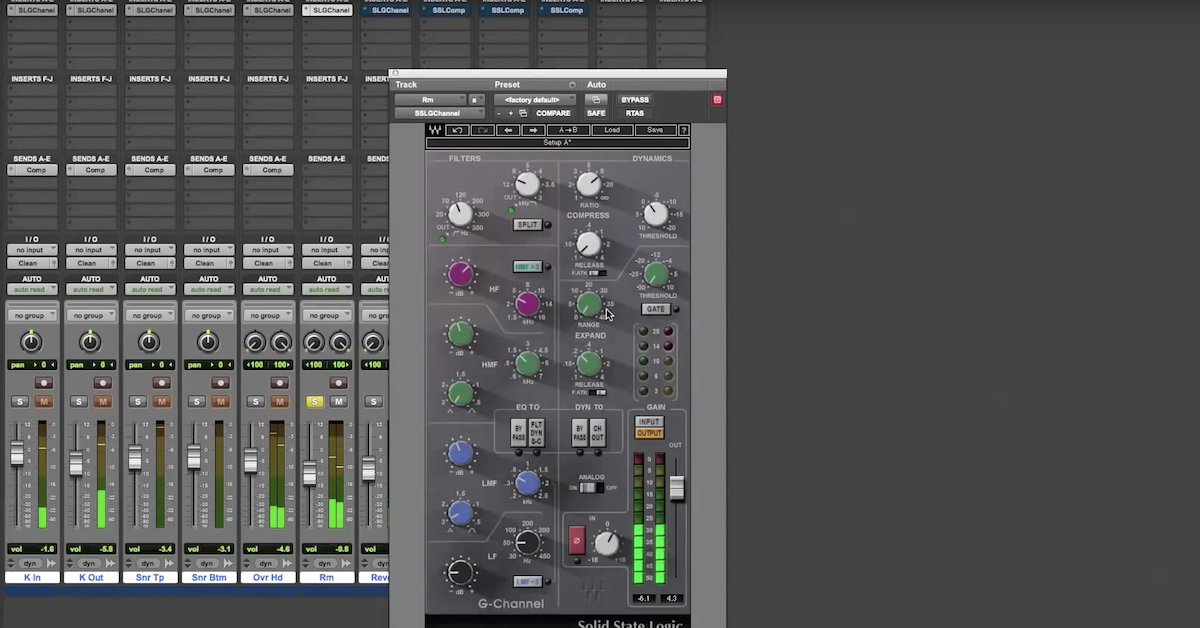
First I’ll start off with my kick drum track. Bring up the E-Channel Strip. I’ve got it in it’s default settings, and the default routing is to first start out with the dynamics section then go into my filter section, and finally the EQ section. What I’m doing here is just a little bit of compression and then the expander/gate, then I’m going into the filter section which has a high pass starting around 40 Hz, and then a low pass around 10k. And I have a 4-band equalizer, boosting a little bit around 2k and up around 5k to give it some snap and punch. I’m rolling off around 200 and 300 Hz to take away the boxiness and then boosting finally around 60 Hz just so I can kind of fill out the bottom end of my kick drum.
[kick drum]
On the external microphone I’m still using the E-Channel, but i’ve clicked on the split button right here. What this is going to do is move the filter section in front of the dynamics. This can be done if you don’t want your really low end signal triggering the compressor. This is a popular way to use the plugin, especially for things like kick drum or bass where in the first situation the compressor was sensitive to the really low frequencies, but by putting the filter in front, now the compressor and gate are no longer listening to those really low frequencies that you’re going to roll off anyways.
[toms]
To demonstrate that the compressor is not listening to it, if I roll it off, it’s no longer listening. I’m doing a similar thing on the sub kick. Where I had the split engaged. And that’s just putting the filters before the dynamics section.
Next let’s get to the G-Channel I’ve got inserted on the snare drum. Again I’ve got the split button engaged. Even though it’s the G-Channel strip, it’s gonna do a similar sort of thing. I’ve got the filters going before the dynamics and thing going into the equalizer.
[drums]
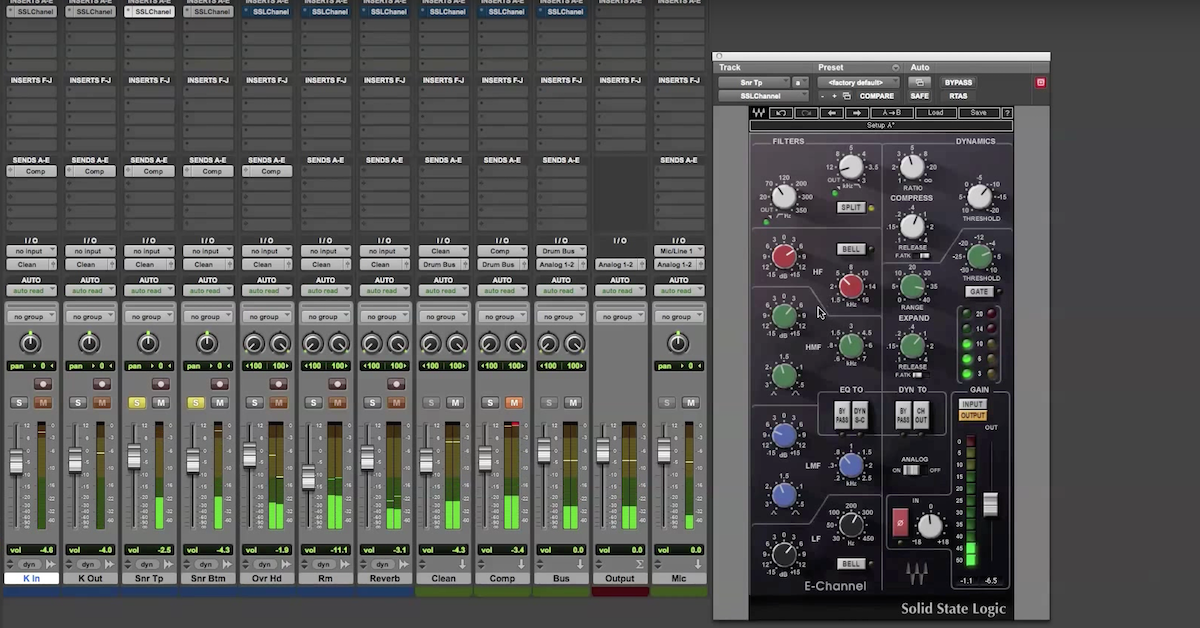
On my snare bottom mic I’ve decided to use this channel out button. What this channel out button is going to do is put the equalizer in front of the dynamics section. I’ve also got the split engaged which also puts the filters in front of the dynamics section. So let’s listen to this one.
[drums]
If I roll everything out, you’ll see that the compressor is not doing as much here, meaning that the equalizer — the signal I’m taking out — is in front in fact of the compressor. Now you see the compressor doing more work.
I’m doing a similar sort of thing with the E-Channel. I’ve got the channel output engaged so that the equalizer section is before the dynamics section.
Next let’s go over here to the overhead and room mics and see what’s going on with them. I’ll start out with this pair of room mics. I’ve got the G-Channel going, and what I’m doing, is I’ve got the filter dynamics sidechain engaged. For the overheads and room mics I’m going to be doing some side-chaining. What I’ve got when you engage this one is you put the filter section in the sidechain of the compressor. The filters then are no longer affecting the actual signal that’s gonna pass through, but it’s affecting a signal that’s separated out and that goes into the dynamics section. What I want for these room mics is my compressor to be heavily compressing this signal, however I don’t want it to be activated by the kick drum. So what I’ve done is increase the filter to 350 Hz, so that’s gonna block out all the low end so my compressor isn’t listening to the low end. However I still want those signals, those frequencies in my signal to be present in the actual output. And that’s what you can do by moving the filters into the sidechain of your compressor.
[drums]
So you can hear if I disengage the button, now the compressor is responding to the kick drum and the actual output signal has been rolled off below 350Hz. When I engage this, then the compressor isn’t doing anything for the kick drum it’s mostly just listening to the snare. You have to be sure not to engage the split button because the split button will put it back before the dynamics section. But this room mic, again, I’m just using the split button so that I’ve put the filters below the dynamics section.
Finally with my overheads, let’s bring this up. On the E-Channel strip the side chaining works a little bit different. No matter what, when you click on this button, you’re going to put the equalizer in the sidechain of the compressor. You can engage the split button and the split button will put the filters before your dynamics section and out of the path of the sidechain. So in this case the filters are affecting the actual audio that’s passing through the entire plugin. I’ve taken it out, now the filters and the equalizer are both in the sidechain path and so basically the input signal what you’re hearing is only the input signal being compressed. You’re not hearing any of the equalizer affecting it.
So let’s look at what I’m doing with the equalizer. What I want to do is use it as a way of getting rid of the harsh components of the cymbals in my overheads. So when there’s a loud harsh signal, I want the compressor to kick in. This is what you would typically use a de-esser for on vocals. And because I don’t have any vocals here, I wanted to show you how to use it. This would be a smilier routing that you would want. So if we actually disengage this, you’ll hear what the signal, the equalizer section is doing. So I’m cranking up the harsh parts of my signal around 3k and these high frequencies as well. I’ve rolled out the low end here and here and here as well. So now the compressor is listening for the harsh parts and when it’s extra harsh it’s decreasing the volume.
Again, you can use these bypass buttons to switch out the equalizer or the compressor if you’d like.
And those are the main setting of the internal routing of the SSL plugins. I’ll go ahead and play you out the track so you can hear what’s going on, maybe bypass all the plugins and bring them back in, give you a better idea.
Elevate Your Ears