What’s All This Noise About Dither?
07/24/2013
Article Content
Unless you’ve put some serious effort into learning to master your audio, the concept of dither can be fairly bewildering. We’ve all been told to “do” it, but what are we actually doing? If you’ve done any experimentation, it may be one area that hasn’t led you to any firm conclusions, likely because it’s so difficult to hear, even under ideal circumstances.
So in this article, I hope to uncover some of the mystery behind it, but present it practically so that you can make more informed decisions during the mastering process. Fair warning, dither is a relatively technical topic so this will be a fairly technical article, but I guarantee that you will learn something. There will be lots of listening examples as well, so grab your nice pair of ‘phones if you want to get critical.
An example of the mastering process in terms of bit-depth and sample rate:
These are the sample rates and bit-depths I typically track/process with, but the changes from step to step are what you should take note of.
- Final Mix @ 24-bit 88.2 kHz
- Import to mastering DAW @ 24-bit 88.2 kHz (increasing the bit-depth to 32-bit will maintain better dynamic precision throughout processing, but I’ll use 24bit for my examples)
- Process @ 24-bit 88.2 kHz
- Downsample to 24-bit 44.1 kHz
- Dither down to 16-bit 44.1 kHz
- Finished CD Quality Master@ 16-bit 44.1 kHz
Meat and Potatoes
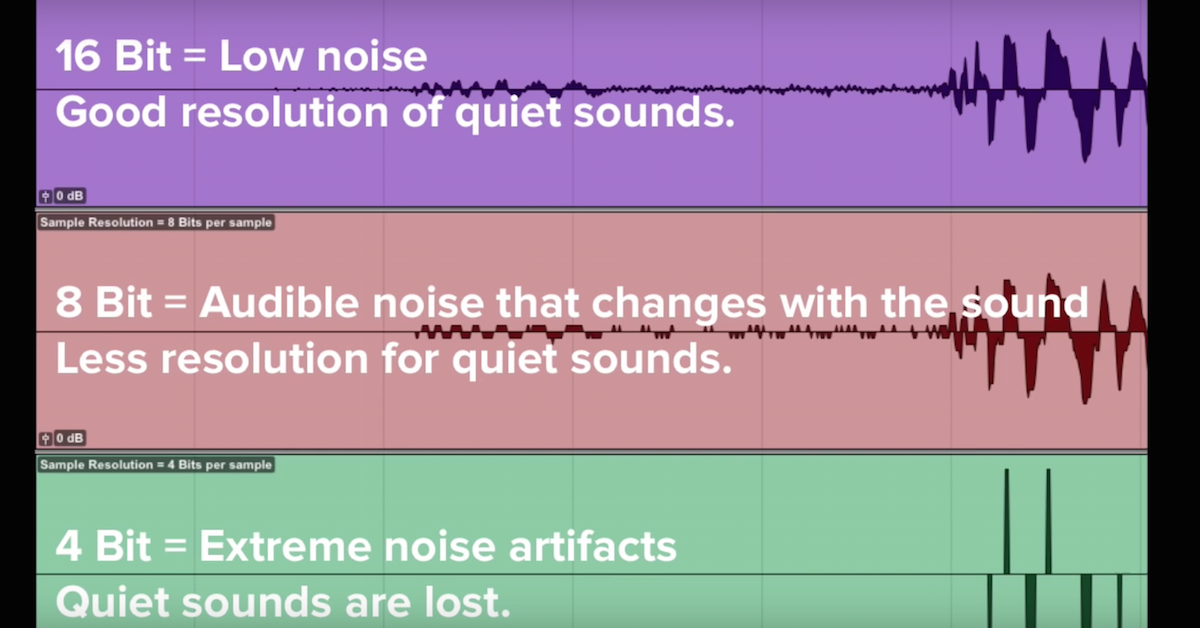
To refresh, bit-depth can be considered synonymous with the amplitude/dynamic precision of a digital signal. In a 16-bit signal there are 65,536 (-32768 to +32767) discrete steps, or values, and in a 24-bit signal that number increases to over 16 million.
To put that in perspective, if each step in an unsigned (only positive values) 16-bit signal was a piece of paper, the stack would be almost 22 feet high. In a 24-bit signal, the stack would be over a mile high. While that’s a good analogy for comparing the number of possible values, it’s important to remember that they both share the same ceiling at 0dBFS.
Unfortunately, due to the limitations of the final medium (CD), we must convert the signal to a depth of 16 bits. To do so, the converter goes along, sample-by-sample, and chops off the last eight bits. Those are now lost and gone forever. This process inherently leaves distortion and other digital artifacts behind, because we’ve erased pertinent information from the signal.
In the mid to high amplitude portions of the signal, these errors don’t manifest as audibly as they do in the low-level portions, because they’re masked by actual audio. This is the reason you normally wouldn’t notice if a track did not use dither; the “bad stuff” is on the outskirts of the audio. This is also the same reason that many engineers and audiophiles tend to perceive un-dithered audio as harsh, “lacking depth,” or cold — but definitely not unlistenable (unless the mix is just bad, but that’s another story).
Reverbs and room ambience are usually the quietest portions of a track, but are just as responsible for creating the space and “feel” of a track as the music itself. If you’re a mix engineer, you know what it’s like to make pass after pass to ensure that the reverb on that vocal isn’t too loud or too soft, so why negatively impact your client’s work, or your own, in the mastering process?
Audio Examples — Before
Before we talk about what dither is and how it functions, take a listen to these examples:
Example 1.1: Original Source File @ 24-bit 44.1 kHz
Example 1.2: Source Truncated (no dither applied) to 16-bit 44.1 kHz
Example 1.3: In this example, I turned the source audio down -60dB, truncated the audio, and normalized the result to 0dBFS. Lowering the level before truncation allows the audio to react more radically than it would in a normal context and, essentially, turns the noise floor up to be equal with the audio. This is to give you some perspective on what exists in the noise floor of un-dithered audio and what we’re trying to correct. Examples using this process will be followed by the word “Normalized.”
Truncated (no dither) Normalized
Anyone will tell you that last one sounds bad, or really cool if you’re like me, but here is why. When we reduce our bit depth to 16-bit, the smallest value we can encode was originally made up of 128 discrete values in 24-bit (and thousands in 32-bit). Now any value smaller than what we call the Least Significant Bit (step +/-1 of 32767) has become 0. What we end up with is what you heard in the last example; i.e. distortion, harmonics, dropouts.
So, what are going to do to correct all of the distortion and digital artifacts? The answer is to add more noise. While it sounds counterintuitive, the goal is to prevent the distortion by summing the original signal with random digital noise (think pink/white noise) that will ultimately average to that of the original signal.
If we apply dither, as the samples are converted a random value will be added to the original sample at roughly -90 to -100dBFS. By doing so, we are actually able to encode original values smaller than the LSB, because we’re adding a comfortable noise floor for the low-level audio to sit with, rather than letting the values drop to 0 just because the original signal is below the threshold of the LSB. The random values are also different between left and right samples to maintain stereo separation.
If you’re a visual person, here’s an example from Bob Katz’s book, “Mastering Audio: The Art and the Science.” This is for a mono-signal, but the same thing would happen in a stereo signal for both left and right.
Remember that these are binary values we’re talking about.
—Upper 16 bits— -Lower 8-
Original 24-bit: MXXX XXXX XXXX XXXW YYYY YYYY
Add random number: ZZZZ ZZZZ
The bit, ‘W,’ becomes the LSB in a 16-bit signal and is the bit that gets toggled based on the resulting summation.
Now that we’ve talked about it, lets listen to it. Exciting!
Audio Examples — After
Example 2.1: Source file dithered down using MBIT+ with default settings. This is the application of dither in a normal context.
Example 2.2: MBIT+ Normalized
If you listen beyond the noise itself, the music is all still there. Especially take note of the sustain and decay on the last vibe-hit. Imagine that the decay from the vibe was the end of a reverb tail. That’s something you’d want to hold on to.
Now, you probably want to know what all of the POW-R and MBIT+ stuff means. Dither is really a tradeoff between removing distortion and “ambience recovery,” but sometimes dither noise, especially flat dither (triangular and rectangular), can actually obscure the ambience and decays we’re trying to retain.
These different dither options are actually called noise-shaping filters. Think of it as the EQ curve of that particular dither noise. To make the application of dither as transparent as possible, companies have developed their own dithering algorithms and filters to accomplish this. The idea, in many instances, is to remove energy from the most audibly sensitive areas, 2-4 kHz, and move it to less sensitive areas >16 kHz. You may have noticed the high-frequency shelf in example 2.2, while it sounded fairly dull overall.
Now, if you’d like you can check out the other noise-shaping filters in action. As I did with the previous examples, I’ve provided an example of the normal context for the dither and also one where the noise is equal to the original signal. With and idea of what each one sounds like, you can decide which shape might be most appropriate for your project.
Audio Examples — Shape
3.1 POW-R 1
3.2 POW-R 1 Normalized

Ready to elevate your ears?
It doesn’t have to take years to train your ears.
Get started today — and you’ll be amazed at how quickly using Quiztones for just a few minutes a day will improve your mixes, recordings, and productions!
3.3 POW-R 2
3.4 POW-R 2 Normalized
3.5 POW-R 3
3.6 POW-R 3 Normalized
3.7 Rectangular
3.8 Rectangular Normalized
3.9 Triangular
4.1 Triangular Normalized
You may see some additional options when dithering, depending on the program or plug-in you’re using. These options further tweak the noise-shaping filter. For completeness, I’ll give you a run down on what those options do:
- Shape — determines how much noise-shaping actually occurs; ‘None’ being completely flat and ‘Ultra’ having the most drastic curve.
- Amount — simply the level of the dither being added.
- Auto Blanking — mutes the dither noise if the audio signal is completely silent (0) for at least 0.7s.
- Limit Peaks — suppresses peaks in aggressive noise-shaped dither, as those peaks can reach -60dB. (Shape-Ultra, Amount-High being as aggressive as it gets)
- Suppress Harmonics — If, for whatever reason, you decide not to add dither, but don’t want to leave all of the truncation artifacts behind, this option will alter the ‘truncation rules’ and move some of the harmonic distortion away from the audible frequencies. The result is truncation with a better tonality.
While we’ve got a lot to consider, just in the dithering step alone, the truth is that unless the genre and mix are right, the difference between dithering and plain truncation is fairly inconsequential, but when applied properly, it can only make your audio sound better.
Lastly, the golden-rule of dither: If you can help it, only dither once throughout the process and only after you’ve down-sampled. Otherwise, you’ll just be compounding the dither noise.
Thanks for reading and hopefully you know something you didn’t an hour ago.
If you’d like to get even more into the nitty-gritty and learn more about mixing and mastering than you thought possible, I’d suggest picking up a copy of Bob Katz’s book here.
For some great information on digital audio, mediums, codecs, etc.: Principles of Digital Audio
Both of these are great references for any engineer.
[Note: Source audio from Chesky Reference Disc. Examples completed using Triumph and Ableton Live.]
For more, check out these videos from Eric Tarr on dithering:
Eleveate Your Ears