How to Manipulate Simulated Amp Cabinets with EQ Matching
08/17/2015

As an audio engineer, I like to use guitar cabinet modeling in several different ways. I like to use it in the conventional way, where I’ll record a dry electric guitar signal that I send through a virtual guitar amplifier that I then send through a virtual guitar cabinet.
But I also like to use speaker simulation in unconventional ways, where maybe I’ll take my lead vocal and send that through a simulated speaker to create a signature sound for my song. Or maybe I’ll take my drum tracks, or individual tracks from my drum mix, and send those through a guitar cabinet model to come up with some kind of special effect.
The issue that always comes up for me, no matter what way I’m trying to use the guitar cabinet modeling, is trying to dial in the exact sound that fits with my song. Most amp simulator software will give me what I’ll call “high level control” over the sound, but it doesn’t give me a lot of fine grain control over the sound.
So what I’ve come up with then is a trick you can use for a lot of detailed control over the sound of the guitar cabinet as a special effect. I’m going to demonstrate this then by using the IK Multimedia Amplitube software. This is a plug-in, but you can use almost any amp simulator software to do this, along with a couple other plug-ins that I’ll show you here coming up.
So let’s say I’ve got a drum mix, and it sounds like this without the guitar cabinet model on it.
[drum mix]
Next, I’ll add in the effect.
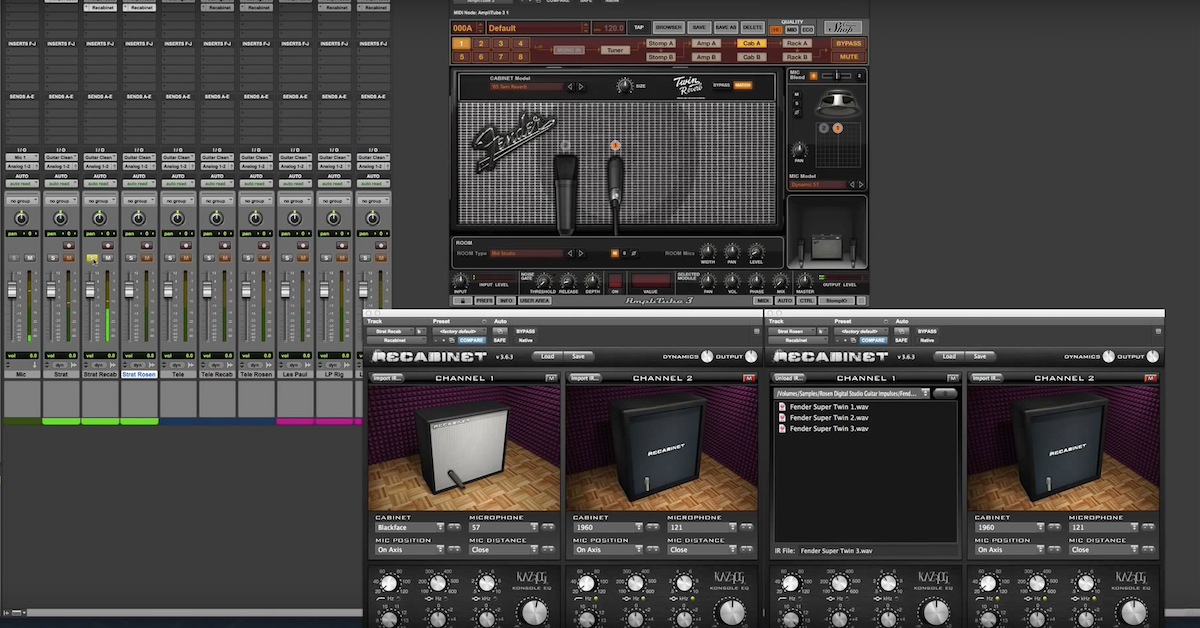
Here, I actually want to bypass in this case the amplifier, and just focus on the cabinet. So when I come into this screen here in Amplitube, there are a couple of things that I can change.
So for instance, right off the bat, I can change the actual speaker that’s being simulated. So I might try it out here, and go for a couple of different sounds.
[drums, with speaker emulation]
So each one of these cabinets has a slightly different sound. They each sound a little bit different or unique.
Let’s say I also want to focus just on one of the microphones then. I’ll mute this one and focus on this one here. I can also swap out a different microphone and try and find one that matches well with this cabinet and this track, and if I had a full song going here, one that fit with everything.
[drums, with speaker emulation]
So I think you get the picture. Each cabinet sounds a little bit different. So does each microphone. The issue that comes up with – what if there’s some more things about this particular sound of the cabinet that I wanted to change? Maybe I don’t like a particular resonance, and I can try out different equalizers and all of that kind of stuff within the plug-in.
What I want to demonstrate then is if you go outside of the plug-in, and use a couple other different pieces of software, you can actually gain really, really focused control over the entire sound of this cabinet.
So I’m going to leave this one as it is right now. I like the sound of this cabinet. I’m going to switch over to another plug-in that I can use to actually capture the sound of this plug-in that will also give me control over the captured sound.
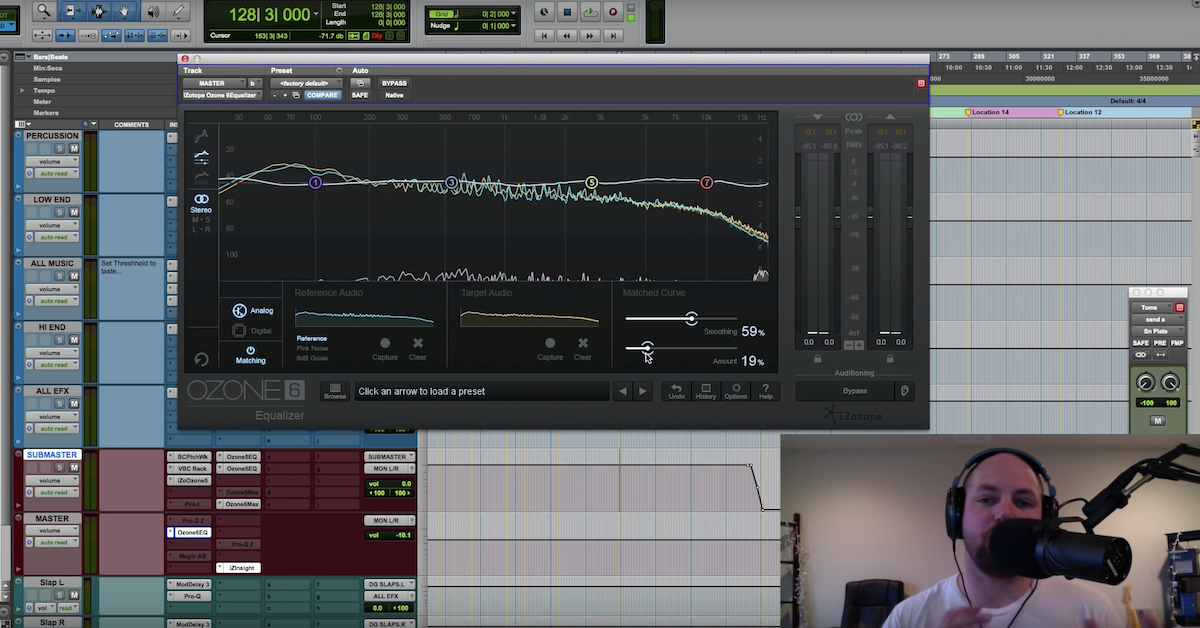
So I’ll do this in a couple of different ways. First one I’ll bring up here is Ozone. This is Ozone 6 from iZotope. What I’m going to do here is use the spectral matching feature to capture the spectral characteristics of this combination of guitar cabinet and microphone.
In order to do this, I’m going to start out with a reference, and then – or a target, and then also capture the reference, which is going to be the cabinet. Rather than using this sound of the drums, I’m going to switch over here to a special signal that I’ve synthesized that will be great for doing this task of just capturing this sound, or the characteristics of this speaker.
So this is going to be a frequency sweep. It starts from low frequencies, and sweeps all the way up to high frequencies that you’ll see here. I’ll bypass this effect to begin with, so this one is bypassed. I’m going to just send this sweep signal into the matching feature of Ozone – the Ozone equalizer, and just get a reference for a flat spectrum.
Now, if you need to catch up to speed on how to use spectral matching in Ozone, there’s plenty of other videos. I have some that I’ve done myself, and other guys from The Pro Audio Files that have some great videos to check out there. I’m just going to make use of it in this video.
Also, as another side note, those of you that have asked before about some of these test signals that I used in the videos, if you have any interest in using the ones in this video or any of the other ones that I have in other videos, please post a comment below or send me a private message. I’ll be happy to hook you guys up with these test signals that you can use for your own experimentation.
So here, I’m going to record this frequency sweep going into Ozone.
[sweep]
Alright, so that is without the guitar cabinet model on it. That’s going to be the one I’m going to record for the target.
Next up, let me bring the cabinet in. So now it’s here. I’m going to capture the sweep that goes through the cabinet, and figures out how the cabinet is going to adjust the volume of different frequencies.
[sweep plays with emulation]
Alright. So now I’ve measured the flat spectrum without processing, and then how the spectrum changes if you send this sweep signal through the actual effect.
So now, what I have control over from within Ozone is I can smooth out the spectrum, or I can also increase it, or decrease it. Right? If I bypass Amplitube – I’m actually going to move it over here to this other track for a second so there’s no confusion.
I’ll go back to my drums. Let’s listen to what this sounds like, and how I can play around with these different controls to tailor the sound of the cabinet, or the drums going through the cabinet.
[drum mix]
So hopefully you can hear this combination of the amount slider and the smoothing slider. You can do some pretty cool things and really dial in the sound. This is going to be much more powerful than even just doing a parallel cabinet, where you have the mix knob or a wet/dry knob. This is going to be even more sophisticated than just having a simple wet/dry knob.
What I’ll then show you is a similar kind of task that is in a different plug-in that gives you slightly different controls. So this is the controls that you get with Ozone to manipulate the sound. What I’m going to do then is switch over here to another plug-in.
This is one from FabFilter called Pro-Q2. An awesome equalizer to use. I’m going to do a similar kind of task. It works a little bit different here than it did in Ozone, where you have this EQ matching feature down here.
What I’m going to do is send the signal in here on the actual track. It’s going to listen to the input, then also the side-chain. So what I’m going to do is come over here. I’ve moved over this Amplitube plug-in to a separate track, and I’ve got two sweeps over here. One that’s going to be the dry sweep, and one that’s going to be the affected sweep by the amplifier.
I can record both of these things, and Pro-Q2 is going to do the matching, so that I get the curve of the cabinet that it’s going to record. So I can do these things here…
[sweep]
Alright, that’ll be good. I can click on match. What it’s going to do then is create an equalizer that would’ve achieved this kind of curve. I have control initially here over the number of these different poles, or these bands is how they refer to it here, that’s appropriate way to call them. These bands across the spectrum, and I can change these bands. This is going to be a lot like the detail control in Ozone, or the smoothing control.
By increasing them, it’s going to match closer and closer. As close as it can to it. You can pick anything in the middle. One thing I will say is that if you start out with the most here, you can click finish. Then what you’re left over with is the combination of these bands that would’ve created this kind of curve.
The nice thing about FabFilter is not only can you dial in the amount or smoothing and all of that kind of stuff, but I can actually go in and then adjust each one of these bands independently. So, if I didn’t like this little notch that shows up in the mid-range, or I want to emphasize it, I can dial this in as much as I want. I can select a bunch of these different bands, and adjust them together. That way, if I decide, “Oh, I didn’t really like this particular resonance that shows up in this high frequency,” I can pull this one out.
So this is a very, very powerful way to think about manipulating the sound of a guitar speaker cabinet. As long as I started out with them, I can get rid of all of these things and smooth out the spectrum, too from what I was working with before.
So find some of these like this. Right, smooth it out a little bit more. You get the idea. It’s a different way of manipulating the spectral characteristics of this guitar cabinet.
So that brings me to the end of this video and this demonstration. I hope that you guys can take something away from it. Not only is it demonstrating how you can have control over a guitar speaker cabinet, it also demonstrates some compare and contrast the differences between the matching features of Ozone, and also the matching features of Pro-Q2. It really depends on what you’re going for and what kind of control that you want for which one you should pick or choose for whatever task you’re working on.