7 Tips for Transparent Vocal Tuning
Article Content
You’re used to hearing vocal tuning — your ears expect it even. No, really, even if you’re someone who hates the “fake” or “robotic” sound of “Auto-Tune vocals,” chances are you regularly hear a whole lot of vocals that have been tuned, assuming you listen to music that was made this century.
Let me take a step back here — I don’t mean to be confrontational! This isn’t only about you. Audiences in general are used to hearing vocals that have been cleaned up with some pitch correction. Tuning software has just been used too widely — to the point where it sounds “normal” to us now. The genie is out of the bottle, and there’s no getting it back in.
Look, vocal tuning isn’t one-size-fits-all, and nobody is forcing you to use it or to use it in a way you don’t like. Though Antares’ Auto-Tune is sort of like the Kleenex or Coke of tuning software, it’s far from the only game in town. Whatever tools you use for vocal tuning, there are lots of ways to do it. Let’s take a look at some of my favorite tips for tuning vocals transparently.
1. Figure Out the Key of the Song
This first tip is pretty basic, but it’s an easy step to improving vocal tuning that a lot of people seem to overlook. No matter what you use to tune vocals, I guarantee you that the software works better when you’re clear on the key of the vocal part.
Start with the simple stuff. What’s the root note? Is the song major or minor? Or maybe it’s closer to one of the other five modes? Are there any accidentals (notes not in the key) in the vocal part? Get clear on this stuff before you start tuning. Most (if not all) tuning software will ask you to input a key. Even if you prefer to do things more “manually,” understanding what notes are in the key and in the part (not always the same!) will help you make the right choices.
Transparent tuning should aim to give a little boost to the singer’s intonation. Making sure it does that in a way that sounds natural and musical is the first step to getting there.
2. Don’t Go Too Hard
If your goal is for vocal tuning to sound transparent, the easiest way to screw that up is to correct the pitches too much. Even the best singers have some natural variation in their pitch. Really! Listening to recordings of great vocalists from the analog era can really drive this home.
Ever hear someone say “David Bowie could have really been huge if only someone had fixed his vocals?” Yeah, me neither. Could you make his vocal in “Heroes” sound more in tune? Sure — but why?
Every tuning plugin offers some way to control its intensity. If a tuned note is a totally static event with no natural wobble or drift, that’s a good sign you’ve gone too far. Tune it until you find yourself not being distracted by pitch issues. Don’t aim for “perfection” if you want the performance to sound human.
3. Don’t Go Too Fast
The intensity of vocal tuning isn’t the only thing to keep an eye/ear on. Its speed can have a huge effect on how natural a vocal ends up sounding.
Singers will often slide into notes, exploring spaces between pitches before landing on “in tune” notes. Though this can sometimes be a sign of a singer who lacks confidence, it can also be something a vocalist does intentionally. Too-fast tuning can iron out this type of movement in a vocal recording, making it sound robotic and quantized in the most extreme cases. At minimum, tuning a vocal too fast can put the vocal into sort of an “uncanny valley,” where the singer seems to find each note just a little too easily.
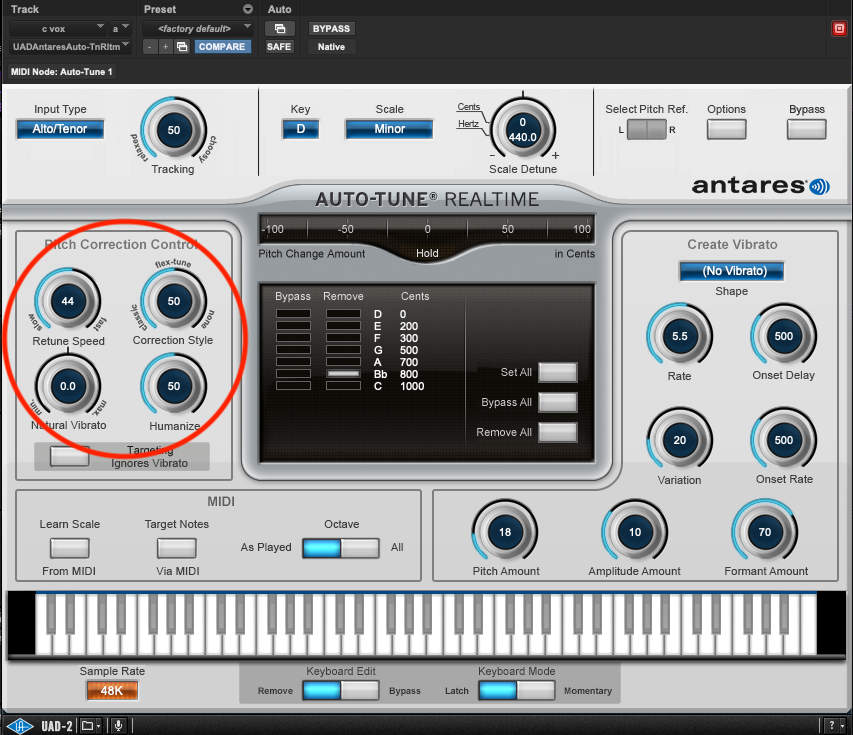
Tuning software with more “manual” controls (Melodyne, Waves Tune, Flexpitch) gives you the ability to control the speed with which one note glides into the next. More “automated” tuning plugins (Auto-Tune or Waves Tune Real-Time) have more straight-ahead speed controls.

The circled section shows controls dialed for a more leisurely, natural tuning style
Fast tuning is crucial for the classic, stylized Auto-Tune sound, but it’s something to avoid if you want tuning to sound natural. Set your tuner’s speed control just fast enough that it keeps notes from straying out of tune long enough to be noticeable. If transitions from notes are totally “stepped” like on a keyboard instrument, you’ve gone too far to still be transparent.
4. Leave Some Sections Untuned
Is this the laziest tip possible? “The key to transparent vocal tuning is, like, not tuning the vocals!” But seriously — maybe try, you know, not tuning vocals… when you can get away with it.
If I’m using Auto-Tune or a similar plugin to tune vocals, I’ll often dial it in and commit a pass of that tuning, having previously saved the untuned take. From there, I’ll go through and find moments where the tuning feels like it’s too much or unnecessary, and sub back in the original vocal. In some instances, it’s really just certain moments that need tuning, and the song is better served by leaving the rest untouched.
Make an honest assessment of the song, the vocal performance and your intention for the production. It might be that a more natural delivery has intrinsic value that outweighs a more technically “perfect” vocal production. This is going to be more true for styles where authenticity is important, compared to ones that feel inherently processed and unnatural. Figure out where your track sits on that spectrum and plot a course from there.
5. Tune Doubles Less Intensely

…no you’re out of tune!
When I have two vocal tracks and one is clearly the “primary” one (rather than two equally important vocal tracks), I will more often than not tune one more heavily than the other. Which I tune more aggressively kind of depends on the specifics of the situation. Sometimes, the more natural move is to really clean up the lead, letting the secondary vocal be a little quirkier. Other times, it makes more sense to let the lead have a funky character, while the double is tuned heavily to keep things from getting messy.
Whatever the process, the goal is ultimately the same: the doubled vocal should sound raw and natural, but free of distracting pitch issues.
This trick works just as well with backup vocals, by the way, whenever each backup vocal line is double tracked. With these sorts of vocal harmonies, the “main” track is always the one I’ll tune more thoroughly. That primary track provides the meat of the part, while the double helps it feel fuller and more vibrant.
6. Know the Strengths and Limitations of Your Tuning Plugins
I’m not here to debate the relative merits of one tuning plugin over another. I use a few, personally, depending on the situation. Do you swear by Auto-Tune? Great. Think Melodyne is the best? Love it. Waves Tune? Flex Pitch? Revoice? Yes, yes and yes. Do what works for you.
Any tuning software will have the ability to do some things more or less “automatically.” Some allow you to control the pitch and tuning of a vocal manually. Most will lean more in one direction or the other, while still offering workarounds that let you do it all.
The point is, whatever it is you use, understand what you can and can’t do with it. Got a vocal part that moves between keys, or has lots of chromatic notes? It’s going to be hard to get a plugin like Auto-Tune to work naturally without a little extra effort on your part. Need to do a basic tuning job on a vocal take in a hurry? You might find Melodyne gives you a little more friction than the result is worth.
Not forcing a tuning plugin to work too hard outside of what it excels at is an easy way to get a more natural result. No one of them alone is perfect, which brings me to my next point…
7. Combine a Few Different Types of Tuning Software
You should own both a screwdriver and a hammer. Why? Don’t screws and nails do basically the same thing? I guess… but try doing every project with only one or the other and you’ll quickly realize why that’s a stupid idea.
The same principle applies here. Sometimes I can dial in settings on Auto-Tune and get a vocal 90% of the way there. But that last 10%? It either sounds over-tuned and robotic or it sounds stubbornly pitchy. That’s when I’ll pull up Melodyne to fine-tune the rest. It’s workflow is slower, and it comes with its own, different set of artifacts, but between the two I can usually get a result I’m happy with.
There are, of course, other options, but they tend broadly to fall into one camp or the other in terms of how they function — though I’ll give a shoutout here to Synchro Arts Revoice Pro for truly bringing something new to the table! Whatever your preferences are or whatever your budget allows, I think it’s worth having one tuning plugin that excels at correcting an entire part with the twist of a few knobs and another that allows you to fine-tune things by hand.
Logic users will find that Flex Pitch functions more or less like Melodyne. Waves Tune Real-Time offers an Auto-Tune-like option that will set you back a lot less. The original-flavor Waves Tune is another one in the Melodyne camp, for those keeping score.
I know, I’m kind of telling you that you have to buy plugins here, which I generally don’t love doing. But if you want to do vocal tuning right, it’s really an area where having a diverse toolkit pays off. And for what it’s worth, there is at least one free option out there.
Yup, you need both a screwdriver and a hammer. Get them both — you won’t regret it.
Conclusion
Whether it’s adjusting tape speed to make the key more comfortable for a singer or just comping a vocal from a few takes, there have been ways to “cheat” a better vocal performance in the studio since the earliest days of recording. Tuning software is just the latest and greatest. Not wanting a vocal to end up sounding like Cher isn’t a viable excuse for avoiding vocal tuning anymore. The tools at your disposal are flexible; the options limited only by your imagination.
I was staunchly opposed to vocal tuning when I first began engineering professionally, but eventually I found myself in a situation where I couldn’t avoid it. When I tune vocals now, I do it on my terms, and I can still get results that make clients happy. With the right approach, there’s no reason you have to compromise.


