The Complete Guide to Mixing Drums
11/5/2017
Article Content
Writing about how to mix is a bit like dancing about architecture. There’s really no substitution for doing it, repeatedly. I want to make that clear before I get into this detailed guide. What I’d like to do is give you perspective on what to listen for, options on what to work towards, and some techniques for getting from point A to B.
I don’t expect to give you a secret formula. My hope is to give you some information which will expedite the learning process. I’m providing this disclaimer because I see too many articles claiming a “how-to-do” rather than a “how-to-learn”, and anyone shortchanging the fact that production is a skill that requires practice is selling snake oil.
So, how does one mix drums? In my experience, the first step is to auralize the finished sound. This is a 100% creative decision. There is no decided way in which your drums should sound outside of what you intend. Intention is the cornerstone of whether or not our drum treatment is successful. We need to decide creatively what we want the listener to experience.
Often we want full, powerful and punchy drums. This is no surprise. But is that all? We can have all of those things and have the sound feel relaxed, or have all those things and have the drums feel aggressive. And on occasion, we want the drums to run together with a rounder, softer sound. We want to define our goals.
This begs the question — how do we know what we want? Perhaps you’ve heard your favorite mix engineer say “the song really mixed itself.” Or, something to the extent of “I let the song tell me what it wants.” That’s because the clues are all contextual. The feel of the music, the meaning of the lyrics and (most importantly) how the drummer is playing, tell us what we need to know.
The Big Picture
Grouping
For my process, the first step is always the same. I group my drums together and output them to a subgroup.
From the subgroup, I make a couple of aux returns which I’ll later use for parallel processing. Those will stay muted for now. I’ll also make a couple of subgroups within the drum channels. I’ll make one for the kick, where all kick mics go, one for snare and sometimes stereo groups for toms or auxiliary cymbal captures. This helps organize my thought process and consolidate channels if I’m mixing on a console.
In addition, I’ll create a few parallel return channels for kick, snare and a couple of reverb returns as well.
Phase
Once I have an idea what I’m going for, I start top down. I get my balances the way I want them, maybe leaning more on overheads and room for more “acoustic” styles of music, and favoring a bit more close mic if I’m going for something that’s intended to be more “in-your-face”. I then check the phase between shared sources. I’ll sum the overheads in mono and flip the polarity on one channel to hear what sounds best. I’ll repeat the same between the snare and kick close mics. I’ll also flip the snare top and the kick-out with the overheads playing. Going one step further, I’ll phase-align the snare close mics, and sometimes the kicks, rooms and overheads.
One might look at this process as rudimentary — of course, we want to get the best phase relationship between shared sources. However, even this technical process has a creative foundation.
Inherent to phase relationship is the perception of depth. The kick-in and kick-out will be most in-phase when they’re playing at the same time with the same polarity. However, there is no circumstance that we would ever hear the inside of the kick at the same time we would hear the outside of the kick. The kick would have to be infinitely thin.
Perfect phase alignment isn’t always desirable. Perfect phase in the overheads will contract the stereo image. Sometimes we want that super strong mono center, and sometimes we want something very wide. Sometimes we want that perfect punch from a kick drum, sometimes we prefer the depth caused by the slight timing variation.
This is why we need to know what we want first. Basically, whenever we’re changing the time relationship in exchange for a phase relationship, we’re obtaining punch and fullness at the expense of depth. You just have to determine what is more important for the song at hand.
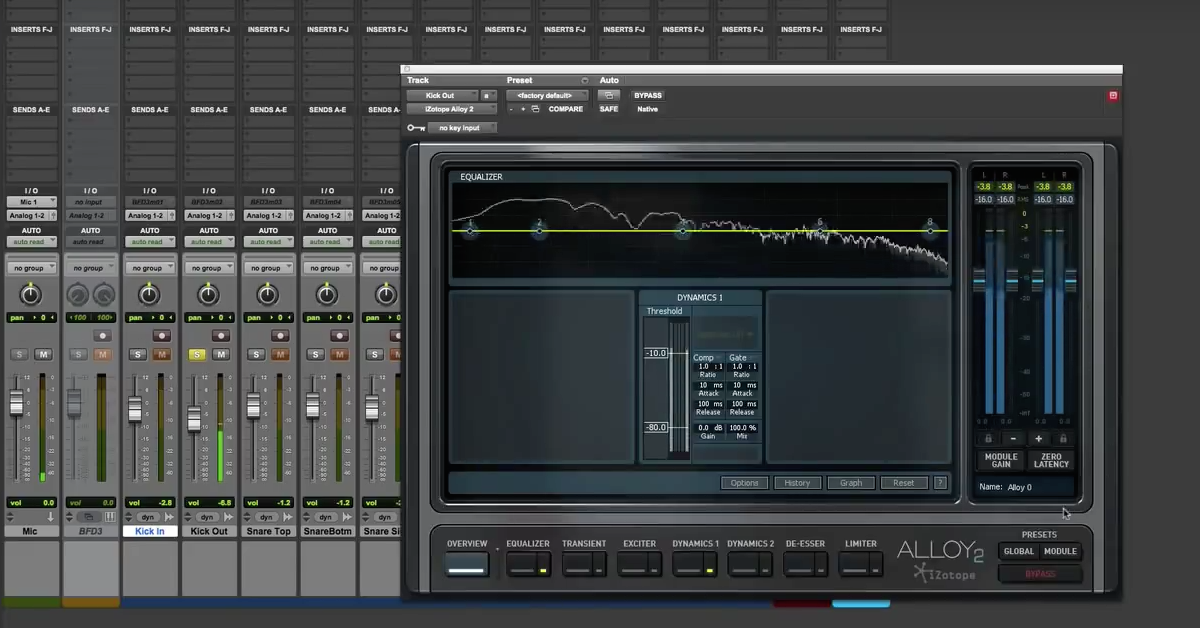
EQ
From there I look at the general treatment of the drums as a whole. How loud or soft do I want the drums in context of the rest of the music? How bright? How clean? There’s no reason to EQ the top end and notch out the same room tone on every single channel if I can just do it on the drum buss.
I’m going to establish the big picture. If I want something “analog-y” and “organic”, I’ll probably keep most of my room tones in there and be a bit more judicious with the top end. If I want something “poppy” and “punchy”, I’ll etch out anything that isn’t foundational to the sound of the drum itself, including all the stuff that builds up in the lower mids and sneak in as much sparkly top end as I can get away with. If I crank the top end and love it, I may add a de-esser to the drum buss in order to keep the cymbals in check. Ultimately, this process is a look at the whole kit.
For a more conventional approach to mixing rock drums, I generally add broad low end from the subs and top end from the high treble. I tend to surgically remove the low mids in the room and play up the 1-2k range depending on how it was recorded.
For vibier indie stuff, I’m almost doing the complete opposite. I may play up the treble around the 5k range rather than the sparkly 10k range — and that’s if I feel its needed. I’m going to be cautious about removing low mids and make subtle cuts, if at all. If I’m playing up the low end, it’s going to be the primary bass range (80-250Hz) rather than the sub frequency range. Basically, I’m looking to keep the sound “natural” and just smooth out anything that might throw off my ear.
Compression
As far as compression goes, I look at this as a purely artistic tool. I may use it to get the entire kit feeling like it’s moving together and sound a bit fatter. I may use it to round out the sound and make it feel a bit more lo-fi. I may use compression as a special effect and go totally ballistic. What’s important, from my perspective, is how I view the timing and the action of the compression.
In terms of timing, there are generally two controls on a compressor: attack and release. This tells us what they do in terms of time, which is basically useless.
I like to relabel them (in my mind) as the punch and fullness controls. The attack control exists on a scale of “round” to “punchy” and the release goes between “dense” and “open”. This way I know if I listen to the drums and say to myself “that’s a bit too punchy”, I know to simply speed up the attack. Likewise, if it feels like the drums are in a sock, I need to slow the release down a bit. By reorganizing these thoughts in my mind, I can cater to the feel of the record and make an artistic adjustment, rather than rationalize ideas like: the release is too slow (huh?).
The action of a compressor is a bit trickier. This comes down to the shape of the attack and release. For example, a perfectly linear compressor would apply gain reduction equally over time. Guess what? Most compressors are not perfectly linear. Some apply gain reduction subtly at first, but become increasingly heavy-handed the more the threshold is breached (like a Vari-Mu), or perhaps increase gain reduction as a function of time like an optical compressor.
Many compressors actually begin applying gain reduction as the threshold is approached, or what we call a “soft knee” action. All of this will effect the groove and feel of the drums. Soft knee action makes the drums feel like there’s a sense of resistance to the sound. In subtle amounts, this creates a “glue” and in larger amounts, this creates a great deal of “tension.”
Sharper acting compressors, like high ratio VCA or FET compressors, tend to sound transparent and punchy when used subtly, or aggressive and edgy when used heavily. And again, I like prescribing adjectives to these ideas as I am trying out compression on the kit because it will help me steer towards the vibe I am going for.
Getting Into It: Drum Overheads
Once I have the big picture of my drums figured out, I mix into my subgroup, generally starting with overheads. When processing overheads, the two big questions are: how roomy or tight do I want my kick to be, and how much cymbal do I want?
To the former, some people recommend high-passing the hell out of the overheads, other people prefer not to high-pass at all. Personally, I find this goes back to the theme of the article: work toward the intention of the song.
I don’t think there’s too much use for deep sub tones in the overhead in most cases, so even if I’m leaving things fairly natural, I may be looking to attenuate the lowest tones out with a low-shelf filter. How much and at what corner frequency really depends on what’s down there and how clean or boomy I ultimately want it. Alternatively, if I’m looking for a punchy kick, I may high pass around 400-500Hz and rely on the close mics to provide the lower energy of the kick and snare.
It’s important to set things with the close mics in the mix because EQs will alter the phase of what’s being processed. If we move our filter around there’s usually a sweet spot where the drums seem to lock together and feel fullest, but we’re only going to hear that if all the drums are in the mix. We can also use a linear phase EQ to preserve the phase relationship between the overheads and close mics. My only gripe with this is that I tend to not love the sound of linear phase EQs, but solely for the purpose of high-passing the overheads, it’s not a bad choice.
In terms of top end boost, if I worked the drum buss right, we already have our sparkle, so I view any further adjustment as a cymbal level adjustment. I’ll boost or cut from the lower tones of the cymbals (4-6kHz) as a means of getting the cymbals forward or back. I find that close mics on cymbals rarely sound great and we’re ahead of the game if we have something that sounds halfway decent. So I tend to rely on the overheads as much as possible when it comes to cymbals.
With compression on overheads, there are a few takes. Sometimes I just want to smooth out the player’s dynamics if they’re a bit heavy-handed or inconsistent on a particular drum. A little EQ in the sidechain can help with targeting whatever that drum may be (taking out top end to target the snare, or boosting top end to target the hi-hat).
Using a stereo-linked compressor is important to keep the image from shifting in weird ways. If the player is controlled enough, I may use compression to thicken the sound and bring up the room tone to make the drums feel a bit more expansive. Or I just like the color of the compressor. Nothing wrong with that. Sometimes I just want a bit of peak limiting if the transients are feeling over pronounced. Sometimes I don’t use compression at all to keep things clean and open sounding.
Honing In
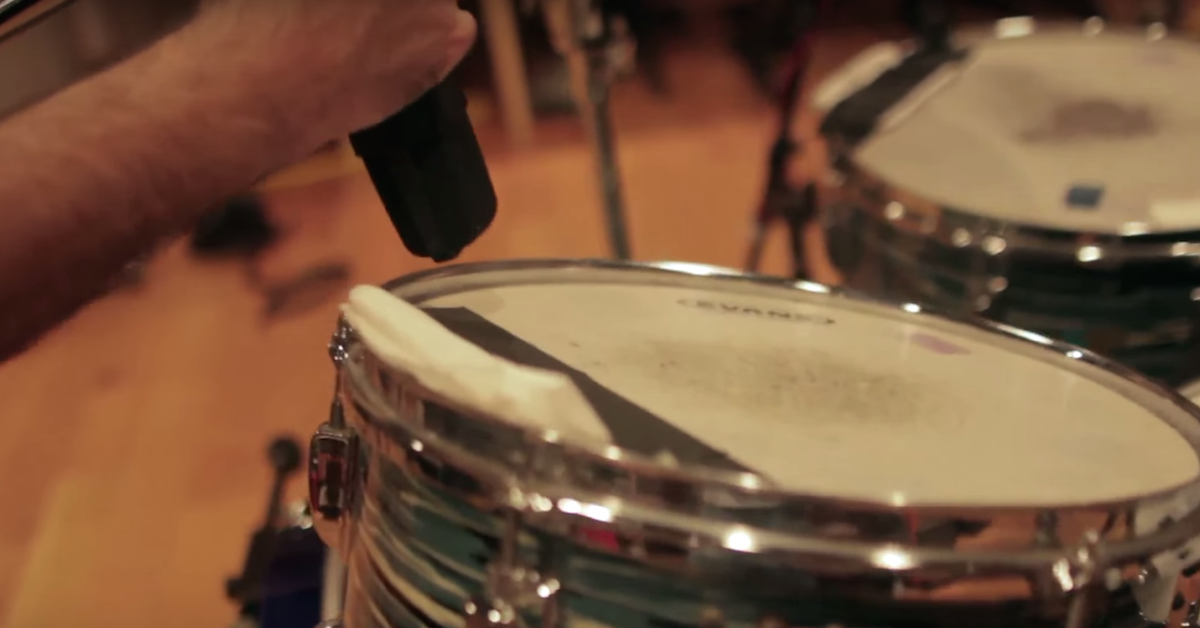
After the overheads, I generally move to the close snare. There are four really big considerations when it comes to the snare:
- How much snare wire?
- How aggressive should it sound?
- What to do with ghost notes?
- How much bleed is acceptable?
In regards to snare wires, I think of it like this: if I mix in a ton of snare bottom, I don’t really have to EQ my snare to make it bright. The presence of the snare wires does that for me. But, it’s a different texture of brightness, a heavily EQ’d snare will sound like it has a sharper tone and transient. A snare that’s made bright by the presence of the wires will sound more relaxed.
If I’m doing a hard rock kind of thing, I might opt to lean on the snare top and brighten up the overall sound of my snare buss; whereas, if I’m doing like a Lumineers type of vibe, I’ll lean a little heavy on the snare bottom and leave the snare buss without the treble boost.
This plays right into how aggressive I want the snare. If I want a super snappy, punchy snare, I’m going to be pretty liberal with the EQ. I’m basically going to boost as much top end and as much of the fundamental weight of the snare as I can get away with. Upwards of +10db or more is really not rare for me. I’m also not going to be shy about compression and saturation.
It’s a bit counterintuitive, but part of what makes a snare punchy is the fullness of the sound — meaning, if we pull up the sustain/body of the snare it’s going to hit a bit harder. My goal for compression is to effectively bring up the body while preserving transients as much as possible.
Distressors, 1176s and the Spectra Sonics 610 tend to be favorites because they act fast enough to sculpt out exactly how much transient is going to come through. They’re also good picks because tonally they’re all a bit midrange-forward which will give the snare more apparent presence. Don’t be afraid to dig in with that compressor. High ratios tend to play nicely with snares.
In addition to compression, a touch of distortion or saturation can add extra size and aggression to a snare. I’m a big fan of the Decapitator in particular, which I can use to soft-clip a snare just a hair and eek a bit more size out. Lastly, parallel compression can be great for thickening up a snare. Fast attack, fast release, low threshold compression returned on an aux track and blended up under the dry snare often works very well.
With compression comes two other considerations: the presence of ghost notes and bleed.
It’s rare that I don’t play up the drummer’s ghost notes. Sometimes it’s a bit cleaner to get these from the overheads, but if I can reinforce them a bit from the close mics, I consider that a win. Because those ghost notes live at a lower dynamic, they tend to sit right along with the bleed from the cymbals and other drums. In order to ease off the bleed as the ghost notes are coming up, I may need to incorporate some expansion. The key here (pun intended) is to EQ the sidechain detector to hone in on the snare, allowing more of the snare to pass through and less of the bleed. Otherwise, we just end up knocking those ghost notes back down again.

Ready to elevate your ears?
It doesn’t have to take years to train your ears.
Get started today — and you’ll be amazed at how quickly using Quiztones for just a few minutes a day will improve your mixes, recordings, and productions!
I should mention that I’m not a big fan of hard-gating drums. To my ear, it ruins the sound of the close mic by skewing the transients and messing with the resonance, but I’ll use an expander to keep things in check. As a general rule of thumb, I’m setting the attack on my expander as fast as it can possibly go and setting the release as slow as I can get away with while still cutting out bleed. How much expansion I’m using is really just along that scale of crispy & clean vs natural.
Bleed adds dimension and glue but inherently muddies the sound and masks transients. So it’s a matter of having that end goal in mind while choosing how to approach things.
Kick Drums
For me, kicks are all about EQ choices. There’s so much character from the sub range to the top of the treble, and what we choose to bring out is very genre-dependent.
If we want the personality of the kick we really have to preserve that midrange. All that 300-800Hz stuff is the skin of the kick and the material it’s made from. It’s also where a lot of the room tone lives. For styles where the kick isn’t the primary rhythm driver or styles that simply demand vibe over impact, my default approach is to keep that stuff in there even if it means a rounder/roomier sound.
By contrast, if we want power, we need that kick drum clean. I’m going to take out any aberrant tones and highlight the energy that comes from under 150Hz. I’m also going to emphasize the smack that comes from where the beater hits the batter head, which is generally happening above 3k. The extreme example of this would be certain styles of metal, where the kick is super clicky and subby, with very little in the dead center midrange.
Another consideration is the shape of the kick. For faster records, short, punchy kicks tend to work well. For more groove-oriented music, it helps to have some sustain in the low-end ring of the kick. For this, standard compression can help, or you may want to send the kick through an aux, pushing the sub tones through an EQ and then compressing the snot out of that.
This EQ’d parallel compression chain can add a ton of weight to a kick drum even when it’s blended in subtly. The big benefit here is that you can get a bit more weight into the kick without interfering with anything in the midrange, whereas regular compression may start to mask some of your midrange elements.
If all else fails, I add a subharmonic generator like Lowender by ReFuse. Some kicks don’t have those natural sub tones. Where there’s a will, there’s a way. A subharmonic generator can be just the ticket. Even just a sine wave generator tuned to the key of the song, triggered with a gate to open when the kick hits can be a brilliant way to add low-end punch to a kick.
Toms
Toms are generally very ringy drums. The main question I’m asking myself is how tight or how ringy do I want them. This is going influence my expansion and compression choices respectively. Outside of that, I have yet to hear a close miking technique on toms that doesn’t pull out hella skin tone. So I find myself being pretty aggressive with my midrange attenuation even on records that I want a more natural tone. Of course, if you want that “war drum” skin sound on a floor tom — it’s exactly the opposite. Pump up them mids! Music is so subjective.
There are two kinds of treatment to toms I find myself using fairly often.
One is that I don’t like the bleed of the tom mics, but find that there’s no clean way to get rid of it without killing the tails. To compensate, I’ll recreate the tails using a mono plate insert. Usually just the stock Pro Tools D-Verb. My expander or my strip silence tends to go overkill on the very ends of the toms, so this D-Verb insert is kind of a band-aid over the wound that isn’t detectable when the overheads and room mics are in the mix.
The other technique is subharmonic generators on floor toms. When that floor hits and the whole record goes “whump”, it just gets me in all the right ways. Even on the more “au naturel” songs, I find a little of this subtly tucked in, gives it a bit of somethin-somethin.
Close Cymbals
I have yet to hear a close capture of a cymbal that doesn’t make me say “well that sounds like a monster trapped in a trash can.” Close cymbals are the second-class citizens of the drum recording. EQ the living bejeezus out of em, tuck them in to reinforce the overheads, and only if necessary.
The one exception might be the ol’ ribbon mic over the ride bell. A Beyerdynamic 160 tilted off-axis and above the bell actually sounds pretty nice. A little EQ usually gets it where it needs to be (a touch of top end, maybe etch out any “clank” tone).
Rooms
When it comes to room mics, the big question I’m asking myself is: does this want to sound like “hi, I’m in a room” or “hi, I’m in your room.” If it’s the former, blending in the room mics is mainly about balance.
There may be a gut response to take out pronounced room tones, but that’s the stuff that tells the listener it’s an actual room. Resist the urge. Maybe take out some sub if it’s killing the vibe of the kick. Now, if you want it to be super punchy and just have a sense of space, that’s when you go apesh*t in cleaning up the room tones. Those EQ settings tend to look like a kid OD’d on Halloween candy and had nothing but an Etch-A-Sketch to preoccupy himself. Is it an EQ setting? Is it a seismograph? Who can tell?
I’m also not opposed to augmenting the room with reverb returns from the close mics and/or overheads. I tend to like plates. They get out of the way pretty fast since the higher tones are in the earliest parts of the tail, and they tend to play nicely with the natural room rather than creating the “room in a room” effect.
Lastly, a fun effect is compressing the heck out of the room returns. The effect of the pumping room can add some fun groove and texture and has the psychological effect of making the room sound bigger. It’s traditionally done in heavy rock records and fun to play with. The classic is the stereo 1176 with all the ratio buttons pressed in at the same time. Give it a whirl, it’s pretty cool.
Trash Mics
I’m generally a big fan of “trash mics”. These are mics that are placed in crazy places, or run through SansAmp, or just make no sense on paper but add some personality and energy to the sound. Some classic examples are dictaphone mics used as center overheads, a mic placed right in the middle of the kit and ran through a distortion box, or the good ol’ mic-in-a-trash-can.
If there are no trash mics, don’t be afraid to create your own via an effect return. Literally, anything can go — drums are very masochistic. They love getting beat up. Experiment with Soundtoys Decapitator or iZotope Trash on a parallel return of the complete kit or even just the overheads.
All of this serves as a good reminder that this is supposed to be a creative and fun endeavor. Honestly, I’d rather hear interesting drums than super clean, clear, punchy ones.
Tying It All Together
Once we’re done with all of this, we come back around to the big picture again.
Now we’re listening to the drums in the context of the record.
If we want wide guitars, maybe we need to pull down the stereo left and right on the drums in a bit. Maybe we got all this way and the drums just need some more body — so we create a parallel compression return on the entire kit. Maybe it just needs a bit more edge to keep up with the crunchy guitars and bass. Ok, let’s pull in a parallel distortion return. We can tweak our settings just to polish the surface. A little more low in the kick, a little less mids in the toms, and poof — there it is.
You have now made drums happy.
Eleveate Your Ears