The Complete Guide to Audio Pass Filters
11/18/2013
Article Content
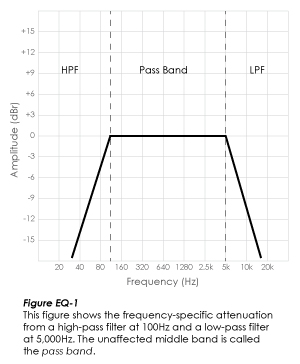
An audio pass filter attenuates an entire range of frequencies. There are two types of pass filters (Fig. 1). A high-pass filter (HPF) attenuates content below a cutoff frequency, allowing higher frequencies to pass through the filter. A low-pass filter (LPF) attenuates content above a cutoff frequency, allowing lower frequencies to pass through the filter.
The slope of filter attenuation is usually quantified in decibels per octave. For example, a 12 dB per octave HPF located at 100 Hz would accomplish 12 dB of relative attenuation at 50 Hz, and 24 dB at 25 Hz. This slope would continue to extend into very low frequencies, effectively attenuating signal to an indiscernible amplitude.
Pass filters are simple, ubiquitous audio tools that should be a part of ever engineer’s basic toolbox. Here are some effective ways to incorporate pass filters into your recording and mixing technique.
Signal vs. Noise
In physical terms, signal and noise are not separate components of an audio signal. Though you may choose to think of them as discrete elements, noise is a part of every waveform. Some types of noise components are relatively isolated to a specific frequency range. In those cases, pass filters can be excellent tools to reduce of eliminate the offending signal content.
For example, high-pass filters are often used in studio recording and sound reinforcement to attenuate extraneous low-frequency content like mechanical rumble or vocal plosives. By choosing a filter with a cutoff frequency below the fundamental frequency range of the program, a HPF can be used to differentiate between program signal and low-frequency noise.
Low-pass filters can also be used to eliminate unwanted, counter-productive bandwidth. One common example is using a LPF to establish the limited bandwidth of a low frequency transducer, like a ‘sub’ mic on a kick drum. Other examples include the entire universe of subtractive synthesis.
Course Tone Control
The subjective quality that we call ‘tone’ or timbre is a result of the harmonic content of a signal. Harmonic content is the balance, or relative loudness relationships, between the component harmonics of a complex waveform. An equalizer changes tone by attenuating or amplifying a limited frequency range within a complex waveform.
As described above, audio pass filters establish the limited audible bandwidth of a signal. This can have very useful tonal results.
Low-pass filters are used in music production as both fixed and modulated tone controls. The most transient elements of any waveform are the direct contribution of that waveform’s highest harmonic content. Consequently, dramatic changes in tone can be achieved by changing the cutoff frequency of a LPF (Figure 2).
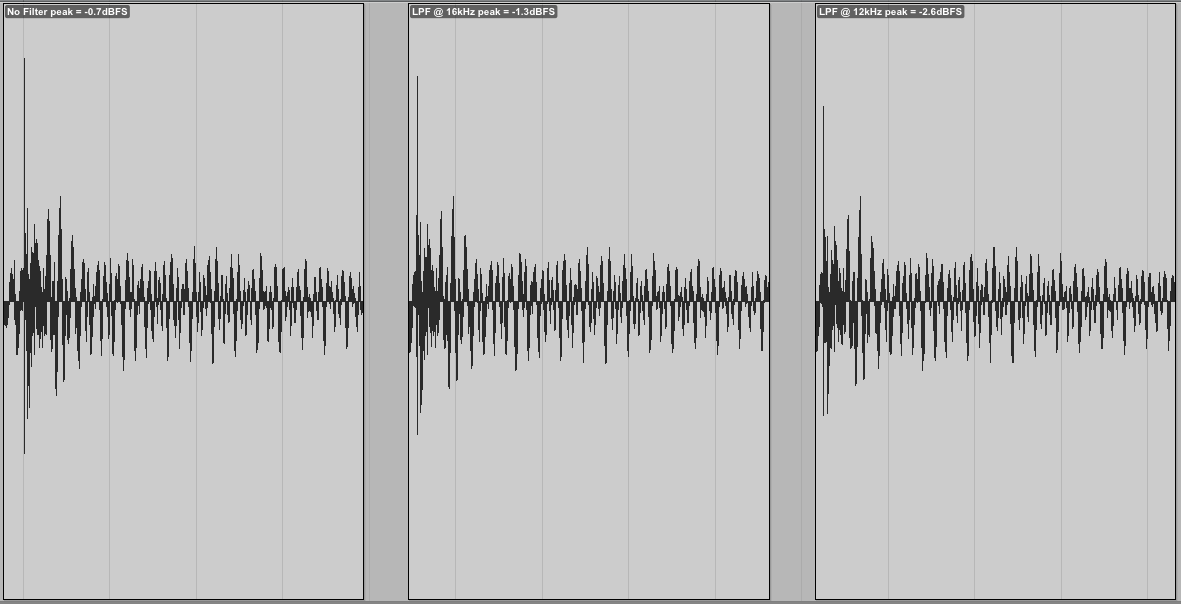
A waveform unfiltered, LPF @ 16k Hz and LPF @ 12 kHz, showing 1.9 dBFS difference in peak amplitude
Pass filters are often used in combination with shelving EQ to check or limit the effect of the shelf beyond the filter’s cutoff frequency. For example, some engineers like to use a Baxandall type shelving EQ to boost very high ‘air band’ frequencies. Placing a low-pass filter after the high-frequency boost in signal flow will provide additional control over the tonal effect.
The very same technique can be used to shape low-frequency content, in this case matched with a high-pass filter.
Pass Filters and Distance
High frequency content is one of the most important cues our auditory system uses to sort out proximity. A low-pass filter can be used very effectively to mimic the sensation that one signal is further away from the listener than another (unfiltered) signal. This technique can be used very quickly, and easily to establish spatial contrast between two signals, especially if they’re separated in the stereo field.
Try using a low-pass filter on the output of a delay. As the cutoff frequency of the delay component is reduced, you should expect to hear a more ‘realistic’ spatial separation between the direct signal and the delay. LPF cutoff frequencies in the 2 kHz-5 kHz range are typical.

Ready to elevate your ears?
It doesn’t have to take years to train your ears.
Get started today — and you’ll be amazed at how quickly using Quiztones for just a few minutes a day will improve your mixes, recordings, and productions!
Once the LPF is established, try introducing a high-pass filter as well. Cutoff frequencies in the 100 Hz-250 Hz range will exaggerate the spatial effect even more. Add a little slow delay modulation and you have one of those fancy “vintage” delay plugins using the freebie plugs that came with your DAW.
High-Pass Filters and Mix Clarity
Many of the most common problems with mixes (from mixers of all experience levels) are the result of monitoring problems. One of the most common monitoring issues is inaccurate low frequency reproduction. If you’re not using full-range monitors in a well-treated room, there are low-frequency truths about your mixes that might (or should) surprise you.
Here are some warning signs:
- You prefer the sound of your mix on headphones, ear buds, car audio, etc.
- There are one or more instruments in your mix that seem to eat up headroom disproportionately.
- Your compressors keep pumping, but you can’t hear why.
- The midrange clarity of your mix is unstable/inconsistent.
If mix problems stem from a lack of monitoring accuracy, it’s fair to ask, “how am I supposed to address the problems in the very same room?” Very fair, but there are some options.
If it’s a compression-related issue, don’t compress. If you can’t bring yourself to bypass a compressor, use a pre-compressor HPF on the track in question. Try moving the filter to the sidechain of the compressor once you’ve established an effective cutoff frequency. One or a combination of these approaches will keep just about any signal from pumping.
Turn off any vocal compression and listen to your vocals for clarity and lyrical intelligibility.
- If they’re OK, then your vocal compression is the problem. See above.
- If the vocals become muddled, turn off any mix buss compression you might have on the master fader or group masters.
- Without the buss compression, listen for low frequency content that happens during the inconsistent vocal clarity.
- Try adding a HPF to any suspicious busses or their compressor sidechains until the vocal clarity returns.
- Re-instate the vocal compression and be sure that the fix holds.
None of these steps requires you to actually hear the offending low-frequency content. Rather, you can learn to listen for the results of this unfiltered audio, and address the problem deductively.
The list of helpful applications of pass filters goes on and on. The basics might not be inventive, but hearing fundamental technique in action is exciting. Try adding filters to your first-pass mixing technique. You might find yourself introducing them earlier and earlier in the recording process.
Eleveate Your Ears