How to Sound Check a Band for a Live Show
08/24/2017
Article Content
Congratulations! If you’re reading this article it’s probably safe to assume you’ve got a live gig coming up and you’re looking for some pointers. If not, you might like How to Book a Gig for Your Band or How to Get a Job at a Music Venue.
Let’s start at the beginning.
Advancing the Show
The first step in soundchecking a band is advancing the show, and it happens weeks before the actual event. Basically, advancing the show, or the advance, is just a series of emails between the band and the venue confirming the details of the show, like set times, equipment information and payment details.
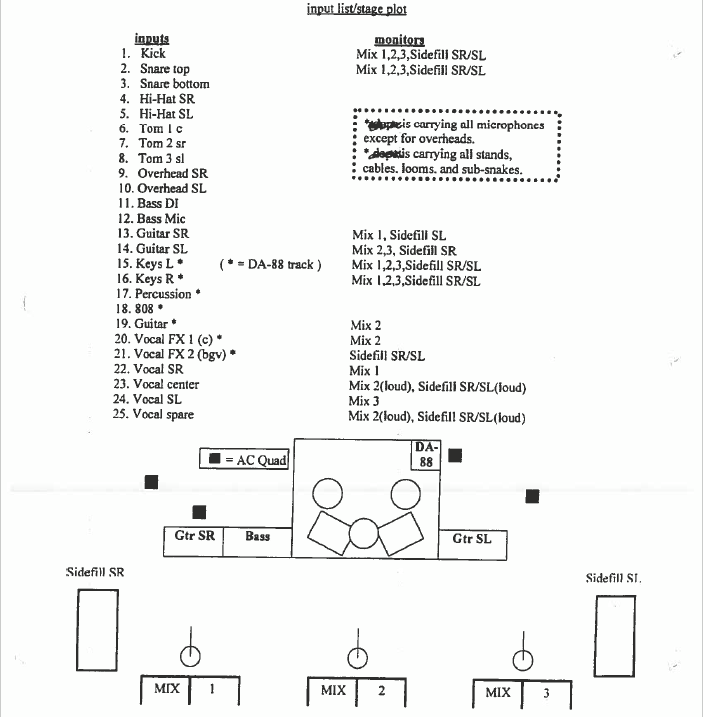
The advance usually includes an input list and a stage plot from the band. The input list is a list of every mic and/or line they would like to use, and the stage plot is an image of how they usually set up on stage.
The venue usually provides info on the backline in the advance as well. The backline is any instrument(s) provided by the venue, typically drum kits or amps.
Note: the term backline can also be used as a verb, meaning to push your equipment back and make room for the opening acts’ gear; “There’s no room backstage, let’s backline the amps.”
Turn On, Tune In, Drop Out
After checking the advance and setting up any necessary gear, it’s time to turn everything on and test the equipment.
Remember, it’s important to turn the console on first, then any system processors like graphic EQs, and turn on your speakers and monitors last. Once everything is turned on, test each speaker and monitor one at a time to make sure they’re all working properly.
Now it’s time to ring out the wedges to help prevent any feedback during the show. Start by placing a vocal mic on a stand in front of the stage right wedge. Send the mic signal to the wedge and slowly turn up the gain until it starts to feed back. Identify the offending frequency and attenuate it using a graphic EQ. Repeat this step until the feedback stops (or as close as you can get), and then repeat the whole process for the remaining stage wedges.
Next, it’s time to tune the room. Put on a song that is mixed well, represents all of the frequency ranges, and is somewhat similar to the artist that will be performing. Listen to how the song sounds on this system, in this room. What frequencies stand out? Does it seem muddy, or boxy, or harsh? Can you feel the low end in your chest? Use a graphic EQ to correct any problem in the room using subtle subtractive EQ.
Load In
By now, the band should have arrived and started loading in their gear. Introduce yourself, let them set up and get comfortable, and then put up whatever remaining mics or DI boxes you need. There may be changes from the input list or stage plot. That’s fine. Just go with it. As they say, the show must go on!
Most engineers choose to arrange their channels something similar to this, but you can use whatever order you like. What’s important is that you know where everything is. It’s always a good idea to label channels using console tape, just in case!
- Kick
- Snare
- Toms (smallest to largest)
- Cymbal mics /overheads (from stage right to stage left)
- Bass
- Guitars (from stage right to stage left)
- Keyboards, horns, strings, etc.
- Vocals (from stage right to stage left)
Note: Stage directions are given from the perspective of the performer. Stage right is to their right, and stage left is to their left. Downstage is towards the audience, and upstage is away from the audience.
Line Check
After confirming with the band that you’ve taken care of all their needs (there’s always an acoustic guitar someone forgot about, or a keyboard that only gets used for one song, or a vocal mic so the drummer can tell jokes), it’s finally time to start sound check! Get the band on stage, it’s time to make some noise!
Start by bringing your master fader to unity. As a general rule, try to keep all of your other faders below your master fader.

Ready to elevate your ears?
It doesn’t have to take years to train your ears.
Get started today — and you’ll be amazed at how quickly using Quiztones for just a few minutes a day will improve your mixes, recordings, and productions!
Next, have each musician play their instrument so you can check their levels. Most engineers choose to line check in the same order as their input list — more or less. Start with the drums (specifically the kick, then the snare, then the high tom, and so on), then the bass, and the rest of the instruments/microphones from stage right to stage left.
When checking each instrument/mic you should be adjusting the following, in order of importance:
- Gain — Use channel meters to find the “sweet spot”, usually where green turns to yellow/orange on the meters
- Fader — Typically around unity. Just keep it below the master fader, and make sure it sounds good in the room
- Gate — Only necessary on kick, snare, toms, and maybe a particularly noisy guitar amp
- EQ — Mostly subtractive EQ to correct problems
- Compression — Mostly for vocals to keep them out front in the mix
- FX sends — Hall reverbs for drums, and plate reverbs and tap delays for vocals are common
Monitors
Some engineers choose to set monitor levels while the corresponding musician is playing (ask the drummer what they want in their wedge while you’re checking drums, ask the bassist while you’re checking bass, and so on). Others choose to do a line check first, then double back and do a monitor check after confirming all of the channels are set.
No matter what approach you take, just remember: if your performers can’t hear themselves properly on stage, everyone is going to have a bad night.
Sound Check
After checking each line individually, it’s time to hear how everything sounds together. Everything may have sounded great during line check, but once the whole band starts playing together, it may become harder for performers to hear themselves on stage, or you may notice mix issues that weren’t apparent before (like kick and bass competing, or vocals getting buried).
This is your last chance for quality control before the doors open. You want to make sure everything sounds as good as possible and everyone can hear themselves on stage.
After the doors open and the crowd fills the room, things will change. You’ll have to make adjustments. Things will go wrong. That’s ok. Just remember to stay alert, use your ears and trust your gut!
Stay tuned for a follow-up article on what to do after sound check.
Eleveate Your Ears