The Basics of Frame Rates in Audio Post Production
Article Content
Frames Rates are a big deal in the film, video, animation and gaming worlds. They effect the smoothness of the image and there are several standards tied to broadcast systems and media types. There’s a ton of information for moving image makers on frame rates and the ultimate decision on what will be used lies with them. But when media gets passed on to Audio Post Production, it is essential that the audio engineer is informed of the frame rate for the project so they can keep all audio sessions in sync.
While the frame rate of a bounced Quicktime movie can be retrieved by simply clicking [Command-I] on the open clip, the file you may have received was not necessary exported properly. Or the burned-in timecode, which is hopefully there, may not match the frame rate that is specified in the deliverables for whatever reason. Or the content will need to be converted for US or European broadcast specs or for film distribution.
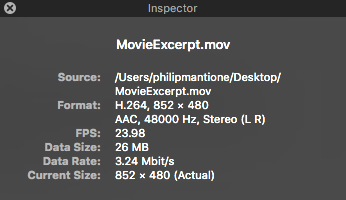
The key to eliminating any confusion is an open line of communication with the video editor. Always verify the desired frame rate and conform all of your post production sessions appropriately. The are some visual indicators that can identify and mitigate potential problems.
Visual Display Indicators
If Pro Tools is used (the DAW of choice for Post-Production), the video track will display the session frame rate in the track header. If it matches the imported video it will be displayed in white. If not, it will be displayed in red, indicating that you need to conform your session frame rate to match the imported video.

Frame of session does not match video

Frame of session does match video
If you receive a video with burned-in timecode (meaning it’s visible in the video itself), any number displayed should match the location number displayed in your DAW. You should check this towards the end of the video where inconsistencies will be most obvious.
If it doesn’t match, there are two possible issues. One, the timecode of the video does not match your session (see above). Or two, you may need to configure a SMPTE offset to accommodate a leader in the video by adjusting the Session Start SMPTE Code in the Session Setup Box.

The numerical display itself can be an indicator of drop or non-drop frame rates which will be discussed below. The standard display format of SMPTE (Society of Motion Picture and Television Engineers) timecode is:
Hours:Minutes:Seconds:Frames

This identifies an exact frame of the visual image. Drop frame timecode replaces the colon before the frames section with a semi-colon, so a drop frame timecode would appear like this:

Drop Frame vs. Non-drop Frame
This is perhaps the most confusing concept regarding frame rates.
So here’s what’s going on …
First all, although it may seem from the name that drop frame timecode actually removes frames from the visual image, that is not true. It simply removes number location identifiers periodically so as to keep the timecode consistent with the clock on the wall (so to speak).
As the frame numbering scheme skips certain numbers, all subsequent frames are re-numbered accordingly. Why is this necessary? Well, if you need the time on the screen to match the clock, which might be crucial in broadcast situations where everything is tightly timed out, then drop frame should be used.
Here’s the math behind the curtain. It is really not big a deal once you grasp the underlying concept.
In the days when television was broadcast in Black and White (which I hate to admit I remember), the frame rate was 30 FPS. This was related to the electrical system in the US of 60Hz and the use of interlacing two video fields (odd and even lines), which effectively limited the full frame rate to 30 fps (or 60/2 = 30).
When color broadcast emerged, a delay or lag was introduced of .1% so delay compensation was added to mitigate phasing issues in the signal. The result was that refresh rate frequency was shifted slightly downward 59.94Hz. So the resulting FPS became 29.97 FPS (59.94/2).
Now to adjust this frame rate to the clock on the wall involves a numbering trick.
If you run an hour program or video at 30 FPS you would need to display 108,000 frames:
30 FPS x 60 Seconds x 60 minutes = 108,000 frames
If you run an hour program or video at 29.97 FPS you would need to display 108,000 frames:
29.97 FPS x 60 Seconds x 60 minutes = 107,892 frames
To conform every second of programming with each second of content, the difference of 108 frames per hour needed to be reconciled (108,000 – 107,892 = 108)
So it was decided to remove (or drop) two timecode frame numbers from the count every minute, with the exception of every tenth minute. That means that 54 times per hour (because there are six intervals of 10 minutes per hour which would not be affected so 60 – 6 = 54) two timecode frame numbers are skipped.
This can be observed simply by looking at the Pro Tools SMPTE display as it transitions frame to frame. Normally, the count changes on what would be the 30th frame to the next second and zero frames. The first two examples below show the transition using a drop frame rate and second two with a non-drop frame rate. Both examples show a one frame progression.


Note that two frames have been skipped here


As mentioned above, this happens 54 times per hour thus eliminating the extra 108 frames that cause the discrepancy (54 x 2 = 108).
This is referred to as 29.97 Drop Frame Rate for obvious reasons. There is also a 29.97 Non-Drop Frame Rate, which does not make the numerical compensation.
It should be noted that this is purely a numbering trick. No actual frames are deleted (which would cause a glitch). Only the frame number locations are changed.
Typical Frame Rates
Now that you know probably more than you ever wanted to about drop frame rates, below are other rates you may come across:
- 30 FPS Non-Drop – matches the the clock on the wall without dropped frames needed
- 30 FPS Drop – is technically the same numbering sequence as 29.97 FPS Drop
- 29.97 FPS Non-Drop – discussed above
- 29.97 FPS Drop – discussed above (based of the NTSC broadcast standard)
- 24 FPS – relates to standard film rate
- 23.976 FPS – this is derived from a similar difference (as described above) of .1% but as related to 24 FPS (24 x .001 = .024) and (24 – .024 = 23.976)
- 25 FPS – is the European video standard and relates to their electrical grid which operates at 50Hz (known as PAL)
Pull-up & Pull Down
Audio Rate Pull Up/Pull Down
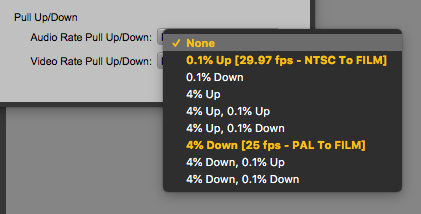
Video Rate Pull Up/Pull Down
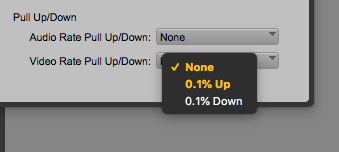
These processes are designed to change the actual playback speed of the picture or sound, as opposed frame rates which are numbering schemes. Adjustments are intended to mitigate sync and speed issues caused by the transferring media between film and video, and also for differences between European and US broadcasting systems.
These three pieces of information will allow you to choose the appropriate speed change as needed.
- What is the speed of the visual media you will be working with?
- What is the intended speed of the final dub?
- What are the specs requested for the deliverables?
When you see strange sample rates such as 44.01, 44.056, 47.952, etc., it is an indication that a Pull Up or Pull Down process has been used.
Conclusions
If there is anything is certain about frame rates and pull up/pull down processing, it is that communication and double-checking the specifications of requested deliverables is crucial. Along with the quality of the audio content, synchronization is equally as important and if things are not right, most fingers will be aimed squarely at audio post-production crew, regardless of where the blame might actually lie. The best way to deal with problems is to prevent their occurrence in the first place.
Check out my other articles, reviews and interviews
Follow me on Twitter / Instagram / YouTube


