5 Common Mistakes to Avoid for Mastering in the Box
08/5/2017
Article Content
As I discuss in my course Mastering in the Box (and the new expansion pack), mastering is the final step in music production. It’s also one of the most important in getting productions up to professional standards. Improper mastering, however, can ruin the dynamics, tone and overall sonic quality of your music.
Here are some common mistakes to avoid when mastering with a computer-based setup:
1. Over-Compressing/Limiting
Although compression and limiting can be integral in boosting overall levels and obtaining “competitive” masters, being too heavy-handed with these types of processors can result in squashed, lifeless, and even smaller sounding masters.
I like to be careful and discern the two. Limiting will generally be the final step when applying processing to your master. I like to use compression earlier in the chain for boosting perceived loudness, subtly taming transients or adding character to the program material. Keep in mind that every mix is different and may drive these processors harder depending on frequency spectrum, overall volume and how transient the material is.
It’s also important to not use the wrong approach for compression and limiting. Slower attack times, and fast to moderate release times will most likely preserve the precious transient information and give you better results, so make sure to pay attention to these parameters on your plugins.
Preferred Plugins:
UAD Shadow Hills Mastering Compressor and Cytomic the Glue for compression.
FabFilter Pro-L and PSP Xenon for limiting.
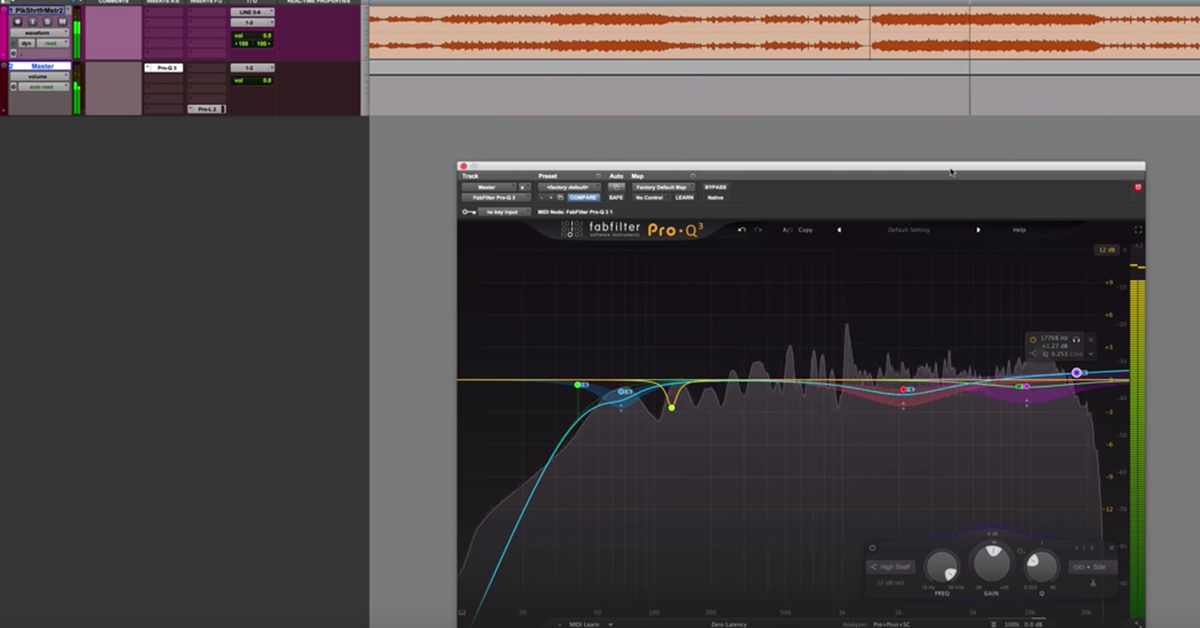
2. Overusing Filters and Equalizers
We can do so much with filters and equalizers; sometimes we forgot it’s easy to do too much. From subtly carving out unwanted frequencies, to adding an airy top end, we can really shape the tone of our material. When done correctly, an equalizer can be one of the most useful utilities for any type of audio engineer, mastering included.
Be careful to be precise and conservative (most of the time) when using a filter or EQ. I love using the UAD Manley Massive Passive for boosting at 12 or 16k to give a smooth top end to my masters, but it’s easy to go from clear and pleasant to harsh and sizzly. Listen carefully to determine where to draw that line.
Muddy mixes can benefit from some surgical EQ in the 200 Hz – 1 kHz range, but considering that so much musical vibrance, impact, and character exists in that range, pulling too much out can result in thin and lifeless masters. Try using a Mid-Side Equalizer for an added level of control. With this, you can boost or attenuate the center separately from the sides, so if you need to address harshness, but it only exists in the sides, you can do so without affecting the information in the center.
Preferred Plugins:
Brainworx bx _Digital v3
UAD Manley Massive Passive
iZotope Ozone 7
3. Using the “Set It and Forget It” Approach
In a recent master of the live set of a singer/guitar player, I ran into a common problem in mastering; harsh “esses”. This sibilance was a result of an overload of 6 to 8k information in the recording of the vocal performance. Unfortunately, some of the other processing that I was doing was only making the problem worse. I inserted the FabFilter Pro-DS (my favorite De-Esser as of late) onto the material, and set it to attenuate at that exact range, but ran into another issue; there was a lot of important acoustic guitar frequency information at that exact range. So while the De-Esser was doing its intended job when the singer was delivering “esses”, it was also taking away from the guitar when the singer wasn’t. The solution was to automate parameters on the De-Esser so that it was only working when I wanted it to. I automated the threshold, but one could also experiment with the bypass and other parameters to achieve the desired result. It took a long time, as the live set was over an hour, but it was well worth it.

Ready to elevate your ears?
It doesn’t have to take years to train your ears.
Get started today — and you’ll be amazed at how quickly using Quiztones for just a few minutes a day will improve your mixes, recordings, and productions!
The lesson here is that the material was better because I didn’t simply pop a bunch of plugins on the material and call it a day. That isn’t what mastering is supposed to be. Sometimes a chorus could use some extra brightness, or a specific section of the bridge is lacking impact. Thanks to the brilliance of automation, you can use processing at specific moments to make the material be the best it can possibly be.
Tip: My De-Esser automation was an example of fixing a problem, but you can use this approach to embellish your masters, too. Experiment with stereo widening, subtle saturation, or whatever you’d like to help improve the material.
4. Not Checking your Master on Multiple Sets of Monitors
I am confident that I can get a master sounding great on the main set of monitors in my room, but ultimately, the music I master will end up being listened to on many different types of playback systems in less than ideal environments. I try to listen to my work on as many different systems as possible, because the ultimate goal for music recording, mixing, and mastering engineers is to create an experience that is enjoyable everywhere. In addition to my main monitors, I check my work on studio headphones, computer speakers, my home theater system, my car stereo, and my iPhone. My job is to create a master that “translates” well between all of these different systems because very few listeners will be using quality studio monitors for playback.
Tip: It’s getting easier to wirelessly send music out of your computer to your television or other devices, so take advantage of this ever-improving advancement in technology. I use Airplay to send from my iMac to my Apple TV and it works great.
5. Disregarding Inter-sample Peaks
It’s been a common practice for years to be constantly pushing levels to near 0 dBFS when mastering music. A negative effect of this is the issue of “inter-sample peaks”. A DAW will not account for peaks that may occur between samples once your digital file is converted back to an analog signal and played back via the listener’s preferred playback medium. The solution is using a “True Peak Limiter” which allows you to detect and prevent inter-sample peaks. There are many great options on the market, but my favorite Limiter Plugin (for this and a multitude of other reasons) is the FabFilter Pro-L.
Other True Peak Limiters:
Sonnox Limiter v2
iZotope Ozone 7
Eleveate Your Ears