The Complete Guide to Mixing with Compression
04/15/2018
Article Content
Compression is a bit of a heady topic. It can be a bit difficult to picture and hear what’s really happening, making it a little tricky to understand. However, it’s actually fairly simple once the understanding takes place. So good news — if you’re struggling with compression it’s gonna click and you’ll just “get it.” Hopefully, this guide you are reading will help that happen.
Essentially compression is just dynamic manipulation. It’s like a little robotic finger on a volume knob that reacts to an incoming signal. As more signal comes in, the finger turns down the signal going out. With less signal, the finger attenuates less or not at all. The big question is: what parameters are we giving this robot finger to operate within? Are we having the attenuation happen fast, slow, somewhere in the middle? Are we doing a lot of attenuation or just a little? How much amplitude is required to make this attenuation occur? As these questions get more specific, compression starts to get a bit more complex.
The Architecture of a Compressor
In order to understand what compression does we need to understand how it generally works. The recipe is fairly simple. We can think of a compressor as two circuits: a “processor” which effects the signal, and “detector” which tells the processor how to act.
When we send a kick drum through a compressor, that signal splits into two routes. It travels down its signal path into the processor, but it also goes down another path to the detector known as “the sidechain.” If you think about that phrase “sidechain”, it’s actually very descriptive of the detector path. It’s a “chain” of circuitry that exists on the “side” of the main signal so that the compressor can figure out how the main signal should be effected. Thus, we kind of have the kick drum existing in two forms at once.
That’s a little weird to picture at first, but it actually helps quite a bit to think of two processes separately — the actual effected signal that is output, and a signal that’s determining what the compressor is acting on.
I’d like to discuss the processor side of the compressor first. Essentially, this is just an attenuator. There are a number of different designs to this attenuation circuit, but they ultimately aim at the same goal: turn the signal down when the detector says so. Of course that leads us back to those nagging questions: How much attenuation are we doing? How fast? How quickly are we letting go of the attenuation?
Many compressors have fixed answers to these questions — they are built to move at a certain speed and degree. The LA2A is a famous example of this. There are no external parameters which change how the compressor acts. It does one thing, and it does that one thing very well.
Traditionally, however, compressors will have external controls that tell the attenuator what to do.
Let’s start with the most simple scenario: a compressor with an inline detector circuit. Here, the signal coming into the input of the compressor is the same signal that the detector is seeing, and ultimately the same signal that the processor is acting on. In this case, we know that if we feed a kick drum through our compressor we’re going to see a signal with a very fast attack, a very short sustain, and a gradual bit of decay and release. This is the basic shape of a kick — it punches in and out with a bit of ring and room tone in the tail.
In this kick drum example, we will need to cater the action of the compressor in order to get the desired results. And we have a number of parameters we can use to do this.
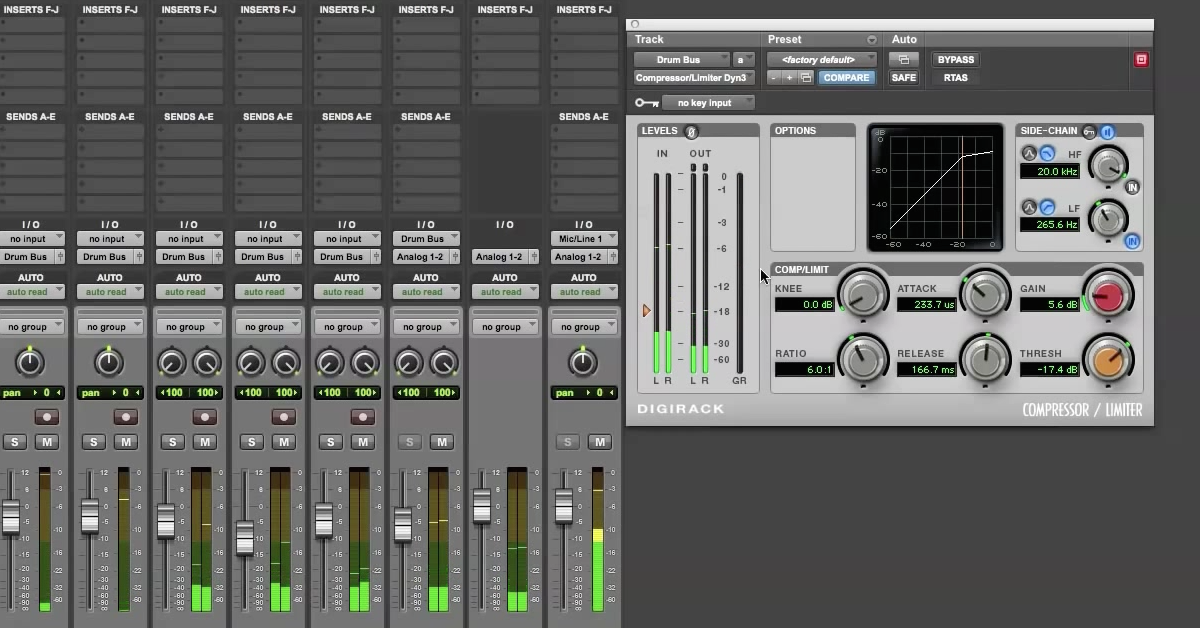
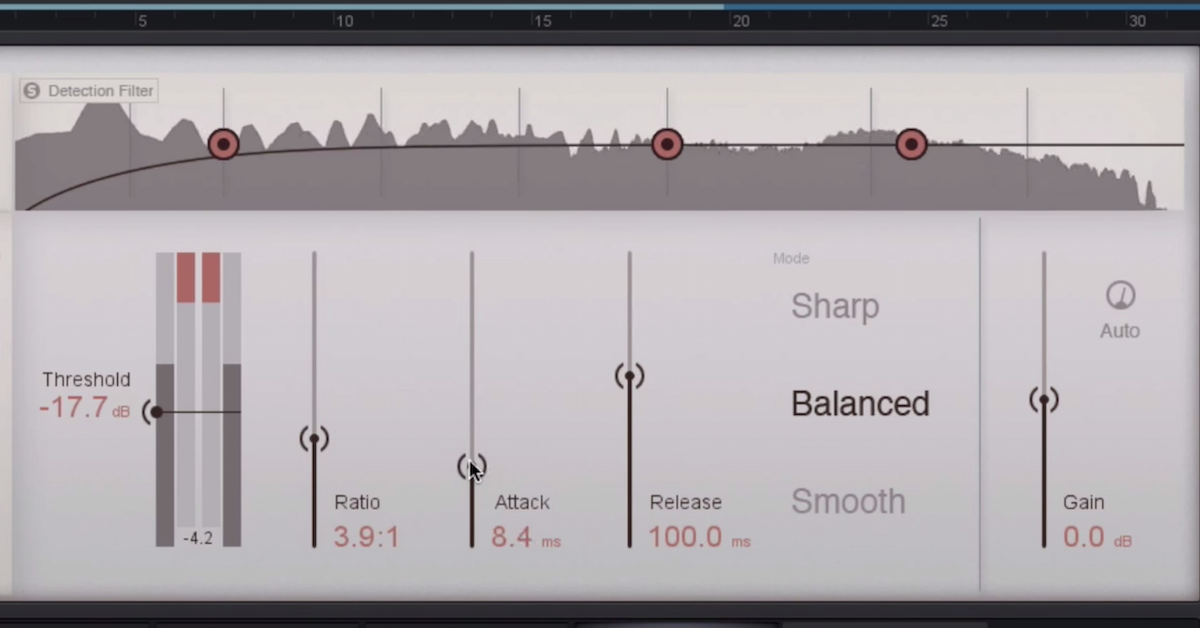
Threshold
This is actually a function of the detector. The threshold refers to the amplitude level in which the compressor acts. While we will be primarily focused on the attenuator going forward, it’s important to recognize that the compression action is all dictated by where the threshold control is set. If, for example, we set the threshold above the loudest peak of our signal no other parameters will matter because the compressor simply won’t be doing anything. Conversely, if the Threshold is set very low, the attenuation parameters will have an immense effect on the result as the compressor will be constantly acting on the entire signal. Additionally, the threshold acts as a “target signal level” for the attenuator to move toward.
Ratio
This function tells the attenuator how hard to work. The ratio works relative to the threshold. If, for example, our kick drum peaks above the threshold, the ratio would indicate how much attenuation would be applied to the kick in terms of how close to the threshold level the resulting signal would be. In other words, a 2:1 ratio would bring the kick level down halfway to the threshold level, while 3:1 would bring the kick down two-thirds of the way toward the threshold level, and an infinity:1 ratio would bring the signal all the way down to the threshold level. Of course, this reduction will all have to act over time, which makes the ratio an imperfect concept.
Attack
The first timing control is the attack. This control dictates how fast or slowly gain reduction is applied to the signal. Mind you, the detector circuit is always in play. Gain reduction begins at the speed of electricity once the compressor is triggered to act. Attack refers to the application speed of gain reduction, not the time it takes for the compressor to act.
Another way to think of it is graphically. Imagine an X-Y graph. If X is time, and Y is gain reduction, the Attack control would dictate how steep the incline of our line would be. Going back to our kick drum, if our threshold is set to just catch the peak of the kick, if we set the attack slowly we will do very little gain reduction even if the ratio is set very high. We will still do some gain reduction, just not very much as the kick peak is moving very fast. This can be a good setting for just rounding out the transient of the kick without really diminishing its punch. However, if we set the attack to fast, our gain reduction will be applied quick and reduce a lot more kick’s attack. This setting would be more akin to peak limiting and could be used to make sure there is no overloading of our signal path from the occasional kick that was hit a bit too hard.
Release
This control dictates how quickly the attenuator lets go of the signal and allows it to return to an unprocessed state. This is a very important part of how the resulting signal will be shaped. For example, let’s say our compressor releases very slowly. That means after the compressor triggers, there will be an audible swelling of the signal as attenuation is reduced. If the release is fast we may hear level restoration occur between notes — an artifact that’s referred to as “pumping”.
On vocals, in particular, a fast release will bring up all the mouth noises and breathes — and this is why pumping is sometimes interchangeably referred to as “breathing.” Or, perhaps, it’s because fast release times will bring out ambient noises which can feel like the sound is “breathing” in and out. Either way, it’s rarely desirable. If the release is exceedingly fast it’s actually possible to get amplitude changes within a signal’s wave shape. This is called intermodulation and tends to be most pronounced on low-frequency sounds (as these sounds have the longest wave shapes).
Now, in between ramping and pumping, there’s a whole flexible middle ground where compression becomes artful. In this area, I think of the release as a “density to openness” control, ranging from faster to slower respectively.
Knee
This requires a little bit of explanation. It’s easy to think of a compressor as a linear device — gain reduction is applied equally relative to the amplitude of the incoming signal. However, when we’re dealing with physical, analog devices we are subject to the laws of physics. The threshold is actually an equilibrium point and not a definitive point in which the compressor acts or does not act.
In truth, as voltage levels begin approaching our threshold the compressor will start reacting, meaning in most analog systems a degree of gain reduction will be applied before the signal level actually breaches the threshold. Similarly, the gain reduction function will not work linearly, but rather will respond asymptotically to signal level above the threshold. This means that the further the signal level exceeds the threshold, the harder the compressor will start to clamp down. In most systems, the ratio actually defines the steepness of this curvature, and the threshold actually refers to the inflection point of the curve. A bit confusing? Yeah, it is.
Let’s describe how it works in a digital system because that’s a bit more clear. In the digital world we’re not subject to the laws of physics. We get to make our own rules. Here, we can have a perfectly linear amount of gain reduction that begins at exactly the threshold point and works according to the ratio throughout.
We can picture this as a signal level that increases over time, hits the threshold, and then sharply angles to produce a line that is less steep. So whether we are four decibels over our threshold, or thirty, the amount of reduction will be exactly according to the ratio. 4:1 compression will function as 4:1 compression no matter how loud the signal is. This is called “Hard Knee” compression. Sometimes we don’t want this. Sometimes we can get more musically flattering results if we soften the knee. This means our compression will kick in as it gradually approaches the threshold, and once over the threshold will respond at increasing strength relative to the signal level. In this example, a 4:1 ratio might act like a 2:1 compressor when we’re only a few dB over the threshold, but may function like a 10:1 compressor when we’re way overshooting the threshold.
The benefit to hard knee compression is that it acts uniformly over the signal. The issue is that the compressor is either on or off, and so it can create a noticeable change between states of neutral and attenuation. The benefit to soft knee compression is that it comes in and out of the state of gain reduction smoothly, making the compression action less obvious. The issue is that fast overshoots will swing the compressor into high ratio style gain reduction producing a much more noticeably present compression effect.
When our knee is adjustable, we can control how gradual we want this transition to be. As a general rule of thumb, the more percussive an element (like drums), the more hard knee compression makes sense, and the more “connected” an element (like vocals), the more soft knee compression makes sense. Many elements have varying degrees of percussiveness and connectivity and we may want to adjust the knee to compensate.
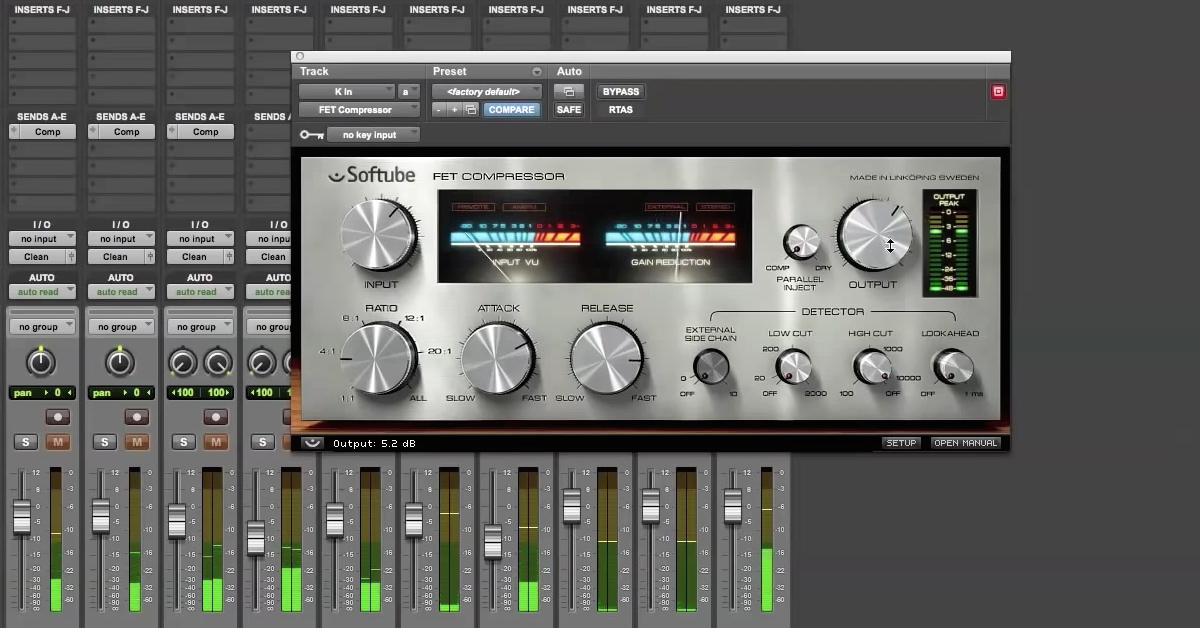
Sidechain
Now, in case that’s not enough, let’s also talk about the sidechain path. In many compressors, the detector circuit is simply in line with the attenuator. However, in many other compressors the detector is along a path called the “sidechain.”
The benefit to having a unique signal for the detector is that we can customize what the compressor is reacting too. Going back to our kick drum, the very front of our sound might be the percussive click of the beater hitting the batter head. Let’s say we want our compressor to act exclusively on the low-end boom of the kick, rather than the whole of the kick sound. If our sidechain has an EQ in line with a low-pass filter, we can remove the click of the batter head from the detector.
Or, perhaps we are compressing the entire mix, and we want the kick to really sing through. For this purpose, we can use a high-pass filter in the sidechain path so that the detector is no longer reacting to the kick drum but to everything else in the mix.

Ready to elevate your ears?
It doesn’t have to take years to train your ears.
Get started today — and you’ll be amazed at how quickly using Quiztones for just a few minutes a day will improve your mixes, recordings, and productions!
To get really complex, some compressors actually have external sidechain paths. The original purpose of this was to be able to send our signal to an external EQ for purposes such as what I mentioned above. Well, leave it to musicians to start doing weird stuff while experimenting. Turns out with an external sidechain you can send any source into the detector circuit! This means that effectively you could have your acoustic guitar duck out of the way of the vocals by feeding the lead vocal to the external sidechain of a compressor that is acting on the guitar.
For EDM fans, you can have the bass duck out of the way of our ol’ kick drum in a similar way. In the former, we would probably want to create that effect subtly. In the latter, we often want to create a deliberate audible pumping effect. This is often referred to as “sidechaining” the kick to the bass.
Compression In Use
All of that is well and good — but what about the real question: Why do we use compressors? It’s no help to know everything about them if we don’t know what we’re trying to do with them.
Here are six reasons I reach for a compressor.
1. Help With Consistency
The main purpose of a compressor is to restrict the dynamic range of an instrument/voice. This means that the loudest parts of a signal and quietest parts become closer together. When we’re following an instrument in a record, a certain degree of dynamic variance is good — it’s part of what makes a performance exciting. However, too much fluctuation can become distracting. It’s no good when we’re trying to listen to the vocal and we have the bass jumping out in front every now and then. Most of this can be controlled with volume automation, but some dynamic shifts happen a little too fast for the fader.
2. Prevent Overloads
Controlling peaks is another important purpose of a compressor. In the days of tape recording, this was particularly true because we wanted the incoming signal level to stay as high above the noise floor as possible while at the same time not overloading the tape machine. Compression helped with this by reducing the loudest peaks of a signal thus allowing us to turn the overall signal up louder. In the digital world this is less true but still applies if we want to put a uniform saturation effect on the sound. It’s also still true in the world of mastering as we may want to gain up the overall playback level and need to control the loudest peaks to prevent digital clipping.
3. Bring out Nuance
Very often the best parts of a performance are in the subtleties, and very often the subtleties are, well … subtle. The ghost notes that the drummer is playing on the snare, the pickups and bends in the bass, and the emotive tails in the vocal lines contain a lot of feel and emotion. When we use a compressor, we are turning the loudest parts down, but that is effectively the equivalent of turning the quieter parts up once we apply makeup gain. Compression can be a great tool for taking the quiet nuances of a performance and bringing them to the forefront.
4. Make an Element Cut
If we have a particularly dense arrangement it may be a struggle to get an element to consistently compete with the surrounding instruments. This is particularly true of vocals. It’s very easy to lose a vocal in a sea of guitars, pianos, drums, strings, zithers, dulcimers, shofars — I don’t know what music you are making here but it’s probably awesome.
Anyway, when we have lots of elements competing for space, compression can help our leads along by keeping them locked into the right level consistently. One of the techniques commonly used by many engineers (including yours truly) is called “parallel compression.”
Parallel compression means making a copy of our source and compressing it into basically an unfaltering brick of signal. We can place this streamlined signal in our mix tucked just loud enough to be consistently heard (even though it’s in the background and quiet). We can then place our original source vocal over the compressed vocal knowing that no matter how loud or quiet we want the source vocal to be, the overall vocal will still consistently be heard as long as the parallel track is anchored in the mix.
5. Exaggerate the Attack or Sustain
One of the big advantages compression has over volume automation is the ability to function within the envelope of a sound. We can use a compressor to actually shape the ADSR of a signal to suit our needs. Going back to our kick drum, let’s say we want to bring out the low ring to hold a bit more bottom weight. Here we can set the attack fast and the release fast to reduce the transient attack of the kick — proportionately emphasizing the sustain. Suddenly we have a longer lasting low-end hit. Or, we can use compression to emphasize the punch.
If we set the attack and release slow, and turn the threshold down low enough to act on both the attack and sustain of the kick, we can actually exaggerate the punch by reducing more of the sustain than the initial transient. It’s a little confusing but give it a try — set the attack time slow, release slow, and threshold low, and listen as the punch of the kick actually becomes exaggerated.
6. Special Effect
Sometimes the fun of a compressor is to abuse it. We can create exaggerated compression effects that may sound weird but actually function very well musically. Big Beat style kick drums come to mind. That big, boofy, monstrous, windy kick comes from over-compressing a normal, innocent kick.
Think Prince’s “Kiss” or Billy Squier’s “The Big Beat”.
This can be a fun effect on room captures, reverb/delay returns, drum busses, modulating guitars, or even vocals if you’re feeling frisky. I’m actually writing this article at a coffee shop and The Bravery “Believe” is playing in the background. That compressor is working so hard on the drum buss it’s actually breaking up a bit — and it sounds awesome!
From all this information and the process of experimenting with various sources, it won’t take long to get a basic feel for compression. One of the keys to getting our ear around it is to overuse the compression to really hear what it’s doing, and then back it off a bit to where it sounds appropriate.
Like I said at the beginning, once it clicks, it clicks.
Eleveate Your Ears