The Complete Guide to Mixing Voice: EQ
08/20/2013
Article Content
[The first of a two part series by Randy Coppinger, originally published on his site.]
Voice acting, singing vocals, narration… just about any flavor of recorded human voice can benefit from signal processing. I’ve developed some typical things I do whenever I’m taking a raw voice recording toward a finished audio product.
I heard Alex U. Case wisely suggest that audio practitioners not seek recipes, but strategies instead. Each voice and project may need different approaches so there is no perfect EQ setting, no perfect compression preset that can be used every time.
So consider this a set of strategies — ideas worth your consideration to use or omit with a great sounding voice as the goal.
—
Equalization — Cuts
The secret to a great sounding dialog or vocal mix is a good recording: plosive free, without mouth noise, sans funky contributions from the room, and lacking sibilance. I suppose an inspired, well performed recording helps a little too. But let’s assume we have a decent voice recording and it’s time to mix/process toward the final audio program.
The way I see it, good voice processing has similarities across media: music, film and TV, game audio, broadcasting/podcasting, theme park shows, talking toys, etc. Typically we want to understand the words, bring out the best qualities of the voice, and optimize for the technical limitations of the playback situation.
To that end I have a typical voice processing chain. I don’t see it as a recipe to follow regardless of the context, but rather a starting point to tailor the sound for each unique production.
FOCUS
My first step is probably the most important and definitely the most likely for me to implement: Frequency Cuts.
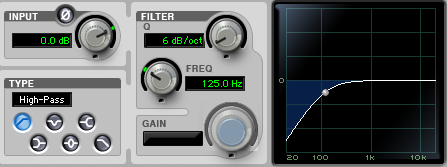
Philosophically, I think of this as simplifying the signal closer to its essence. For voice there is usually low frequency information that gets recorded but we can’t hear. It is good to filter out that stuff. When directional microphones are used up close, proximity effect may be audible.
A shallow low rolloff might help, as discussed in this previous article. When the presentation will have a limited high frequency response, I like to use a high roll off too. If there are “ugly” frequencies in the recording, I’ll use a parametric to find and minimize those. Anything that doesn’t benefit the end result may be minimized using equalization.

CONTEXT
Other cuts may involve spectrum that sounds fine for the voice by itself, but that won’t be important in the larger mix of elements. This isn’t a significant issue for voice-only or voice-dominated projects. But for song vocals, sonically busy scenes, and other source rich environments, additional cuts in the voice can free up spectrum for other sounds.
These may not be obvious at the very beginning of the mix, but instead tend to be uncovered over time. While contextual cuts are less obvious, they can be just as helpful toward a great sounding result.
EXTREMES
In some cases a voice may be heavily modulated. Cartoons, monsters, aliens, robots, and many other kinds of voices are severely processed. In these cases, it is important to consider what’s being done to the voice before applying low/high cut filters or parametric EQ.
For example, if a varispeed up will be applied (faster AND higher in pitch) a low rolloff may be important to prevent subsonic frequencies from becoming audible. And it may not be obvious what frequency or steepness a high pass filter should take until hearing the voice post-varispeed. So there may be an iterative process of cutting, mangling, revisiting the cut, revisiting the mangle, etc. There may also be cuts after the voice is morphed. As with all things audio, let your ears inform your decisions.
Cutting frequencies isn’t intuitive. No, the obvious approach is boost what we want to hear. So why bother cutting? And why make cuts the first step?
If there are other processors applied to the voice, I don’t want any of them trying to cope with spectrum we can’t hear, or don’t want to hear. A high-pass filter and potentially any other useful equalization cuts seem to work best when applied up front. I try to be judicious here; nothing too crazy. But I am always rewarded for focusing the voice on the parts we want to hear by removing and minimizing the parts that we don’t.
Equalization — Boosts
The most obvious approach to EQ is push up more of what you want to hear. Getting the right microphone for the voice and recording it well should mean little or no EQ is needed. Or as my friend Khris Brown likes to say about equalizing voice: “less during initial recording.” And if you do need EQ, cut frequencies first, as previously discussed.
But you may not have the luxury of recording the voice, in which case the person who made those choices may not have set you up for success. And let’s face it, we all make mistakes and figure out later that something needs to be brought out with EQ. Don’t resist using an EQ boost based on the lofty ideal that you shouldn’t need it. Do what needs to be done to inspire listeners.
POST COMPRESSION
I seem to boost frequencies after compression, rather than before. Because when I EQ after, boosts work more intuitively.
Boosting EQ into compression can make the compressor more responsive to the louder frequency range. And since compressors fundamentally reduce gain, boosting into compression can have the opposite effect sometimes. When I boost after compression it feels normal, natural, and obvious.
Conversely I like to cut before the compressor so it doesn’t respond to undesirable stuff. Sure there are times I may break these norms, but it’s pretty rare.

GETTING WARMER
Because most people record with directional microphones, proximity effect leaves many voice recordings with plenty of bass. But when a recorded voice sounds thin, I raise a parametric EQ 3 to 6 dB and sweep through the 80 to 200 Hz region listening for warmth. I tend to start with a moderately narrow Q: 2 to 4. If things sound good through a wide range then I’ll open up the Q. I’ll back off the gain until it feels warm, but not tubby.
In addition to listening for warmth, I’m also listening for weird room resonances (which will overhang past the voice like a short reverb) and other, less pleasant characteristics. I don’t want to trade a solid low end for another problem. So it’s a combination of finding warmth without also accentuating something problematic.
Just north of here, in the 200-350 Hz region, things can sound thick. I don’t tend to boost here because it can make a voice sound nasal, chesty, and/or congested. I’m more likely to cut here than boost. Unless it actually sounds good (which is occasionally does), in which case I will boost it. Any audio “rule” should be considered breakable. Ultimately, how it sounds matters more than what you’re supposed to do.
HERE AND NOW

Ready to elevate your ears?
It doesn’t have to take years to train your ears.
Get started today — and you’ll be amazed at how quickly using Quiztones for just a few minutes a day will improve your mixes, recordings, and productions!
The old Academy Curve had a presence boost in the 2-5k Hz range. When you need more “here and now,” this is the range to sweep. As with warmth, I like a moderately wide Q and a boost of 3 to 6 dB to go hunting for this flavor. In the lower part of this range things can honk. As you move up things can get sibilant. Find the presence frequency while avoiding honk and/or sibilance; try not to trade presence for a bigger problem.
Sometimes boosts in this range will exaggerate mouth noise. If the performer was sticky and click-y, you’ll be hard pressed to boost in the 2-5 kHz range and not bring out mouth noise in the process. In my experience EQ isn’t going to help you get rid of mouth noise, but it can definitely make it worse.
If you know the mic used to record the voice, this may influence your frequency choice for boosting. For example, the Shure SM58 tends to give a lot in the 5-6k Hz region (see graphic below). If the voice is miked by a 58, you probably don’t need to boost any more in that range. It’s far more likely that you need something below that to get more presence (and/or cuts are needed somewhere below 300 Hz, and/or the mic position is bad).

You may find if you work with the same person a lot you get to know characteristics of their voice. For example, I known an actor who has sibilance at about 11 kHz. So I don’t like to boost her voice in that range. Generally speaking, if a male voice is sibilant it will tend to be in the 3-5k Hz range. If a female voice is sibilant it will tend to be in the 5-8k Hz range. But that’s just a strategy. Don’t follow it like a recipe or you may inadvertently trash a recording of someone’s voice who is sibilant outside of the usual range. Sometimes you can see sibilance on a real-time analyzer, which may help you find it more quickly. But if you sweep through the 3-12k Hz region with a narrow Q and a significant boost, your ears will tell you where the harshness resides. Don’t emphasize it in the name of presence.
If simple EQ moves don’t address a sibilance problem you’re having, you might need Extreme EQ, or even a De-Esser.
UP IN THE AIR
Somewhere above sibilance you start to get an airy quality. The voice and microphone play a huge role here. If the mic falls off rapidly above presence frequencies, you may boost like crazy at 12 kHz and never get much air. If the performer just doesn’t have an airy voice, EQing for it isn’t going to be as effective. Being able to boost the airy part of a voice can be elusive compared with warmth or presence.
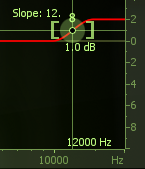
Up to this point all of these boosts have been implemented with a bell-shaped, parametric filter. While it too can be emphasized with a bell, I prefer a high shelf boost to embellish air in a voice.
Best practices for enhancing air are different for dialog and a vocal. In dialog folks generally don’t go for a lot of air in the voice. But in music, air in the voice can sound magical. By all means break the rules if it works for your project, just know that the expectations are different for air in the voice depending on whether you are mixing for dialog or a singing vocal.
EQ IN MATHMAGIC LAND
Tonal sounds of the voice will usually have harmonic content. So if you find something you like at 120 Hz, you will probably like what’s going on at 240 Hz, 360 Hz, 480 Hz, etc. Remember warnings earlier in this article about how some boosts can cause unwanted consequences? Well if you love the warmth at 120 Hz but there is some crazy HVAC noise it emphasizes too, try to get warmth from an interval instead.
Another use for harmonic relationships is feathering. This is where a little EQ is applied to several intervals at once instead a huge boost at only one frequency. Feathering works pretty well with voice tone, but try it with other sources too.
So when you sweep through and find something worth boosting, consider intervals of that frequency to boost instead, or in combination.
AND REMEMBER
If the voice sounds great alone, but seems lacking when combined with other elements, you may need to boost something in the voice.
But don’t forget that you may benefit just as much, if not more, from cuts in other elements that leave sonic landscape available to hear that great voice. You can even cut a little in competing sounds and boost a little of the same in the voice, getting the sound you want without resorting to extreme cuts or boosts.
—
Feel free to leave any questions in the comments!
Ready for part two? Check out The Complete Guide to Mixing Vocals: Compression
Eleveate Your Ears