Mixing Vocals with Waves Butch Vig Vocals Plugin (Part 1)
03/19/2015

Today, I’m coming at you with a video to talk about vocals, and even more specific, Waves has introduced the Butch Vig vocals plug-in, and I jumped all over it and took advantage of the discount introduced at $99 instead of $150.
I pulled it open just about 5 minutes before going live with this video, and was putting it through it paces to try and get familiar with it, and I really like it. So I think I will be finding myself using this, but more important than getting a plug-in like these and the Waves signature series is to understand it and break down the different modules and know what you’re doing and why you’re doing it, so I figured a tutorial would be a good idea to kind of break the plug-in down and show you a comparison of my plug-in chain that’s been adapted from the Dave Pensado method. You can catch that on his ITLs. Then I’ll show you with nothing but the Waves Butch Vig vocals plug-in, and let you hear for yourself the comparison, and then we’re going to go even further in depth into a part two, where I’m going to break down the different modules and show you stock plug-ins and free plug-ins that you can use to accomplish similar techniques so that you can really break down and understand what’s going on, before you go to just pulling up presets and doing your thing.
If you’re interested in that, stay tuned. We’re going to jump right in. First things first, I’ve got a song called “I Don’t Know,” which we’re featuring at themixacademy.com right now. If you want to get your hands on this, go check out themixacademy.com, and you get the multi-tracks and all of my tutorials behind making this one.
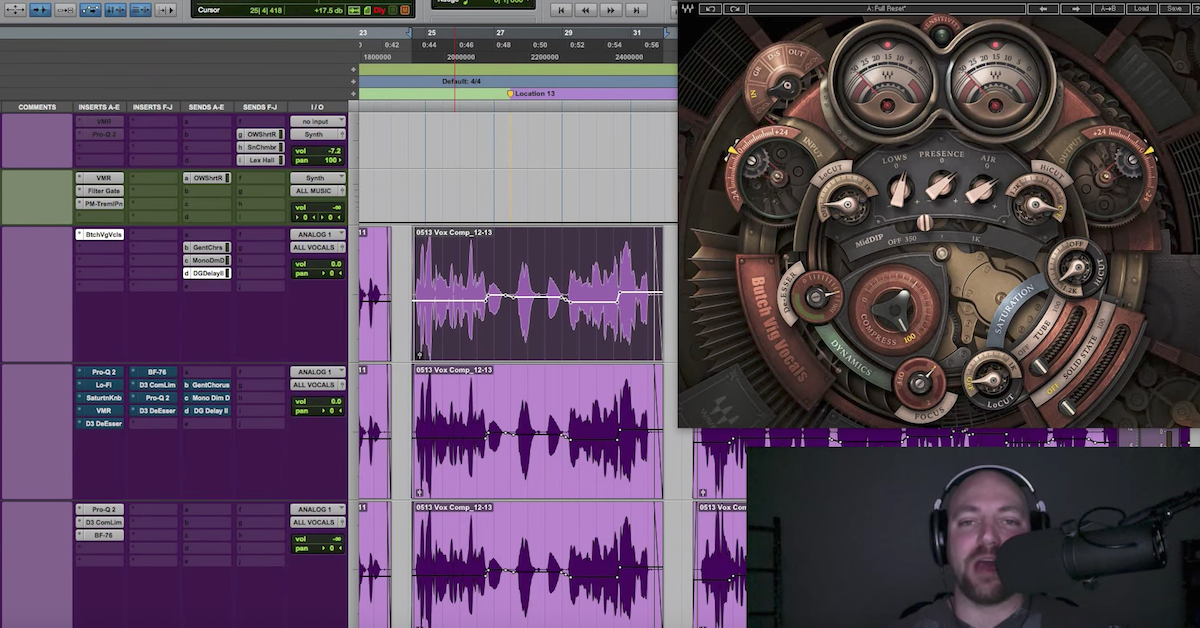
The artist is Nolan Garrett, so I want to give a shoutout to him. Give him a link in the description below. More of that to come, but right now, we’re going to hit play, and take a listen to how I’ve got the vocal mix, and this is going through my chain. I’ve got the VMR EQ, multi-band, all kinds of stuff happening here, and I’m going to show you what that sounds like.
So here’s that.
[music]
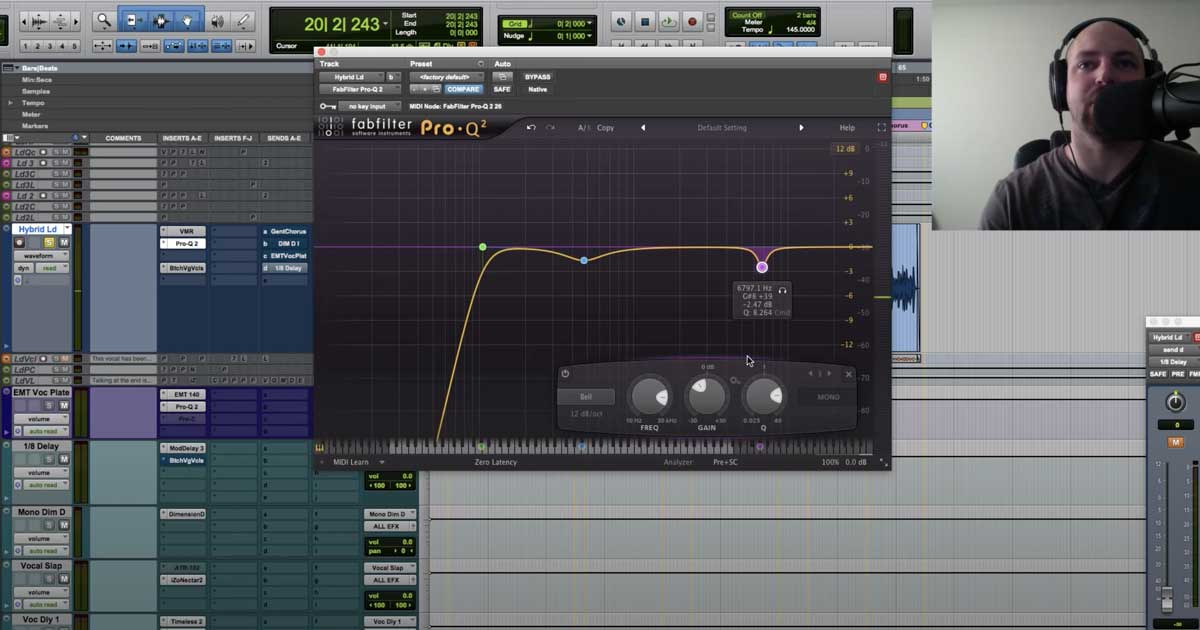
Okay. So, there’s my quick mix of it, and then what I’ve got up here is the Butch lead, I’ve called it for Butch Vig. Then I’ve got nothing but his plug-in on this track. The sends here, I’m going to actually bypass those for a quick second, and they’re the same sends from down here. A little chorus, a little UAD mono-dimension D, and then I’ve got some delay.
I’m going to bypass those effects, and I’m going to solo my vocal processing. So right now, you’re going to hear my vocal in solo, and then I’m going to switch, and I’m going to unmute my Butch lead, and we’re going to hear the difference between the two. Before I started the video, I just kind of dialed in some tones to feel it out and see what I liked and didn’t like, and there wasn’t anything I didn’t like other than lack of control on a couple of features, but let’s take a listen and see what the difference is.
Here’s my vocal processing.
[vocals]
Okay, and then here’s Butch.
[vocals]
Okay. Pretty close, right? I think the only thing I really hear is I could use some more compression, a little bit of extra oomph from it to kind of clean up the dynamic range there, but not bad, right? So the only thing going on is the Butch Vig plug-in, which is pretty sweet.
I’m going to break this down, I’m going to reset all the parameters, and mix it in front of you, but first what I want to do is I want to show you in context of the song and these effects.
So, let’s come down here and put these back in, and here is – we’re going to start out with my processing, and that’s got a parallel chain, so all kinds of stuff. You want to learn more about this process, you can go to mixingvocals.com and check that out, but here is this in the mix, and then I’m going to quickly switch between the two.
[song plays, alternating vocals]
Okay, so I try to keep that switching between the two in alike phrases so you can hear. Really, the only thing that I would say is I could really just use an extra little bit of a layer of compression, which I’ve got this one pushed almost all the way up. Let’s see. Maybe if I do just push it all the way, it’ll get that “in our face” tone I’m going for here.
[song plays]
That’s pretty gnarly, right? Okay.
So, if you want to learn more about the sends, e-mail me, we’ll check that out together. Just apples to apples, this is the only plug-in in the chain, and it’s kicking some serious butt, so I’m digging that.
Alright, so now what I want to do is I’m going to take and put that back to the factory default settings, and I’ve made my lead vocal processing inactive here, and we’re just going to work with the butch lead track, and push this guy. So there’s some volume changes along the way, so bear with me as I kind of work through it. But you’ll see me work through it and I’ll explain some of the processing as we go.
First things first, let’s take a listen and dial in some compression.
[song plays]
Okay, so I just boosted the compression way up. I like a really in-your-face tone for this song, and I’ve done that by just pushing it just about all the way up, as you saw before. We may push that over the edge to 100%, but then I brought up the gain because while I don’t have any gain in the EQ, I want to hear what’s going on, so we’ll probably be adjusting that as well.
Looking at the low-cut, I love the – in the video, he talked about high-pass/low-pass, and how he prefers to say low-cut, high-cut. I totally agree with them, and I’ve tried for so long. I say it correct a lot of the times, but I get it wrong. We all do.
So, humble down, call it a low-cut and a high-cut, and join the Butch Vig party with that. I’m going to use a low-cut pretty much like, 90-100. Somewhere in there. He talked about that in his video as well. That’s about the sweet spot. Some songs, you may see it’s all the way up to 150. For effects, you may ride this up even further, but we’ve got a sweet filter there.
Then I’m going to move in and start boosting with some of the EQ. So let’s see what we get.
[vocals]
Okay, then by boosting presence and air, I’m getting some of the sibilance to come through. He’s got this de-esser here, and in the video, he talked about that. It’s a fixed 6 kHz region that’s de-essing against it, which works for a ton of vocalists, but something that I’ll probably do is do a custom de-esser on the back-end, just so we can kind of fixate on whatever frequency is specific to the vocalist that we’re working with.
This is a good de-esser, let’s pull that in and see what we get.
[song]
Okay. I’ll show you a little trick I like to use when I’m de-essing.
I’ll solo this guy and find an “ess.”
[vocals]
“sss, sss.” That “c” is pretty gnarly. Let’s zoom in and find it.
[vocals]
There we go. So, what I’ll do is I’ll highlight that section. Actually, I’ll make a loop of that section, and I’ll listen to what the de-esser is doing, and I’ll pull it in to taste.
[vocals play]
Okay. And you can do that to taste. You may want some of the top end in it, you may want none of it, so you can squash it if you want.
Moving away from the de-esser, let’s listen back in the track, and come back here and highlight that whole section, and maybe get a bit of the lows back for us.
[song plays]
Okay, sounds pretty cool. Now, one of the first things that I like to do when I mix a vocal is add character or saturation, give it some tone. With some distortion/saturation plug-ins, you’ve got the Saturation Knob, out from Softube, which is really great and free, and so you can use that one. We’ll get to that in part two, but built into the Butch Vig are tube saturation and solid state saturation, so let’s go ahead and pull some of that up and get a little character going.
[song plays]
Okay, so we’re getting some grit pretty early on, which for me, I backed off the input just a little bit, and just kind of feeling this out, and I really like what it’s doing.
Let’s push it a little harder and see what we get from it.
[song plays]
Sounds pretty sweet, right? So, we’ve got some cool character we can add, but I’m going to back this off a little bit more gentle, just to give it some oomph, and then we’ve got these filters here for high and low-cut, where we can shape that saturation tone. Now, when we push saturation/distortion into a vocal, a lot of times it can get harsh or brittle sounding, so by having this hi-cut here, I can dial this back and filter those highs from the saturation, and I’m going to do that to taste.
[song plays]
Cool, and so that enables us to push the saturation harder, because now it’s only affecting the lows and the mid-range, as opposed to all that extra top end. So, a great addition there, and you can go check out the Waves video for tube vs. solid state. There’s good uses for each of them. I dig the tube, it’s a little bit warmer.
That’s that. So let’s take a listen. Let’s see… the mid-cut I didn’t use on this one, but I could hear how it could be useful to get rid of those unwanted mid-range frequencies, and it’s a scoop at about 6.5dB. I guess we can show off what it sounds like here. Let’s hit play.
[song plays]
Cool. I actually kind of dig that at around 500, but one of my favorite tutorials is from Dave Pensado, and he talks about mixing a vocal, and the sweet spot kind of being around that 1-2 kHz region, where he’ll take a bell and boost the EQ around 1 kHz, and he’ll kind of search between 800, kind of scoop up a little bit to 2 kHz.
Find a sweet spot where the vocal’s sounding really nice, and he’ll boost it three, four dB, whatever it takes. Then he’ll cut a little bit on either side of it to further accentuate the frequency that he’s boosting.
Well, this plug-in comes with a focus parameter, where you can take the 1 kHz region, and you can use what they’ve described – Butch has kind of said it’s like a multi-band EQ and compression going on, but just in the 1 kHz region in parallel, or two.
So, it’s quick look at does 1 kHz sound better than two? Does it fit better in the song with one or two, and then you’re rocking and rolling. You’re moving on to other things.
So, let’s take a listen at what that’s doing off, and then I’ll pull in 1 kHz, and then 2 kHz. Let’s see what happens.
[song plays]
Okay. So I did that quickly. Now, what I’m going to do is have it off for just about this whole first section, and then when we go to this second half, I’m going to go to 1 kHz, and then at the turn, I’ll put it at focus #2.
[song plays]
Pretty cool, right? I think I dig one. It’s a little bit pushy for me, so I think I’m just going to back off the output a little bit, and compensate for that extra gain in the 1
kHz region. So let’s see what that sounds like.
[song plays]
Okay, now here’s where when we were looking at the A/B before, I felt like I could use a little bit more compression, and maybe even a limiter, and by pushing this compress knob all the way up to 100, I get that. So, let me back off a bit, and then I’m going to engage going to 100 after the first half.
[song plays]
Yeah, so definitely in your face. When you push it to 100, you maybe want to keep an eye on the input, and make sure that your input is driving. They’ve got this meter up here with all of their signature series plugins, where if you push it too hard, it’ll go from green, to yellow, to red, so you can see.
Hey, break the rules by all means. Push your sound in if you like what it’s doing when you push it to red, but that’s there as kind of a gauge so you can keep yourself in check with how the things are working behind the scenes.
So, that’s kind of a quick look at what this plug-in can do. One more time, let me do the walkthrough with the effects, because these add some gain, and so I’ll probably back off the output, and then we’re going to break into part two, where I’m going to kind of walk you through the processing of saturation, EQ, and some of that stuff without this plugin, but with your stock and free plugins.
So, one more time. Here’s this on our way out, and we’ll catch you in part two.